An auto detailing shed is a building set up around one job: getting a vehicle clean, corrected, and protected to a high standard without working in the weather or fighting for room in a garage stuffed with everything else you own. The work itself is demanding on the space. You wash and rinse, so you need water in and water out. You polish and buff under a machine, so you need a wide ring of clear floor to walk a polisher around every panel without bumping a wall or a workbench. You vacuum, shampoo, steam, and pull trim, so you need power and outlets within reach of the whole car. And every part of correction and finish work depends on being able to actually see the paint, which means bright, even, color-true light from more than one angle. A purpose-built auto detailing shed gives all of that its own room, so the car comes out looking like it left a real detail bay instead of a damp driveway.
What separates a true detailing bay from a shed you happen to wash a car in is the combination of space around the vehicle, water and drainage, power, and light, planned together from the start. Try to detail in a tight one-car garage and you run into the same wall every time: you can open a door but you can't walk fully around the back to buff a bumper, the floor pools water with nowhere to drain, the only outlet is behind a shelf, and the single overhead bulb hides every swirl until the sun catches it later. Plan the bay correctly and you get the opposite: a vehicle parked center-floor with a clear lane on all four sides, a hose and a drain that handle the wash, outlets and lighting wherever you're working, and storage that keeps chemicals, pads, and machines off the floor and out of your way. This guide walks the planning in the order that matters for detailing: the room around the car first, then water and drainage, then power and light, then the sizes that fit one vehicle plus real work room, and how we build the shell tight and dry on your property so it's ready to fit out. If you'd rather price a layout first, you can build and price a shed in a few minutes.

A detailing bay built around the car: clear room on all four sides, water on hand, and bright even light overhead.
A detailing bay wants width, headroom, and a big door, so the rooflines that work are the ones that give you a wide, open floor and room to raise your arms and your tools over the vehicle. A standard gable with a tall wall height and a wide overhead or roll-up door is the most common starting point: straight walls give you a clean rectangle to center the car in, and a single high door lets you pull a vehicle straight in and still swing it around for a true walk-around. The thing to get right is the door and the ceiling, because a buffer, a pressure washer wand, and a raised hood all want vertical room a low shed doesn't give you.
If you want more height to run lighting up high, lift a roof rack or a kayak off a truck, or add a loft for pad and chemical storage above the work, a lofted barn (gambrel) roof buys vertical space and overhead storage without eating floor. A stick-built shop style suits a serious, year-round detailing bay where you want heavier walls, a sealed and sloped concrete floor with a real drain, and room to combine detailing with light mechanical or accessory work, much like a detached garage built specifically for finish work rather than parking. Because clean air, dust control, and color-true light matter to detailing the same way they do to coating, the bay has a lot in common with a paint booth shed, and many owners plan the two side by side. Whatever the roofline, treat the building as a wide, well-lit box with water and a drain, sized so the largest vehicle you detail can sit center-floor with a clear lane all the way around it.
A sedan, hatchback, or compact SUV you want to wash, polish, and protect with full walk-around room. A 14x20 fits one vehicle center-floor with a clear lane on all four sides plus a wall for a sink, hose reel, and a cart.
A full-size truck or SUV, or a car plus a real work zone for machines and product. Step up to a 16x20 or 16x24 so you keep buffing clearance around a bigger vehicle and a dedicated bench wall.
A vehicle, a wide work zone, and room to store pads, chemicals, and machines off the floor. A 20x24 gives a big truck full walk-around room, a wash-and-rinse lane, and a separate dry corner for correction and stock.
Footprint matters more in a detailing bay than in an ordinary shed because the size of the room sets how well you can actually work around the vehicle, not just whether the vehicle fits. The rule is simple: park the largest car you detail in the center of the floor and leave a clear lane wide enough to walk a polisher, drag a hose, and open every door on every side. A door you can't fully open or a corner you can't reach behind turns into a panel you can't correct properly. A 14x20 shed is a sensible floor for one car or a small SUV, giving you walk-around clearance plus a wall for a utility sink, a hose reel, and a product cart. Move up to a 16x20 shed and the extra width keeps real buffing room around a full-size truck or larger SUV, where a tighter bay would leave you squeezing past the mirrors. A 16x24 shed adds length so you can keep a wash-and-rinse end separate from a dry correction-and-coating end, which keeps water away from the work you want bone-dry. The 20x24 shed is the call when you detail big trucks, want a full bench and machine zone, or want room to stage a second set of wheels while the vehicle sits. Build for the largest vehicle you realistically detail plus a full walk-around lane, because a bay that's too tight forces you to work over the car instead of around it, and that's where swirls, missed sections, and dings come from.
These builds look alike from the driveway but they're tuned for different jobs, so match the room to the work you do most. An auto detailing shed is optimized for washing, correcting, and protecting a vehicle: clear room on all four sides, water in and drainage out, outlets all around the car, and bright color-true light to read paint. A detached garage is built mainly to park and store vehicles and gear, so it prioritizes door size and floor area over a wash drain, plumbed water, or finish lighting, and while you can detail in one, a true bay plans water, drainage, and light from the start rather than as an afterthought. A paint booth shed shares the clean-air and color-true-light goals but is tuned for spraying solvent finishes, so it leans hard on filtered intake and exhaust airflow and fire-safe fixtures, where a detailing bay leans on water, drainage, and a sealed sloped floor instead. A backyard workshop overlaps when detailing is part of a broader habit of working on vehicles, since both rooms want heavy power, good light, and bench space, but a workshop spreads its space across many tasks while a detailing bay keeps the floor open for the car. If you're torn, decide whether the room exists to detail a vehicle, to park one, or to spray one, build the water, power, and light for that, and let the other tasks borrow the space.

Zoned for detailing: a wash-and-rinse end with drainage, a dry correction end, and product on a cart, not the floor.
Even a single-car bay works far better planned as zones than as one open room, because detailing moves through stages and water doesn't belong everywhere. The vehicle zone is the anchor and you plan it first: the clear center floor where the car sits with a walk-around lane on all four sides, sloped toward a drain so wash water runs off instead of pooling. The wash-and-rinse zone lives at the drain end, with the hose, the pressure washer, the foam cannon, and a utility sink, kept where runoff flows to the drain and away from the dry work. The correction-and-coating zone is the dry end, ideally at the opposite side of the bay, where you polish, apply coatings or wax, and want the floor and the air free of mist and overspray from rinsing; this is where your lighting matters most and where you don't want water tracking through. A product-and-machine zone along a wall holds your polishers, vacuum, steamer, chemicals, pads, and towels on shelves, a cart, and in cabinets, off the floor so the walk-around lane stays clear. Finally, a small drying-and-staging area lets you blow-dry, pull a set of removed wheels or trim aside, and stage the next step without crowding the car. Sketch these zones before you choose a footprint and you'll see fast whether one vehicle fits a compact bay or whether you want the extra width and length of a larger one to keep wet and dry work apart.
Detailing is wet work, so plan water in and water out from the start. A utility sink and a hose bib or pressure-washer feed put rinse water where you need it, and a floor sloped to a drain or trench carries it away so the bay never pools. A sealed concrete floor pitched to a center or trench drain is the gold standard; it lets you wash, rinse, and squeegee, then dry the bay between vehicles. In freezing country, plan the supply lines and any drain so they can be drained down or kept from freezing through a Panhandle winter.
A detailing bay pulls real power: dual-action and rotary polishers, a strong wet/dry vacuum or central vac, a steamer, a heat gun, and often an air compressor for blow-drying and air tools. Plan a dedicated circuit from the home panel and a small subpanel, with outlets spread around all four sides of the vehicle, plus GFCI protection because outlets near water must trip safely. Ceiling-drop or reel outlets and a retractable air line keep cords off a wet floor and out from under the car.
You can't correct paint you can't see, so light the bay bright, even, and color-accurate. Use high-CRI, daylight-balanced fixtures overhead and add light from the sides and low angles, because swirls, holograms, and missed sections only show under raking light from more than one direction. Good color rendering lets you read the true finish and judge a coating's clarity. Even, glare-free light over the whole car is what separates a real correction from polishing in the dark.
Washing, steaming, and coating put moisture and fumes in the air, so plan airflow that clears humidity and solvent smell and helps the bay dry between jobs. A vent fan, an operable window, or a through-wall fan moves damp air out so panels dry spot-free and coatings flash properly. Pair it with smooth, wipe-down walls and a sealed floor so the bay itself stays clean, because dust and grit on the walls and floor end up in your wash mitt and on the paint.
The keyword for this room is room to work around the car with water, power, and light on hand, and the fit-out is everything that delivers it. For washing and rinsing: a foam cannon and pressure washer or a hose with a quality nozzle, two wash buckets with grit guards, wash mitts, a utility sink, a sloped floor drain, and a squeegee for the floor. For drying: a forced-air dryer or leaf blower, an air compressor with a blow gun, and a stack of plush drying towels. For correction and coating: dual-action and rotary polishers, a backing plate and a full set of cutting, polishing, and finishing pads, compounds and polishes, panel wipe, and your ceramic coating, sealant, or wax along with applicators and leveling towels. For the interior: a strong wet/dry or central vacuum with crevice and upholstery tools, a hot-water extractor for carpets and seats, a steamer, brushes in several sizes, glass cleaner, and microfiber by the dozen. For protection and prep: clay bar or a clay mitt, iron remover and wheel cleaner, trim and tire dressing, and masking tape for taped-off correction. For storage and staging: shelving and cabinets for chemicals, a cart you roll around the vehicle, a pegboard for tools, a towel bin, and a rack for spare wheels or removed trim. Walk your own list before you settle on a size, because the sink, the cart, the machine shelf, the compressor, and a clear walk-around lane all need floor and wall space. None of it works in a 14x20 shed if you try to detail a full-size truck in it, which is why bigger vehicles and a real work zone push most owners to sixteen or twenty feet wide once the wash end, the dry end, and the product wall each want their own space.
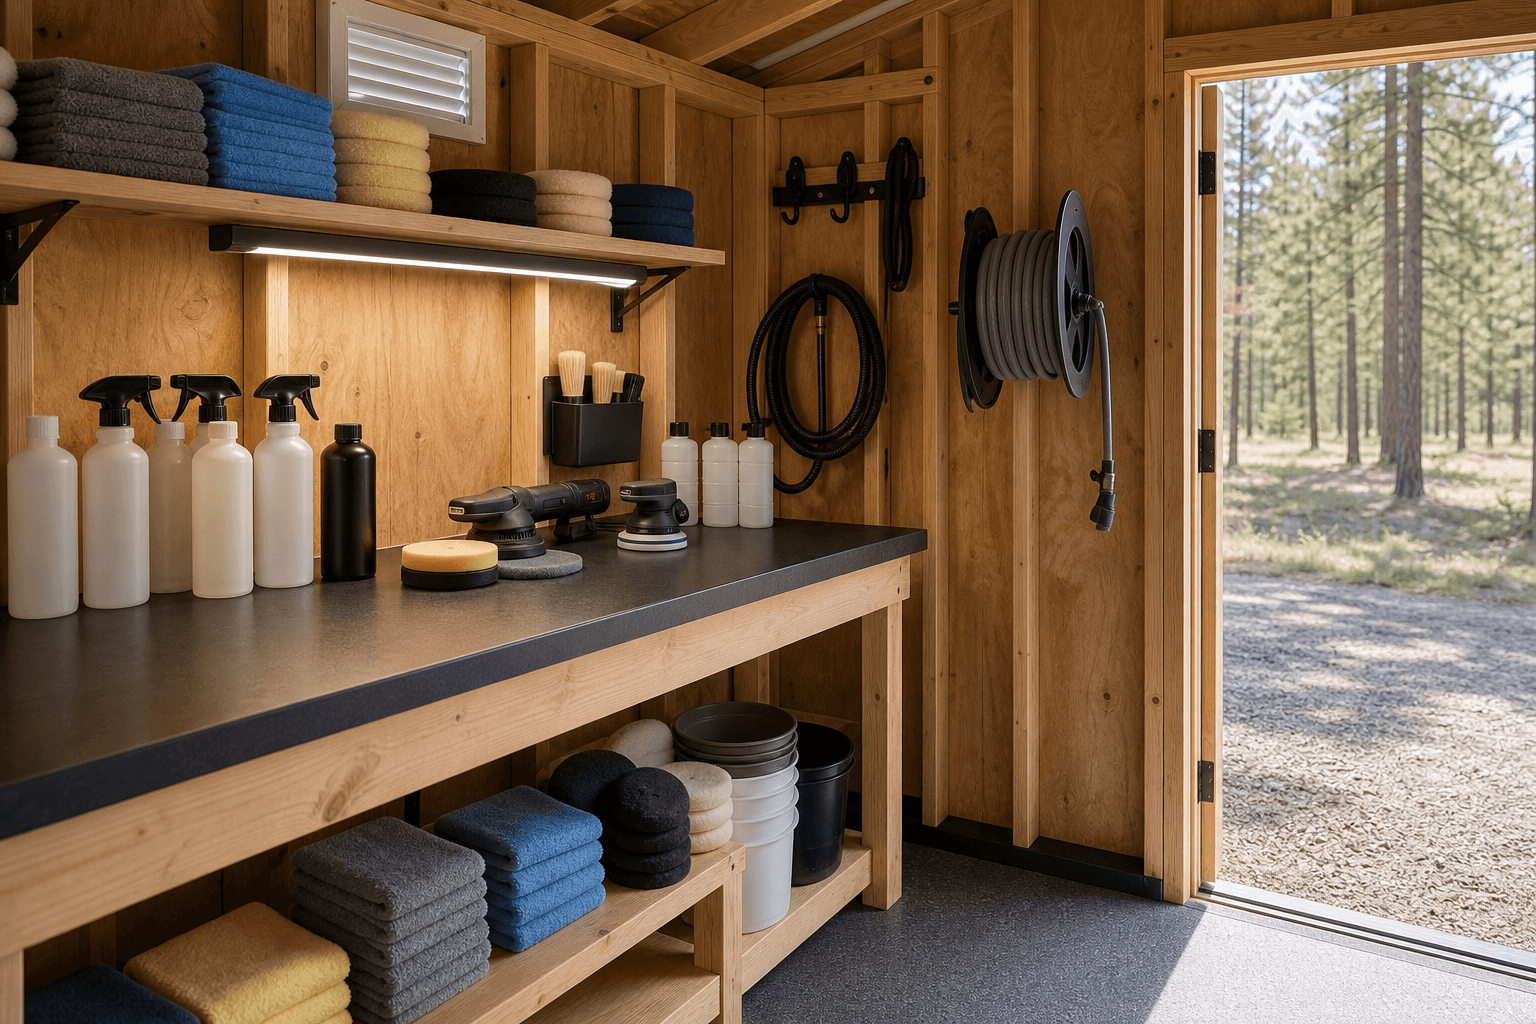
Detail that makes it a bay: water at the wall, GFCI power near it, machines on a cart, and bright light to read the paint.
| Auto detailing shed planning checklist | |
|---|---|
| Best roofline | Tall standard gable with a wide door for the bay; gambrel for overhead storage; stick-built shop for a sealed sloped floor |
| Practical sizes | 14x20 for one car or small SUV, 16x20 to 16x24 for trucks and a bench, 20x24 for a big truck plus prep and storage |
| Water and drainage | Utility sink and hose or pressure-washer feed, floor pitched to a center or trench drain, lines drainable for winter |
| Power | Dedicated circuit and subpanel, GFCI outlets on all four sides of the vehicle, ceiling-drop cords and a reel air line |
| Lighting | High-CRI daylight-balanced fixtures overhead plus side and low-angle light to reveal swirls and missed sections |
| Floor and walls | Sealed, sloped concrete you can wash and squeegee, smooth wipe-down walls, and a vent fan to clear humidity |
Three systems decide whether the bay details well and stays usable through a North Idaho year. Power comes from a dedicated circuit run from your home's panel by a licensed electrician, and a small subpanel in the shed makes it easy to feed a vacuum, polishers, a compressor, lighting, and heat at once without tripping. In a wet room the layout matters as much as the capacity: spread GFCI-protected outlets around all four sides of the vehicle so a buffer or vac reaches every panel without a cord stretched across the floor, drop a few outlets and an air line from the ceiling so they stay off a wet surface, and keep outlets and the panel clear of the direct wash-and-rinse splash zone. Lighting is what lets you actually correct paint: bright, even, high-CRI, daylight-balanced fixtures overhead, plus added light from the sides and low angles, because swirls and holograms only show under raking light from more than one direction. Plan more light than you think you need and place it to wash the whole car without glare. Winter readiness is real here, because detailing in an unheated bay through a Panhandle winter means cold water that won't sheet off, coatings and waxes that won't cure or level right, and wash water that wants to freeze on the floor. Plan to insulate the shell so heat holds, add a safe heat source so the bay stays workable on a cold day, and set up the water supply and any drain so they can be drained down or protected against freezing when the temperature drops. We frame and insulate the shell tight and dry on your property so it's ready for your electrician, your plumber, and your heat to finish.
A detailing bay needs a solid, level base that can take a vehicle's weight and handle water, so most auto detailing sheds sit on a poured concrete slab rather than a plain gravel pad, because a slab can be sealed and pitched to a drain so wash water runs off and the floor stays clean and dry between cars. Where you want a lower-cost base or a wash-mostly setup, a compacted gravel pad sized about a foot wider than the building on each side can work, but a sealed, sloped slab with a drain is the better choice for serious correction and coating work. Plan how wash runoff leaves the site, since rinse water carries soap, dirt, and product, and confirm any local rules on where that water can go before you finalize the drain. North Idaho weather shapes the rest: design the roof for local snow load so it carries a heavy Panhandle winter, keep the floor and any plumbing protected so spring melt and freeze don't crack a line or heave a pad, and place the bay where the gravel driveway gives a clear, gentle approach so you can pull a vehicle straight in without scraping. On permits, the use drives the answer: a plain storage shed under a size threshold often needs no permit, but a building this size, wired for heavy power and plumbed with a water supply and a drain, may trigger a permit, electrical and plumbing inspections, and setbacks, and any wash-water discharge can carry its own rules. Requirements vary across Kootenai County and the cities around Coeur d'Alene, so confirm with your local building department before you finalize size and placement, and we'll plan the build around whatever your jurisdiction requires.
Plan to park the largest vehicle you detail in the center of the floor and leave a clear lane on all four sides wide enough to walk a polisher around every panel, drag a hose, and fully open every door. That's the difference between a detailing bay and a parking spot. A rough target is a few feet of open floor down both sides and across the front and back, so you can stand square to a panel with a buffer rather than reaching over the car or squeezing past a mirror. Doors are the trap most people miss: a sedan door swings wide, and a truck door wider, so a bay that fits the vehicle but not its open doors leaves you correcting door jambs and lower panels in a cramp. For one car or a small SUV, a 14x20 gives that walk-around room plus a wall for water and a cart; for a full-size truck or larger SUV, you want 16 feet of width or more so the lane stays usable. When you're between sizes, size up, because the clear floor around the car is what lets you work without leaving swirls and missed sections, and it's the one thing you can't add later.
Detailing is wet work, so plan water in and water out together. For supply, a utility sink plus a hose bib or a feed for a pressure washer puts rinse water where you need it without dragging a hose from the house. For drainage, the floor is the key: a sealed concrete slab pitched toward a center drain or a trench drain lets wash and rinse water run off instead of pooling, so you can squeegee the bay dry and keep the correction end from sitting in water. A plain flat floor turns a wash into a flood with nowhere to go, which is why most serious bays go with a sloped, sealed slab rather than a gravel pad. Two things to plan for here in North Idaho: first, freeze protection, so the supply lines and any drain trap can be drained down or kept from freezing through winter; and second, where the runoff goes, because wash water carries soap, dirt, and product, and some jurisdictions have rules about discharging it, so confirm the local requirements before you set the drain. Get the slope, the drain, and the supply right and the bay handles wash days cleanly instead of leaving you mopping.
A detailing bay pulls more power than a typical shed because you often run several things at once: a polisher, a strong wet/dry or central vacuum, a steamer or extractor, a heat gun, lights, and frequently an air compressor for blow-drying and air tools. Plan a dedicated circuit run from the home panel by a licensed electrician, and a small subpanel in the bay makes it easy to feed all of that without tripping a breaker mid-job. Just as important as capacity is where the outlets go: spread GFCI-protected outlets around all four sides of the vehicle so a buffer or vacuum reaches every panel without a cord stretched across a wet floor, and keep them clear of the direct splash zone near the wash end. GFCI protection matters because any outlet near water has to trip safely. Dropping a couple of outlets and a retractable air line from the ceiling keeps cords and hoses off the floor and out from under the car, which is both safer and far less annoying to work around. If you run a larger compressor or plan to add equipment later, tell us and your electrician up front so the circuit and subpanel are sized with headroom.
You can only correct paint you can clearly see, and the defects that matter most, swirls, holograms, and light scratches, hide under flat overhead light and only jump out under raking light from an angle. So a detailing bay is lit two ways: bright, even, high-CRI, daylight-balanced fixtures overhead to flood the whole car with true-color light, plus added light from the sides and lower angles so you can sweep a panel and catch what straight-down light hides. High color rendering, ideally 90 CRI or better, lets you read the actual finish and judge how clear a coating looks, which matters when you're trying to tell a corrected panel from one that still has marring. Place the lighting to wash the entire vehicle without hot spots or glare bouncing back at you, because glare hides defects as effectively as darkness. Many detailers add a movable swirl-finder or LED light bar to inspect up close, but the built-in lighting should already let you work all the way around the car without dragging a lamp. Plan more light than you think you need; it's the cheapest upgrade that most improves the finished result.
The goal is to keep every supply and machine off the floor and out of the walk-around lane, because the floor around the vehicle has to stay clear for working and for water to drain. Plan a product-and-machine wall or corner with shelving and cabinets for chemicals, a rolling cart you push around the vehicle so polishes and applicators follow you to the panel you're on, a pegboard for brushes and detailing tools, a bin or shelf for clean microfiber, and a hook or rack for polishers, the vacuum hose, and the air line. Chemicals do best in closed cabinets out of direct sun and, in an unheated bay, somewhere they won't freeze, since many products are ruined by a hard freeze. Keep the wash supplies near the wash-and-rinse end and the correction products near the dry end so you're not carrying wet and dry gear back and forth across the bay. A spot to stage removed wheels, trim, or a second set of tires keeps those off the working floor too. Good storage is what keeps a detailing bay from sliding into a cluttered garage; plan the wall space for it when you size the building, because the cart, the cabinets, and the machine rack all compete with the vehicle for room if you don't.
Size the bay around the largest vehicle you detail plus a full walk-around lane and a place for water, power, and storage, not just around the vehicle's dimensions. For one car or a small SUV, a 14x20 fits the vehicle center-floor with clear room on all four sides and a wall for a utility sink, a hose reel, and a product cart. For a full-size truck or a larger SUV, step up to a 16x20 or 16x24 so you keep real buffing clearance around a bigger vehicle and gain a dedicated bench or product wall; the extra width is what keeps you from squeezing past the mirrors. For a big truck, a wide work zone, or room to keep a wet wash end separate from a dry correction-and-coating end with storage for machines and stock, a 20x24 gives you the floor to do it. The common mistake is sizing to just fit the vehicle and discovering you can't open the doors, walk a polisher around the back, or park a cart anywhere, so when you're between sizes, go up. The clear room around the car is what makes the bay actually work, and it's far cheaper to build in now than to wish for later.
A detailing shed lives or dies by its climate. In Coeur d'Alene, where temperatures drop into the teens in January, water-based products like ceramic coatings and wax have minimum application temperatures — often 50°F or above. That means insulation and a dedicated heat source are not optional upgrades; they are what separates a building that works eleven months a year from one that sits idle all winter. An auto detailing shed built on site can be framed with batt insulation in the walls and ceiling during construction, which is far more cost-effective than retrofitting a delivered shell.
Floor drainage is the other detail that gets skipped on delivered buildings. On-site construction lets you plan a center-drain or side-drain floor before the slab is poured — critical for rinsing down after wet sanding or foam cannon work. In North Idaho's freeze-thaw climate, that drain needs a trap deep enough not to freeze, or a plan for draining it before hard frost.
Lighting quality matters for color-accurate work. South- and west-facing windows let in afternoon sun that washes out surface defects. North-facing windows or controlled skylights, combined with high-CRI LED strips on all four walls, give you the even, shadow-free light that shows every swirl mark before you call a job done.
Lots in Post Falls and Hayden often have enough depth behind a garage to accommodate a detailing shed without sacrificing the yard. Because the build happens on your property, the crew works around existing fences, landscaping, and concrete — no lot clearance required. See current pricing or design your layout in the configurator to check how the footprint fits.
Tell us what you detail and how you work, and we'll help you size, plumb, power, and light a detailing bay with clear room around the vehicle for your North Idaho property.
Keep planning your build with related North Idaho shed guides.