An art studio is the one room where you can make a mess, leave a project half-finished on the easel, and walk away without clearing the table for dinner. That freedom is the whole reason to build one in the backyard instead of squeezing it into a spare bedroom or fighting for the kitchen table. A dedicated art studio gives your work somewhere permanent to live: a wash station you can splatter, a floor you can drip on, walls you can pin studies to, and steady daylight that doesn't shift the second a cloud rolls past. Whether you paint in oils, work in watercolor and gouache, throw pots, print, draw, or run a small kiln, the studio is built around three things the house can never give you cleanly: good light, real ventilation, and a sink within arm's reach.
The difference between a studio you produce in every week and a pretty room you tidy up and avoid comes down to decisions you make before the first wall goes up. Window placement and orientation, an exhaust path for paint and solvent fumes, a plumbed or filled utility sink, a floor that takes abuse, and an insulated shell that holds materials at a stable temperature all have to be planned from the start, because you can't easily move a north window or add a vent fan after the siding is on. This guide walks through the rooflines that suit a studio, the sizes that fit how you actually work, how to zone and finish the inside, and how we build the structure on your property so it's solid, dry, and ready to paint in. If you'd rather see options priced first, you can build and price a layout in a few minutes and come back to the details.
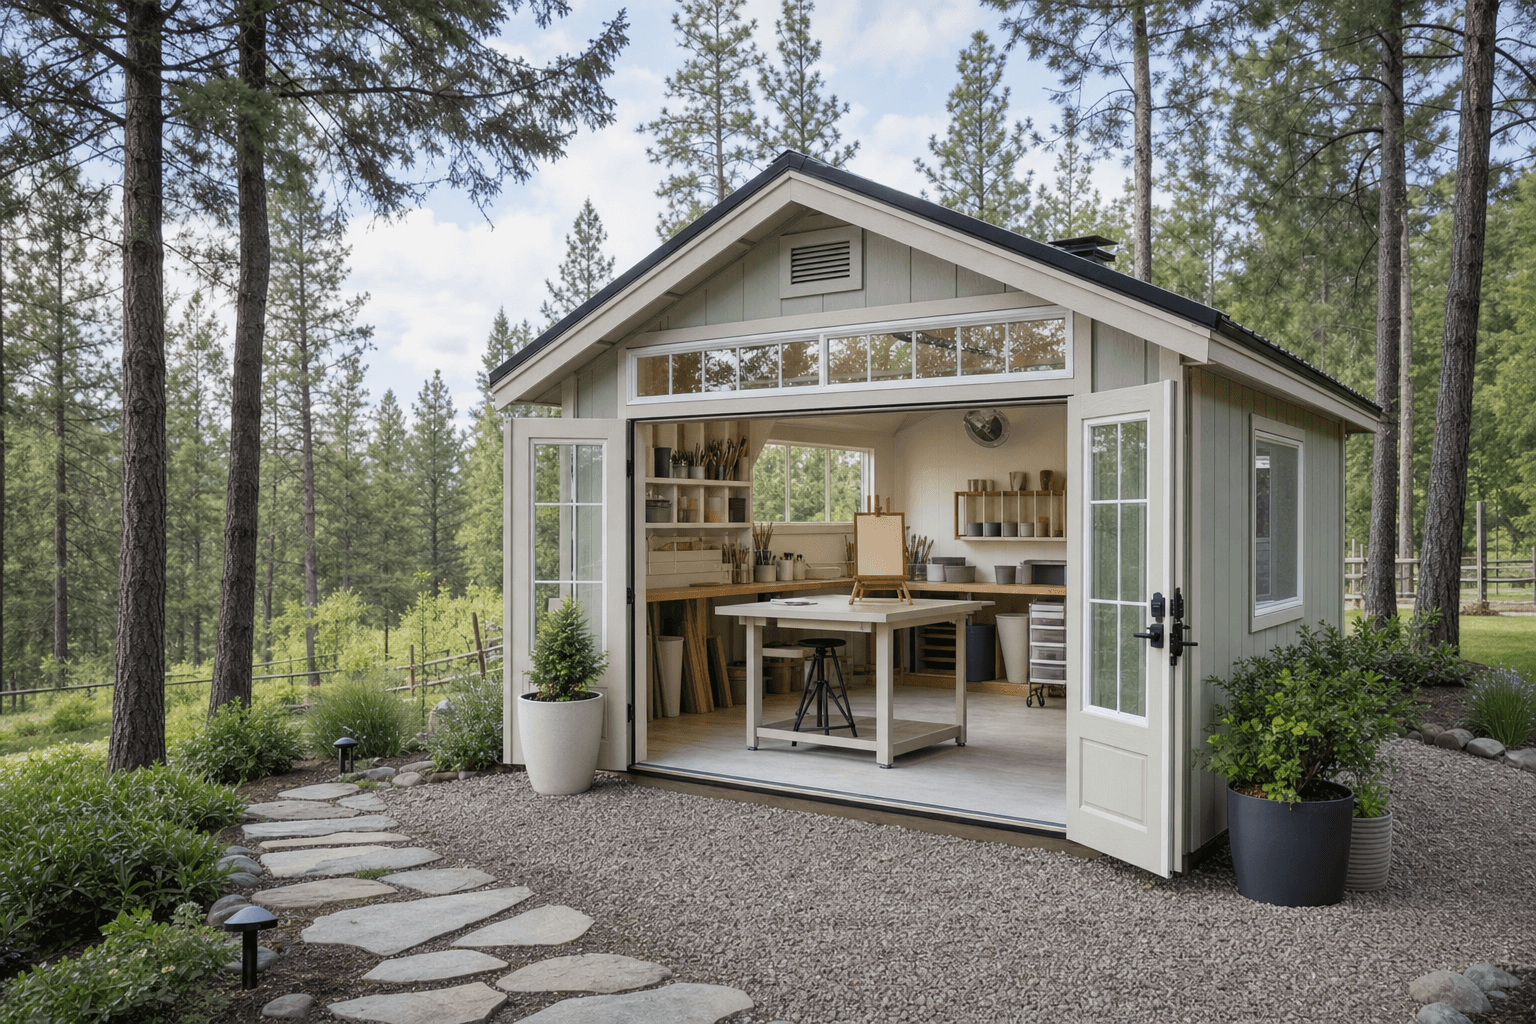
An art studio built around daylight: a north window wall, a vent path, and a floor made to take a mess.
The roofline you choose mostly decides how light gets into the room, so think about glass first. A lean-to or modern single-slope roof is the natural fit for a studio, because the tall wall lets you build a large north-facing window or even a near-full glass wall that floods the room with even, indirect daylight and gives you high clerestory glass above it for extra brightness without sacrificing the lower wall to windows. A standard gable also works beautifully and is the most flexible: the straight walls give you flat surfaces for shelving, drying racks, and a long bench, and you can still cut a generous window or two into the north or east side. A lofted barn (gambrel) roof adds vertical volume and an optional loft, handy for storing finished canvases, frames, and seasonal supplies overhead so the working floor stays clear. A model with a covered porch gives you a sheltered spot to spray a fixative, hose off a tray, or set wet work out of direct sun.
Because an art studio is a finished, conditioned, light-driven room rather than a storage shed, its priorities overlap closely with the other creative spaces we build. It's worth seeing how we handle a music studio when you're weighing the envelope, since both want a tight, insulated shell, real power, and a comfortable temperature year-round even though one chases light and the other chases sound. Whatever roofline you choose, plan the building as a light-filled, well-ventilated room with windows placed for steady daylight, a path for fumes to exit, and an interior you finish to work in, not just to store things.
An easel or drawing table, a taboret for supplies, a small sink, and storage up the walls. A 10x12 is plenty for one artist working in one medium with room to step back from the work.
A large bench, drying racks, flat files, and floor space to move between zones. Step up to 10x14 or 10x16 so a wet area, a dry area, and storage each get their own wall.
Room for a kiln or press, two work surfaces, and a clear viewing distance. A 12x16 gives you a square-feeling room that handles more than one medium or more than one artist at once.
Footprint is the decision everything else rides on, so size for how you actually work and how far back you need to stand from a piece, not just the furniture you own today. A 10x12 shed is a genuine working studio for one artist in one medium: 120 square feet holds an easel or drawing table, a rolling taboret, a small sink, and shelving up the walls while still leaving room to step back and judge the work. Move up to a 10x14 shed and the extra length lets you separate a wet area with the sink and palette from a clean, dry area for drawing, framing, or photographing finished pieces, which is the single biggest quality-of-life upgrade in a studio. A 10x16 shed is the sweet spot for a busy production studio, with room for a long bench, dedicated drying racks, flat files for paper, and a clear stretch of floor to lay out large work. The 12x16 shed is the size to choose when the studio has to do more than one thing at once, a painting zone and a printmaking or pottery zone, space for a kiln set safely away from combustibles, or room for two people to work without bumping elbows, and it's the size most artists wish they'd picked once the easel, the storage, the sink, and the open floor all have to share the room. As a rule, size up one step from what feels adequate, because viewing distance and drying space disappear fast.
These backyard rooms overlap, and the right one depends on what you'll do in there most days. An art studio is built for creative production: it prioritizes steady, even daylight, a ventilation path for paints and solvents, a wash-up sink, and durable, splatter-friendly floors over comfort and ambiance. If the room is really about unwinding and the feel matters as much as the making, that's a she-shed, which leans toward soft light, comfortable seating, and a finished retreat that can flex between crafts, reading, and quiet time. If you're organized around a specific craft with a defined bench, tools, and a tidy setup rather than wet media and fumes, a hobby shed tunes the storage and power to that one pursuit. And if your work is louder than it is messy, recording, mixing, or playing, a music studio spends the budget on insulation and a tight, quiet shell instead of north glass and a sink. Most artists land on a true studio because they need durable surfaces, real airflow, and a place to wash brushes, things the prettier retreats aren't built to handle. If you're torn, build for the way you'll use the room four days out of five and let the rest flex around it.
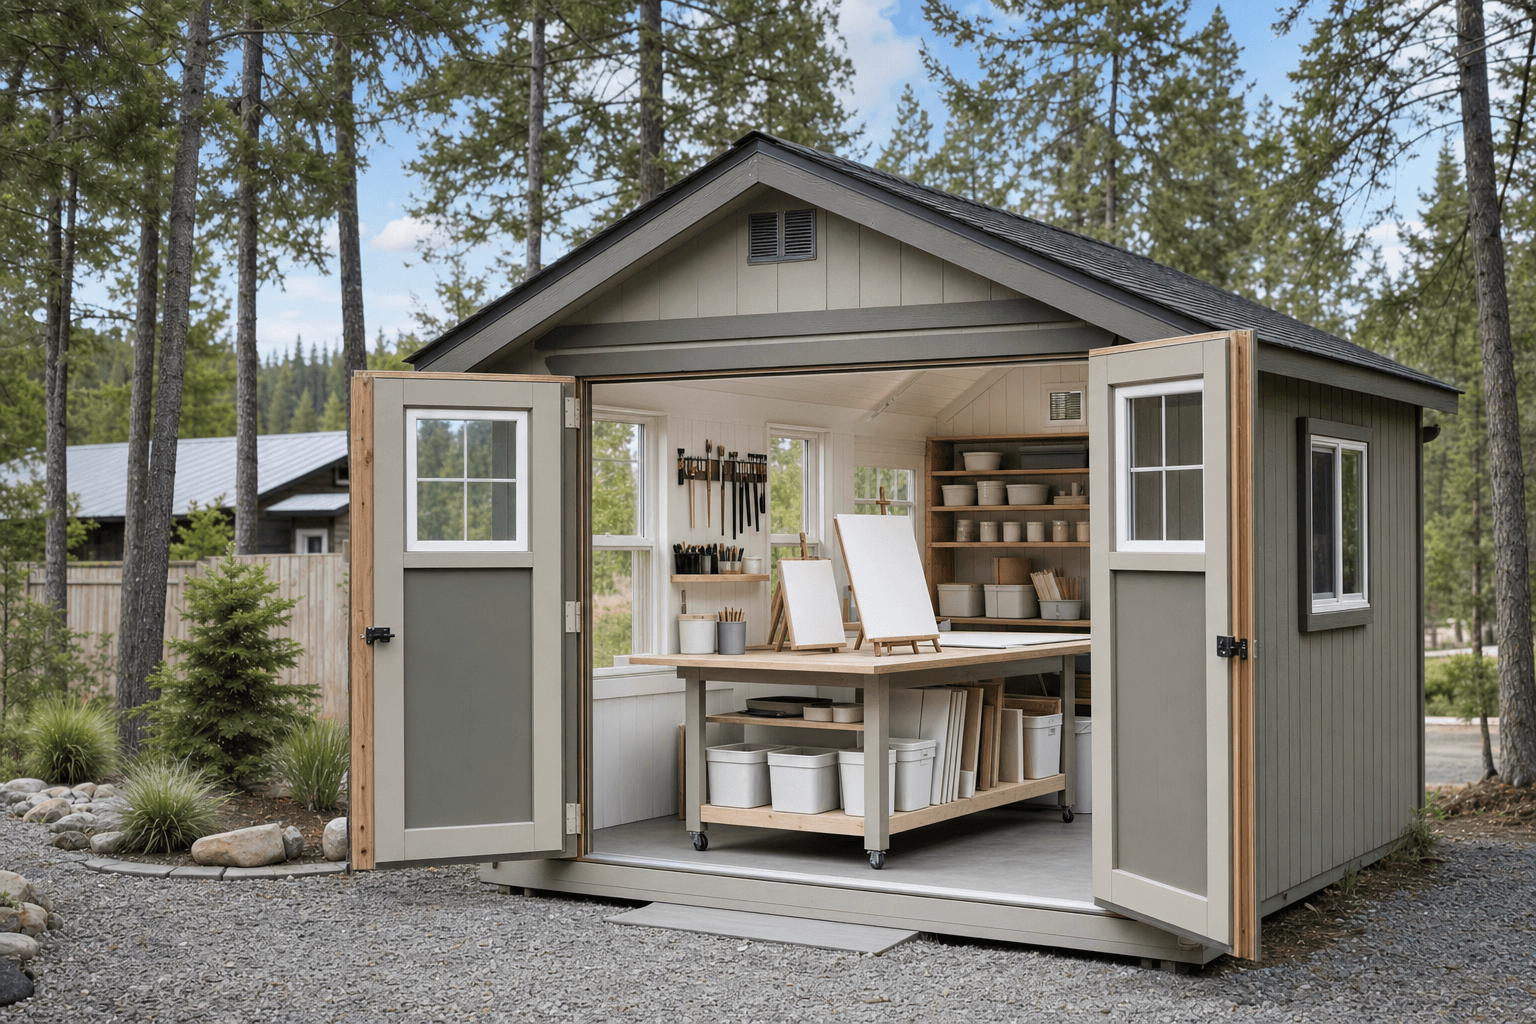
Zoned to work: a lit easel by the window, a wet area at the sink, and storage that keeps the floor clear.
Even a small studio works far better when you plan it as zones instead of one open box. Start with the light zone: put your easel, drawing table, or main work surface where it catches the steadiest, most even daylight, which in this hemisphere means facing or beside a north window so the light barely shifts through the day and never throws harsh shadows or glare across your work. This is the heart of the room, so give it clear space to stand back. Next comes the wet zone, anchored by the sink: cluster your palette, solvent, brush washing, water buckets, and anything that drips into one area with a washable floor and a wipeable wall behind it, so the mess stays contained and out of the clean half of the room. Build a dry and storage zone along the walls behind or beside the work, where shelving, flat files, a drying rack, and cabinets keep paper, finished pieces, and supplies in reach but off the floor, which is what keeps a working studio from drowning in its own materials. If you fire clay or use a kiln or a heat tool, reserve a hot zone with clearance from walls and combustibles and its own ventilation. Finally, keep a clear viewing lane, a few feet of open floor opposite the easel, so you can always step back far enough to read the whole piece. Sketching these zones on paper before you settle on a footprint is the fastest way to tell whether a smaller building will work or whether you'll want the extra wall length of a larger one.
A north-facing window or window wall for steady, glare-free daylight, backed by high-CRI LED fixtures around 5000K so colors read true after dark or on gray winter days. Layer overhead, track, and task lighting so the work surface is evenly lit with no shadows from your own hand.
An exhaust fan vented outside, ideally on the wall opposite an operable window so fresh air crosses the room and pulls paint, solvent, and fixative fumes out. For a kiln or heavy solvent use, plan a dedicated vent and a clear makeup-air path so the studio stays breathable.
A deep utility sink with a sediment trap or filter for brushes, hands, and trays, plumbed to your home's lines or fed from a nearby hose bib with a gray-water drain. A wipeable splash wall and a drying rack beside it keep the wet zone self-contained.
Sealed concrete, epoxy, or commercial vinyl that shrugs off spills, scrapes, and dropped tools and wipes clean, over an insulated, finished envelope that holds paint, paper, and clay at a stable temperature through North Idaho's swings.
The keywords for a studio are light, air, and a sink, and the fit-out is everything that serves them. For painting: an easel or two, a rolling taboret, palettes, brush holders, solvent and medium cans stored in a flammables cabinet, a brush-washing tank at the sink, and a wipeable apron wall. For works on paper: a drawing table or light table, flat files, a paper rack, a guillotine cutter, and tackable wall panels for studies. For pottery and ceramics: a wheel, a wedging table, ware boards and a drying rack, glaze buckets, a sturdy sink with a clay trap so sediment never reaches your drain, and a kiln set on a non-combustible base with its own vent. For printmaking: a press, an inking slab, a drying rack, and a wash-up area for plates and screens. For lighting and finishing: high-CRI bulbs, track or clamp lights, blackout or diffusing shades to tame harsh afternoon sun, and a spot to photograph finished pieces under even light. And for the practical side: a flammables cabinet, a covered waste can for oily rags, a first-aid kit, a fan, and a stool you can perch on at the bench. Walk through your own version of this list before you settle on a size, because a real studio is more than an easel and a window, and a 10x12 shed fills up the moment you add a sink, drying racks, and storage. That's why most working studios start around 120 square feet and why artists who size up rarely regret it once the wet zone, the dry zone, and the viewing lane all have to share one room.
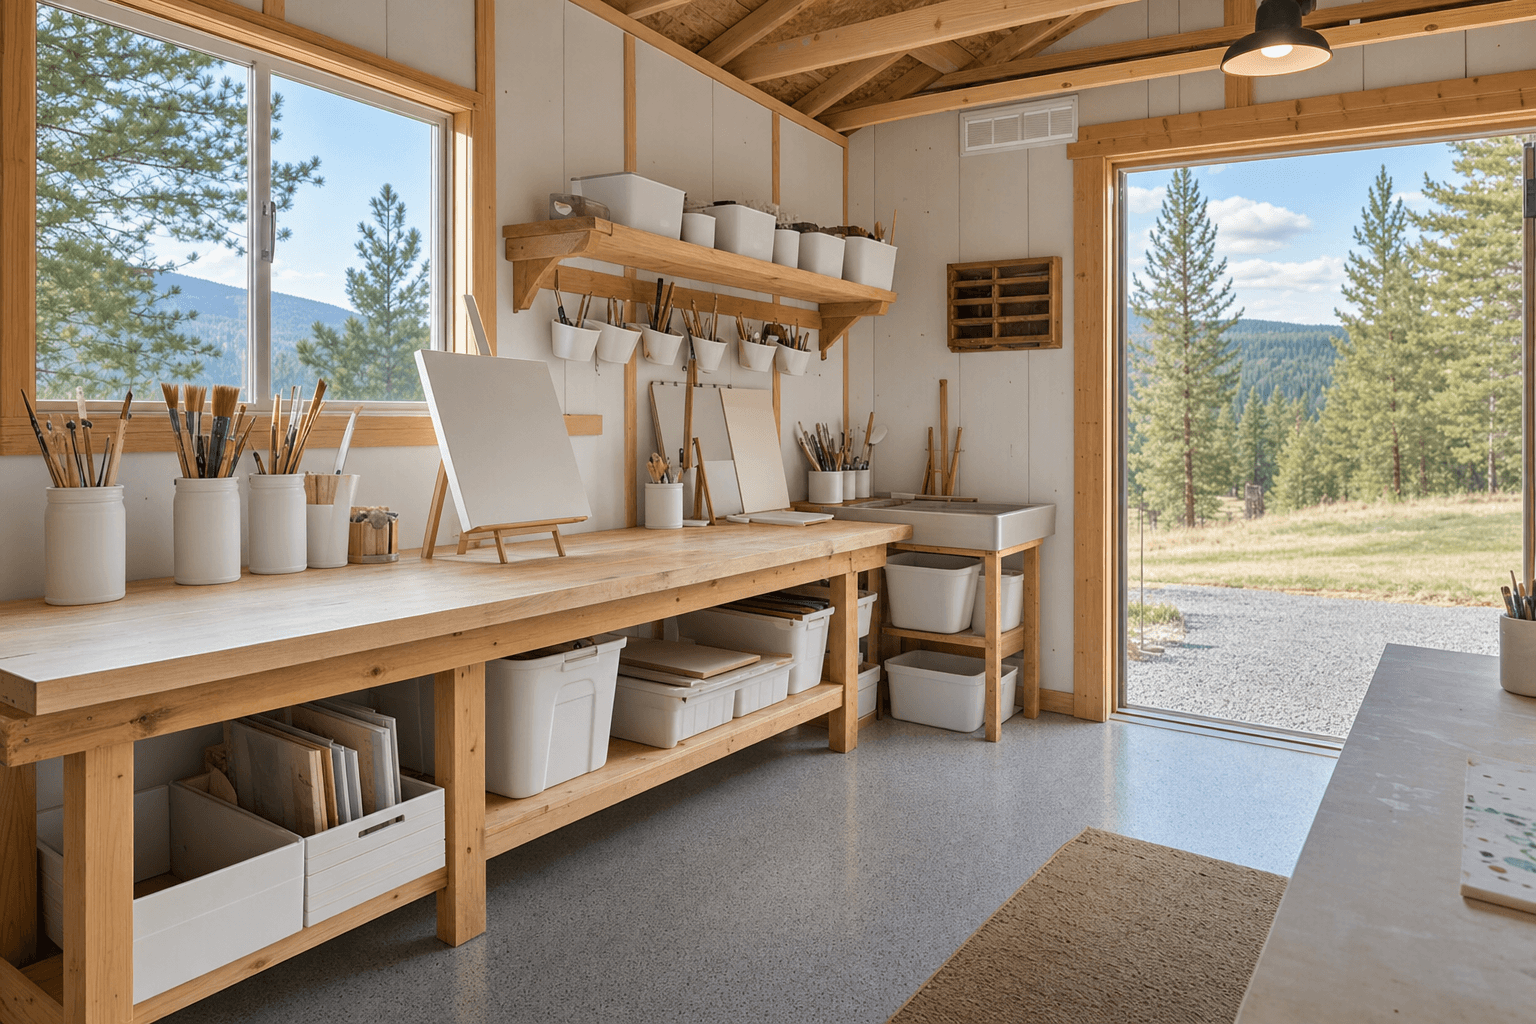
The details that make it a studio: a deep wash sink, a wipeable splash wall, and brushes drying within reach.
| Art studio planning checklist | |
|---|---|
| Best roofline | Single-slope or gable for a tall north-window wall; lofted barn for height and overhead canvas storage |
| Practical sizes | 10x12 for one medium, 10x14 to 10x16 for a wet-and-dry production studio, 12x16 for multi-medium or shared work |
| Natural light | North-facing windows or a window wall for steady, glare-free daylight; clerestory glass adds brightness up high |
| Ventilation | Exhaust fan vented outside, set opposite an operable window for cross-flow; a dedicated vent for a kiln or heavy solvents |
| Sink and wet area | A deep utility sink with a clay or sediment trap, a wipeable splash wall, and a washable floor in the wet zone |
| Floor and climate | Sealed concrete, epoxy, or commercial vinyl over an insulated, finished shell that holds materials at a stable temperature |
Four systems decide whether your studio is as usable in February as it is in June. Light is the first: build for north-facing daylight wherever you can, because north light is even, soft, and barely shifts through the day, so colors stay consistent and you never fight glare across a wet surface. Back it with high-CRI LED fixtures around 5000K for true color after dark and on the gray days North Idaho hands you all winter, and layer overhead, track, and task lights so the work is lit evenly with no shadow from your own hand. Power comes from a dedicated circuit run from your home's panel by a licensed electrician, usually in buried conduit, with a small subpanel inside so you can add a circuit for a kiln or a press later without trenching again; place outlets at the easel, the bench, the sink, and a dedicated higher-amperage line if a kiln is in your plans. Ventilation is non-negotiable once paints, solvents, fixatives, or a kiln are in the room: plan an exhaust fan ducted outside, ideally on the wall opposite an operable window so fresh air crosses the room and carries fumes out, plus a makeup-air path so the fan can actually move air. Winter readiness ties it together: a fully insulated and finished envelope with a quiet electric heater or a ductless mini-split holds the room and your materials at a stable temperature, which keeps paint from thickening, water-based media from freezing, and clay from drying unevenly, while the same insulation keeps the studio cool and comfortable in summer. We frame and build the shell tight and dry on your property so it's ready for your electrician to wire and your plumber to connect the sink.
A working studio stays straight, dry, and comfortable only on a solid, level base, so most sit on a compacted gravel pad sized about a foot wider than the building on each side so water drains away from the structure, or on a concrete slab, which many artists prefer because a sealed slab doubles as the durable, washable floor the wet zone needs. North Idaho weather drives the rest of the plan. Design the roof for local snow load so it shrugs off a heavy Panhandle winter, keep the floor up off the ground so spring melt and rain drain away instead of wicking into the building and your stored paper and canvas, and place the studio where the gravel driveway or a clear path lets our crew bring materials in to build. We build with weather-rated framing and finishes suited to pine-country freeze-thaw cycles, and we set the structure to drain and breathe so it lasts and stays dry inside, which matters when humidity swings can warp paper and ruin pigments. On permits, the deciding factor is usually how the building is used, not just how big it is. A small detached shed under your jurisdiction's size threshold often needs no permit, but once a studio is insulated, heated, wired, and plumbed with a sink you work in regularly, your county or city may treat it as a finished accessory building and require a building permit, electrical and plumbing permits with inspections, and adherence to setbacks. Rules vary across Kootenai County and the cities around Coeur d'Alene, so confirm with your local building department before you finalize the size and where it sits. Once you know what your jurisdiction requires, we plan the build around it so the structure, the rough-in for power and water, and the placement all line up.
North-facing windows give you the steadiest light an artist can ask for. In the Northern Hemisphere the sun never swings directly into a north window, so the light comes in soft, even, and indirect, and it barely shifts through the day, which means the colors on your palette and canvas stay consistent from morning to evening with no harsh shadows or glare across a wet surface. Place your largest window or window wall on the north side and position your easel or main work surface beside or facing it so the light falls evenly on your work. If a north wall isn't possible because of how the building sits, east light is the next best for morning work, and you can soften any strong direct sun with diffusing shades. A single-slope or gable roof also lets you add higher clerestory windows that bring in extra even daylight while keeping the lower walls free for shelving and storage. We frame the openings where your light plan calls for them so the daylight works for you instead of against you.
Ventilation is essential the moment you bring solvents, oil paints, fixatives, or a kiln into a closed room, because those fumes need a way out and you need fresh air coming in. The most effective setup is cross-ventilation: an exhaust fan ducted to the outside on one wall and an operable window on the opposite wall, so fresh air enters on one side and the fan pulls the contaminated air straight across the room and out, rather than letting it pool around you. Size the fan to the room's volume and run it whenever you're using solvents or spraying. If you fire clay, a kiln needs its own dedicated vent, either an overhead canopy hood or a downdraft vent that pulls fumes directly from the kiln to the outside, plus clearance from walls and a makeup-air path so the vent can actually move air. Store solvents and oily rags in a covered metal container, and keep a flammables cabinet for anything that off-gasses. We build the wall penetrations and a tight, insulated shell so your vent fan and any kiln exhaust can be installed and ducted cleanly to the outside.
Yes, and a sink is one of the most useful things you can add to a studio, because washing brushes, hands, trays, and tools at a real wash station instead of carrying everything back to the house changes how often you actually work out there. A deep utility sink is the standard choice. Plumbing it usually means running a supply line and a drain from your home's system out to the building, which a licensed plumber handles, often in the same trench as the electrical conduit to save on excavation. If a full hookup isn't practical, a simpler setup feeds the sink from a nearby hose bib for cold water and drains to a gray-water system, which works fine for rinsing brushes and tools. One important detail for ceramics: install a clay trap or sediment trap under the sink so clay, plaster, and grit settle out instead of hardening in your drain line and clogging it. Set the sink in the wet zone with a wipeable splash wall behind it and a washable floor underneath, and you have a self-contained wash-up area. We rough in the building so the sink, supply, and drain all connect cleanly.
Good storage is what keeps a working studio from drowning in its own materials, and the rule is to go up the walls and keep the floor clear for working and stepping back. For supplies, use wall-mounted shelving, a rolling taboret beside the easel, labeled bins, and a flammables cabinet for solvents and mediums so volatile materials are contained. For works on paper, flat files or shallow drawers store sheets without bending them, and a wall rack holds tubes and rolls. For wet and drying work, a freestanding or wall-mounted drying rack lets paintings, prints, or ware boards cure without taking floor space. For finished pieces, store canvases vertically in a padded rack so they don't lean and dent, and keep them off the floor and away from temperature swings; a lofted-barn roof or an overhead loft is a great place to tuck finished and seasonal work. Keep your most-used tools within arm's reach of the work surface and the rarely-used gear higher up or overhead. Because all of this stacks up fast, plan storage into your zones before you choose a size, since a studio that's the right footprint for the easel can still feel cramped once the racks and files arrive.
A studio floor takes spills, drips, scrapes, dropped tools, and the occasional smear of paint or glaze, so you want a surface that's durable and wipes clean rather than one that stains and traps mess. A sealed concrete slab is hard to beat, especially if you're already pouring a slab foundation: it's tough, easy to mop, and a coat of concrete sealer or epoxy makes it resist paint and solvent stains. Epoxy floor coating goes a step further with a continuous, chemical-resistant surface that comes in colors and cleans up with a wipe, which is ideal for a painting or printmaking studio. If you're building on a wood floor over a gravel pad, commercial-grade sheet vinyl or luxury vinyl plank gives you a washable, water-resistant surface that's softer underfoot than concrete and far more forgiving of dropped brushes and tools. Around the wet zone and the easel, an anti-fatigue mat you can hose off adds comfort for long sessions and catches the worst of the drips. Whatever you choose, seal it well and avoid carpet or untreated wood, which soak up spills and never come fully clean. We can build the studio on a slab or a finished wood floor depending on the surface you want.
Art materials are sensitive to temperature and humidity, so the envelope does double duty: it keeps you comfortable and it protects your supplies and finished work. Build the studio as a finished, conditioned room with a continuous insulated envelope, insulated walls, ceiling, and floor, plus a sealed door and windows that don't leak air, so the inside stays at a stable temperature instead of swinging with the weather. That stability matters because cold thickens oil paint and can freeze and ruin water-based media, heat can soften and crack some materials, and big humidity swings warp paper and canvas and make clay dry unevenly. For heat, a quiet electric heater sized to the room or a ductless mini-split holds a steady temperature through North Idaho winters, and a mini-split adds cooling and some humidity control for summer. Because the space is small and tightly sealed, it conditions quickly and your running costs stay reasonable. If you store pigments, paper, or finished pieces long-term, aim for stable, moderate humidity and avoid letting the room freeze or overheat between sessions. We build the shell tight, insulated, and dry on your property so it holds a steady climate and keeps your materials safe year-round.
Natural light quality is the argument for north-facing glazing, and it's worth positioning a backyard art studio on your lot with that orientation in mind. In Coeur d'Alene and across North Idaho, north-facing windows deliver consistent, shadow-free daylight without the midday contrast shift that south or west windows produce — critical for color accuracy in painting and drawing. An on-site build places the structure exactly where your lot and compass allow, rather than where a delivery truck could drop it.
Ventilation for paints, solvents, and fixatives needs to be planned at the framing stage. The exhaust fan location, the makeup air path, and the electrical circuit all run behind walls — and a studio that feels clean to work in during summer needs that airflow spec even in winter, when you'll be tempted to seal the building tight against the cold. A balanced, low-flow ventilation strategy keeps fumes below threshold without blowing the heat out of the room.
Durable, washable floors are a different spec than what goes into a typical storage shed. Sealed concrete, vinyl plank with a tile inset at the sink, or a painted ply floor with a polyurethane finish all hold up to dropped pigment and solvent spills in ways that standard shed flooring does not. Specifying the floor during construction is far simpler than resurfacing later.
Post Falls and Hayden properties where winters run cold benefit from a well-insulated envelope — an uninsulated studio is simply unusable from November through March without expensive heating. Check our materials and finish options, see art studio builds in the portfolio, or design your studio and get a free estimate.
Tell us how you work and we'll help you size, lay out, and price a north-lit, well-ventilated studio with a wash station for your North Idaho backyard.
Keep planning your build with related North Idaho shed guides.