Target archery is a quiet, focused sport — you, the bow, the breath, and the spot you are trying to hit. The trouble for most backyard shooters is space and shelter: a few good ends of shooting in fair weather, then the bow goes back in a closet, the arrows scatter into a drawer, and the practice habit fades by November. A dedicated archery range shed fixes that. It gives you a covered shooting station you can use in rain or snow, a safe and predictable place for the backstop and the lane, and a real home for the bows, arrows, and tuning gear that the sport quietly accumulates. The goal is a setup so safe and so easy to use that you shoot a few ends after work without a second thought.
North Idaho On Site Sheds builds every range building on your property, so the covered station, the door, and the line of sight down your lane are planned around your actual yard — the slope, the gravel pad, and where a safe backstop can sit with a clear, controlled space behind it. This guide walks through which shed style makes the best covered shooting station, how to think about safe lane length and a proper backstop, how to size the building for the way you practice, and how to fit out the bow and arrow storage, the tuning bench, and the lighting that keep a target-archery habit alive through a real winter. Safety leads every decision here, because a home range only works when it is built to keep every arrow where it belongs.
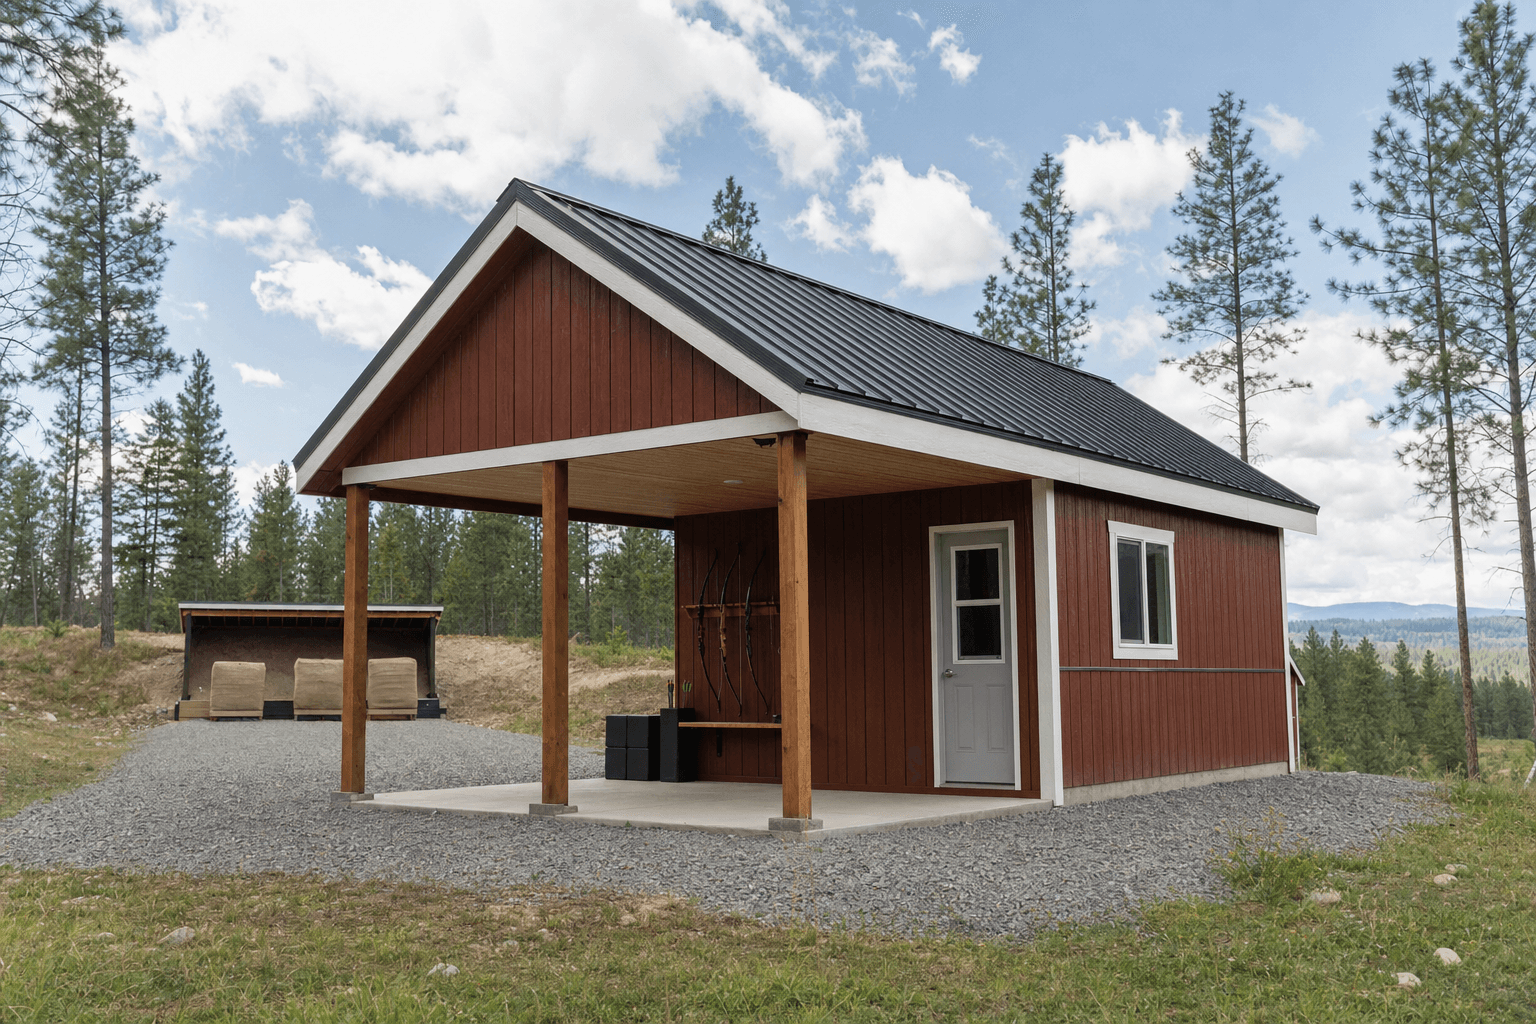
An archery range shed starts as a covered shooting station: a sheltered shooting line, a clear sightline down the lane, and a dry home for bows and gear.
An archery range building does a different job than a closed storage shed: it shelters the shooting line while keeping a wide, open sightline down the lane to the target. That makes the roofline and the door opening the decisions that matter most. A standard gable is a clean starting point — tall enough at the ridge to draw a longbow or a tall compound without clipping the rafters, and easy to fit with a wide opening or a roll-up door so the front of the building becomes your covered shooting station. A lean-to or modern single-slope is often the most natural archery shape: it sheds North Idaho snow predictably to the back, and the tall open front faces your lane, giving you a roofed shooting line with bright, even daylight on the target. A porch model is worth a look too, because a deep covered porch is essentially a ready-made shooting station with the storage and tuning room tucked behind it, dry and out of the weather.
Whichever roofline you pick, keep the building's role honest: this is a covered shooting station plus a gear room, not a place where any arrow is ever loosed indoors at a wall. The structure shelters you and your equipment; the lane, the target, and the backstop live downrange in the open, in a space you control. Because the bow and arrow care side of the building overlaps so much with general hobby work, an archery shed plans a lot like a hobby shed — a bench, good light, and organized walls. If the same building also stores hunting bows, broadheads, and field gear in the off-season, plan the storage side alongside a hunting gear storage layout so the bows, arrows, and kit all have a dry, organized home. Decide up front whether shooting comfort or gear storage leads, because that drives how much of the footprint becomes open covered station versus enclosed room.
The building shelters the shooting line; the safe lane length and a solid backstop live downrange in open yard you control. Size the structure to the station and storage, and lay the lane out separately with safety first.
An 8x12 or 8x16 gives one or two shooters a sheltered shooting line, a bow rack, an arrow tube wall, and a small tuning bench — plenty for steady backyard practice.
A 10x16 or 10x20 adds width for a full tuning bench, a fletching and repair zone, seating, and storage for several bows and the family's arrows alongside the covered line.
When you size the building, remember the lane is measured outside in open yard and the shed is sized for the shooting station and the gear — keep those two numbers separate. For one or two shooters who want a sheltered shooting line, a bow rack, an arrow wall, and a small tuning bench, an 8x12 is a tidy covered station. Step up to an 8x16 and the extra length gives you room for a proper bench at one end and a bow-and-arrow wall at the other without crowding the shooting line. Going to ten feet of width — an 10x16 or 10x20 — is what turns the building into a real archery room: width for a deep tuning bench, a fletching and repair corner, a stool or bench for resting between ends, and organized storage for several bows and a household's worth of arrows. Length buys you a longer covered line and more bench; width buys you the room to keep the shooting side and the gear side from fighting over the same floor. If you shoot with kids or a club's worth of friends, size up so two people can stand on the line comfortably and a third can wait and watch from behind.
These overlap, and the right call comes down to what the building leads with. A hobby shed is a general bench-and-bright-light room for any pursuit, and an archery shed is essentially a hobby shed organized around a covered shooting line — the bench tunes and fletches, the walls hold bows and arrows, and the open front faces a safe lane. If you mostly want a dry, comfortable place to practice target archery and tinker with your setup, an archery-first layout puts the covered station and the equipment care front and center. If the same space is really a year-round retreat where archery is one of several things you do, a man cave layout with a comfortable corner and the shooting station built in might suit you better.
The other common pairing is storage. Plenty of North Idaho archers shoot recreational targets in summer and hunt with a bow in fall, so the building doubles as a hunting gear storage room when the season turns — broadheads, a range finder, a release aid, and field kit all want the same dry, organized home as the target gear. That is a great fit, with one safety rule that stays constant: edged hunting points get locked away and handled only at the bench, never near the shooting line, and the practice lane only ever sees field points into a proper target. Naming the lead use — practice comfort, all-purpose retreat, or seasonal gear storage — keeps you from a building that does none of them well.
Zone it: a covered shooting line at the open front, a tuning bench along one wall, and bow and arrow storage kept clear of the line.
Think of the archery shed as four working zones instead of one open box, laid out so the shooting line stays clear and everything else supports it. The shooting station is the open front: a defined shooting line with solid footing, a roof overhead for weather, and a clean, unobstructed sightline down the lane to the target. Keep this zone deliberately empty — nothing stored in front of the line, nothing a drawn bow can clip, and a clear lane behind you so no one ever walks downrange while a shooter is on the line. A tuning and repair bench runs along one side wall, well back from the shooting line, with a bow press or press fittings, a vise, a fletching jig, and outlets for a bow scale and small tools. A storage zone holds the bows on a proper rack and the arrows nose-down in labeled tubes or a quiver wall, up off the floor and out of the shooting path. A rest and ready zone by the entry gives you a stool or bench to sit between ends, a hook for a finger tab or release, and a spot to stage the arrows you are about to shoot.
Good zoning is mostly about keeping the shooting line sacred. Leave the front of the building open and unobstructed, store all the gear behind or beside the line rather than in front of it, and set the bench far enough back that no one tunes a bow in the path of a shooter. Put the storage and the bench where they are easy to reach without crossing the line, and keep a clear, single lane from the line to the target so the rule is simple and obvious: only one place to stand, only one direction an arrow ever travels. A range that flows this way is one where the safe habit is also the easy habit — you step to the line, shoot your ends, then walk a clear path to collect arrows with no bow drawn anywhere behind you.
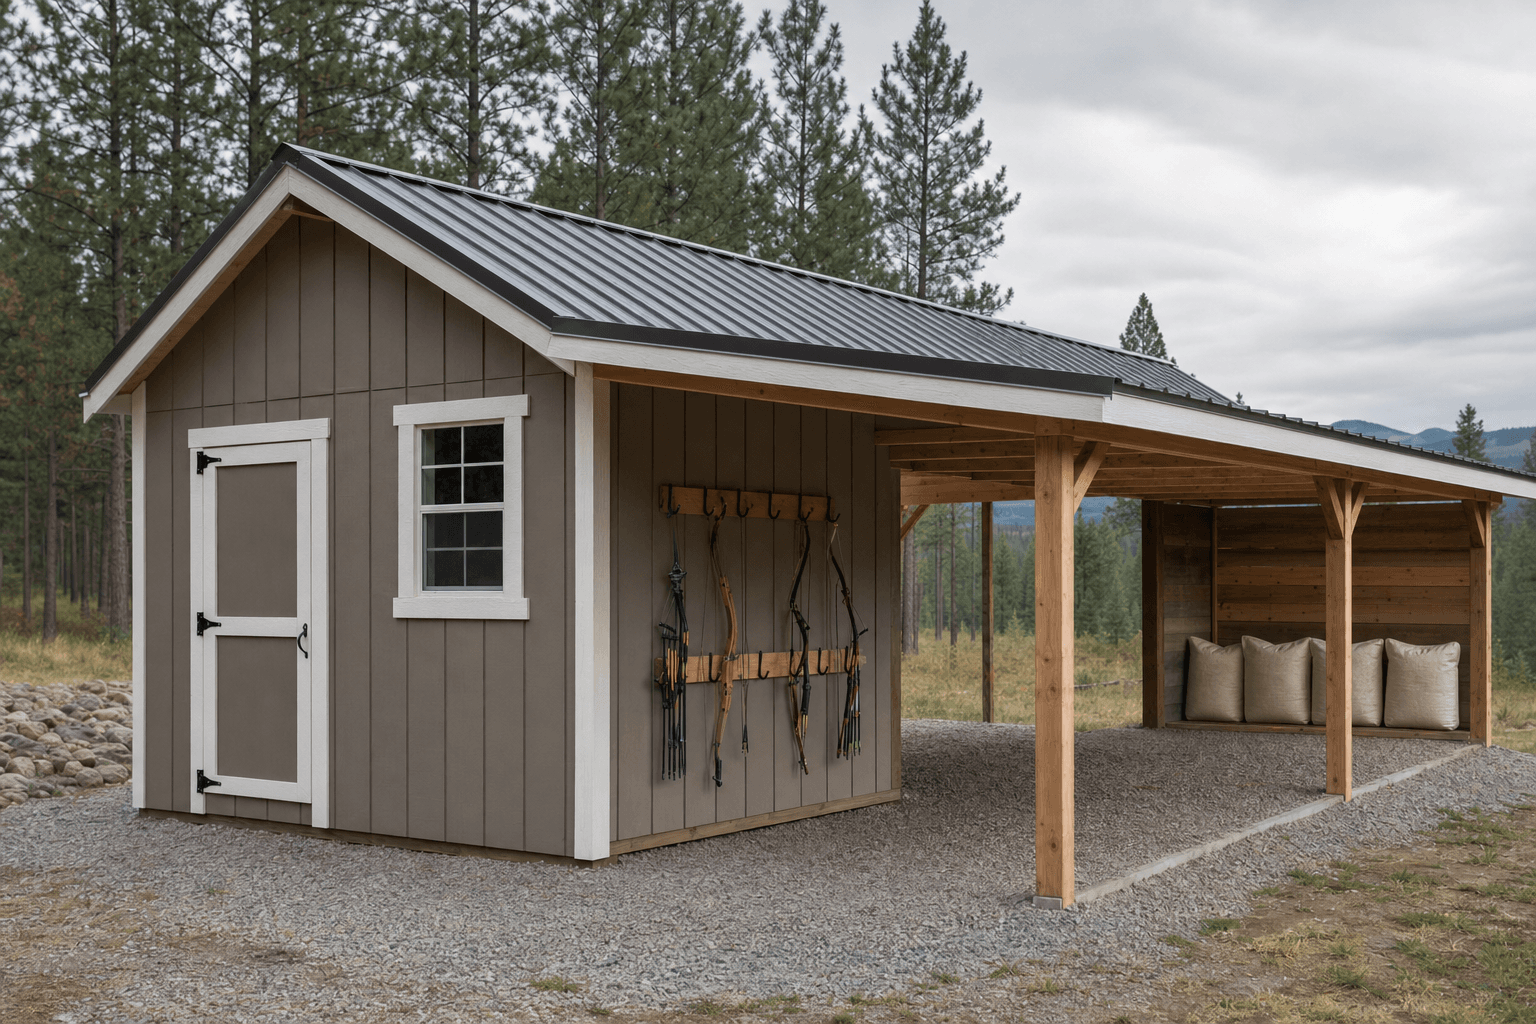
Wall hooks or a dedicated rack hold each bow by the riser, strings unstressed, and a row of labeled arrow tubes or a quiver board keeps points down and shafts straight — all kept clear of the shooting line.
A solid bench set back from the line with a bow press or press fittings, a vise, a fletching jig, a bow square, and a paper-tune setup, so nock-point, rest, and arrow work all happen in one organized, well-lit spot.
A reliable backstop and a foam, bag, or layered target sit in the open lane outside the building, sized to stop your draw weight, with the shed only sheltering the shooter and the gear, never serving as a backstop itself.
Good footing on the line, a stool to rest between ends, hooks for tabs and releases, and a door you can lock so bows, arrows, and any edged points stay secure and out of reach when you are not on the range.
This is where a bare building becomes an archery range, and it is worth naming exactly what lives inside so you size the bench, the racks, and the lighting around it. The bows are the anchors — a recurve or longbow on a rack that supports the riser, a compound bow hung so the cams and string stay unstressed, and maybe a youth bow for the kids on a lower hook. The arrows want a wall of their own: labeled tubes or a quiver board holding field-point target arrows nose-down, sorted by spine and length, with a clear bin for any that need re-fletching or new nocks. Around them goes the tuning kit that keeps a setup shooting true: a bow press or press fittings, a bow scale, a bow square, a nock-point tool, a fletching jig with glue and vanes, a serving jig and spare string material, allen wrenches, and a paper-tuning frame.
From there you fit out for the practice itself: spare strings and a string wax, a release aid or finger tabs and an armguard, a chest guard, a quiver and a hip or field quiver for the line, and a stack of paper target faces with a stapler or clips. Add a bright, organized gear wall so nothing rolls into a corner — a small parts bin for nocks, points, inserts, and vanes, plus a notebook or app log for your sight marks and tune notes. If the building doubles for the fall, a locked cabinet holds the bow-hunting gear separately — broadheads in a closed case, a range finder, a release, and field kit — kept apart from the target arrows and handled only at the bench. The small, organized touches are what turn an after-work practice session into ten quiet minutes on the line instead of a hunt for gear.
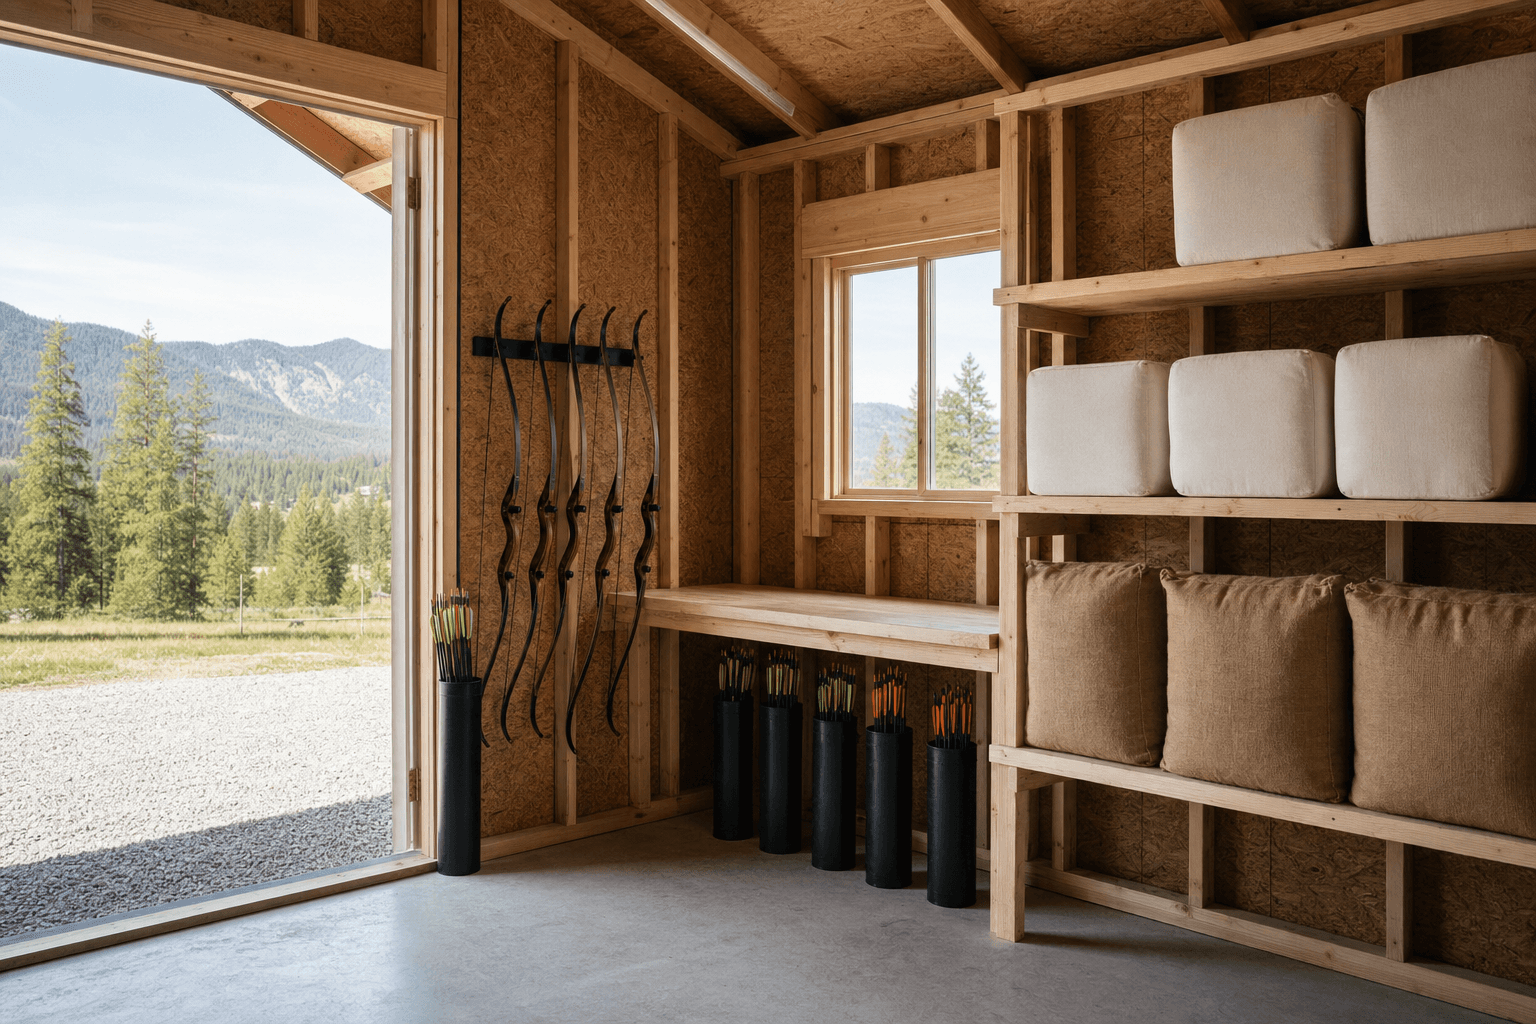
A bow press, a fletching jig, and labeled arrow tubes — the tuning details that keep a setup shooting true through the season.
| Backyard archery range planning checklist | |
|---|---|
| Shooting line | A clear, defined shooting line at the covered front with solid footing, an unobstructed sightline down the lane, and nothing stored in front of it that a drawn bow could clip |
| Lane & backstop | A measured lane in open yard you control, ending in a backstop and target rated to stop your draw weight, with a wide safe margin behind and beside the target |
| Storage | A bow rack and labeled arrow wall kept clear of the line, plus a lockable cabinet for any edged hunting points handled only at the bench |
| Bench | A tuning and fletching bench set well back from the shooting line, with a press, a vise, a fletching jig, and outlets for a scale and small tools |
| Lighting | Bright, even, glare-free light on the target and the line plus task light over the bench, so the spot stays clearly visible on short winter days |
| Winter readiness | A snow-rated roof and anchoring, a plowed path to the station, and optional insulation and heat so the range stays usable through a North Idaho freeze |
Light is what keeps target archery enjoyable, because you cannot shoot a spot you cannot clearly see. Plan bright, even, glare-free lighting on two fronts: daylight-balanced LED over the target and down the lane so the face reads true without a hot spot or a shadow across it, and a separate task light over the tuning bench for close fletching and nock work. Aim the lane lighting so it lights the target, not the shooter's eyes, and avoid a single harsh fixture that throws a glare back up the lane. A few well-placed fixtures beat one bright one. For power, a small run from the house gives you outlets for the bench, a bow scale, a battery charger for any electronic sight or release, and the lighting, so the range works at dusk and on the dark afternoons that make up a North Idaho winter.
Winter is exactly when a covered, lit range earns its keep, so plan for it. A snow-rated roof and solid anchoring keep the covered station safe under a real load, and a plowed path to the shooting line means you actually use it after a storm instead of letting the bow hibernate. If you want to practice in comfort through the freeze, insulate the walls and roof of the enclosed storage and bench area and add a gentle heat source like a mini-split or an electric heater, so the gear stays dry, the bench is comfortable, and your hands work on a January afternoon. Insulation also steadies the temperature for the bows and strings, which last longer when they are not swinging from a humid summer to a hard freeze. A range you can stand to use in winter is a range you keep using all year.
A home range is a safety project first and a building second, so plan the lane and the backstop before you plan anything else. Lay the lane out so every arrow travels in one direction, into a backstop and target rated to stop your draw weight, with a wide, clear safe margin behind and to the sides of the target — never toward a house, a neighbor's yard, a road, or a path where someone could walk. Many archers add a backed bank, a dedicated target bunker, or a stop curtain behind the target as a second line of defense, and orient the lane so the natural ground or a slope catches anything that sails high. Keep the downrange space controlled and off-limits while anyone is on the line, set a hard rule that no one walks to the target until every bow is down, and store the gear so curious hands cannot reach a bow or an arrow unsupervised. The building helps enforce all of this: it gives you one defined shooting line, one direction to shoot, and a lockable home for the equipment.
For the structure itself, a compacted gravel pad drains well and gives the covered station a stable, dry footing, while a concrete slab makes an even better shooting line and a dead-flat bench floor if you want the more finished option. Plan the approach so the lane stays level and clear and the station faces the safest direction your yard allows, and read how to prep a shed site before delivery so the pad, drainage, and access are ready. North Idaho winters drive a snow-rated roof, good anchoring, and a plowed path. On the rules side, many small sheds skip a permit, but larger buildings, any electrical work, and setback or HOA requirements often do not — and a backyard range may have its own local considerations for where and how it can sit. Confirm what your town and county require on the service areas pages, and factor any electrical permit into the plan before you finalize the size and the placement on your property.
Lay the lane out in open yard, separate from the building, and size it to the distances you actually practice — many backyard target archers shoot at 10, 15, or 20 yards, while some want room out to 30 or more. The backstop matters more than the exact length: use a target rated to stop your draw weight, set behind it a backed bank, a dedicated bunker, or a stop curtain as a second line of defense, and keep a wide, clear safe margin behind and beside the target so a high or wide arrow is still caught. Aim the lane so every arrow travels in one direction into solid ground, never toward a house, a neighbor, a road, or any path someone could walk, and keep the downrange space controlled and off-limits whenever anyone is on the line.
For a home range, plan a covered outdoor lane rather than shooting indoors at a wall. The building works as a covered shooting station at the open front — it shelters you and the gear from rain and snow while you shoot down a lane in the open yard, so the arrow always has a real backstop and a wide safe margin behind it outdoors. A fully enclosed indoor lane needs far more depth, a heavy purpose-built backstop, and careful safety engineering that a backyard shed is not the place for. A lean-to or porch model gives you the best of both: a dry, roofed shooting line with a clear sightline to a target that lives safely downrange in the open.
Give bows and arrows their own storage kept clear of the shooting line. Hang each bow on a rack that supports the riser with the string unstressed — a recurve or longbow on proper hooks, a compound hung so the cams and string relax — and store arrows nose-down in labeled tubes or a quiver board, sorted by spine and length, with a bin for any that need re-fletching. Keep a tuning and fletching bench along a side wall, set well back from the line, with a bow press or press fittings, a vise, a fletching jig, a bow square, and a nock tool so maintenance happens in one organized spot. Insulating the enclosed area steadies temperature and humidity, which helps strings and limbs last. If you also keep edged hunting points, lock them in a closed case and handle them only at the bench, never near the line.
Plan bright, even, glare-free light so you can clearly see the spot, since you cannot reliably shoot a target you cannot see well. Use daylight-balanced LED to light the target and the lane without a hot spot or a shadow across the face, and aim the fixtures so they light the target rather than shining back into the shooter's eyes — several well-placed lights beat one harsh one. Add a separate task light over the tuning bench for close fletching, nock, and serving work. Good lighting matters most on short North Idaho winter afternoons, when a lit, covered station is the difference between practicing year-round and shelving the bow until spring.
Size the building and the lane as two separate things. The lane lives outside in open yard and is set by your practice distances and a safe backstop, so it is not limited by the shed footprint. The building is sized for the covered shooting station and the gear: an 8x12 or 8x16 suits one or two shooters with a bow rack, an arrow wall, and a small bench, while a 10x16 or 10x20 adds width for a full tuning bench, a fletching corner, seating, and storage for several bows and the family's arrows. Length buys a longer covered line and more bench; width keeps the shooting side and the gear side from crowding each other. If kids or friends shoot with you, size up so two people fit on the line and a third can wait safely behind it.
Build the range so the safe habit is also the easy one. Keep a single defined shooting line at the covered station, one clear direction for every arrow, and a backstop and target rated for your draw weight with a wide safe margin behind and beside it. Keep the downrange space controlled and off-limits while anyone is on the line, set a hard rule that no one walks to collect arrows until every bow is down, and store all gear behind or beside the line so nothing obstructs a drawn bow. Lock the bows, arrows, and any edged hunting points away when the range is not in use so they are never reachable unsupervised, teach younger shooters the same one-line, one-direction rule from the start, and keep a basic first-aid kit on hand. The building reinforces all of it by giving you one place to stand, one way to shoot, and a secure home for everything.
A covered shooting lane changes how much you actually use a backyard range in North Idaho. Coeur d'Alene and Post Falls get real winter, and an uncovered target berm turns into a shoveling project every time you want to shoot. A compact archery range shed built on site over the shooting position keeps you on the range through October and back on it by March — without hauling gear through snow to a bare target stand.
The backstop is where most DIY ranges create problems that a planned build avoids. On a North Idaho property — especially the sloped or partially wooded lots common in Hayden, Rathdrum, and on the hills above Coeur d'Alene — the downrange zone needs a clear sightline to the target and solid ground behind it. A built-on-site structure can be positioned to work with the natural grade rather than fighting it, and the overhead cover can be extended to shield the target face from rain and sun exposure that degrades foam blocks quickly.
Bow and arrow storage inside the shooting structure solves a real daily-use problem. Leaving a recurve or compound in a garage that swings between 20°F and 90°F across seasons causes limb warps and string creep. A small conditioned or at least insulated bay — sized to hang bows off the wall and keep a flat surface for a tuning bench — keeps equipment in consistent condition. That kind of detail is straightforward to frame into an on-site build from the start.
If you're ready to price a covered lane, design your layout in the shed builder or request a free estimate with your dimensions and site conditions in mind.
Tell us how you practice and where a safe lane can sit in your yard, and we will help size the covered station, the storage, the tuning bench, and the site prep around your property — then you can build and price it online.
Keep planning your build with related North Idaho shed guides.