A backyard workshop is where the table saw lives, the lumber rack fills up, and a half-built project waits on the bench until you have an hour to get back to it. The shops people love are not the biggest ones — they are the ones planned around the work: enough wall height to stand sheet goods on end, enough power to run a saw and a dust collector at the same time, and enough light that you can read a tape measure in the back corner at dusk. This guide walks through how to plan a real woodworking and project shop for a North Idaho property: which shed style and roofline fits, what size to build, how to wire and insulate it, and how to lay out the bench and stationary tools so the workflow actually flows.
North Idaho On Site Sheds builds every workshop on your property, so the plan can answer to your real grade, your driveway, and how a sheet of plywood gets from the truck to the bench. Start with the biggest tools you own — or plan to own — and the heaviest stock you will cut, then size, power, and lay out the building around that. Get the shell right and the shop grows with you for years; get it wrong and you spend every Saturday working around it.
A year-round shop starts with the shell: tall walls, wide doors, and power run before the first tool rolls in.
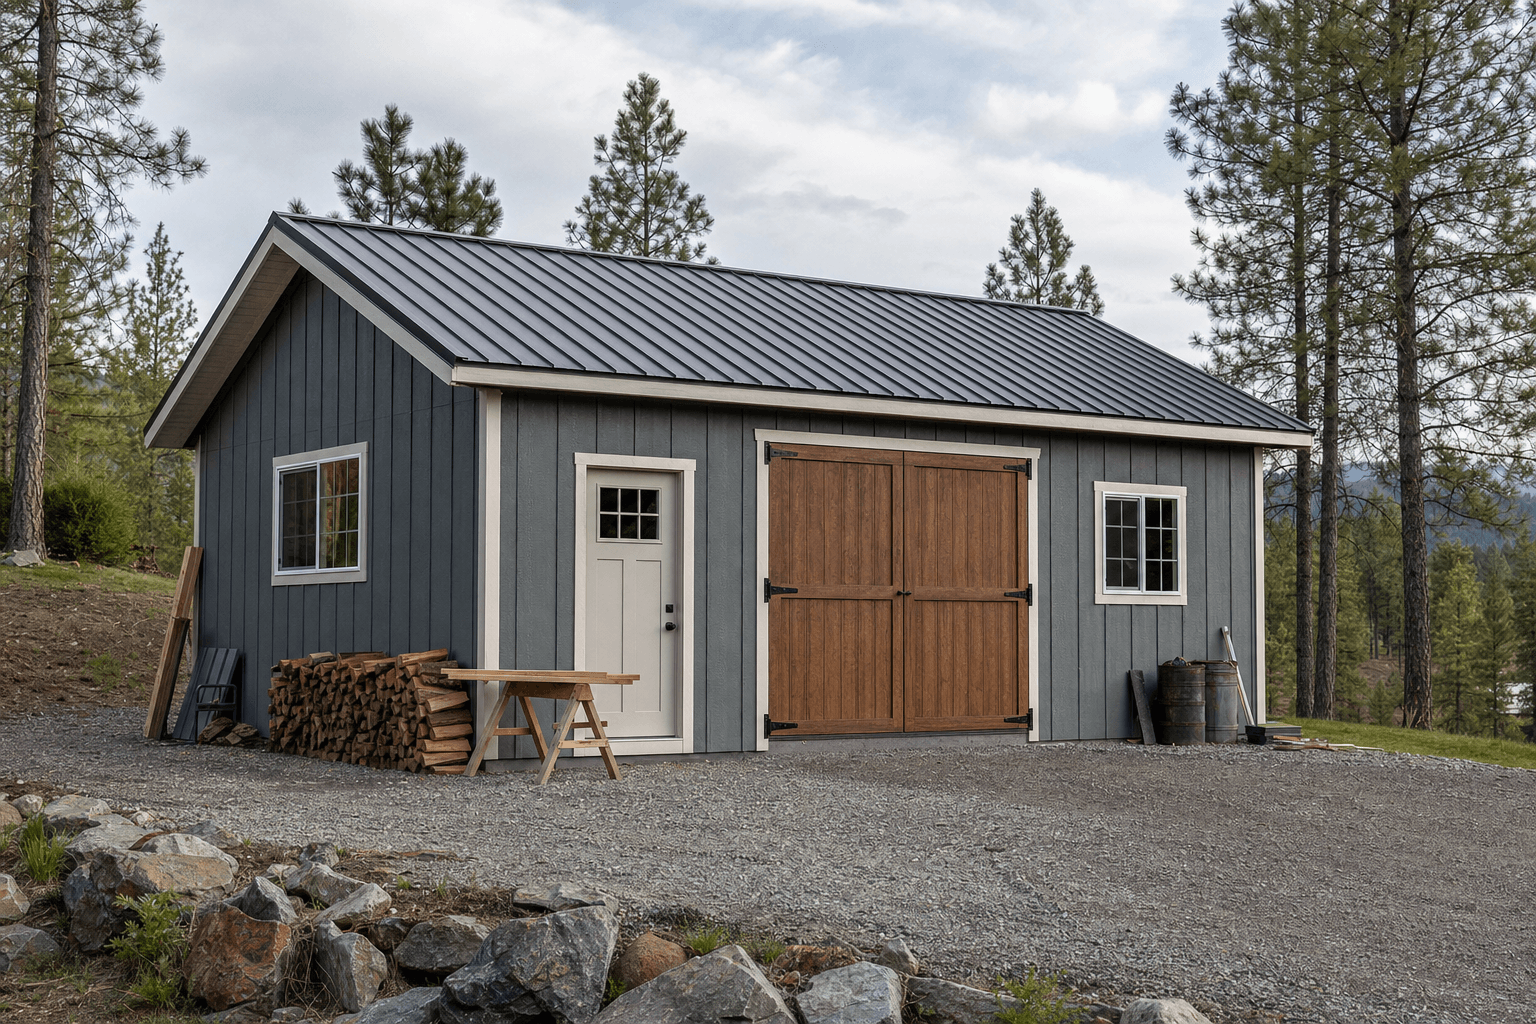
A workshop wants volume and wall height more than almost any other building. A standard gable is the honest starting point — tall at the ridge, simple to insulate, and easy to line with plywood walls you can screw a French cleat or shelf into anywhere. Step up to taller sidewalls (think 8-foot-plus) and the gable becomes a genuine shop: you can stand a 4x8 sheet on end, run a wall of cabinets, and still have headroom over the table saw. A lofted barn (gambrel) buys you a storage loft for clamps, jigs, offcuts, and seasonal stock, keeping the floor clear for machines. A lean-to or modern single-slope sheds North Idaho snow predictably to one side and gives you a tall front wall to fill with windows and task light.
If you are choosing between a storage-first building and a true shop, lean toward the shop spec every time — taller walls, a stick-built feel, and room to insulate and wire. A workshop sits closer to a stick-built shop or detached garage than to a plain storage shed, and it overlaps heavily with a flexible maker space if you also weld, paint, or run a 3D printer. Decide whether woodworking leads or mixed making leads, because that one choice drives the ceiling height, the circuits, and the ventilation.
A 12x16 holds a workbench, a wall of storage, and one stationary tool like a table saw or miter station with room to feed short stock.
A 12x20 or 14x20 gives a real outfeed path for the table saw, a dedicated bench wall, a lumber rack, and a corner for dust collection.
A 16x24 fits a full stationary-tool lineup, a mobile assembly table, sheet-goods storage, and clear aisles to break down plywood safely.
Footprint drives everything about how a shop feels, so compare the real dimensions before you commit — a few feet decides whether a 4x8 sheet clears the saw on the outfeed side or jams against the wall. A 12x16 is a comfortable one-machine hobby shop; a 12x20 or 14x20 opens up a true table-saw outfeed path and a dedicated bench wall; and a 12x24 gives you length for a long lumber rack plus a miter station against one wall. The extra width on a 14-foot building is what lets two people work without bumping elbows, and it leaves room to walk fully around an assembly table mid-project. If you run several stationary tools and want to break down full sheets of plywood inside, size up to a 16x24 so the aisles stay safe with the saw running. Depth matters more than width in a shop — length is what lets stock and outfeed flow in a straight line instead of pivoting around machines.
These overlap, and the right call comes down to how you will use the space. A tool shed is about access and organized storage — wall systems, a small bench, and gear you grab most weeks — so it favors floor space and shelving over machine room. A backyard workshop is a place to spend hours building, so it favors wall height, bright lighting, insulation, and dedicated 240V circuits for the machines. A detached garage or stick-built shop blurs into a workshop once you add a vehicle bay, but a purpose-built shop puts the bench, the saw, and the dust collector first instead of parking.
Plenty of buyers want one building that pulls double duty, and that works — just decide which job leads. If projects and machines lead, build a workshop and add a tool wall; if storage leads with occasional tinkering, build a tool shed with a bench corner. A flexible maker-space build is the move when woodworking shares the room with welding, painting, or electronics, because it plans the ventilation and power for mixed work. Naming the priority up front keeps you from a building that does neither job well — and it sets your ceiling height, your circuits, and your dust strategy before the walls go up.
Zone the shop: a bench wall, a machine zone with outfeed room, lumber storage, and a clear assembly floor.
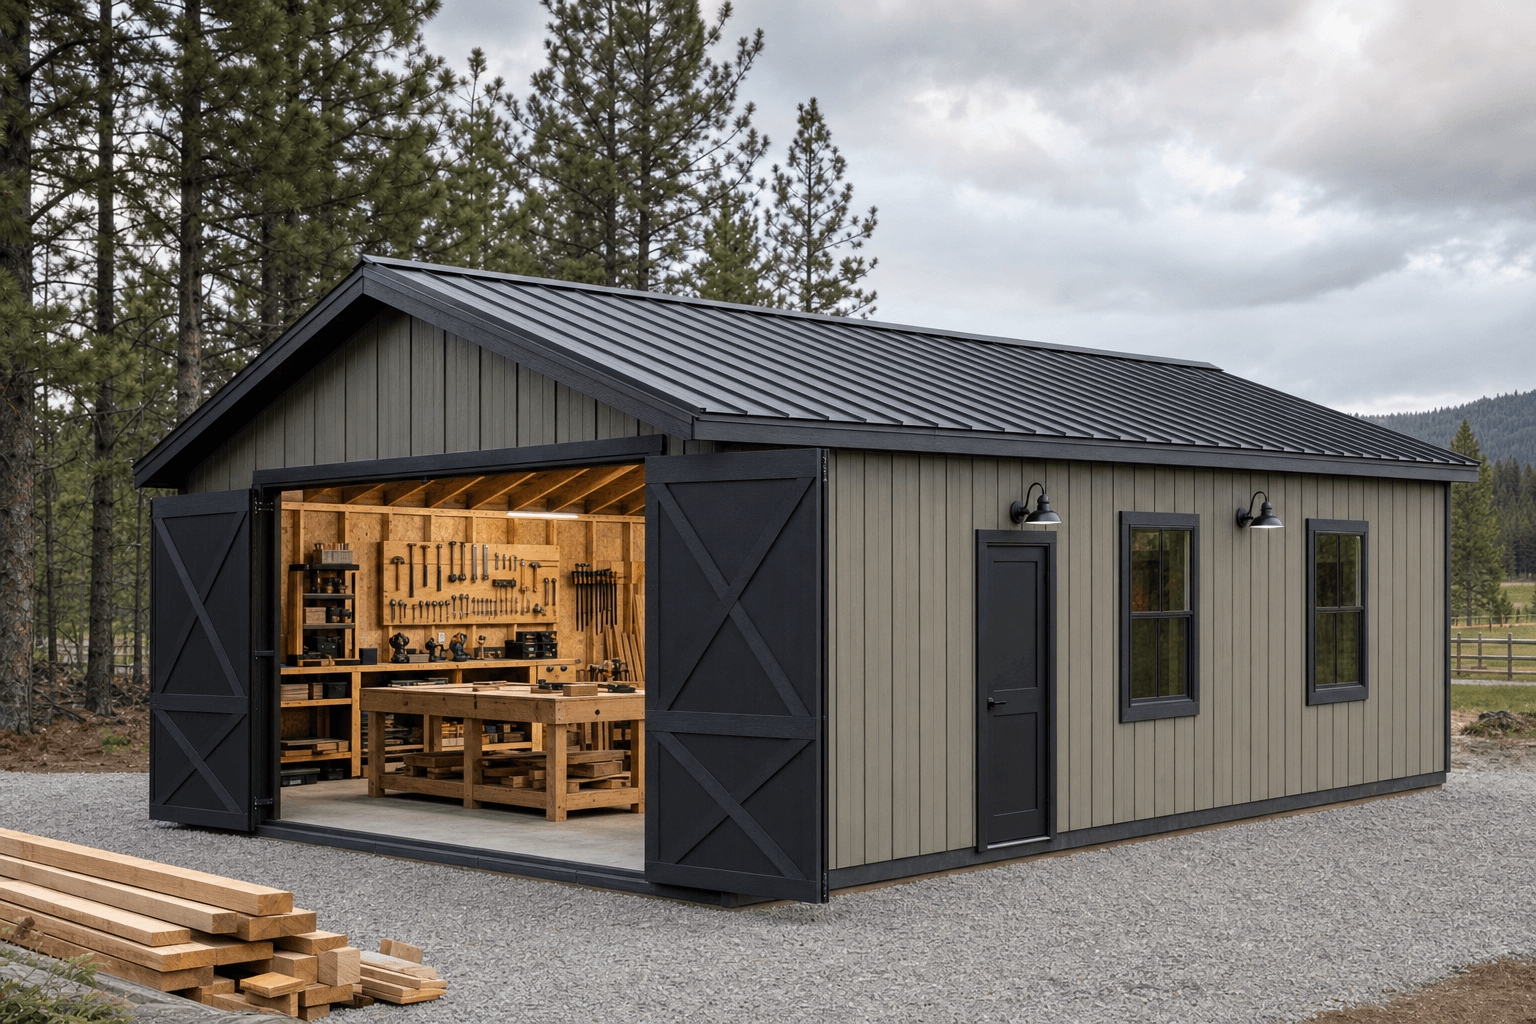
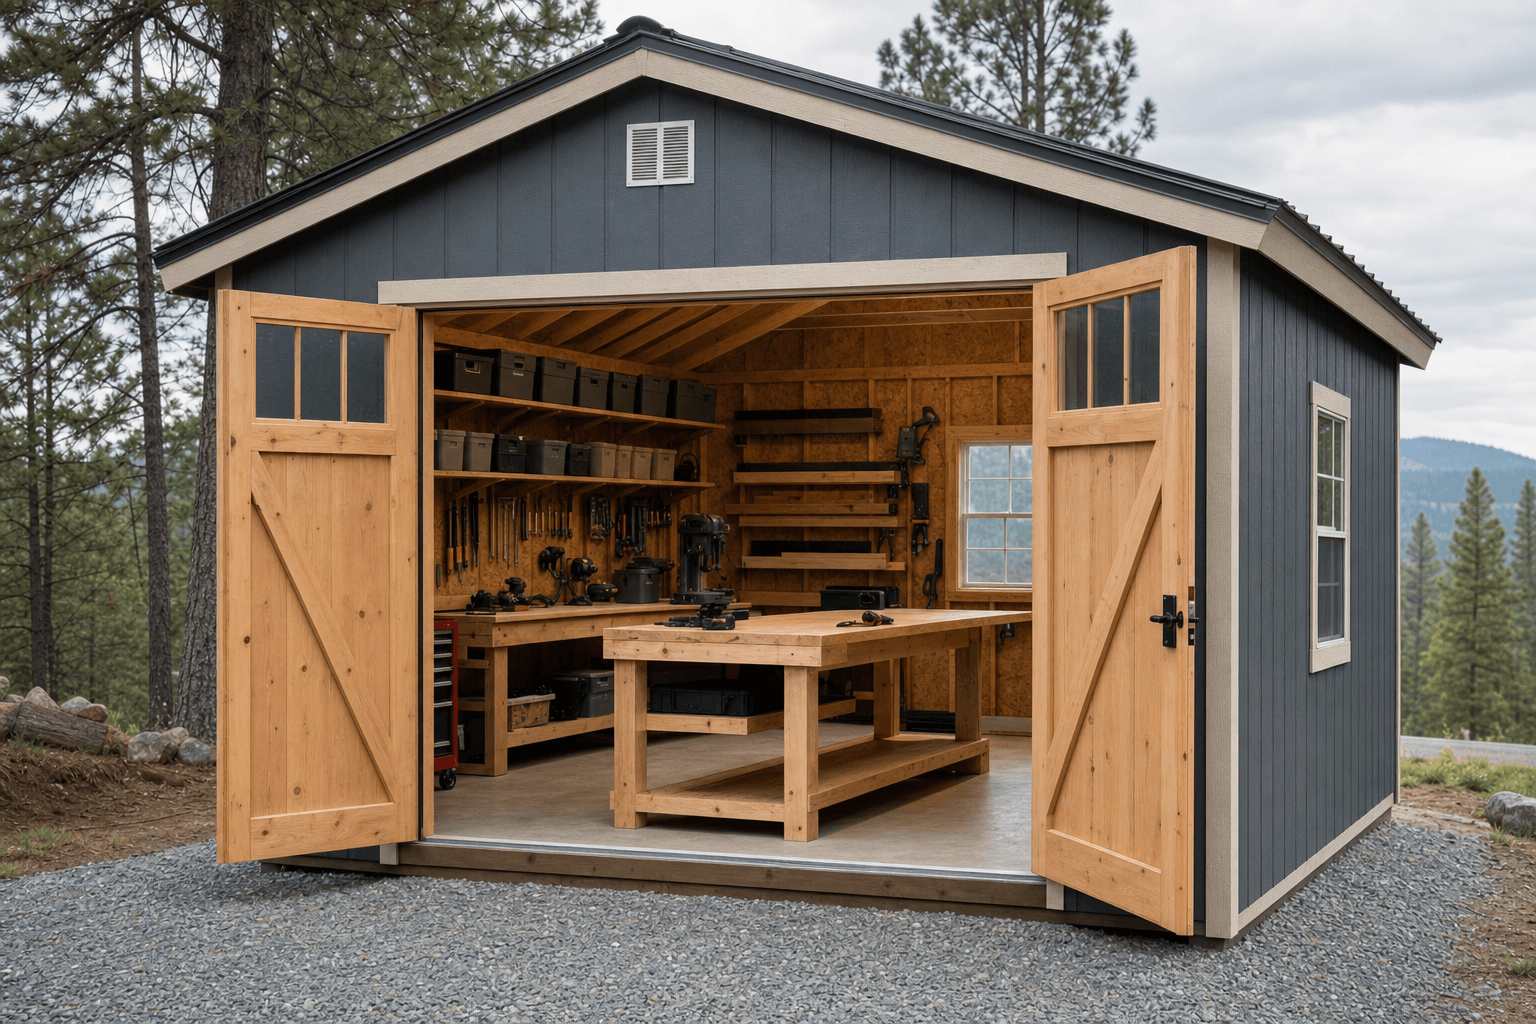
Think of the shop as four working zones instead of one open box, and lay them out so material moves in a straight line. A bench wall runs along one long side with your vise, hand tools, and power outlets at counter height. A machine zone centers on the table saw with clear outfeed and rip-fence room — this is the space you protect first, because everything else can flex around it. A lumber and sheet-goods zone holds the wood rack and a vertical plywood cart near the door so stock comes in and goes straight to the saw. An assembly floor in the middle stays deliberately open for a mobile workbench, glue-ups, and finishing.
Good zoning means you never carry a board across a running blade or trip over a hose to reach a clamp. Put the dust collector in a corner or a closeted bay so its noise and footprint stay out of the work triangle, and leave a clear path from the wide doors to the saw so a full sheet of plywood never has to pivot. Leave roughly 3 to 4 feet of aisle around the table saw and at least the length of your longest board on the outfeed side, and you will rarely have to stop and shuffle machines to make a cut. A shop that flows is one where the next cut is always a step away, not a furniture-rearranging project.
A heavy bench with a vise for joinery and clamping, plus a mobile, flat assembly table you can roll to the middle for glue-ups and finishing.
Plywood-lined walls take a continuous French-cleat rail so chisels, clamps, and jigs hang where you reach for them and move as your kit grows.
A wall-mounted cantilever rack for boards and a vertical cart for plywood keep stock off the floor, flat, and easy to pull without digging.
A central dust collector or a cyclone plumbed to the big machines, plus a shop vac for the bench, keeps fine dust out of your lungs and off every surface.
This is where a bare building becomes a workshop, and it is worth naming exactly what lives inside so you size the power, the floor, and the dust plan around it. The stationary tools are the anchors: a table saw with an outfeed table, a miter saw on a station with stop blocks and wings, a drill press in a corner, and a bandsaw, jointer, planer, or router table as the work demands. A dust collector or cyclone ties the big machines together with blast gates and flexible hose, and a wall-mounted shop vac handles the bench and the track saw.
Around the machines you fit out for the daily work: a lumber rack loaded with hardwood and construction stock, a vertical cart of plywood and MDF sheets, and a clamp rack bristling with bar clamps, pipe clamps, and parallel clamps. Add a finishing shelf of stains, glues, and solvents stored away from anything that sparks, a sharpening station, a roll-around tool chest, an air compressor and hose reel for brad nails, and labeled bins for screws, dowels, and hardware. The small touches matter too: a shop stool, an anti-fatigue mat at the bench, a secure, well-organized tool wall so nothing walks off, and a fire extinguisher rated for solvents and sawdust.
Clamps on a dedicated rack, tools on French cleats, and lumber off the floor — the details that keep a shop moving.
| Backyard workshop planning checklist | |
|---|---|
| Wall height | Taller sidewalls (8 ft+) so you can stand sheet goods on end and run full-height cabinets |
| Doors | Wide doors sited for a straight path from the driveway to the saw for sheet goods and machines |
| Power | A dedicated subpanel with 120V bench circuits plus a 240V circuit for the table saw and dust collector |
| Lighting | Bright, even LED task light over the bench and machines, plus daylight from windows where you can |
| Insulation & heat | Insulated walls and ceiling with a heat source so finishes cure and you can work through a North Idaho winter |
| Dust & air | Central dust collection with blast gates, a shop vac, and ventilation to clear fine dust and finish fumes |
Power is the line most home shops underbuild, and it is the hardest thing to add later, so plan it generously up front. A table saw, a dust collector, a planer, and a compressor can all want to run together, and a single 120V circuit will trip and stall. Plan a small subpanel fed from the house with several 120V circuits for bench outlets and lighting, plus at least one 240V circuit for a cabinet saw, a dust collector, or a future jointer or welder. Space outlets every few feet along the bench wall at counter height so you never run an extension cord across the floor, and add a switched outlet near the door for the dust collector. This kind of dedicated subpanel-and-240V wiring is exactly what a true shop build is meant to support, and it is far cheaper to rough in now than to add once the walls are insulated and lined.
Lighting and heat decide whether the shop gets used in January. Layer bright, even LED light over the whole floor so there are no shadows on the saw, then add focused task light directly over the bench, the drill press, and the lathe. Insulate the walls and ceiling and add a heat source — a mini-split, an electric or gas heater, or in-floor heat on a slab — because most wood glues and finishes will not cure below roughly 50 degrees, and nobody does good work with cold hands. Insulation also tames noise and keeps the morning chill off your stationary tools so they are ready when you are.
A workshop is heavy, and it earns a real floor. A compacted gravel pad drains well and works for a lighter shop, but most serious shops want a concrete slab — it carries the weight of stationary tools, gives a dead-flat surface for rolling assembly tables, and takes anchor bolts for a table saw or a dust collector. Plan the approach so a sheet of plywood or a 600-pound saw can come straight off the truck and through the doors without a muddy uphill fight. Read how to prep a shed site before delivery day so the pad, drainage, and access are ready.
North Idaho winters drive several choices: a roof and anchoring rated for local snow load, insulation that keeps the shop workable through a long freeze, and a clear, plowed path so the doors open after a storm. Workshops also tend toward the larger footprints and added power that can trigger local rules — many small sheds skip a permit, but bigger buildings, electrical work, and setback or HOA requirements often do not. Confirm what your town and county require on the service areas pages, and factor any electrical permit into the plan before you finalize the size and where the shop will sit.
Plan more than you think. Run a small subpanel from the house with several 120V circuits so bench outlets and lighting are on separate breakers from the machines. Add at least one 240V circuit for a cabinet table saw, a larger dust collector, a jointer or planer, or a welder, since those trip a 120V circuit constantly. Detached-building wiring usually needs a permit, so plan it before the walls close up.
Yes, if you cut wood regularly. The fine sawdust you cannot see hangs in the air and coats every surface and your lungs. A central dust collector or cyclone plumbed to the table saw, planer, and miter saw with blast gates captures the bulk at the source, while a shop vac handles the bench. Plan the ducting and a dedicated circuit early rather than retrofitting around finished walls.
Insulate and heat it if you want to use it year-round, which is most of the point of a backyard shop. Insulated walls and ceiling hold heat, cut machine noise, and keep condensation off your cast-iron tool tops. A mini-split, an electric or gas heater, or in-floor heat on a slab all work — size it to hold the shop above about 50 degrees, since most wood glues and finishes will not cure colder than that.
Taller than a basic storage shed. Aim for sidewalls around 8 feet or more so you can stand a 4x8 sheet of plywood on end, run full-height wall cabinets, and clear the dust hood over a table saw. A lofted or gambrel roof adds an overhead loft for clamps, jigs, and seasonal stock. If you break down full sheets inside or handle long lumber, prioritize wall height and volume over a few extra feet of floor.
You can do a lot with the build. Insulated walls and ceiling are the biggest help — the same insulation that keeps the shop warm also deadens the whine of a saw and the roar of a dust collector. Solid-core doors and good weatherstripping seal the gaps that leak sound, and placing the loudest machines against an interior wall or in a closeted bay keeps the worst inside. It will not be silent, but it stays neighborly.
Lay it out so material moves in a straight line, and protect the table saw's space first. Run the workbench along one long wall with outlets at counter height, and center the machine zone on the saw with clear outfeed behind the blade and rip-fence room to the side. Keep the lumber rack and plywood cart near the doors so stock goes straight to the saw, and leave the floor's center open for a mobile assembly table.
A workshop that runs year-round in North Idaho needs more than a large footprint — it needs walls that can hold heat when it's single digits outside and a roof that won't flex under a February snow load. A backyard workshop built on site in Coeur d'Alene or Post Falls is framed to those local conditions from the start, with wall height, insulation spec, and roof pitch chosen for how you actually plan to use the building through all four seasons.
Electrical planning done during framing is where on-site construction pays off the most for workshop builds. A 240V subpanel, dedicated circuits for a table saw and dust collector, overhead drops for extension cords, and a circuit for a mini-split — all of this is straightforward when the walls are open. Retrofitting a delivered shed with serious shop power typically means tearing into finished walls or running exposed conduit around door frames.
Wall height matters more in a workshop than in most shed types. Standard 8-foot walls limit what you can do with wall-mounted storage, overhead lighting placement, and air filtration unit mounting. A crew building in place can frame at 9 or 10 feet without cost that would be prohibitive in a factory-built unit, and sloped lots in Hayden or on the wooded parcels common around Athol are navigable during on-site framing in ways they simply aren't for delivery.
Kootenai County accessory structure permits are typically required once a workshop footprint crosses certain thresholds — knowing that number before finalizing dimensions avoids a redesign. See workshop builds in our portfolio or design your shop layout now.
Tell us the machines you run and where the shop should sit, and we will help size the building, wall height, power, and site prep around your property — then you can build and price it online.
Keep planning your build with related North Idaho shed guides.