If you buy in bulk — flats of canned goods from the warehouse club, fifty-pound sacks of flour and rice, cases of pasta, buckets of wheat and beans, and a chest freezer's worth of meat and garden produce — the food quickly outgrows the pantry and the kitchen. It ends up stacked in the garage where summer heat cooks it, piled in a basement corner where damp gets at the labels, or scattered across closets where you lose track of what you have and let things expire. Worse, a garage or an open carport is an open invitation to mice, and a single chewed bucket lid or a moth infestation in the flour can cost you a whole shelf. A dedicated bulk food storage shed solves all of that at once: a dry, pest-proof, climate-stable room built to hold months of bulk groceries and home-preserved food in good condition, organized so you can actually find and rotate it.
North Idaho On Site Sheds builds every food storage building right on your property, so the shelving, the insulation, the power for freezers, and the pest sealing can be specified around exactly what your household stocks and how much of it. This guide is about the three things a food room has to get right — keeping it dry, keeping pests out, and holding a cool, stable temperature — and how to build them into a shed that protects bulk groceries, #10 cans, bucketed staples, and a freezer full of meat through a North Idaho year. We will cover which roofline suits a pantry building, what footprint matches how much you store, how to lay out the interior in zones, how to fit it with shelving sized for buckets and cans, how to wire it for freezers, and how to keep the building cool, sealed, and rodent-tight. If you also can and preserve, you will see where this overlaps with a canning kitchen shed and a root cellar shed.

A dry, pest-proof room of its own: sealed shelving for cans and buckets, a freezer on its own circuit, and insulation that holds a cool, steady temperature.
A food storage shed is less about a fancy roofline than about wall space, insulation, and a tight, sealable shell, because the whole job is lining the walls with loaded shelving and holding a steady, cool temperature inside a building mice cannot get into. That makes the standard gable the natural starting point: the straight sidewalls take floor-to-ceiling shelving on every run, the peaked roof gives you headroom to stack the top shelf, and a simple, well-built box is easy to insulate and seal tight against pests and drafts. Order taller sidewalls so you get a full extra shelf of height for lightweight cases and empty buckets up top, and keep the window count low — a food room wants cool and dark more than it wants daylight, and every window is one more thing to insulate and seal. A lofted barn (gambrel) raises the center and adds a loft, which is a smart spot for the lightweight overflow — paper goods, empty jars, off-season canning equipment — while the climate-stable floor space stays clear for the food that needs the cool.
If you want a square, walk-the-aisles pantry with shelving down both long walls and a freezer bank at the end, a stick-built shop style gives you straight walls to the eave with no slope cutting into the top shelf, which maximizes usable shelving. A lean-to or modern single-slope sheds North Idaho snow predictably to one side and tucks neatly against a house or garage, which can help you reach a power feed for the freezers and keep the building shaded and cooler. Whatever the roofline, the parts to spec up are insulation, sealing, and power: a bulk food shed has to hold a cool, even temperature, lock pests out completely, and run freezers reliably, which is more than a plain storage box is built to do. A food storage shed sits right next to a root cellar shed when you also want a cold, humid spot for fresh roots and squash, and it shares a wall's worth of needs with a canning kitchen shed the moment you start putting up your own jars and need somewhere to store them.
An 8x10 lines three walls with shelving for canned goods, bucketed staples, and #10 cans, with room for a chest freezer and a clear lane to load and rotate stock.
An 8x12 or 10x12 adds aisle space, a second freezer, and a packing bench, so a family can store months of bulk groceries and home-preserved food and still walk the shelves.
A 10x16 holds a year of staples, multiple freezers, a full canning-jar wall, and a repack station — a true pantry building you walk into and work in.
Footprint here is about how much food you keep ahead and how much of it needs a freezer, so size to your real stock level, not a single grocery run. An 8x10 is the deep-pantry starting point: line three walls with adjustable shelving for canned goods, jars, and #10 cans, stand a row of food-grade buckets along the floor, fit a chest freezer in one corner, and keep a clear lane down the middle to load and pull stock. An 8x12 adds the length for a second freezer and a small packing bench where you portion bulk buys into jars and buckets, which is the size most serious bulk-buying households land on. A 10x12 buys real aisle width so you can walk between shelving runs with a loaded tote and open a chest freezer lid all the way without shuffling, and it gives you a true walk-in pantry rather than a reach-in storage box. If you garden, hunt, raise your own meat, or simply keep a year of food ahead the way many North Idaho homesteads do, step up to a 10x16: there is room for multiple freezers, a full wall of home-canned jars, deep staple storage in buckets and cans, and a repack-and-inventory station, all in a building you walk into and actually work in. Depth and shelving height matter as much as floor area — taller walls and a longer run mean more linear feet of shelf, and the heaviest loads (cans and full buckets) belong low while light cases ride up high.
These buildings all deal with food, but they hold different food at different temperatures, and naming the lead use keeps you from a room that does several jobs poorly. A bulk food storage shed leads with shelf-stable bulk and frozen — canned and dry staples on sealed shelving, bucketed grains and beans, #10 cans, and chest freezers — in a cool, dry, dark, pest-proof room that holds a steady temperature year-round. A root cellar shed leads with fresh, raw produce: it is built cold and humid on purpose, often partly bermed or earth-banked, to hold potatoes, carrots, beets, apples, squash, onions, and cabbage through winter without freezing or sprouting. The two are close cousins and many homesteads want both, but they are tuned differently — a food storage shed stays dry, while a root cellar stays humid; a food storage shed runs freezers, while a root cellar relies on ground temperature — so if you store both bagged groceries and fresh garden roots, plan distinct zones or two buildings rather than asking one room to be both dry and damp.
If you put up your own food, the natural neighbor is a canning kitchen shed: it is built around a work surface, a heat source for the canner, a sink, and prep space for processing the harvest into jars — the place food gets preserved, where a bulk food shed is the place it gets stored. Many people build one efficient pair: you process tomatoes, salsa, jam, pickles, and broth in the canning kitchen, then the cooled, labeled jars move next door to the dark, stable shelving of the food storage shed. There is also real overlap with disaster readiness — a well-stocked food shed is already a deep emergency larder — so if grid-down resilience is part of your reason, look at an emergency preparedness shed, which adds stored water, fuel, medical supplies, and grab-and-go gear to the food. Decide which job leads — store bulk and frozen, cellar fresh roots, can the harvest, or prep for emergencies — and build the climate, the shelving, and the power around that first, then fit the neighboring use into the same plan.
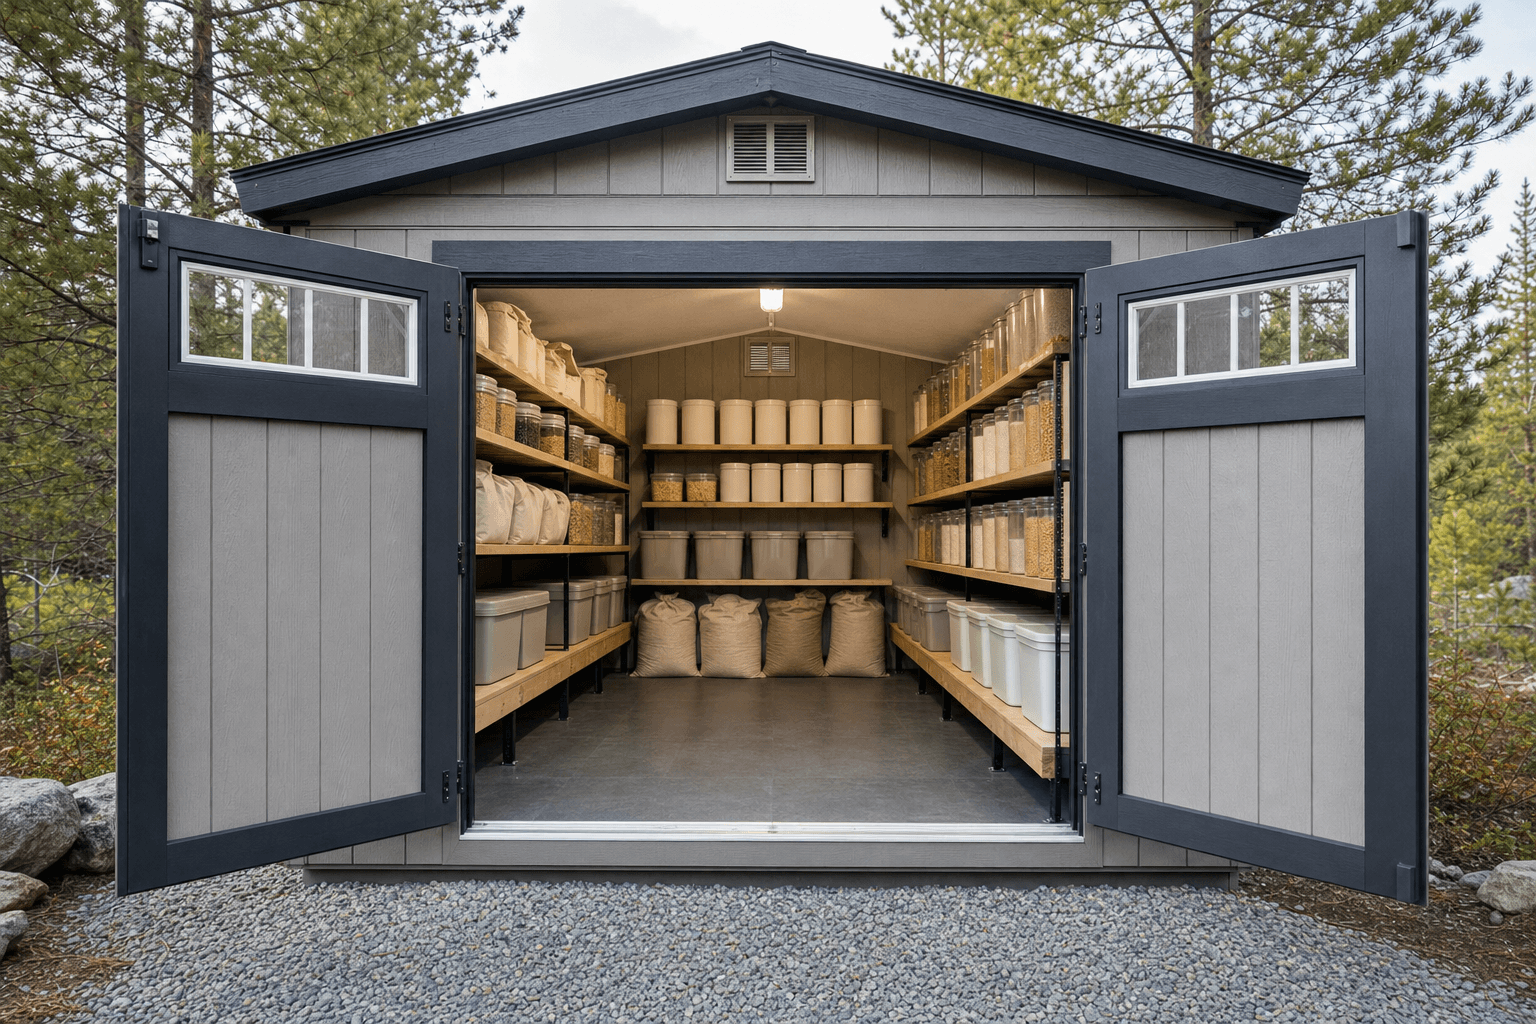
Zone it: sealed adjustable shelving for cans and jars, buckets of staples low and on pallets, a freezer bank on its own circuit, and a packing bench.
Think of a food storage shed as a working pantry laid out by how food moves through it — bulk comes in, gets repacked, gets shelved, gets rotated out — and zone it so newest stock goes in at the back and oldest comes off the front. A dry-goods shelving zone anchors the long walls with adjustable steel or sealed wood shelving for canned goods, jars, boxed and bagged staples, and stacked #10 cans, with the heavy cans and full jars on the lower, sturdier shelves and light cases of paper goods or cereal up top. A bucket-and-bulk zone sits low along the floor or on a short pallet base, where food-grade buckets of wheat, rice, beans, sugar, flour, and oats line up off the concrete and out of the reach of any moisture wicking up from below. A freezer zone takes one wall or a corner near the power feed, with chest or upright freezers spaced for lids and doors to open fully and for air to circulate around the coils. And a packing-and-inventory zone centers on a bench where you portion a fifty-pound sack into buckets, seal jars, label and date everything, and keep the inventory list or whiteboard.
Good zoning is what makes rotation actually happen instead of being a good intention — load new stock from the back or one side and pull from the front, so nothing migrates to a dark corner and expires unseen. Keep a clear central lane wide enough to carry a loaded tote and open a freezer lid without moving anything, and put the heaviest, most-used items at waist height where you reach them most. Group the shelving by category and keep like with like — all the canned vegetables together, all the baking staples together, all the #10 cans of long-term storage in their own block — so a glance tells you what is running low. Set the packing bench near the door so a cartload of warehouse-club flats lands on it for sorting before anything gets shelved, and keep a step stool for the top shelf and a hand truck for the buckets right where the heavy work happens. A room laid out in clear zones is one you can inventory at a glance and rotate without thinking about it.
Rated steel or sealed wood shelving deep enough for #10 cans and quart jars, with adjustable shelves so you can size each bay to canned goods low and light cases high, all loaded to rotate front to back.
Stackable food-grade buckets with gasketed or gamma-seal lids for wheat, rice, beans, flour, sugar, and oats, set on a short pallet base or low shelf so moisture from the slab never reaches the bottom layer.
Chest or upright freezers placed near the power feed on their own circuits, spaced for full lid and door swing and airflow around the coils, so meat, garden produce, and bulk frozen goods stay solidly frozen.
A sturdy bench for portioning bulk sacks into buckets and jars, with an oxygen-absorber and lid-sealing setup, a label-and-date system, and a running inventory whiteboard so first-in really comes out first.
This is where a cool, sealed shell becomes a real pantry, and it is worth naming exactly what goes in it so you size the shelving, the bucket base, and the power around it. The dry bulk staples are the backbone: food-grade buckets of hard and soft wheat, white and brown rice, rolled and quick oats, pinto and black beans, lentils, sugar, salt, and all-purpose and bread flour, most of them packed with Mylar liners and oxygen absorbers for the long haul and sealed with gasketed or gamma-seal lids. Alongside them sit the #10 cans — the big institutional cans of dehydrated and freeze-dried vegetables, fruit, milk, eggs, and ready meals that stack neatly on deep shelving and store for years. Then comes the everyday canned and boxed stock you buy by the flat at the warehouse club: canned vegetables, beans, tomatoes, soups, broth, tuna and chicken, pasta and pasta sauce, peanut butter, oil, and condiments, plus the home-canned jars of your own tomatoes, salsa, jam, pickles, and broth lining a wall of their own.
Around the shelf-stable food, you plan the cold and the gear. The freezers hold the bulk meat — a quarter or half beef, a hog, wild game from the season, whole chickens — plus garden produce you blanched and froze, berries, butter, bread, and big-batch meals. The packing and preservation gear earns the bench: empty buckets and lids, Mylar bags and oxygen absorbers, a bag sealer, canning jars and lids, a canning kitchen overflow of equipment, a vacuum sealer and rolls, a scale for portioning, and a marker and labels for dating every container. Round it out with the organization layer — a printed or whiteboard inventory, a rotation system that tracks what to use next, a step stool, a hand truck for the buckets, and a few totes for odd lots — and the small consumables like extra lids, gaskets, and absorbers you would hate to run out of mid-repack. That full fit-out is what turns a storage shed into the room your household eats out of all year.
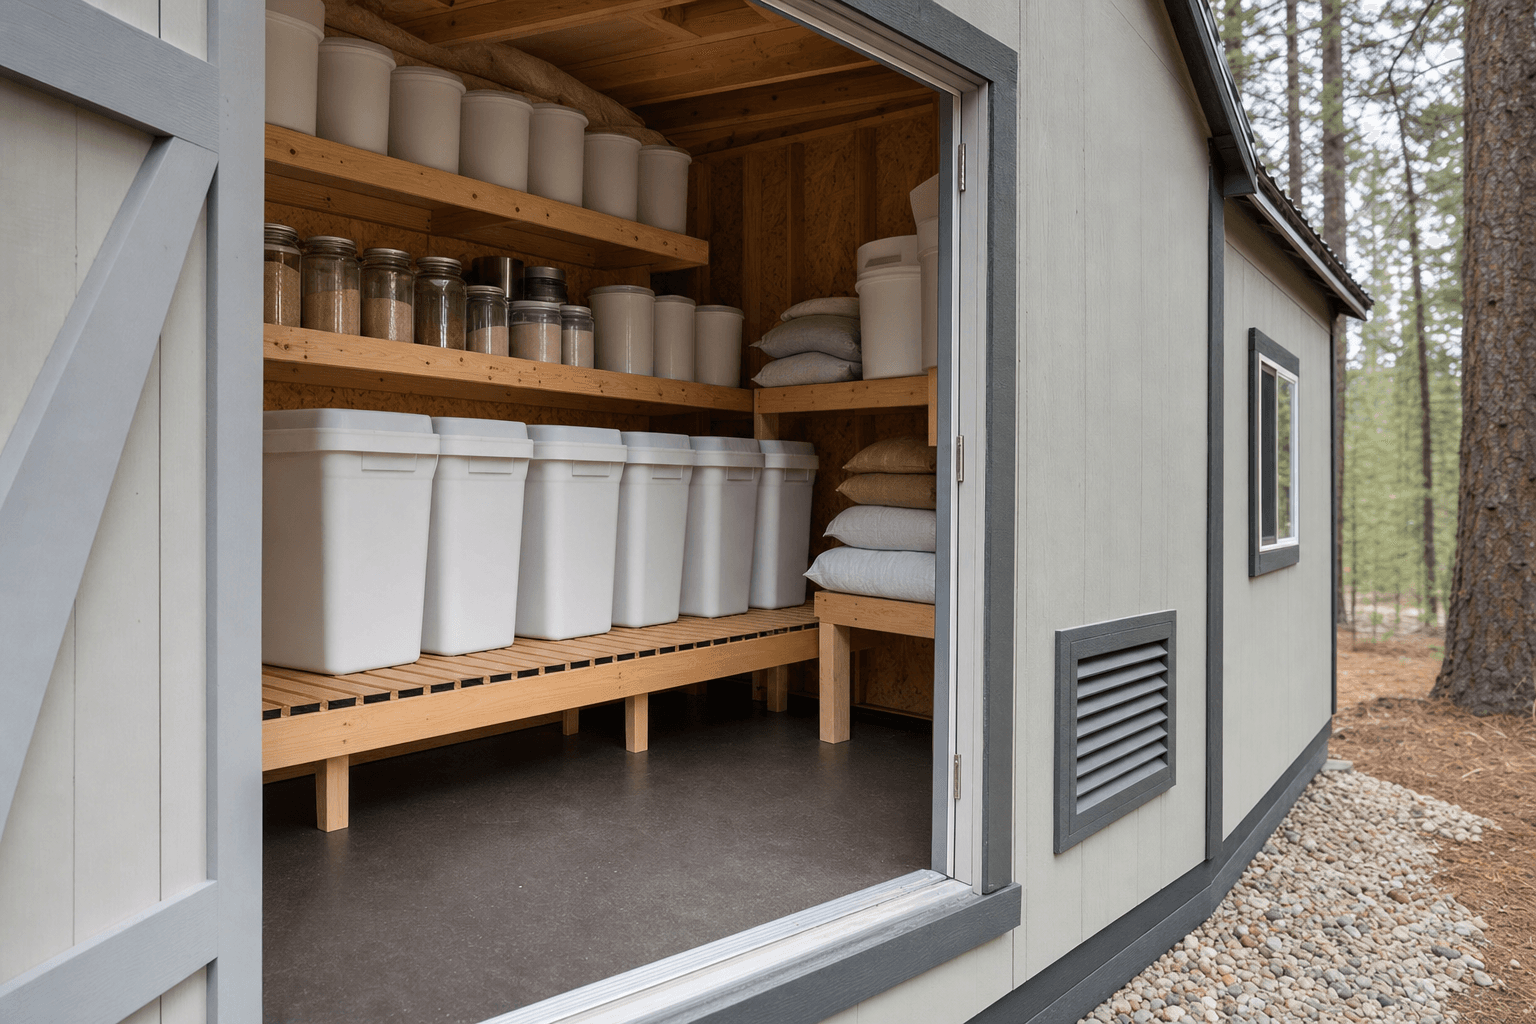
Gasketed bucket lids and labeled #10 cans on sealed shelving — the detail that keeps staples airtight, pest-proof, and rotating in date order.
| Bulk food storage shed planning checklist | |
|---|---|
| Cool, stable temperature | Insulated walls and roof, low window count, and a shaded or north-facing placement so the room stays cool and even rather than swinging with North Idaho summer heat and winter freeze |
| Dry interior | A sealed, well-drained floor, a vapor barrier, and enough ventilation to keep humidity down so cans do not rust, labels do not peel, and dry staples do not draw moisture |
| Pest and rodent proofing | A tight, sealed shell with rodent-proof flashing, sealed gaps and utility penetrations, fine screening on every vent, and food kept in gasketed buckets and hard containers off the floor |
| Shelving for buckets and cans | Heavy-duty adjustable shelving rated for the weight of canned goods and #10 cans, with a low pallet base for food-grade buckets so the heaviest stock loads low and stays off the slab |
| Freezer power | Dedicated 120V circuits sized for one or more freezers running continuously, placed near the units with no reliance on a single shared outlet that a full freezer bank would overload |
| Rotation & inventory | A first-in, first-out layout loaded back to front, a label-and-date system on every container, and a running inventory so stock gets used in order and nothing expires unseen |
A bulk food shed that runs freezers is an electrical building first, so plan the power before anything else, because a freezer bank that trips a breaker or loses power can spoil a season of meat. Run a proper circuit from the house and plan dedicated 120V outlets sized for the freezers you actually run — a single chest freezer is modest, but two or three uprights and chests running together want their own circuits, not one shared outlet feeding a daisy chain of power strips. Place the freezer outlets right where the units sit along one wall so no cord stretches across the room, leave space around each freezer for airflow over the coils, and if a power outage would put a lot of meat at risk, plan for a backup — a spot to wheel in a generator and a transfer setup, or an alarm that warns you when a freezer warms. Add good, even LED light over the shelving and the packing bench so you can read labels and dates and inventory the room after dark, since a food room with low windows is dim by design.
North Idaho's swing from hot summers to hard winters is exactly what a food room is built to ride out, and insulation is what makes that possible. Summer heat in an uninsulated shed cooks canned goods, shortens the shelf life of everything, and forces the freezers to work overtime; hard winter cold can freeze and burst home-canned jars, split bottled liquids, and crack the seal on stored water. Insulate the walls and roof well, keep the window count and size down, and place or shade the building so it stays cool and even — a steady cool temperature is the single biggest factor in how long bulk food lasts. Protect anything that freezes and bursts: store home-canned jars and any liquids where the room stays above freezing, or plan a small heat source to hold the room just above the freeze line through a cold snap. Keep a plowed path to the door so the pantry stays reachable after a storm, and run the freezers on a thermostatted, alarmed setup so a warming unit gets your attention before the food is lost. A well-insulated, well-powered room is one where bulk food and a full freezer ride out both the August heat and the January freeze in good shape.
A food storage shed earns a proper base, and because it carries a lot of concentrated weight — full shelving, stacked cans, buckets of grain, and loaded freezers — and has to stay dry and rodent-tight, the foundation matters more than it does under a light garden shed. A compacted gravel pad drains well and keeps a framed floor dry from below, but for a heavy, walk-in pantry many buyers step up to a concrete slab: it gives a dead-flat, sealable, washable floor, takes the weight of loaded shelving and freezers without flex, and leaves no gap underneath for rodents to nest. Whichever you choose, seal the floor and add a vapor barrier so moisture from the ground never wicks up into the bottom layer of buckets and cans, and grade the pad so rain and snowmelt drain away from the building rather than pooling at the threshold where it would invite damp and pests. Set the shed in a shaded or north-facing spot if you can, since shade keeps the room naturally cooler, and place it a short, easy carry from where you unload groceries. Read how to prep a shed site before delivery so the pad, the drainage, and the access are squared away first.
North Idaho's four seasons drive the rest of the spec, and pest pressure drives the detailing. Plan a roof and anchoring rated for local snow load, and seal the building tight against the cold so it holds an even temperature through winter and does not draw condensation. Detail the shell to be rodent-proof from the start — mice are relentless around stored food, and a single gap at the base, an unscreened vent, or an unsealed utility penetration is all they need — so plan tight construction, metal flashing or hardware cloth at the base, fine screening on every vent, and sealed gaps around wiring and any plumbing. Keep the surrounding ground clear and the gravel approach plowed so the pantry stays usable after a storm and gives rodents no brush or woodpile to nest against the wall. Most small sheds skip a building permit, but a slab, the added electrical for freezers, and setback or HOA rules can apply — confirm what your town and county require on the service areas pages, and factor any electrical or foundation permit into the plan before you finalize the size and where the shed will sit.
Cool, dry, and dark are the three conditions that decide how long bulk food lasts, and you build all three into the shell. Cool comes from insulation and placement: insulate the walls and roof so the room holds an even temperature, and set the building in a shaded or north-facing spot so summer sun does not heat it — a steady cool room dramatically outlasts a shed that bakes in August and freezes in January, because heat is what degrades canned and dry food fastest. Dry comes from a sealed, well-drained floor, a vapor barrier under the slab, and enough ventilation to keep humidity down so cans do not rust, labels do not peel off, and dry staples do not draw moisture and clump. Dark comes from keeping the window count and size low and using LED light only when you are in the room, because light and especially direct sun break down oils, vitamins, and color in stored food over time. Building on-site lets you spec the insulation, the floor sealing, and the window placement for a cool, dry, dark room from the start rather than retrofitting a bright, uninsulated box.
Treat pest-proofing as two layers: keep them out of the building, and keep them out of the food even if one gets in. Start with the shell, because mice are relentless around stored food and need only a gap the width of a pencil. Build tight, seal every gap at the base of the walls, add metal flashing or hardware cloth where the wall meets the foundation so nothing can chew or burrow in, screen every vent with fine mesh, and seal around every wiring and plumbing penetration. A concrete slab helps because it leaves no crawl space underneath to nest in. Then protect the food itself: store dry staples in gasketed food-grade buckets, gamma-seal lids, and hard containers rather than bags a mouse or a moth can chew through, keep buckets and cans up off the floor on a pallet base or shelving, and never leave open bags or spilled grain that draws pests in. Keep the surrounding ground clear of brush and woodpiles so rodents have no cover against the wall, and check the room regularly. A tight shell plus hard, sealed containers is what keeps a year of food from feeding the mice instead of your family.
Match the shelving to the weight and shape of what you store, because canned goods, full jars, and bucketed grain are heavy and unforgiving of flimsy shelves. Use heavy-duty adjustable shelving — rated steel or sturdy sealed wood — and load it with the weight low: stacked #10 cans, canned vegetables, and full quart jars on the lower, strongest shelves, and light cases of paper goods, cereal, or empty jars up top. Make the shelves adjustable so you can size each bay to the can or jar height and not waste a third of every shelf as dead air, and make them deep enough to hold a #10 can or two rows of pint jars without overhanging. Food-grade buckets are heavy and better off the shelf entirely: line them up on a short pallet base or a low, reinforced bottom shelf so they sit off the slab — keeping moisture away from the bottom layer — and so you are not lifting a full forty-pound bucket of wheat down from height. Leave the shelving open at the back or one side so you can load new stock behind the old and pull from the front to rotate. Sizing the shelving to your real container mix is one of the best reasons to build the room on-site.
Plan the electrical around the freezers running continuously, because a freezer is not an occasional load — it cycles all day, every day, and a bank of them adds up fast. Run a proper circuit from the house and give the freezers dedicated 120V outlets sized for how many you run; a single chest freezer is a modest draw, but two or three chests and uprights running together should not share one outlet through a tangle of power strips, which is how breakers trip and a freezer quietly thaws. Place the outlets right where the freezers sit along one wall so no cord stretches across the room, and leave space around each unit for air to move over the coils, since a freezer crammed against a wall or another unit runs hot and works harder. Because a power outage can put a lot of meat at risk, plan a backup if your stock justifies it — a way to wheel in and connect a generator, or a temperature alarm that warns you when a freezer warms up — and keep the room insulated so the freezers are not also fighting summer heat. Spec the freezer circuits up front so the room can run a full bank reliably from day one.
The goal is first-in, first-out — the oldest food gets used first — and you make that automatic with layout and labeling rather than willpower. Lay the shelving out so you load new stock from the back or one side and pull from the front, so cans and jars physically move toward you as they age and nothing migrates to a dark corner to expire unseen; can rotators and gravity-fed shelves do this for you, but even plain shelves work if you commit to loading behind and pulling in front. Label and date every container the day it goes in — the purchase or pack date on every bucket, jar, and case — so you can see at a glance what is oldest. Keep a running inventory on a whiteboard or a printed sheet by the door that tracks what you have and what is running low, and update it as you add and pull. Group like with like so a glance tells you the count, and shop your own shelves first. A packing bench with a label maker, a marker, and the inventory list right where you repack bulk buys is what turns rotation from a chore into the natural way the room works.
Insulation is what lets a food room ride out the swing from hot summers to hard winters, and it pays off in shelf life and freezer efficiency both. Insulate the walls and the roof well — the roof especially, since summer heat builds at the top of the room — so the building holds a cool, even temperature instead of tracking the outdoor swing; every degree cooler and steadier meaningfully extends how long canned and dry food lasts. Keep the window count and size low, because windows are weak points for both heat gain and heat loss, and add a vapor barrier so the insulation does not trap condensation against a cold shell. Pair the insulation with placement: a shaded or north-facing spot stays naturally cooler in summer, which does half the work for you. For winter, the same insulation keeps the room from freezing as hard, but if you store home-canned jars, bottled liquids, or water that will burst when frozen, plan a small heat source — a thermostatted electric heater is enough — to hold the room just above the freeze line through a cold snap. The combination of a well-insulated, sealed, shaded shell and a little winter heat is what keeps both your shelf-stable food and your freezers in good shape through a full North Idaho year.
Temperature stability is the real design challenge for a bulk food storage shed. Dried goods, #10 cans, and sealed buckets all store best in the 50–70°F range — and North Idaho's climate swings hard enough in both directions to threaten that window without the right envelope. A shed built on site can be insulated to a spec that keeps interior temps stable year-round rather than tracking outdoor extremes, which is what a delivered, uninsulated box will do by January in Coeur d'Alene or Post Falls.
Pest exclusion starts at framing. Rodents enter through gaps that look negligible — around utility penetrations, at the sill plate, at threshold transitions. Because an on-site build is framed and sealed in place, those details get addressed during construction when sealing them is straightforward. Retrofitting a delivered structure against mice and voles typically means finding entry points after the fact.
Shelving loads matter more than people expect. A full run of 5-gallon buckets or case-stacked #10 cans is dense. Wall-mounted shelving in a storage shed built on site can be anchored to actual framing members at the correct spacing — not floating on thin wall panels. If you're adding a chest freezer or two, the subfloor spec needs to account for that concentrated weight at the outset.
Sandpoint and Bonners Ferry properties at higher elevation see colder average lows, which adds insulation value but also means any unheated shed can dip below freezing in January. A simple low-wattage thermostat-controlled heater keeps the floor zone above freezing with minimal operating cost when the building envelope is properly sealed. Design the layout in our shed builder or get a free estimate for your lot.
Tell us what you stock — bucketed staples, #10 cans, flats of canned goods, and a freezer or two of meat and produce — and how much, and we will help spec the shelving, the insulation, the freezer power, and the pest-proofing around your property, then you can build and price it online.
Keep planning your build with related North Idaho shed guides.