If you keep a boat on Coeur d'Alene Lake, Hayden, Pend Oreille, or Spirit Lake, you already know the boat is the easy part to store — the mountain of gear that goes with it is what takes over the garage. Life jackets for the whole family, two or three tow ropes, a wakeboard and a slalom ski, a couple of tubes, an anchor and rode, fenders and dock lines, coolers, dry bags, and a heap of wet towels and swimsuits after every outing. A dedicated boat gear shed gets all of it out of the house and off the garage floor, close to where you load the truck or hitch the trailer, so a day on the water starts with grabbing organized gear instead of digging through bins. This guide is about storing the gear, not the boat itself — the racks, hooks, bins, and drying space that keep a season's worth of water-sports kit dry, sorted, and ready to go.
North Idaho On Site Sheds builds every lake gear shed right on your property, so the wall layout, the rack heights, and the drying zone can be specified for your actual gear and your launch routine rather than a generic storage box. Start by laying out what you own — count the life jackets, measure the longest board or ski, and be honest about how many tubes and ropes really come back wet every trip. Then plan the walls, the floor, and a drying corner around storing and drying all of it at once. We will cover which roofline gives you the height for long boards and hanging gear, what footprint fits a family's water-sports kit, how to zone the interior, and how to keep everything mildew-free through a long North Idaho off-season.
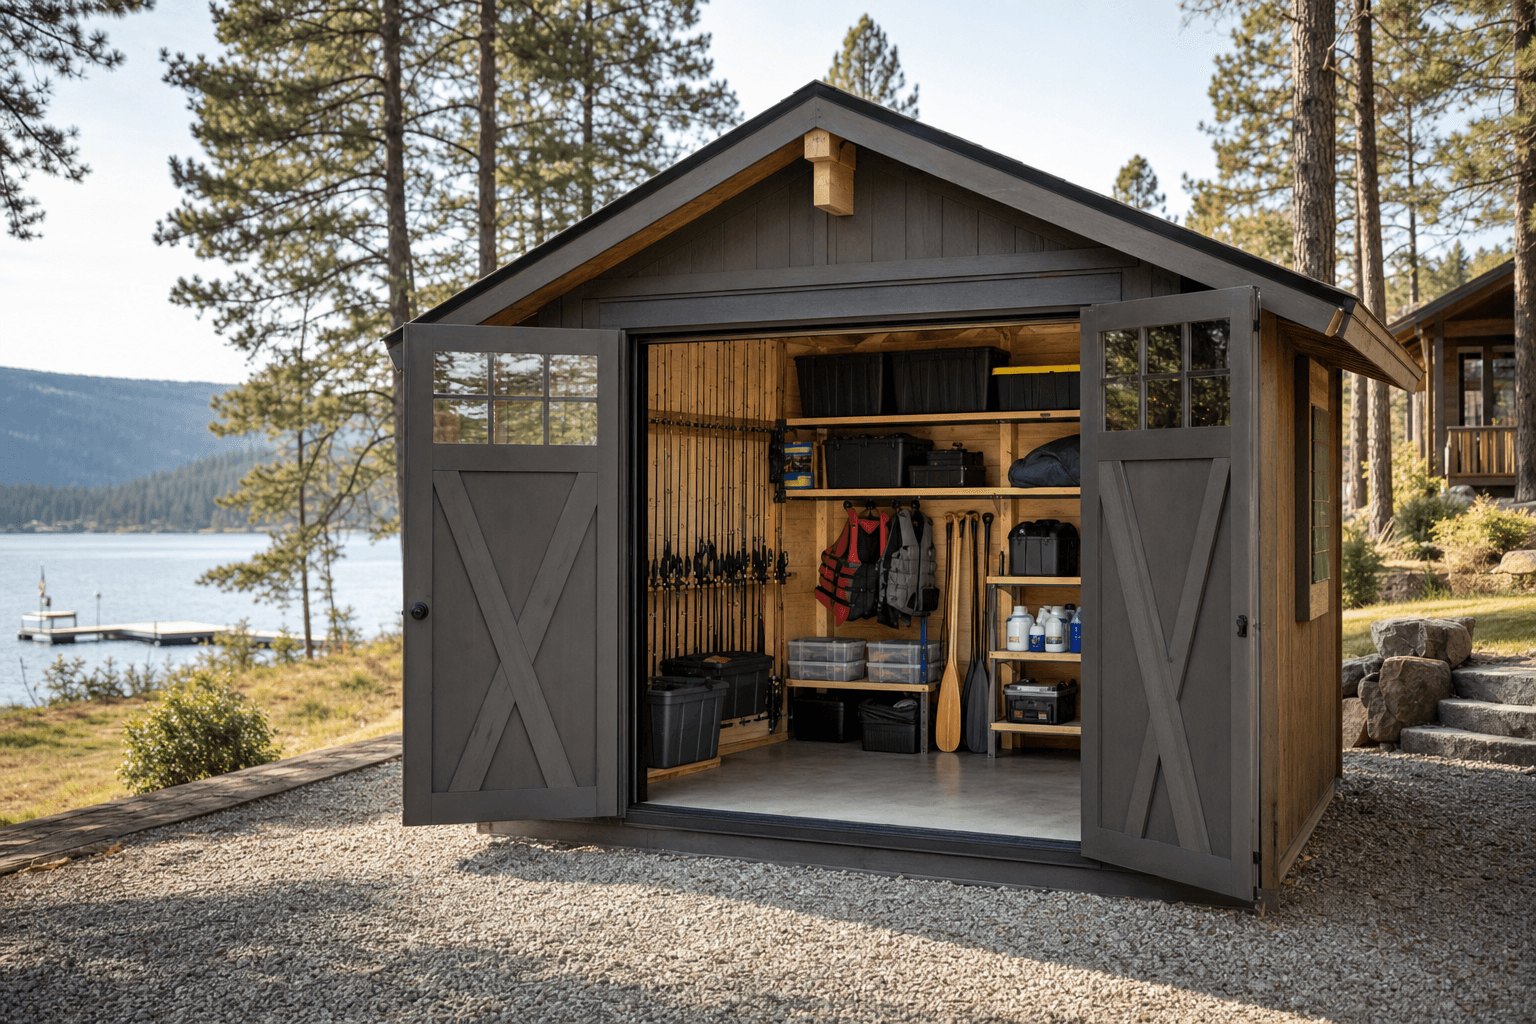
Get the lake kit out of the house: wall racks and hooks hold life jackets, ropes, and boards so a day on the water starts with grabbing organized gear.
A boat gear shed asks two things of its shell: clean, tall walls you can fill with racks and hooks, and enough length to stand a wakeboard or a slalom ski on end without it touching the roof. That makes the standard gable the honest starting point — it gives the most usable wall height for the money, lines easily with plywood you can screw a rack into anywhere, and leaves open sidewalls for vertical board racks and rows of life-jacket hooks. The number that matters most is sidewall height: taller walls let a 5- to 6-foot wakeboard or a long ski hang or stand vertically with room to spare, and they let you run a high shelf for coolers and dry bags above the hanging gear. A lofted barn (gambrel) raises the center ridge and adds a small loft that is perfect for the off-season overflow — extra tubes deflated and folded, a spare anchor, last year's life jackets the kids outgrew — while keeping the floor open for the gear you grab every weekend.
If your gear list leans long and bulky — multiple boards, a stack of tubes, paddles — a stick-built shop style with tall, square walls gives you full-height runs for vertical racks without the roof slope eating into the storage. A lean-to or modern single-slope sheds North Idaho snow predictably to one side and gives you one tall front wall to fill with hooks and a window. Whatever the roofline, the walls and the door are the parts to spec up: plywood-lined walls hold racks and hooks anywhere, and a wide door lets you carry a board or a loaded cooler straight in. A boat gear shed sits right next to a kayak and paddleboard shed when paddle craft join the fleet, and it shares its drying needs with a gear drying shed the moment wet wetsuits and towels become half of what you store.
An 8x12 holds life jackets, a couple of ropes, an anchor and fenders, a few tubes, and coolers, with a small bench and a drying corner by the door.
A 10x12 or 10x16 racks boards and skis vertically, hangs every life jacket and rope, stores tubes and coolers, and keeps a real drying zone.
A 12x16 fits multiple boards, a wall of life jackets, tubes and ropes, coolers and dry bags, plus a dedicated rinse, drying, and prep corner.
Footprint decides whether the shed feels like an organized gear room or an overstuffed closet, so compare the real dimensions before you commit — a couple of feet is the difference between sliding a board onto its rack and wrestling it past a stack of tubes. An 8x12 holds the essentials for a small boat — life jackets on a wall, a couple of ropes, an anchor and fenders, a few tubes, and coolers — with room for a small bench and a drying corner. A 10x12 opens up a second wall so you can rack boards and skis vertically and still hang every life jacket and tow rope where you can see it. A 10x16 gives you the length to line one whole wall with vertical board racks and tube storage while keeping an open lane to carry gear in and out. The extra length on a 16-foot building lets you keep boards on the wall, bins along the back, and a drop zone by the door without anything overlapping. If you want the full kit, a wall of life jackets, multiple boards, and a dedicated rinse-and-dry station all set up at once, step up to a 12x16 so the floor stays clear with everything in place. Length matters as much as width here — a long, narrow building lets a 6-foot board stand on end and a slalom ski lie flat without crowding the walkway.
These lake sheds overlap, and the right call comes down to what you store most. A boat gear shed leads with the support kit for a powerboat day — life jackets, tow ropes, towables, anchors, fenders, dock lines, coolers, and the wet gear that comes home after — organized on racks, hooks, and bins, with a drying zone built in. A kayak and paddleboard shed changes the build the moment you own paddle craft: long, low cradles or vertical racks for hulls that can run 10 to 14 feet, paddle hooks, and wide-door access to slide a kayak straight in. If your gear is mixed — a ski boat plus a couple of paddleboards — decide which takes the most room and build around it first, then fit the other in; a board rack and a hull cradle want different walls, and planning both up front keeps either one from getting shortchanged.
The other natural neighbor is fishing gear. If you run lines off the boat and the rods, reels, and tackle pile up alongside the water-sports kit, a fishing tackle shed is built around vertical rod racks, tackle-box shelving, and a workbench for rigging — a different storage problem than tubes and tow ropes, but one that fits naturally in the same building. And because almost everything that comes off the lake comes home wet, a boat gear shed shares its core need with a gear drying shed: heat, airflow, and hanging space so wetsuits, towels, ropes, and life jackets dry instead of going moldy in a bin. Naming the lead use up front keeps you from a building that stores boards poorly and dries gear poorly both — and it locks in your rack layout, your door size, and your ventilation before the framing is ordered.
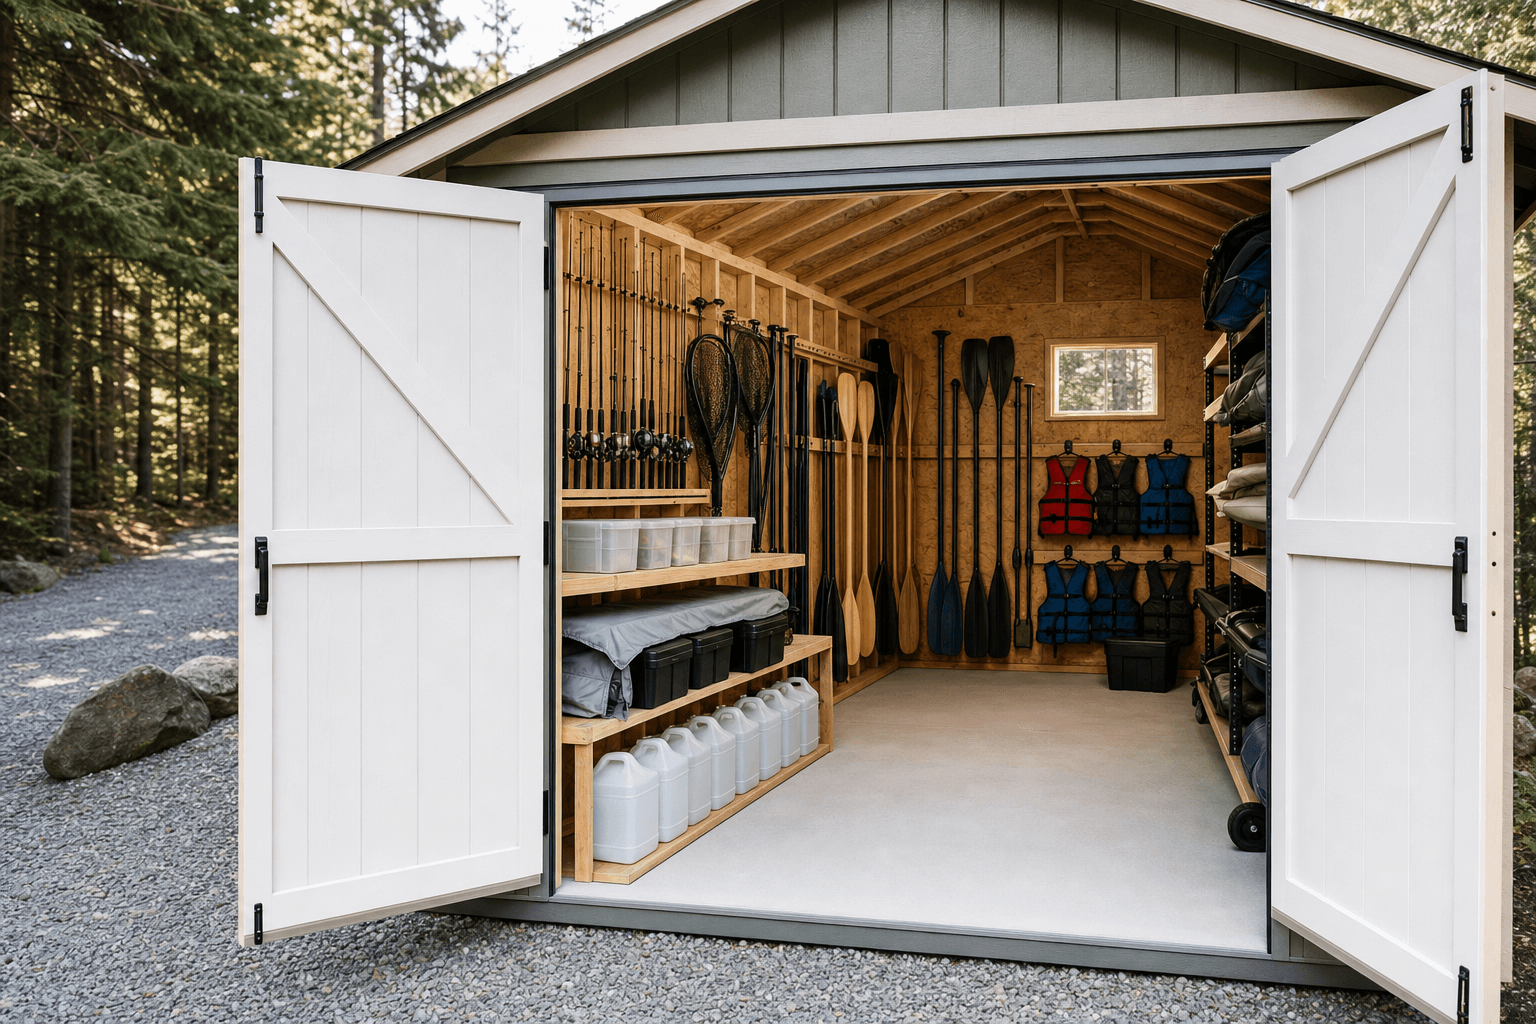
Zone the shed: a board-and-ski wall, a life-jacket and rope wall, bins for tubes and coolers, and a drying-and-rinse corner by the door.
Think of a boat gear shed as four working zones instead of one open box, and lay them out so nothing has to move when you grab a life jacket or load the cooler. A board-and-ski zone anchors on one tall, plywood-lined wall, with vertical racks or padded hooks for wakeboards, skis, and kneeboards spaced so fins and edges clear each other — this is the wall that needs the most height, so protect it first. A life-jacket and rope zone hangs every PFD on labeled hooks or a rod so they air out and you can count them at a glance, with a reel rack or rope hangers above for tow ropes, the ski line, and dock lines coiled and out of the way. A bin-and-cooler zone uses sturdy shelving and labeled totes for deflated tubes, fenders, the anchor and rode, dry bags, sunscreen, and the small stuff, with the heavy coolers on a low shelf you can lift them onto. A drying-and-rinse zone sits by the door, where wetsuits, towels, swimsuits, and life jackets hang and drip without soaking the rest of the floor.
Good zoning means you never have to take a board down to reach a rope, and you never trip over a cooler to get to the life jackets. Put the drying zone nearest the door so wet, dripping gear stays by the entrance instead of tracking water across the storage. Hang the life jackets and ropes you grab first at an easy reach, and put the off-season overflow — deflated tubes, spare lines, last year's gear — up high or in the loft. Keep a clear lane down the middle, at least a board length plus a couple of feet, so carrying a long board or a loaded cooler in and out never means rearranging everything else. If you load a trailer or a truck for each trip, set the most-grabbed gear closest to the door so the staging happens in one quick pass.
Padded vertical racks or wall hooks for wakeboards, skis, and kneeboards screwed into plywood-lined framing, spaced so fins and edges clear each other, plus a high shelf for coolers, dry bags, and seasonal overflow.
A row of labeled hooks or a hanging rod so every PFD dries and is easy to count, with reel-style hangers or wall hooks above for tow ropes, the ski line, dock lines, and fenders coiled clear of the floor.
Heavy-duty shelving and clear, labeled totes for deflated tubes, the anchor and rode, dry bags, sunscreen and small gear, with a vented or open design so nothing seals up damp.
Hooks and a drying rack by the door for wetsuits, towels, and swimsuits, a boot tray or a drip mat, good airflow, and a heat source so wet kit dries overnight instead of staying damp and musty.
This is where a bare shell becomes a real gear room, and it is worth naming exactly what lives inside so you size the walls, the shelving, and the drying space around it. The board and watercraft storage comes first: padded vertical racks or wide wall hooks for a wakeboard, a slalom and a combo ski, a kneeboard and a wakesurf board, plus a folding rack or a high shelf for the boards you use least. The life-jacket and tow-gear wall is the heart of the everyday kit — a row of labeled hooks or a hanging rod for every PFD so they air out and you can grab the right size fast, with reel hangers or coil hooks above for tow ropes, the slalom line, a tube rope, dock lines, and fenders. Underneath goes the bin-and-shelf storage: heavy-duty shelving with clear, labeled totes for deflated and folded tubes, the anchor and rode, throw cushions, dry bags, sunscreen and goggles, and a bin for the wet stuff that has not dried yet.
Around the racks you fit out for the season's small gear and the wet-down: a shelf for two or three coolers with the heaviest at liftable height, a bin for swim toys and the kids' floats, a hook for the boat ladder and a wall spot for the bumpers and the boat hook, and a small bench for rigging a rope, pumping a tube, or charging a handheld radio. For the drying corner, add a row of hooks and a drying rack for wetsuits, rash guards, towels, and swimsuits, a boot tray for wet sandals, and a mat under it all so drips do not pool. If you also store rods and tackle, a tackle shed-style rod rack and a tackle-box shelf tuck neatly into the same building. The right racks, a real life-jacket wall, and a proper drying setup are what turn a storage shed into the lake-ready gear room you load from before every trip.

Labeled life jackets that air out, ropes coiled on hooks, and boards racked vertically — the details that keep lake gear dry and ready.
| Boat gear shed planning checklist | |
|---|---|
| Wall framing | Plywood-lined walls so vertical board racks, life-jacket hooks, rope hangers, and shelving can screw in anywhere and hold loaded gear |
| Ceiling height | Taller sidewalls so a 5-6 ft wakeboard or a long ski stands or hangs vertically with a high shelf for coolers and overflow above it |
| Door & access | A wide door so you carry a long board, a loaded cooler, or an armful of tubes straight in without turning sideways at the threshold |
| Drying zone | Hooks and a rack by the door for wetsuits, towels, and life jackets, plus a drip mat so wet gear dries without soaking the storage floor |
| Airflow & heat | A vent or fan and a heat source so wet kit dries overnight and gear does not seal up damp, mildewed, and musty through the off-season |
| Off-season storage | A loft or high shelves for deflated tubes, spare ropes, and out-of-rotation gear so the floor stays open for the kit you use every weekend |
A boat gear shed does not need a full shop's wiring, but a little power and light go a long way because half of what happens inside is sorting, drying, and staging in the early morning or after dark. Plan a couple of dedicated 120V outlets run from the house: one at the bench for an electric pump to inflate tubes, a charger for handheld radios or a fish finder, and a shop vacuum, and one for the drying zone so you can run a fan or a small heater when the gear comes home soaked. Place the outlets where the work happens — at the bench and by the drying corner — so no cord crosses the lane where you carry boards. For light, run bright, even LED fixtures across the ceiling so you can find the right life jacket and read a tote label without squinting, and add a task light at the bench for rigging a rope or working a reel.
Keeping gear mildew-free is the real job in a North Idaho lake shed, because wet gear plus a closed building equals mold and that sour, musty smell every boater knows. The fix is airflow first: a roof or gable vent and a small fan keep air moving so wetsuits, towels, and life jackets dry instead of stewing, and so condensation does not bead on the walls during a cold snap. Hang wet gear to dry rather than stuffing it damp into a sealed tote, and choose vented or open shelving and bins so nothing traps moisture against itself. Add a heat source — a small electric heater or a mini-split — sized to take the chill and damp off, which speeds drying through the cool shoulder seasons and keeps the shed from sitting cold and clammy. A vented, gently heated shed is the difference between gear that is dry and ready next weekend and a bin of life jackets that comes out mildewed in the spring.
A boat gear shed is not heavy, but it still earns a proper base. A compacted gravel pad drains well, keeps the floor dry, and works under a framed floor — which matters in a building where wet gear drips and you may rinse sandy kit by the door. Set the shed where you load the truck or hitch the trailer so staging gear for a lake day is a short carry, not a trek across the yard, and plan the approach so you can walk a long board or a loaded cooler straight in off a path. Read how to prep a shed site before delivery day so the pad, drainage, and access are squared away. Lakefront and near-lake lots can also carry shoreline setbacks and drainage rules worth checking before you pick the spot.
North Idaho winters drive the rest of the spec. The roof and anchoring need to be rated for local snow load, the building wants enough insulation and airflow to keep gear from freezing damp and musty through the off-season, and a plowed or shoveled path keeps the shed reachable after a storm so you are not postholing out to grab the dock lines in March. Plan the off-season into the layout from the start — deflated tubes, coiled spare ropes, and out-of-rotation life jackets go up high or in a loft so the working gear stays at hand. Most small gear sheds skip a permit, but bigger buildings, added electrical, and setback, shoreline, or HOA rules sometimes do not — confirm what your town and county require on the service areas pages, and factor any electrical permit in before you finalize the size and where the shed will sit.
Give life jackets and tow gear their own wall and keep it visible. Hang every PFD on a labeled hook or a hanging rod — one per jacket — so they air out fully and you can read the size at a glance instead of digging through a bin; group them by who wears them or by size so the kids' vests are together and the adult ones are together. Above the jackets, mount reel-style hangers or sturdy hooks for the tow gear: coil each tow rope, the slalom line, and the tube rope on its own hook so they never tangle, and give dock lines and fenders their own spot too. Keep this wall near the door so loading the boat is one quick pass, and you will never again leave for the lake missing a rope or a jacket.
Build a drying zone by the door, separate from the dry storage, so dripping gear stays near the entrance. Add a row of hooks and a drying rack for wetsuits, rash guards, towels, and swimsuits, plus a drip mat or tray underneath so water does not pool on the floor. Towables are the tricky part: a wet tube sealed in a tote grows mildew fast, so hang or drape tubes open to air-dry before you deflate and store them, and never pack them away damp. Make the corner actually work with airflow and heat — a vent or small fan moves the moist air out, and a small heater speeds drying through cool weather. Dry everything before it goes back on its rack or into a bin, and your gear comes out fresh next trip instead of musty.
Match the system to the shape of each item. Long, flat gear — wakeboards, skis, kneeboards — stores best on padded vertical racks or wide wall hooks on a tall, plywood-lined wall, spaced so fins and edges clear each other. Life jackets and ropes go on a wall of labeled hooks so they air out and stay visible. Bulky soft gear like deflated tubes, dry bags, throw cushions, and the small stuff lives in clear, labeled totes on heavy-duty shelving, with coolers on a low shelf you can lift them onto. Use vented or open bins rather than sealed ones so nothing traps moisture, and label everything so any family member can put gear back in the right place. The goal is a spot for every item that you can reach without moving something else.
Plan the off-season into the shed from the start so winter storage is simple. Before everything goes away for the season, make sure each piece is fully dry — deflate and fold tubes only after they have aired out, rinse and dry life jackets and ropes, and let wetsuits and towels dry completely so nothing seals up damp for months. Move the out-of-rotation gear up high or into a loft — deflated tubes, the spare anchor, coiled extra lines, and last season's outgrown vests — so the floor stays open. Keep the shed vented and gently heated through winter so the building never sits cold and clammy, which is what causes mildew and that sour smell. Come spring, the gear is dry, sorted, and ready instead of needing a weekend of airing out before the first trip.
Mildew comes from wet gear plus stagnant, closed-up air, so attack both. First, never store anything damp — hang wetsuits, towels, life jackets, and ropes to dry fully before they go into a bin or onto a rack, and air-dry tubes before deflating them. Second, keep air moving: a roof or gable vent and a small fan keep the shed from trapping moisture, and they stop condensation from beading on the walls during a cold snap. Use vented or open shelving and bins rather than sealed totes so nothing seals moisture against itself. Add a small heat source to take the damp chill off through the cool seasons, which speeds drying and keeps the building from sitting clammy. A dry, ventilated, slightly warmed shed simply does not grow the mold that ruins gear stored in a sealed, unheated box.
Size it to the gear, not the boat, since the boat lives on its trailer or at the dock. For a small boat with the essentials — life jackets, a couple of ropes, an anchor and fenders, a few tubes, and coolers — an 8x12 with a drying corner does the job. A family that wakeboards, skis, and tubes usually needs a 10x12 or 10x16 so you can rack multiple boards and skis vertically, hang every life jacket and rope, and still keep a real drying zone. If you own several boards, a wall of life jackets, a pile of tubes, and want a dedicated rinse-and-dry station all set up at once, a 12x16 keeps the floor clear with everything in place. When in doubt, go up a size — gear collections grow, and the extra length lets a long board stand on end without crowding the walkway.
Lake life around Coeur d'Alene, Hayden Lake, and Pend Oreille generates a remarkable amount of gear — life jackets, tow ropes, wakeboards, tubes, fenders, and the wet, sandy things you don't want in the house. A boat gear shed built on your property keeps it all organized, ventilated, and a short walk from the trailer.
Moisture management is the whole game with boat gear. Wet PFDs and ropes need to breathe, not sit sealed in a tote growing mildew. We frame the shed with the ventilation and wall finish to let damp gear dry out, and we can add hooks, racks, and shelving so everything hangs instead of piling on the floor.
Building on site matters most for waterfront and near-water lots, where access is tight and the ground is rarely flat. We set the building where it works for your driveway and trailer turnaround in Coeur d'Alene or Post Falls, rather than dropping a pre-built shed wherever a truck can reach.
If you also store the trailer or a kicker motor over winter, size the doors and footprint for it now. Design your shed in the builder to compare layouts, browse the models we build, then get a free estimate.
Tell us what you store — life jackets, boards, ropes, tubes, and coolers — and how you load for the lake, and we will help spec the racks, the drying zone, power, and off-season storage around your property, then you can build and price it online.
Keep planning your build with related North Idaho shed guides.