Charging an electric vehicle in North Idaho is mostly about two things the driveway cannot give you: a real Level 2 circuit and a roof over the car while it charges. If you drive an EV around Coeur d'Alene, Post Falls, or Hayden, you have probably been topping up on a slow 120V garage outlet or standing in blowing snow to plug in a charger bolted to the side of the house. A dedicated EV charging shed fixes both problems at once. It gives the charger a weather-protected home, runs a proper conduit and circuit from your electrical panel, lights the parking spot so you can plug in after dark, and adds covered parking so the car is not buried in snow every morning. The point is to charge fast, charge dry, and never wrestle with a frozen connector again.
North Idaho On Site Sheds builds every covered EV charging structure right on your property, so the charger wall, the circuit, the conduit run, and the parking bay are sized for the vehicle and the panel you actually have. Start with the basics: which EV (or EVs) you charge, how far the build sits from your main panel, and how much spare capacity that panel has, because those three numbers drive the entire electrical plan. This guide covers which roofline sheds snow over a parked car, what size holds the vehicle plus a Level 2 charger and some storage, how to route conduit from the house, and how to wire, light, and weatherproof the structure for a long Idaho winter. The charging circuit is the heart of the build, and everything else is designed around keeping that circuit safe, dry, and easy to use in the cold.
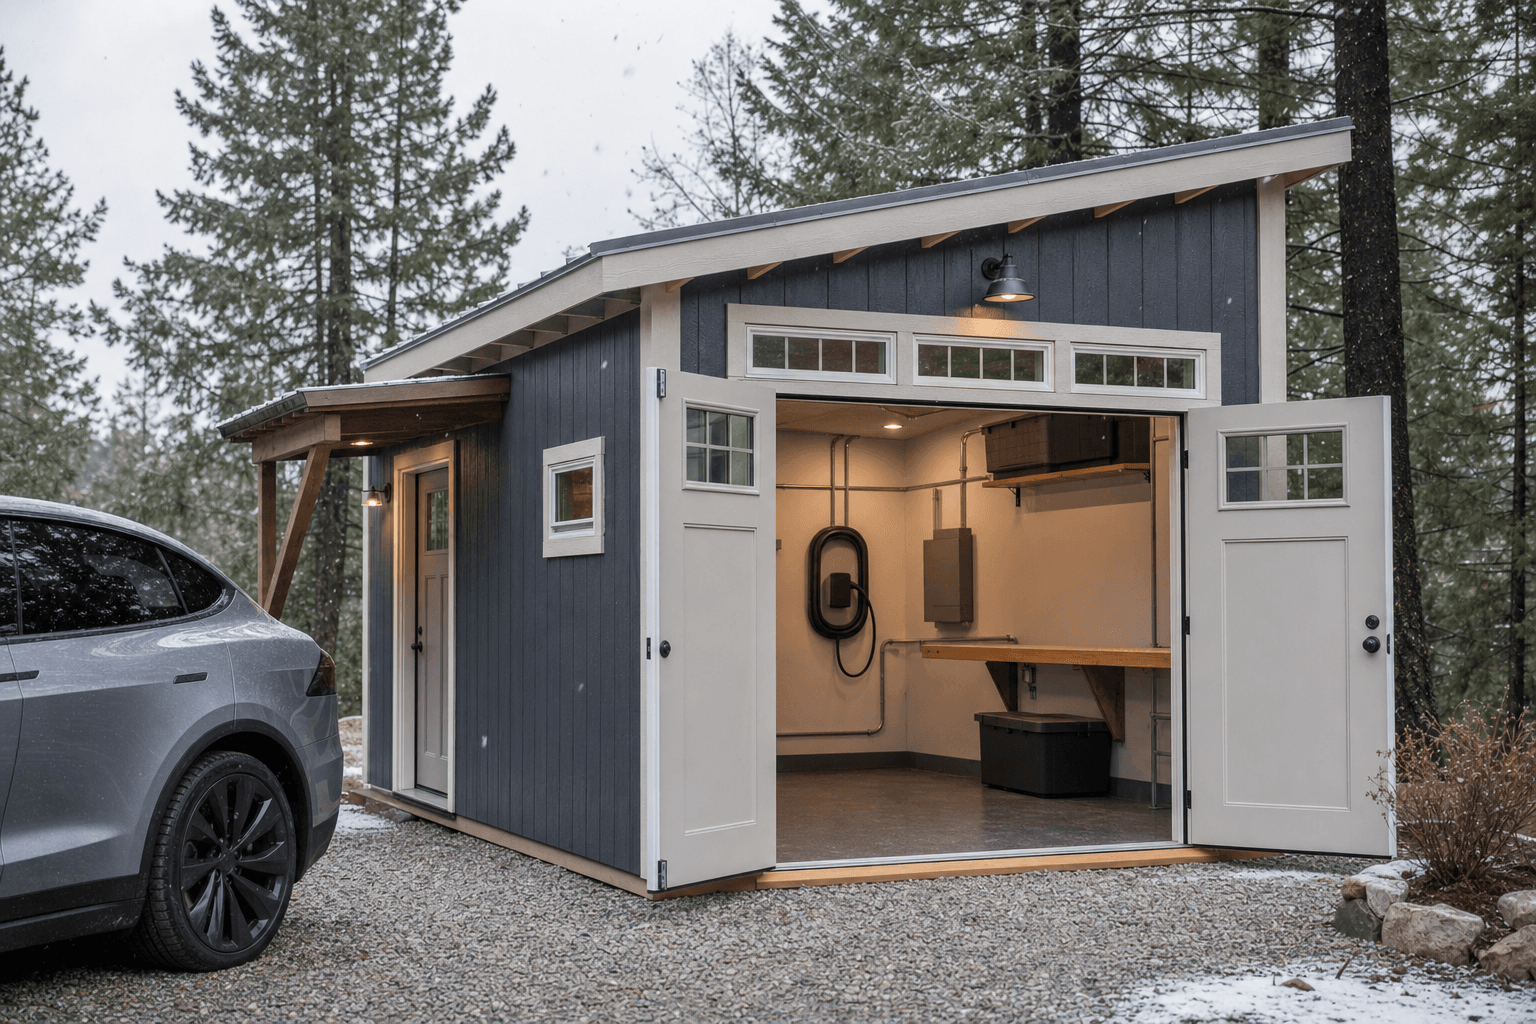
Charge fast and dry: a weather-protected Level 2 charger, conduit run from the panel, lighting, and covered parking out of the snow.
An EV charging structure asks two things of its shell: enough height and depth to park a vehicle under cover, and a solid wall to mount the charger and bring in conduit. That makes a lean-to or modern single-slope roof one of the best starting points — it sheds North Idaho snow predictably to one side, away from where you walk to plug in, and gives you a tall front wall for the charger, a light, and the conduit entry. A standard gable carport-style structure works just as well when you want a symmetric roof and the option to close in one end for a workbench or battery wall; the higher ridge clears a tall SUV or truck and keeps snow load handled on both slopes.
If you want the vehicle fully enclosed rather than just covered, a detached garage is the natural step up — four walls, a door, and the same Level 2 circuit, but with the car sealed against weather and theft. A stick-built shop style gives you a tall, square wall to mount the charger, run a subpanel, and add a real workbench beside the parking bay. Whatever the roofline, plan the charger wall first: put it on the side closest to your main panel so the conduit run is short, keep the connector reachable from the car's charge port, and leave the roof overhang generous enough that you plug in under cover even when snow is sliding off the eave. An EV charging shed sits right next to a solar and battery shed in how it is wired, and the two pair naturally when you want to charge from stored power.
A 10x16 or 10x20 covers one vehicle and dedicates a wall to a Level 2 charger, the conduit entry, and a light, with room to walk around the open door.
A 12x20 covers a long pickup or SUV with the charger wall clear, plus a corner for a workbench, tires, or a battery cabinet without crowding the bay.
A 12x24 fits two charge ports on a shared circuit or one vehicle and a real shop wall, with the conduit, subpanel, and lighting planned across the build.
Footprint decides whether you park, plug in, and walk around the open car door easily, or squeeze past a mirror in the dark with a cold cable in hand. Compare the real dimensions against your vehicle before you commit, and remember an EV bay needs clearance on the charge-port side for the cable and the open door. A 10x16 covers a compact or mid-size EV and leaves a wall for the charger, the conduit entry, and a light — enough for one car and a clean plug-in. A 10x20 adds length for a longer sedan or a small crossover and keeps space at the front to mount the charger where the cable reaches the port without crossing the walkway. A 12x20 opens up width for a full-size truck or SUV with the doors clearing the posts, plus a corner for tires, a workbench, or a battery cabinet. If you charge two EVs, or want one vehicle plus a real shop and a subpanel, step up to a 12x24 so both charge ports reach their connectors and the electrical has room to live on its own wall. The extra footprint is what turns a tight carport into a place you actually want to plug in every night.
These overlap, and the right call comes down to how enclosed you want the car and where the power comes from. A covered EV charging shed leads with a roof, posts, a Level 2 charger wall, and a circuit from the panel — fast, dry charging without the cost and footprint of full walls, ideal when you mainly want the car out of the snow and the charger out of the weather. The moment you want the vehicle sealed against wind-driven snow, prying eyes, and a hard freeze, a detached garage is the build: the same charging circuit, but with four walls, an insulated door, and the option to heat the space so the car and charger live in a milder environment all winter.
If the question is where the electricity comes from rather than how enclosed the car is, a solar and battery shed changes the plan — now you are housing panels' worth of stored energy and a battery bank, and the EV charges off that storage instead of, or alongside, the grid. The wiring discipline is nearly identical: a dedicated circuit, a tidy conduit run, and a subpanel, with the battery shed adding ventilation and fire-aware separation for the storage itself. Many North Idaho drivers end up wanting both ideas in one structure: covered parking with a Level 2 charger fed partly from on-site solar and battery. And if you want charging to keep working when the grid drops in a winter storm, a generator shed ties in as the backup source, so the EV circuit, the house, and the standby generator are all planned together. Name the lead use first — covered charging, full enclosure, or stored power — and the circuit, conduit, and roofline fall into place before framing is ordered.
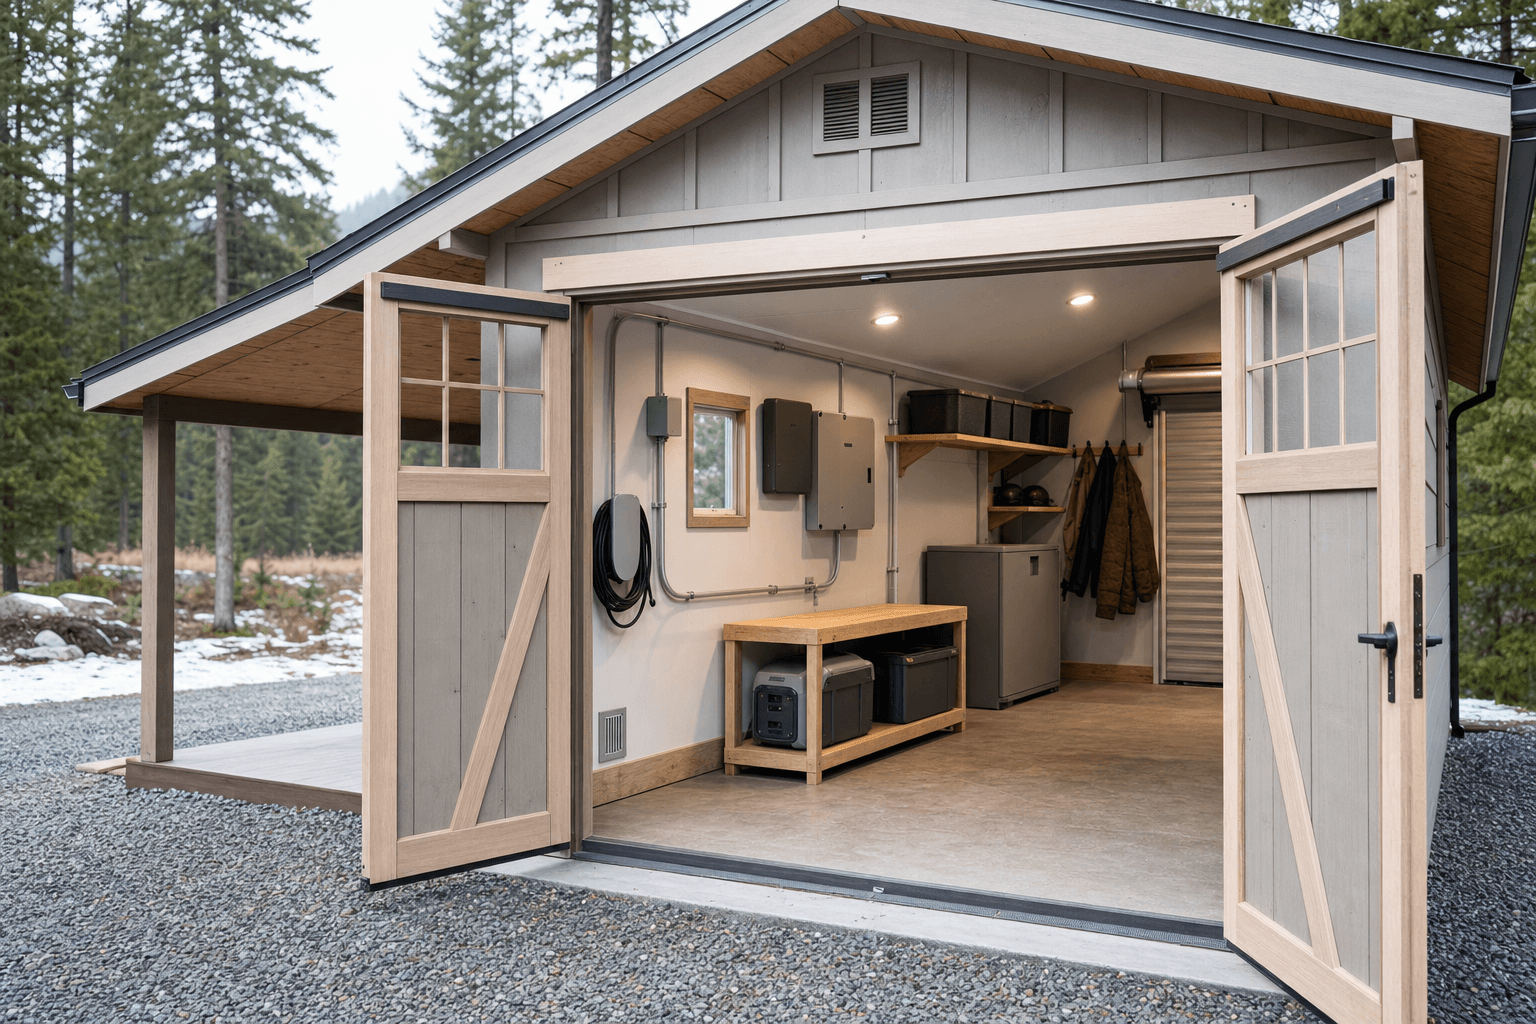
Zone the structure: a Level 2 charger on the panel-side wall, a clean conduit run, a lit parking bay, and a corner for storage or a battery cabinet.
Think of an EV charging structure as a few working zones instead of one open slab, and lay them out around the charge port and the panel. The charging zone is the one you plan first: mount the Level 2 charger on the wall closest to your main panel so the conduit run is short, position it so the cable reaches the car's charge port without stretching across the walkway, and keep the connector at a comfortable height for plugging in with gloves on. The parking bay is sized to your actual vehicle with clearance on the charge-port side for the open door and the cable, and enough roof overhang that you plug in under cover even as snow slides off the eave. A walk-around zone keeps a clear path on at least one side so you are not edging past a mirror in the dark.
If the build is bigger than a single bay, a storage or shop zone takes a back wall or a corner — a workbench, a tire rack, a cabinet for the charging cable and adapters, or a battery enclosure if you are pairing with solar. Keep that zone clear of the charger itself so nothing leans against the unit or blocks the cable. The light belongs where you plug in, the charger belongs where the conduit is shortest, and the parking bay belongs where the door clears the posts. Get those three right and the structure works every day, in the dark, in the cold, with the car dusted in snow.
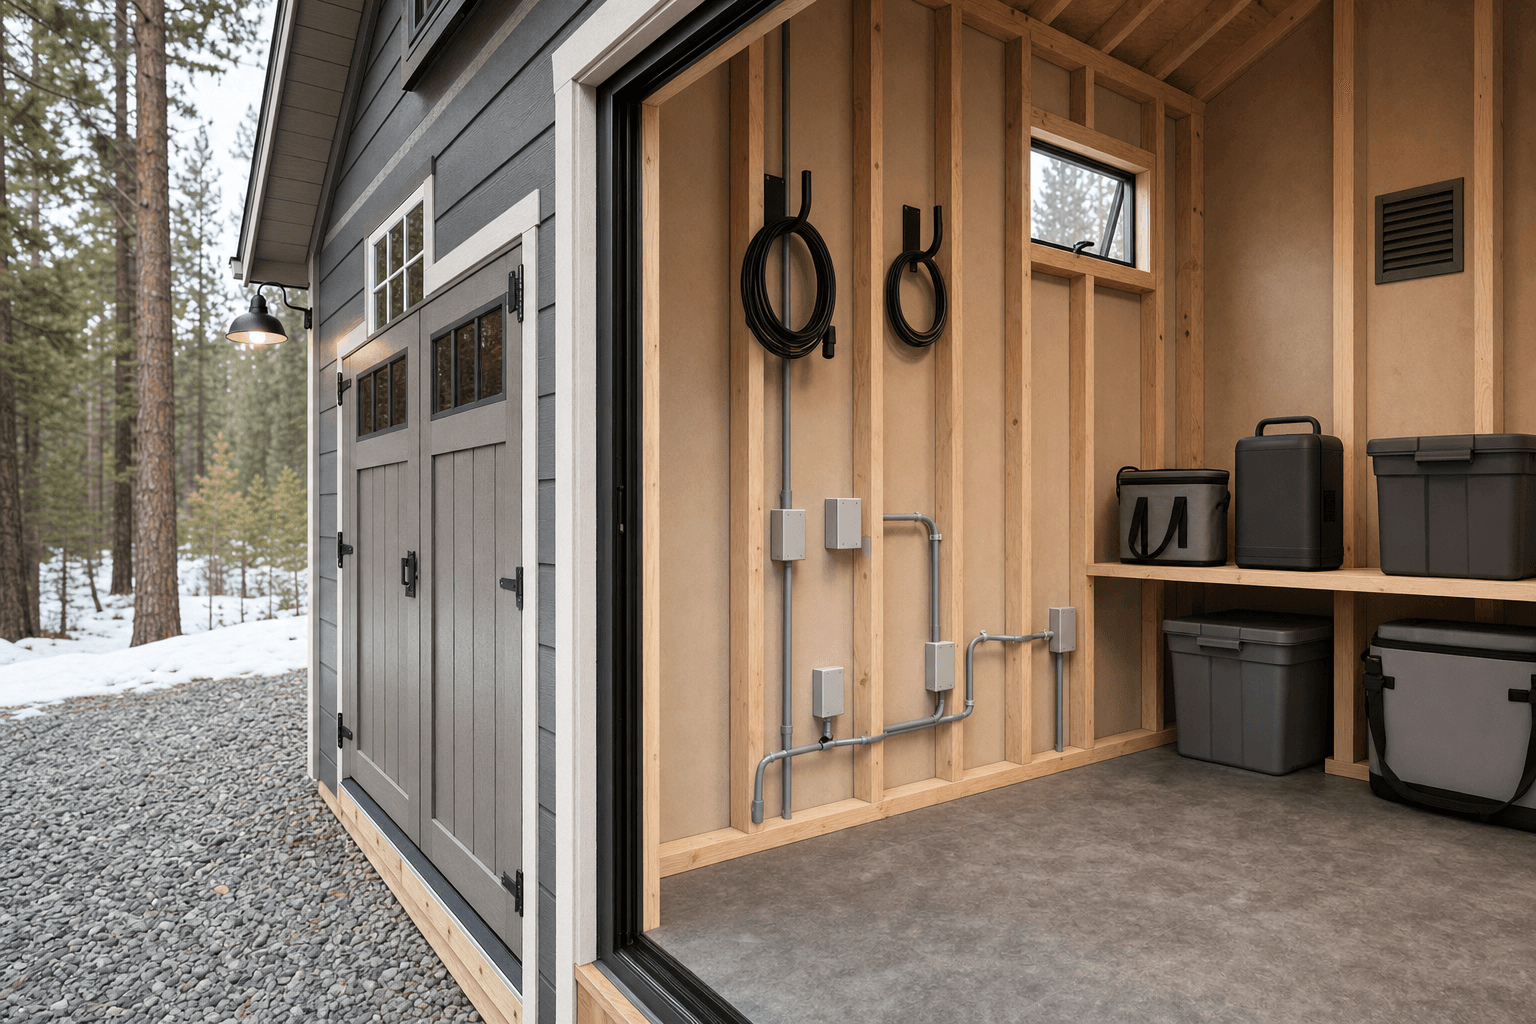
A hardwired or plug-in Level 2 charger fed by its own dedicated 240V circuit and breaker, mounted on the wall nearest the panel so the conduit run is short and the cable reaches the charge port without crossing the walkway.
Conduit sized and routed from your main panel to the charger — buried or run along the structure to code — with a subpanel when the load or the distance calls for it, so the circuit is protected from weather and snow.
A roof and overhang rated for North Idaho snow load that sheds away from where you plug in, keeping the car, the charger, and the connector dry so you are not clearing snow off the charge port every morning.
Bright LED light at the charger and over the parking bay, a switch or motion sensor by the entry, and a hook or reel to keep the cable off the ground and out of the snow and slush between charges.
This is where a bare carport becomes a real charging setup, and naming exactly what lives inside is how you size the circuit, the conduit, and the parking bay. The charging hardware comes first: a Level 2 charger (hardwired or on a NEMA 14-50 plug), its own dedicated 240V breaker in the panel, and the EVSE mounted at a height you can reach with gloves on. Most home Level 2 chargers draw 32 to 48 amps, which means a 40- to 60-amp circuit and a panel with the spare capacity to feed it — and if the panel is full or far away, a subpanel out at the structure is the clean answer. Around it goes the conduit and wiring: properly sized conductors in conduit run from the panel to the charger, buried or surface-run to code, with a disconnect where required, so the whole circuit is protected from weather, snow, and a string trimmer.
Then you fit out the convenience and storage gear: a cable reel or wall hook so the connector never drags in the slush, a bright light over the charge port, a switch or motion sensor by the entry, and a small cabinet for the mobile charger, adapters, and a winter brush for the charge-port door. If you are storing tires, a workbench, or tools, those take a back corner well clear of the charger. And if the EV charges partly from on-site power, the same conduit-and-subpanel discipline runs straight into a solar and battery shed, with the battery bank and the charger sharing a tidy, code-built electrical wall. The right charger, the right circuit, a clean conduit run, and a light where you plug in are what turn a covered slab into a building you can charge in fast every day, all winter.
The details that make it work: a Level 2 charger on a dedicated circuit, conduit and a disconnect run to code, and a light right where you plug in.
| EV charging shed planning checklist | |
|---|---|
| Level 2 charger circuit | A Level 2 charger on its own dedicated 240V breaker, typically a 40-60A circuit for a 32-48A charger, mounted within reach of the vehicle's charge port |
| Panel capacity | Confirm the main panel has spare capacity for the charger load, or plan a subpanel at the structure when the panel is full or the run is long |
| Conduit run | Properly sized conductors in conduit from the panel to the charger, buried or surface-run to code, with a disconnect where required and weather protection throughout |
| Weather protection | A snow-rated roof and overhang that sheds away from the plug-in side, keeping the car, the charger, and the connector dry through the North Idaho winter |
| Lighting & convenience | Bright LED light at the charger and over the bay, a switch or motion sensor, and a cable reel or hook so the connector stays off the snow and slush |
| Parking bay & clearance | Bay sized to your vehicle with clearance on the charge-port side for the open door and cable, plus a clear walk-around path on at least one side |
An EV charging shed earns serious electrical planning because the charging circuit is the whole point, and a Level 2 circuit done casually is not worth the risk. Plan a dedicated 240V circuit sized to your charger — most home units draw 32 to 48 amps, so a 40- to 60-amp breaker — run from your main panel in conduit to the charger wall. Confirm the panel has the spare capacity first; if it is full or the structure sits far from the house, a subpanel at the build is the clean fix, and it leaves room to add a second charger or a shop circuit later. Route the conduit the short way by mounting the charger on the panel-side wall, bury or surface-run it to code, and add a disconnect where required so the circuit is serviceable and weatherproof. This is exactly the kind of work to permit and have done to code — a 240V EV circuit is not a DIY extension cord.
Lighting and weather are not afterthoughts in a North Idaho EV build, they are what make winter charging livable. Lighting matters because you plug in after dark for months — put bright LED light at the charge port and over the parking bay, with a motion sensor or a switch at the entry so you are never fumbling for the connector in the cold. Weather protection is the reason to build a structure at all rather than bolt a charger to the house: a snow-rated roof and a generous overhang keep the car, the charger unit, and the connector dry, so you are not brushing snow off the charge-port door or thawing a frozen latch every morning. Cold also slows charging and shrinks range, so covered parking that keeps the worst of the snow and frost off the battery pack genuinely helps — and if you want the milder option, an insulated detached garage with the same Level 2 circuit keeps the car and charger in a warmer space all winter. Plan the light where you plug in, the roof to shed away from you, and the circuit to code, and the build charges fast and dry in January.
A covered EV structure is not heavy, but it earns a proper base and a smart spot. A compacted gravel pad drains well and keeps meltwater and slush from pooling under the car, and it works under a slab or a framed bay — which matters where you track in snow and want the charge port and connector kept out of standing water. Site the structure where the conduit run from your panel is short and where you can pull the car straight in off the driveway without a tight, icy turn, and read how to prep a shed site before delivery day so the pad, drainage, and the conduit path are ready. Plan the roof to shed snow away from the plug-in side and the walkway, not onto them.
North Idaho winters drive a roof and posts rated for local snow load, an overhang that keeps the charging side clear, and a plowed approach so you can reach the structure and the charger after a storm. The electrical is the part that most often needs a permit and inspection: adding a 240V Level 2 circuit, a subpanel, and conduit from the house is exactly the work your town and county want done to code, and the structure itself may trigger setback, height, or HOA rules depending on size and location. Confirm what your jurisdiction requires on the service areas pages before you build. Doing the charging circuit to code is not red tape — it is what keeps a high-power circuit safe in a structure you use every single day, in every kind of weather Idaho throws at it.
It depends on your charger, but most home Level 2 units draw 32 to 48 amps, which means a dedicated 240V circuit on a 40- to 60-amp breaker run from your main panel. The first thing to check is whether the panel has the spare capacity to feed that load on top of the house — many older North Idaho panels are close to full. If the panel cannot take the added circuit, or if the structure sits a long way from the house, the clean answer is a subpanel out at the shed, fed by a single larger run, with the charger circuit and room for a second charger or a shop circuit branching off it there. Either way, this is a hardwired or NEMA 14-50 circuit on its own breaker, not a shared outlet, and it is exactly the kind of work to permit and have done to code. We size the circuit and the conduit around your charger and your panel so the build is right the first time.
EV charging equipment is built to be weather-rated, so charging outdoors in winter is technically fine — but covering it is what makes it livable here. A roof and a generous overhang keep snow and ice off the charger unit, the connector, and the car's charge-port door, so you are not brushing off the port or thawing a frozen latch every morning before you can plug in. It also keeps the connector dry and out of the slush between charges. Cold weather already slows charging and trims your range, and parking the car under cover keeps the worst of the frost and snow off the battery pack, which helps. You do not have to fully enclose the car to get most of this benefit — a covered structure with the charger on a protected wall handles it. If you want the milder option, an insulated detached garage with the same Level 2 circuit keeps the car and charger in a warmer space all winter.
The circuit starts at your main panel and runs in conduit out to the charger, and the shortest, cleanest path is the goal. We mount the charger on the wall of the structure closest to the panel so the run is short, then route conductors in conduit — buried underground or surface-run along the structure, sized and installed to code — with a disconnect added where it is required. When the load is high or the distance is long, the better approach is to run a single larger feed to a subpanel at the shed and branch the charger circuit off there, which keeps voltage drop in check and leaves room to add circuits later. The whole run is protected from weather, snow, and a string trimmer, and it is inspected as part of the permit. Planning the conduit path before delivery day — including where it enters the structure and how it crosses the yard — keeps the install clean and to code.
For months in North Idaho you plug in after dark, so lighting is not optional. Put bright LED light right at the charge port and over the parking bay, with a switch or a motion sensor at the entry so the area lights up the moment you walk or drive in and you are never feeling for the connector in the cold. A cable reel or a sturdy wall hook keeps the connector off the ground so it never drags through snow and slush or freezes to the slab between charges. Mount the charger at a height you can reach comfortably with gloves on, and position it so the cable reaches the car's charge port without stretching across the walkway. A small cabinet nearby holds the mobile charger, adapters, and a brush for clearing the charge-port door. These small touches are the difference between a charger you fight with on a January night and one you plug in without thinking.
Yes, and the two are built with nearly the same electrical discipline, which is why they pair so well. An EV charging structure already has a dedicated circuit, a tidy conduit run, and often a subpanel, and a solar and battery shed adds the panels' worth of stored energy and a battery bank that the car can charge from instead of, or alongside, the grid. Many North Idaho drivers want exactly this: covered parking with a Level 2 charger fed partly from on-site solar and storage, so the daily charge leans on the sun and the battery. The battery side adds its own needs — ventilation and fire-aware separation for the storage itself — but the conduit, the subpanel, and the code-built electrical wall carry straight over. If keeping the charge going during a winter grid outage matters, a standby generator can tie into the same plan as the backup source. Naming whether you want grid, solar-and-battery, or backup power up front lets us wire the whole structure as one system.
Size it to your actual vehicle plus clearance on the charge-port side for the open door and the cable, not just the car's footprint. A 10x16 covers a compact or mid-size EV with a wall free for the charger, the conduit entry, and a light, which is plenty for one car and a clean plug-in. A 10x20 adds length for a longer sedan or a small crossover and keeps room at the front to mount the charger where the cable reaches the port without crossing the walkway. A 12x20 opens up width for a full-size truck or SUV with the doors clearing the posts, plus a corner for tires, a workbench, or a battery cabinet. If you charge two EVs or want one vehicle plus a real shop and a subpanel, a 12x24 gives both charge ports room to reach their connectors and lets the electrical live on its own wall. The extra footprint is what lets you park, plug in, and walk around the open door without squeezing past a mirror in the dark.
A covered EV charging station makes practical sense in North Idaho for a straightforward reason: a cold-soaked battery charges more slowly and holds less range. Keeping the vehicle under cover — and the charger protected from ice and snow — means you start every Coeur d'Alene winter morning with more miles than an uncovered driveway charge delivers.
The electrical work is the critical path. A Level 2 EVSE runs on a dedicated 240V circuit, and the conduit needs a clean run from your main panel to the shed. On-site framing lets the builder coordinate with your electrician during construction — framing in conduit sleeves and backing before the walls close — rather than retrofitting through finished walls after the fact.
Winter readiness extends to the shed itself. A well-insulated EV charging shed keeps the interior above freezing without active heat in most Kootenai County winters, which protects the EVSE unit and any electronics stored nearby. If you're in a colder hollow north of Sandpoint or on a wooded Bonner County parcel, a small radiant heater circuit is worth the added breaker.
Post Falls and Hayden properties with detached garages often split the question: add charging to the existing garage, or build a dedicated shed closer to where the car parks. The shed route is worth pricing when the garage run is long — a closer structure with its own subpanel is frequently cheaper than trenching conduit across a large yard.
Lighting, a hook or two for cables, and a work ledge round out a charging shed that functions rather than just powers. See pricing options or start in the shed builder with the electrical package as your first add-on.
Tell us which EV you charge, how far the build sits from your panel, and the parking you want, and we will help spec the Level 2 circuit, the conduit run, weather protection, lighting, and winter readiness around your property — then you can build and price it online.
Keep planning your build with related North Idaho shed guides.