If you fish Lake Coeur d'Alene, Pend Oreille, Hayden, or the St. Joe and Coeur d'Alene rivers, your gear has a way of taking over the house. Rods lean in three different corners, the spare reels live in a kitchen drawer, the tackle is split between a tote in the truck and a box in the closet, and a wet set of waders is hanging off the shower rod again. A dedicated fishing tackle shed pulls all of it into one room that is built for the way you fish: rods racked and ready by length and species, tackle organized so you can grab a kokanee setup or a bass kit in under a minute, a bench for tying leaders and re-rigging, and somewhere wet waders, nets, and life jackets actually dry between trips instead of going back in the truck damp and musty.
North Idaho On Site Sheds builds every tackle shed right on your property, so the wall framing, the rod storage, and the bench can be specified around your rods, your boxes, and the species you chase instead of a generic storage box. Start by taking honest stock of what you own — fly rods and spinning rods, trolling and casting setups, the kids' rods, a wall of tackle, waders and boots, nets, a cooler or two, and a couple of seats' worth of life jackets — and plan the walls, the bench, and the drying corner around all of it. This guide covers which roofline gives you the length to rack long rods, what size fits the gear plus a real rigging bench, how to lay the room out in zones, and how to wire, heat, and ventilate it so it works through a long North Idaho off-season.
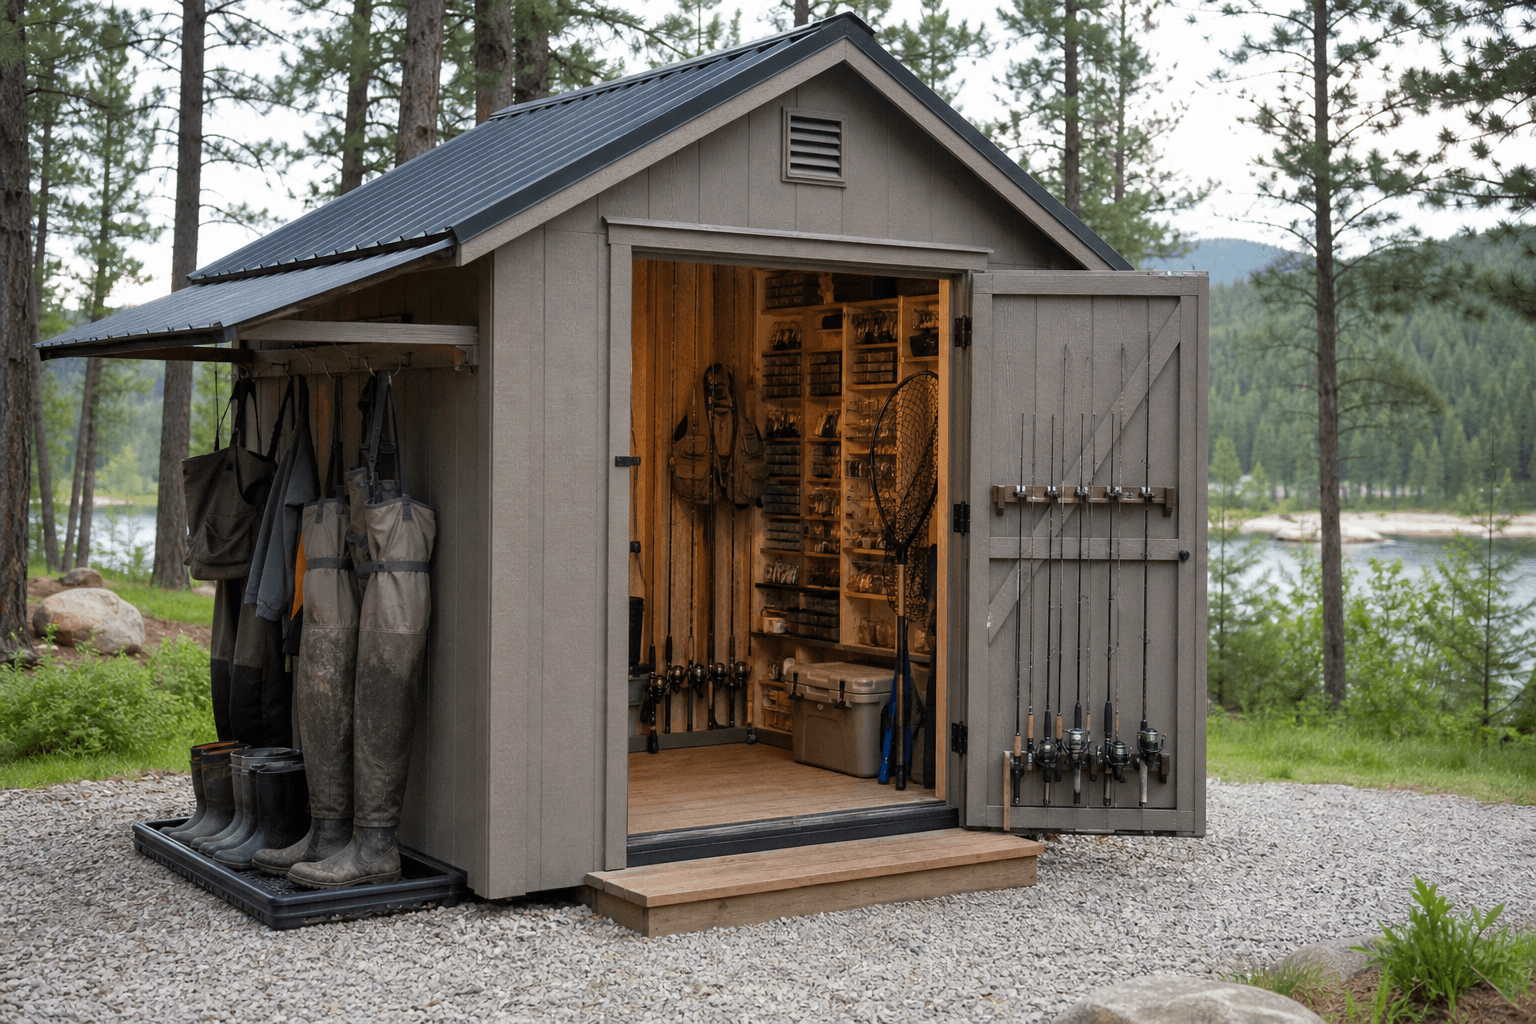
One room for the whole kit: rods racked by length, a tackle wall, a rigging bench, and a drying corner for waders and nets.
A tackle shed asks two things of its shell: enough wall length to rack long rods without bending the tips, and enough usable wall and bench space to hold the tackle and the rigging work. That makes the standard gable the natural starting point — it gives the most headroom and clean, straight sidewalls you can line with plywood and fill with horizontal rod racks, vertical rod holders, and a wall of tackle. The dimension that matters most here is length: a long sidewall lets you store 8-, 9-, and 10-foot rods horizontally on overhead racks with the tips fully supported, and it gives you room for the bench, the cooler stack, and the drying corner without anything overlapping. A lofted barn (gambrel) raises the center ridge and adds a small loft, which is perfect for the gear you only touch seasonally — the ice-fishing kit, the spare cooler, the float tube, the off-season tackle — while keeping the floor and the working walls open for the setups you fish all summer.
If you do a lot of your own tying, rigging, and reel maintenance, a stick-built shop style with a tall, square wall gives you a full-height wall for a pegboard and a long bench without the roof slope crowding your head over the vise. A lean-to or modern single-slope sheds North Idaho snow predictably to one side and gives you a tall front wall for a big window over the tying bench — good light matters when you are threading 6X tippet or tying size 18 nymphs. Whatever the roofline, line the walls in plywood so rod racks, reel shelves, and tackle organizers screw in anywhere, and spec a door wide enough to carry rods and a loaded cooler through without turning sideways. A tackle shed sits right next to a boat and gear shed when there is a boat, motor, or trailer gear in the picture, and a kayak and paddleboard shed the moment you are storing hulls and paddles alongside the tackle.
An 8x10 racks a personal rod collection on one wall, holds a tackle wall and a compact rigging bench, and gives waders and a net somewhere to dry.
A 10x12 racks rods on two walls, adds a real rigging and tying bench, a cooler stack, and room for a family's waders, nets, and life jackets.
A 10x16 fits a full rod wall, a long bench, deep tackle storage, a cooler bay, a drying corner, and a dedicated cleaning and prep station.
Footprint decides whether the shed feels like an organized base or a cluttered closet, so compare the real dimensions before you commit — a couple of feet of length is the difference between sliding a 10-foot rod onto an overhead rack and catching the tip on the door frame every time. An 8x10 racks a personal rod collection on one wall, fits a tackle wall and a compact rigging bench, and is plenty for one angler who fishes hard but stores light. An 8x12 adds the length to rack longer rods cleanly and makes room for a longer bench and a proper drying corner. A 10x12 opens up a second wall for the rest of the rods plus a deep tackle wall, a real tying and rigging bench, and a cooler stack — the right call for a serious kit or a family where three or four people fish. If you want the full rod wall, a long bench, deep tackle storage, a cooler bay, and a dedicated cleaning-and-prep station all at once, step up to a 10x16 so the floor stays usable with everything in place. Length matters more than width here — a long, narrow building runs a full wall of horizontal rod racks and still keeps a clear lane to the bench and the door.
These overlap, and the right call comes down to what you are really storing. A fishing tackle shed leads with rods, reels, and tackle — racked rods, a tackle wall, a rigging bench, and a drying corner, with the focus on organizing the small, valuable, easy-to-lose gear so every trip starts fast. A boat and gear shed changes the build the moment a boat, kicker motor, or trailer is in the picture: you need a wider, taller door, more open floor, and storage planned around fuel cans, life jackets, ropes, anchors, downriggers, and electronics rather than just tackle boxes. If you fish from a boat, a common move is to keep the bulky boat gear and the trailer setup in a boat shed and run the tackle, rods, and rigging bench in a separate tackle room — or to plan one larger building with a clear split between the two.
Paddle anglers have a different overlap. If you fish from a kayak, canoe, or float tube, the hulls and paddles want the long, open wall storage and the wide door that a kayak and paddleboard shed is built around, while the rods, tackle, and rigging bench still want the racked, organized treatment a tackle shed gives. The other natural neighbor is drying. A huge part of why anglers want a dedicated building is somewhere wet waders, boots, nets, and life jackets actually dry between trips — and that is exactly what a gear drying shed is built around: heat, airflow, and hanging hardware that pull the damp out overnight. Naming the lead use up front keeps you from a building that stores tackle poorly and dries gear poorly both, and it locks in your door size, your wall storage, and your ventilation before the framing is ordered.
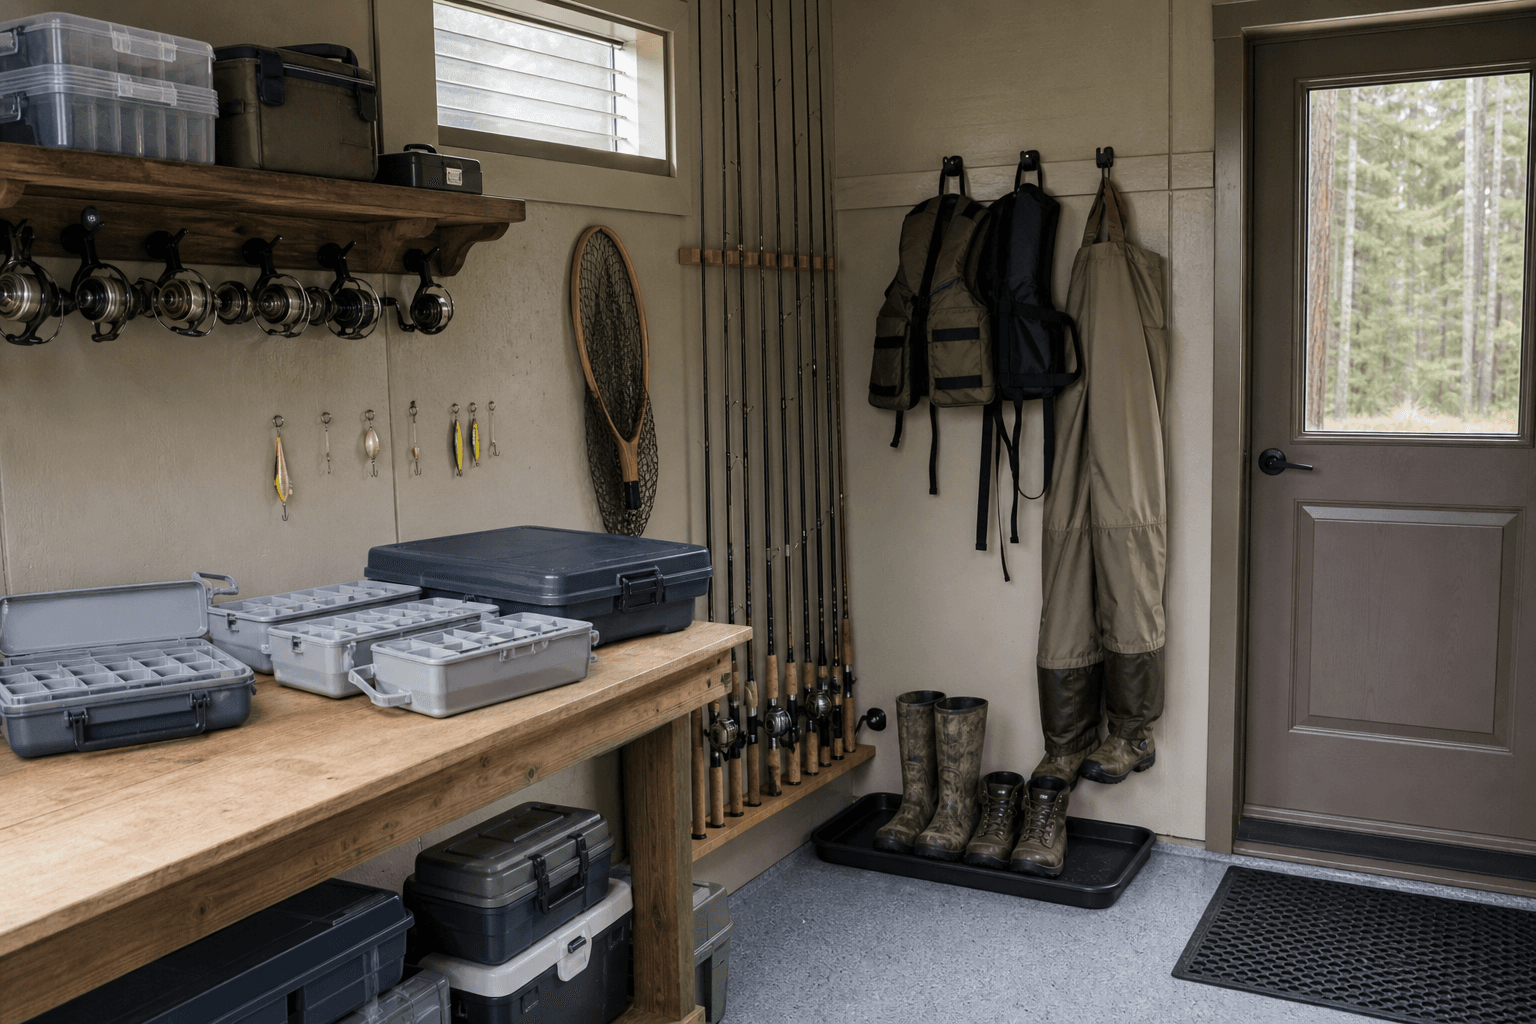
Zone the room: a rod wall, a tackle organizer wall, a tying and rigging bench, a cooler bay, and a drying corner by the door.
Think of a tackle shed as five working zones instead of one open box, and lay them out so nothing has to move when you grab a rod or start re-rigging. A rod zone anchors on one or two plywood-lined walls, with horizontal overhead racks for long trolling and fly rods and vertical holders for spinning and casting rods — group them by length and species so the kokanee rods, the bass rods, and the fly setups each have a home and the tips are always supported. A tackle zone sits next to the rod wall: a grid of organizers, labeled boxes, and shallow drawers so jigs, spoons, spinners, flies, soft plastics, terminal tackle, and leader material are sorted and visible. A rigging and tying zone centers on a bench with good light, a vise, and small-parts storage, set where you can sit and work on leaders, re-spool a reel, or tie flies. A cooler and bulk zone holds the coolers, the bait fridge, the buckets, and the net rack low and near the door so they load straight into the truck. A drying and cleaning zone lives by the door, where wet waders, boots, nets, and life jackets hang and drip and where a wash sink or prep counter handles the messy work.
Good zoning means you never have to unhook a rod to reach a tackle box, and you never trip over a wet wader to get to the bench. Put the rigging bench where the light is best — under a window or a bright fixture — because tying tippet and threading small hooks is close work. Keep the dirtiest jobs, the wet gear and the cleaning, nearest the door so water, mud, and fish smell stay by the entrance instead of tracking across the room. Hang the rods and tackle you fish most at an easy reach and push the seasonal kit — the ice gear, the spare cooler, the off-season boxes — higher or up into a loft. Leave a clear lane from the door to the bench so carrying rods and a loaded cooler in and out never means rearranging the room.
Horizontal overhead racks for long trolling and fly rods, vertical floor-to-ceiling holders for spinning and casting rods, all screwed into plywood-lined framing and grouped by length and species, plus a shelf or cabinet for reels and spare spools.
A grid of stackable tackle organizers, shallow drawers, and labeled boxes for jigs, spoons, spinners, flies, soft plastics, and terminal tackle, sorted by species or technique so a full setup is grabbed in one trip, not assembled from five places.
A solid bench with great light, a fly-tying vise, a leader and tippet station, small-parts bins for hooks, beads, swivels, and split shot, and a spot to re-spool reels, build leaders, and service gear out of the weather.
Hooks and a rack by the door for waders, boots, nets, and life jackets, a boot tray, a wash sink or prep counter for cleaning gear and prepping bait, and the airflow and heat to dry it all overnight instead of leaving it damp and musty.
This is where a bare shell becomes a fishing base, and it is worth naming exactly what lives inside so you size the walls, the bench, and the airflow around it. The rod storage comes first: horizontal ceiling racks for long trolling, spey, and fly rods so the tips are fully supported, vertical wall holders for spinning and casting rods, a rack for the kids' rods, and a shelf or locking cabinet for reels, spare spools, and line. The tackle organization is the heart of the room — stackable utility boxes and a wall of organizers for hard baits, spoons, spinners, jigs and jig heads, soft plastics, blades and dodgers, kokanee and trolling gear, plus a fly-storage system of boxes or a fly bench, all sorted by species or technique and labeled so a setup is grabbed, not hunted for. On and around the rigging bench go a fly-tying vise and tools, bobbins and thread, hooks, beads, cones, and dubbing, a leader and tippet station, swivels, split shot, snaps, and beads in small-parts bins, a reel-spooling station, line winder, and pliers, nippers, and a hook hone.
Then you fit out for the wet, bulky, and messy gear. Plan a wader and gear-drying corner — and a dedicated drying setup earns its keep here — with hooks and a boot-and-wader hanger, a net rack, a place for rain jackets and a wading belt, and a tray under it all to catch the drip. Stack the coolers and bulk gear: a soft and a hard cooler, a bait bucket and aerator, a minnow or worm bin, a small bait fridge, a tackle backpack and a sling, and the landing nets and gaffs. Add a cleaning and prep station by the door — a counter or a sink for rinsing gear, prepping bait, and cleaning a fish, a cutting board and fillet knives, a hose bib nearby, and a covered trash bin so nothing draws flies. If you also haul a boat, keep the boat-specific gear — the life jackets, anchors, ropes, and electronics — in its own zone or building so it does not crowd the tackle wall. The right racks, a real bench, and an honest drying setup are what turn a storage shed into the room you stage every trip from.
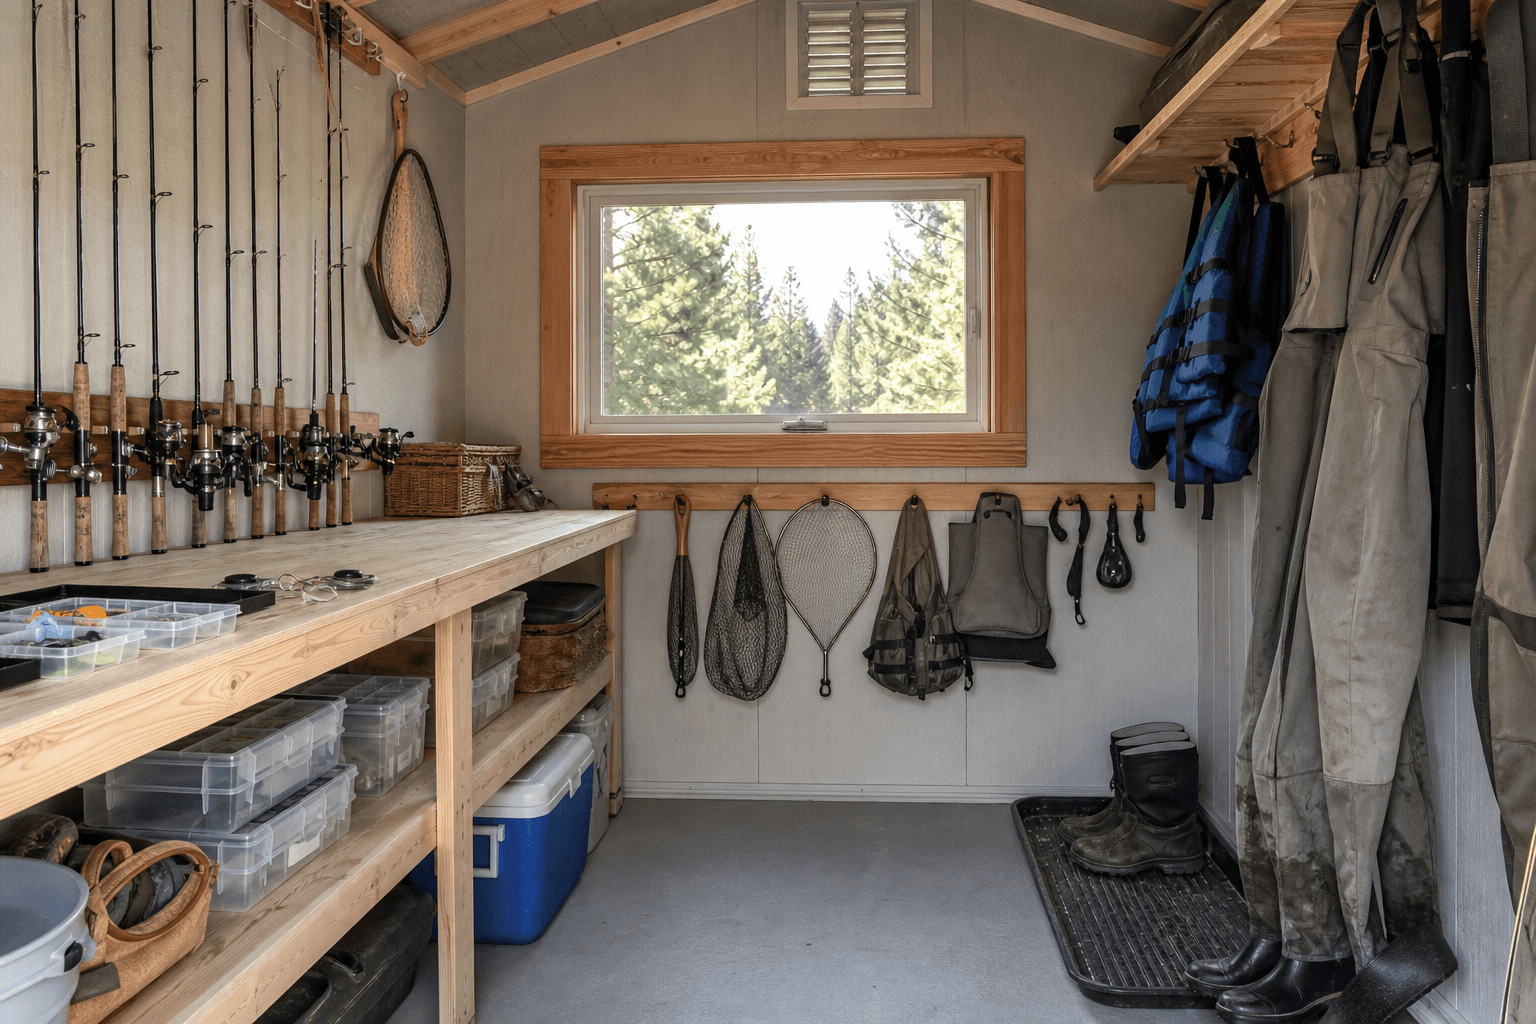
A tying vise, tackle sorted by species, and tools within reach — the details that turn a tackle shed into the base every trip starts from.
| Fishing tackle shed planning checklist | |
|---|---|
| Wall framing | Plywood-lined walls so horizontal rod racks, vertical rod holders, reel shelves, and tackle organizers screw in anywhere and hold the load |
| Length & layout | Enough sidewall length to rack 9- and 10-foot rods horizontally with the tips supported, plus room for a bench, cooler bay, and drying corner |
| Door & access | A door wide enough to carry long rods and a loaded cooler through without turning sideways, with a low threshold near the cleaning corner |
| Rigging bench | A solid bench under good light with a tying vise, a leader station, and small-parts bins for hooks, swivels, beads, and split shot |
| Power & water | Dedicated 120V outlets for lighting, a bait fridge, and bench tools, plus a hose bib or wash sink for rinsing gear and prepping bait |
| Heat & airflow | Insulation, a heater, and a vent or fan so waders, nets, and life jackets dry overnight and the room never smells like wet gear or fish |
A tackle shed earns real power and good light because a lot of what happens inside is close, fiddly work — tying a size 18 nymph, building a tapered leader, re-spooling a reel, threading a hook — and none of that goes well in a dim, cold box. Plan dedicated 120V outlets run from the house: one or two at the rigging bench for a tying lamp, a line winder, and tools, one for a small bait fridge so live bait and prepped baits keep cool, and a spare at the cleaning counter. Place the outlets where the work happens — at the bench, the fridge, and the prep station — so no cord crosses the floor where you carry rods and coolers. For light, layer bright, even LED fixtures across the ceiling so the rod wall and tackle wall are easy to read, then add a focused task light at the bench, because tying and rigging reward shadow-free light over the vise. A window over the bench is worth planning for — daylight makes color selection and close tying far easier.
Water turns a good tackle shed into a great one. A nearby hose bib or a small wash sink lets you rinse weeds and slime off rods and reels, wash down waders, prep and cut bait, and clean a fish without dragging the mess into the house — pair it with a counter, a cutting board, and a covered bin so nothing lingers. Heat decides whether the shed gets used in the cold months. North Idaho winters are long, and an unheated building is a problem on a few fronts: wet waders, boots, and nets stay damp and musty, glues and head cement for tying do not set well when it is freezing, and any water line or wash sink risks freezing. Insulate the walls and ceiling and add a heater — a mini-split, an electric heater, or a small wall unit — so gear dries and you can rig and tie in comfort. Pair the heat with airflow: a vent or a small fan moves damp, fishy air out and brings fresh air in, which keeps the room from smelling like a wet wader and stops condensation from forming on your reels and tools. A heated, ventilated, plumbed shed is the difference between a room you use year-round — tying flies through the off-season and prepping for ice fishing — and a cold box you avoid until the water warms up.
A tackle shed is not heavy, but it still earns a proper base — and because you will be rinsing gear, dripping waders, and cleaning fish inside, drainage matters more here than in a dry storage shed. A compacted gravel pad drains well, keeps the floor dry under a framed floor, and handles the water that comes with a wash sink and wet gear. Plan the approach so you can carry rods and a loaded cooler straight from the door to the truck without a muddy uphill fight, and so the building sits where a delivery comes off the truck clean. If you are running water to a wash sink, plan the supply and the drain before the pad goes in. Read how to prep a shed site before delivery day so the pad, drainage, and access are ready, and check the service areas pages for what your town and county expect.
North Idaho weather drives a few specifics. A roof and anchoring rated for local snow load are not optional — Kootenai, Bonner, and Benewah county winters pile real snow on a roof, and a lean-to or single-slope should shed it away from the door and the path you use. Insulation keeps the room workable through the freeze so gear dries and any plumbing survives, and a plowed or shoveled path keeps the shed reachable after a storm if you fish or tie through winter. Most small tackle sheds skip a permit, but bigger buildings, added electrical or plumbing, and setback or HOA rules sometimes do not — confirm what your jurisdiction requires before you finalize the size and where the shed will sit, and factor any electrical or plumbing permit into the plan early. Pine pollen, gravel-driveway dust, and damp lake-country air all argue for a well-sealed, well-ventilated building that keeps your rods, reels, and tackle clean and dry between trips.
Line the walls in plywood so rod racks and tackle organizers screw in anywhere, then split rod storage two ways. Use horizontal overhead racks for long trolling, spey, and fly rods so the full length of the blank is supported and the tips never hang loose, and use vertical floor-to-ceiling holders for spinning and casting rods, grouped by length and species so the kokanee, bass, and trout setups each have a home. For tackle, build a wall of stackable utility boxes and shallow drawers sorted by technique or species and labeled, so jigs, spoons, spinners, flies, soft plastics, and terminal tackle are visible and a full setup is grabbed in one trip. Add a reel shelf or a locking cabinet for reels, spare spools, and line, and you can be rigged and out the door in minutes instead of hunting through totes.
Start with a solid bench placed under the best light you have — a window or a bright fixture overhead plus a focused task lamp, since tying and rigging are close work. Mount a fly-tying vise and keep your tying tools, bobbins, thread, hooks, beads, cones, and dubbing in small bins within reach. Add a leader and tippet station with spools of mono and fluoro, swivels, snaps, and split shot, plus a reel-spooling setup and a line winder so you can re-spool without a second pair of hands. Keep a hook hone, nippers, and pliers on the bench, and store head cement and glues where they stay above freezing so they set properly. With everything sorted and lit, the bench becomes where you build leaders, tie flies through the off-season, and service reels out of the weather.
Set up a drying corner by the door, away from the rods and tackle, so water and mud stay near the entrance. Add a boot-and-wader hanger that holds them open and upside down so the insides air out, hooks for rain jackets and a wading belt, a net rack, and a place for life jackets, with a tray underneath to catch the drip. Then make the corner actually work with heat and airflow: a heater takes the damp chill off and a vent or small fan moves the wet, fishy air out and brings fresh air in, so waders, boots, and nets dry overnight instead of staying musty for days. Keeping the wet zone near the door and well ventilated also stops condensation from forming on your reels and tackle across the rest of the shed, which is the difference between gear that lasts and gear that mildews and corrodes.
Keep the bulky and the messy gear low and near the door so it loads straight into the truck and the mess stays by the entrance. Plan a cooler bay for a hard and a soft cooler, a shelf or bench for a bait bucket and aerator, and a small bait fridge if you keep live or prepped bait — give the fridge its own outlet. Mount a net rack on the wall so landing nets and gaffs hang clear instead of cluttering the floor, and store buckets and a minnow or worm bin where they are easy to grab on the way out. Pair this zone with a cleaning and prep counter or a wash sink so you can rinse gear, prep bait, and clean a fish right there, with a covered trash bin nearby so nothing draws flies. Keeping coolers, bait, and nets together by the door means loading for a trip is one trip past the door, not a lap around the shed.
Treat species and season as your two sorting axes and label everything to match. Group rods and tackle by what you chase — a kokanee and trolling zone with the dodgers, blades, and downrigger gear together; a bass zone with the soft plastics, jigs, and crankbaits together; a fly zone with the boxes, leaders, and tying bench together; a pike or panfish zone as needed — so a full setup for one species lives in one place. Then handle season with height: keep the gear you fish right now at easy reach on the working walls, and push the off-season kit up high or into a loft. The ice-fishing gear, the spare cooler, and the rods and tackle for species that are out of season can ride up top until their water opens, which keeps the working walls uncluttered. Clear labels and a fixed home for every box are what let you grab the right kit fast even when the seasons overlap in spring and fall.
For one angler who fishes hard but stores a reasonable kit, an 8x10 racks your rods on one wall, holds a tackle wall and a compact rigging bench, and gives waders and a net somewhere to dry — step to an 8x12 if you run long rods or want a longer bench and a real drying corner. For a family where three or four people fish, plan for a lot more rods, more waders and life jackets, and more tackle, so a 10x12 is the honest minimum: it racks rods on two walls, fits a full rigging and tying bench, a cooler stack, and room for everyone's wet gear to dry. If you want a full rod wall, deep tackle storage, a long bench, a cooler bay, and a dedicated cleaning-and-prep station all set up at once, a 10x16 keeps the floor usable with everything in place. Length matters more than width either way — a longer building racks more rods cleanly and keeps a clear lane to the bench and the door.
The Spokane River, the St. Joe, Coeur d'Alene Lake, and dozens of smaller Panhandle waters mean fishing gear is a serious storage and organization problem for a lot of North Idaho households. A dedicated fishing tackle shed on your Coeur d'Alene or Post Falls property keeps rods protected, tackle accessible, and wet waders out of the house — without the chaos of a garage wall covered in fishing stuff.
Rod storage is the hardest thing to retrofit. Wall-mounted horizontal rod racks need clear wall runs with no interruption from shelving or windows. When the shed is framed on your property, those runs are planned from the start — a twelve-foot wall can hold a lot of seven- to nine-foot rods without a single one getting bumped or tangled. The same logic applies to a rigging bench: a deep, well-lit counter at the right height is easier to build in than add later.
North Idaho winters expose gear sheds to freeze-thaw cycles that crack unsealed wood, corrode reel seats, and degrade fly lines stored in extreme cold. A basic insulated wall assembly and a sealed, elevated floor keep interior temperatures stable enough to protect reels and monofilament without running heat constantly. Waders hung in a ventilated space rather than stuffed wet into a bag also last noticeably longer through a Kootenai County winter.
Properties on sloped lots near Hayden Lake or the river benches around Rathdrum benefit from on-site gravel pad work before framing — a level foundation that a delivered shed can't provide on uneven ground. Design your fishing shed in the builder to work through footprint and door options, or get a free estimate for a real number on your property.
Tell us how you fish and what you store — rods, tackle, waders, coolers, and nets — and we will help spec the rod walls, the rigging bench, drying, power, and water around your property, then you can build and price it online.
Keep planning your build with related North Idaho shed guides.