A backyard golf simulator lives or dies on two numbers, and almost everything else is detail. The first is ceiling height: a driver swing arcs the clubhead up over your head and back down, and if the ceiling is too low you either chop your swing short or you put a club through it. The second is room depth: the ball needs room to fly from the tee to a screen far enough away that the impact screen and projector read the shot correctly, and you need room behind the tee for your backswing and your follow-through. Plan a golf simulator shed around those two constraints first, and the screen, the projector, the launch monitor, the mat, and the lighting all fall into place around them. Get either one wrong and you have an expensive room where you cannot take a full swing.
North Idaho On Site Sheds builds every golf simulator room right on your property, which means the ceiling height and the wall framing get specified for a real golf swing instead of a generic storage shed that happens to have a door. That matters more here than in almost any other build, because you cannot raise a ceiling or push out a back wall after the fact. Start with the tallest player who will swing in it and the longest club they will swing, give the room the height and the depth that swing needs, and then lay out the screen, the hitting mat, the launch monitor, the lighting, and the heat so the room plays the same in February as it does in July. Done right, a 12-by-something building becomes a year-round practice bay you actually use, not a fair-weather novelty.
Two numbers come first: ceiling height for a full driver swing and room depth from the tee to the screen. Everything else fits around them.
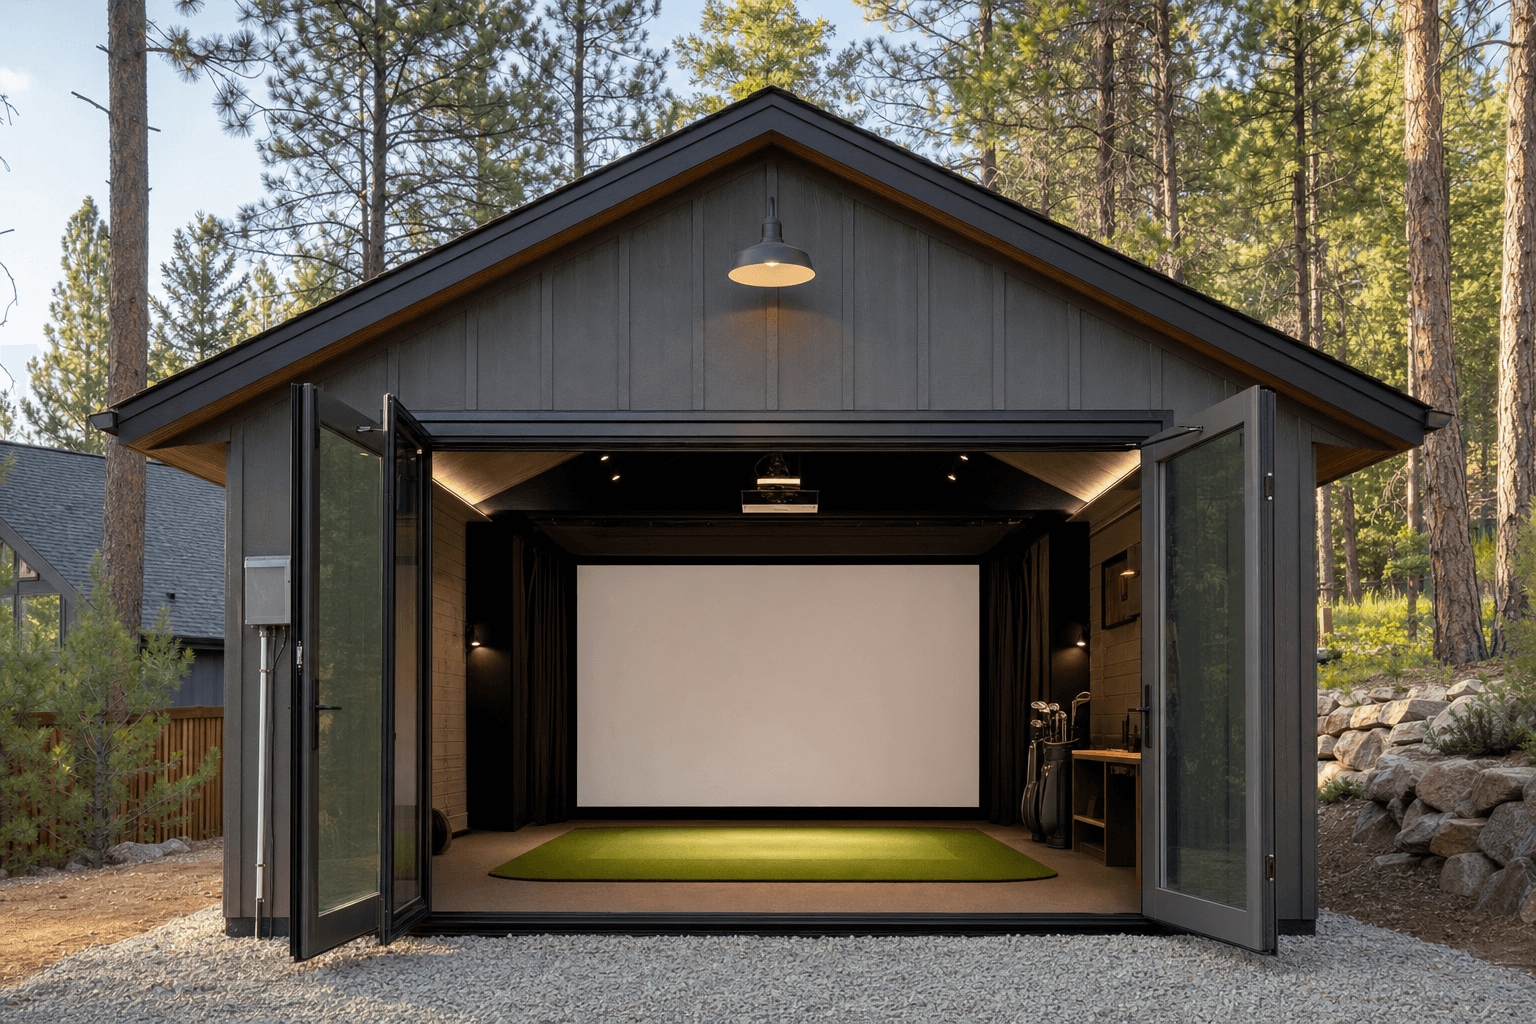
A simulator wants height above all else, so the roofline is not a cosmetic choice here — it sets your ceiling clearance. The standard gable is the honest starting point: it is the most headroom for the money and easy to insulate and line with finished walls. The number that decides everything is sidewall height, so order taller sidewalls — think 9-foot or taller walls — so a full driver swing clears the ceiling at the top of the arc. A lofted barn or gambrel raises the center ridge even higher and is the best friend a tall player has, because the extra ridge height over the tee line buys the clearance a long driver swing needs without going to an oversized building. A lean-to or modern single-slope sheds North Idaho snow predictably to one side and can give you a tall front wall, but watch the low side carefully so the slope does not eat into your swing path over the tee.
Whatever the roofline, height and depth are the parts to spec up, not down — a simulator is closer to a finished, conditioned room than to a plain storage shed, which is why it overlaps with a man cave hangout when the bay doubles as a place to watch a game with friends. The reinforced floor, the power, and the climate planning also overlap with a home gym build, and if the room pulls double duty as a flexible hobby or practice space it has a lot in common with a general-purpose hobby shed. Decide early whether this is a dedicated, finished simulator bay or a flexible room that also hits golf balls, because that one call drives the ceiling height, the wall finish, and how the room gets laid out.
Plan for a ceiling around 9 to 10 feet of true clearance over the tee so a full driver swing arcs overhead without chopping the swing short or clipping the ceiling.
You need room for the ball to fly to the screen plus a safe gap behind it, so a building 16 to 24 feet deep gives the launch monitor a clean read and keeps the screen off the back wall.
Plan enough width that a right- and left-handed player can both swing without hitting a side wall, with room beside the hitting mat for a seat, a club rack, and a few people watching.
Footprint decides whether the room plays like a real bay or a cramped cage, so compare the real dimensions before you commit — in a simulator, length is what makes or breaks it. A 12x16 is a workable single-bay room when the ceiling is tall: enough depth to fly the ball to the screen and stand back, with width for one player's stance and a launch monitor. Step up to a 12x20 and the extra length gives the ball more flight before the screen, a cleaner read for a camera-based launch monitor, and room behind the tee for a full follow-through plus a chair or two. A 14x20 adds the width that lets both a righty and a lefty hit from the same mat and leaves a real seating lane along the side, which is what turns the room into a place people hang out in while one person hits. For the most forgiving setup — a deep ball flight, a wide bay, and room for a sofa, a club rack, and a small bar — a 16x20 gives the simulator room to breathe with everything set up at once. In a golf room, the depth from tee to screen is the dimension you protect first, and the width is what makes it social.
These overlap more than you would expect, and the right call comes down to what leads. A man cave leads with hangout — a TV, seating, a bar, a game table, and gear for downtime — and a simulator slots into one beautifully, because a golf screen plays a game just as easily as a movie. A general hobby shed is a flexible, finished room that can flex between projects and pastimes, and a simulator is one of the most popular ways to use one. A purpose-built simulator bay, by contrast, puts the golf first: the ceiling height, the room depth, the impact screen, and the launch monitor are designed in from the framing, and the comfort follows.
Plenty of buyers want one building that does double duty, and that works as long as you build to the strictest requirement — which, for a simulator, is always the ceiling height and the room depth. A bay that also serves as a hangout still needs the swing clearance and the tee-to-screen distance first, because you cannot retrofit a taller ceiling or a deeper room after the fact, but you can always add a sofa, a mini-fridge, and a screen for movie nights later. If recovery and fitness are part of the picture, the room shares its floor, power, and climate planning with a gym shed and can be laid out to do both. Naming the lead use up front keeps you from a building that golfs poorly and relaxes poorly both — and it locks in your height, your depth, and your screen wall before the framing is ordered.
Zone the bay: the impact screen on the deep wall, the mat and tee back from it, the launch monitor in its read zone, and seating along the side.
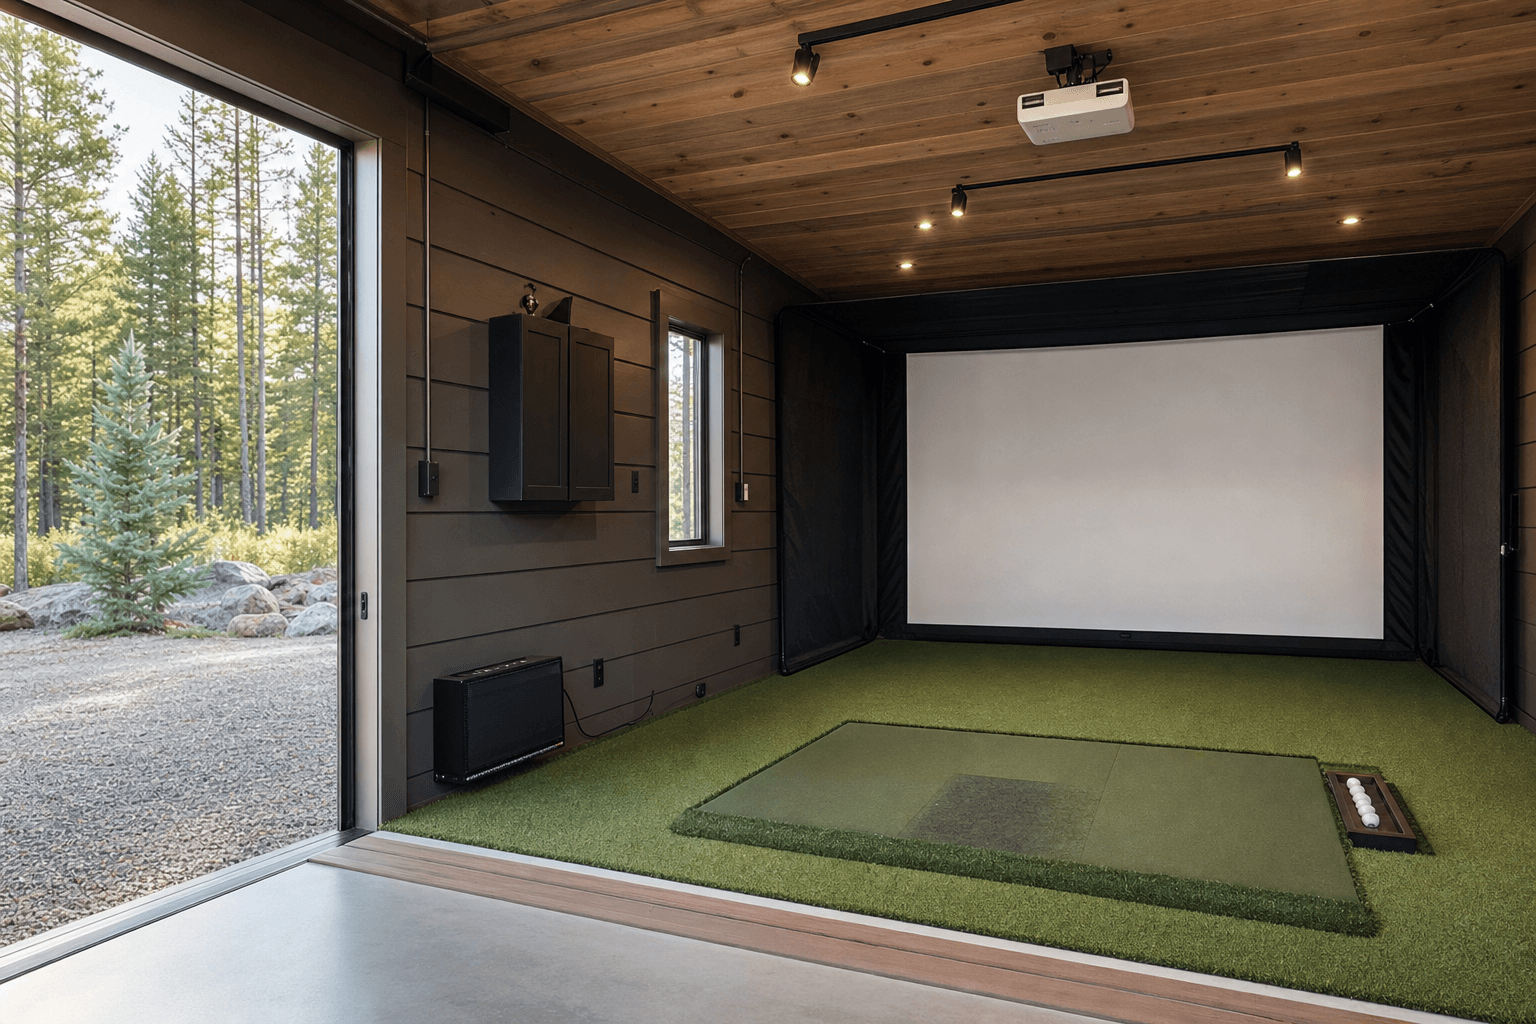
Think of the simulator as a few working zones laid out along the length of the room instead of one open box. The screen zone anchors the far, deep wall: the impact screen hangs a foot or more off the wall with padding behind and around it so a hard shot is absorbed quietly, and the projector throws onto it from the ceiling or from behind the tee. The hitting zone sits the right distance back from the screen — far enough that the ball flies and the system reads it, close enough that the room still fits — with the mat and tee centered so a swing clears the side walls. The read zone is wherever your launch monitor lives: a ceiling-mounted or overhead unit needs clearance and a clear sightline to the ball, while a floor unit in front of or beside the tee needs a clean strip of floor and the right gap to the screen. A seating and staging zone runs along one side wall — a sofa or stools, a club rack, a ball tray, and a small bar or fridge for the people watching.
Good zoning means a club never threatens the screen on the backswing and a watcher never sits in the ball's flight path. Keep the side-wall clearance honest: a driver swings wide, so a left- and right-handed player both need room to the side of the mat without the club catching a wall. Mount the projector where a tall follow-through cannot hit it and where the player's body does not throw a shadow on the screen. Leave a clear gap between the tee and the screen so the ball reads true and the screen takes the strike from a safe distance. And keep the seating tucked along the side, out of the line of fire, where the people watching can see both the screen and the swing. A bay that flows is one where you walk in, tee up, and hit without moving a single thing first.
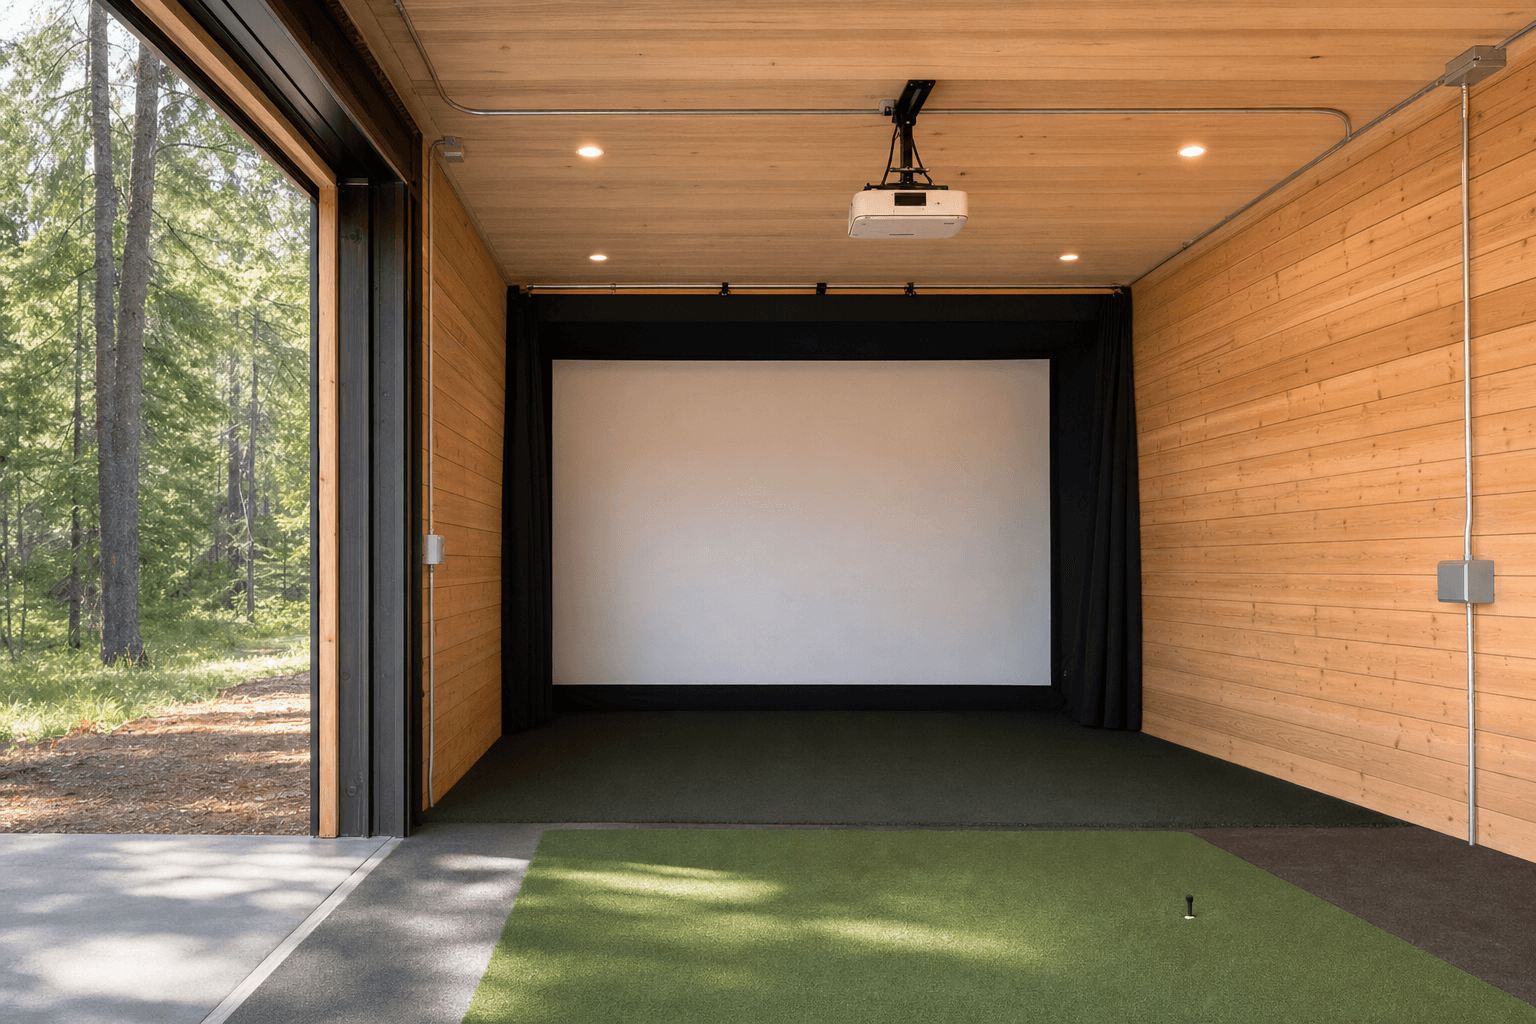
A tensioned impact screen hung off the back wall, wrapped in an enclosure with side and ceiling baffles and padding, so a hard drive is caught safely and the room stays quiet instead of booming.
A short-throw or standard projector mounted clear of the swing and out of your shadow, paired with a launch monitor positioned for a clean read — overhead, in front of the tee, or beside it depending on the unit.
A thick, forgiving hitting mat with a replaceable hitting strip over a dead-level floor, deep enough to stand on through the swing so the stance and the strike stay consistent shot after shot.
Room-darkening shades or minimal windows so daylight never washes out the screen, plus dimmable, glare-free LED lighting you can drop low for a bright projected image and raise to find a ball.
This is where a bare shell becomes a golf room, and it is worth naming exactly what lives inside so you size the height, the depth, the power, and the light around it. The anchors are the big pieces: a tensioned impact screen, an enclosure with side and overhead baffles and padding, a projector throwing onto the screen, and a launch monitor reading every shot. The launch monitor comes in a few flavors that each ask something different from the room — a ceiling or overhead camera unit needs height and a clear downward view, a unit in front of the tee needs a clean gap of floor before the screen, and a radar-based unit set behind the tee needs depth behind you to track the ball off the face. Underneath it all goes the hitting mat: a thick, forgiving mat with a swappable hitting strip, sized so your whole stance is on the mat through the swing.
Around the anchors you fit out for the way the room actually gets used: a club rack or wall hooks for the bag, a tray or basket of balls and tees, a ball return or shag tube, an adjustable tee or rubber tees set into the mat, and a putting strip if you want to roll a few. Add the comfort that makes people stay — a sofa or a couple of stools along the side, a side table, a Bluetooth speaker, a mini-fridge or a small bar, and a screen-side scoreboard if you run a league night. Wire it for a gaming PC or console, the projector, and the monitor, and run the network so the software never stutters mid-round. These are the touches that turn a hitting bay into the hangout room friends ask to come back to, not just a place to grind on your swing alone.
A thick mat with a replaceable strip, a level base under it, and a safe gap to the screen — the details that keep every swing reading true.
| Golf simulator planning checklist | |
|---|---|
| Ceiling height | Around 9 to 10 feet of true clearance over the tee so a full driver swing arcs overhead without clipping the ceiling — the single most important number |
| Room depth | Enough length from tee to screen for the ball to fly and the monitor to read, plus a safe gap to the screen and room behind the tee for a full follow-through |
| Width & clearance | Room for a right- and left-handed swing without hitting a side wall, with a seating and staging lane along one side |
| Light control | Room-darkening shades or minimal windows plus dimmable, glare-free LED light so daylight never washes out the projected image |
| Insulation & heat | Insulated walls and ceiling with a heater and a cooling plan so the bay plays the same year-round through a North Idaho winter |
| Power & network | Dedicated 120V circuits for the projector, PC, and monitor, plus a hardwired or strong wireless connection so the software never stutters |
Light is the thing most home simulators get wrong. A projected image washes out the moment daylight hits the screen, so plan the room to control light from the start: minimal or carefully placed windows, room-darkening shades on any you do have, and dimmable, glare-free LED fixtures positioned so they light the floor to find a ball but never spill onto the screen. The goal is a room you can drop dark enough for a crisp projected image and bring up enough to set a tee and read a putt — and you cannot bolt that on cheaply later, so design the windows and the lighting circuits before the walls are finished. Aim the fixtures so the player never throws a shadow across the screen on their downswing.
Power and network decide whether the system runs clean. A projector, a gaming PC or console, the launch monitor, the lights, and the sound add up, so plan dedicated 120V circuits run from the house with the projector and PC ideally on their own clean breaker, and place outlets at the ceiling for the projector and along the wall where the gear lives so no cord crosses the hitting area. Run the network properly too — a hardwired Ethernet drop to the PC, or a strong dedicated wireless access point — because a simulator that buffers or drops mid-round kills the fun fast. Then make it warm: insulate the walls and ceiling and add a heater — a mini-split is the favorite because it heats in winter and cools in summer — sized to take the chill off fast, because nobody wants to swing in a 30-degree box, and a cold building grows condensation that is hard on the electronics and the screen. Insulation also deadens the thump of ball on screen so a late-night round stays neighborly.
A simulator bay earns a real, dead-level base, because the mat and the stance have to sit flat for every swing to read the same. A compacted gravel pad drains well and works under a properly built, level framed floor, while a concrete slab gives the flattest, most permanent surface and the most solid feel underfoot — a good choice for a dedicated bay that will not move. Either way, plan the approach so the screen, the enclosure framing, a hitting mat, and a heavy projector or PC cabinet can come straight off the truck and through the doors without a muddy uphill fight, and so a tall building has room for its taller walls and roofline on the site. Read how to prep a shed site before delivery day so the pad, drainage, and access are ready.
North Idaho winters drive several choices: a roof and anchoring rated for local snow load — which matters more here because a simulator wants a tall building that catches wind and holds snow — insulation that keeps the bay workable through a long freeze, and a clear, plowed path so you can get to a round after a storm. Because simulators push toward the larger footprints, taller walls, and added electrical that can trigger local rules, plan ahead: many small sheds skip a permit, but bigger and taller buildings, electrical work, and setback or HOA requirements often do not. Confirm what your town and county require on the service areas pages, and factor any electrical or height-related permit into the plan before you finalize the size, the wall height, and where the bay will sit.
Taller than a standard shed, and this is the number to get right first. Plan for roughly 9 to 10 feet of true clearance over the tee so a full driver swing arcs up over your head and back down without you chopping the swing short or putting a club through the ceiling. The taller the player and the longer the driver, the more height you want, so measure your tallest player taking a real driver swing — many golfers raise the club well over 9 feet at the top. Order taller sidewalls, or step up to a gambrel or lofted roof that raises the center ridge over the tee, because you cannot raise a ceiling after the building is up.
Depth is the second critical number after ceiling height. You need enough length from the tee to the screen for the ball to fly and the launch monitor to read it cleanly, plus a safe gap so the screen takes the strike from a distance and room behind the tee for a full follow-through. That usually means a building around 16 to 24 feet deep depending on your monitor. For width, plan enough that a right- and left-handed player can each swing a driver without catching a side wall, with a lane along one side for a seat, a club rack, and people watching. Length protects the shot; width makes the room usable and social.
Hang a tensioned impact screen a foot or more off the deep back wall, wrapped in a padded enclosure with side and overhead baffles so a hard drive is caught quietly. Mount the projector clear of your swing and out of your own shadow — a short-throw unit on the ceiling or a standard projector behind the tee. Place the launch monitor for a clean read: an overhead camera unit needs ceiling height and a downward view, a unit in front of the tee needs a clear floor gap before the screen, and a radar unit behind the tee needs depth to track the ball. Match the room's height and depth to the specific monitor you choose, since each one asks something different.
Start with a dead-level floor, because the mat and your stance have to sit flat for every swing to read and feel the same — a compacted gravel pad under a level framed floor works, and a concrete slab gives the flattest, most permanent base. On top of it, use a thick, forgiving hitting mat with a replaceable hitting strip where the club strikes, sized so your whole stance stands on the mat through the swing rather than half on bare floor. A good mat saves your wrists and joints over a long session and keeps the strike consistent. Plan the mat and floor together so the tee height, the stance, and the level all line up.
Treat light control as a design decision, not an afterthought, because a projected image washes out the instant daylight hits the screen. Keep windows minimal or carefully placed, add room-darkening shades to any you do have, and choose dimmable, glare-free LED fixtures positioned to light the floor for finding a ball without spilling onto the screen. You want to be able to drop the room dark enough for a crisp image and bring it up enough to tee a ball and read a putt. Aim the lights so your body never throws a shadow across the screen on the downswing, and plan the windows and lighting circuits before the walls are finished.
Yes, if you insulate and condition it from the start. Insulate the walls and ceiling and add a heater sized to take the chill off fast — a mini-split is the popular choice because it heats in winter and cools the room in summer when a projector and PC add their own warmth. Heat and insulation also keep condensation down, which protects the projector, the PC, the launch monitor, and the screen from moisture damage, and they deaden the thump of ball on screen so a late-night round stays neighborly. Pair that with a snow-rated roof and a plowed path, and the bay plays the same in February as it does in July.
North Idaho golf courses close by November and don't reopen until April at the earliest. A backyard golf simulator shed built on your Coeur d'Alene or Post Falls property keeps your swing working through the entire off-season without a club membership, a drive downtown, or a booking window.
Ceiling height is the dimension that can't be fixed after the fact. A full driver swing at address requires at least ten feet of clear height — ideally ten and a half or more for taller players — measured to the lowest obstruction, not the ridge. Because NIOS frames on your property, wall height and truss design are set before the first board goes up, not after you discover the ridge beam is in the way.
A simulator shed also needs to handle a North Idaho winter from the inside. Insulated walls and a mini-split or wall heater keep the space functional when it's ten degrees in Coeur d'Alene, and a properly vapor-managed wall assembly prevents the condensation that wrecks projectors and screens. Electrical capacity for a projector, launch monitor, and heating load is easier to route when the building is wired new rather than adapted from a storage shed.
Wooded or sloped lots in Hayden, Rathdrum, and the rural edges of Kootenai County can make shed placement tricky — an on-site build resolves grade and access in ways a delivered unit cannot. Price your simulator shed in the builder to compare footprints and wall heights, or get a free estimate. See the pricing page for a realistic range before you commit to a size.
Tell us your tallest player, your launch monitor, and how you want to use the room, and we will help spec the ceiling height, room depth, screen wall, light control, power, and heat around your property — then you can build and price it online.
Keep planning your build with related North Idaho shed guides.