A home brewery shed moves the whole messy, wonderful process of making beer, cider, or wine out of the garage and the kitchen and into one building designed around it. Brewing is wet, hot, and steamy, it runs on water and power, and it asks for steady temperatures for days or weeks while a batch ferments. Try to do all of that on the kitchen stove and you fight your household the entire time, boil-overs on the cooktop, a fermenter crowding a closet, kegs taking over the fridge, and steam fogging the windows. A purpose-built home brewery shed solves it by giving the brew its own room with the things brewing actually needs: a brew zone with a powerful burner or electric system, water close at hand, a floor drain so you can hose the place down, temperature control for fermentation, and storage for kegs and bottles. It is the difference between brewing around your life and brewing in a space built to do it.
A brewery shed is really a small, hard-working production room, so the decisions that matter are utility decisions, not decor. How you power the boil, whether you run water and a drain, how you hold fermentation temperature through a hot July and a cold January, and how you vent the steam and heat, those choices set everything else. Get them right and you have a space you can brew a ten-gallon batch in on a weeknight, clean down in minutes, and walk away from while the yeast does its work. This guide walks each one in order, points you to the sizes that fit a brew rig plus fermentation and storage, and explains how we build the shell tight and dry on your property so it is ready for your electrician and plumber to finish. If you would rather see layouts priced first, you can build and price a shed in a few minutes and come back to the details.

A backyard brewery shed built around the process: a brew zone with power and water, a sloped floor with a drain, fermentation temperature control, and keg storage.
A brewery generates heat and steam and needs headroom over a tall kettle and a counterflow chiller, so the roofline matters more than it does for a plain storage shed. A standard gable is the workhorse choice: straight walls make it easy to line a brew bench, a sink, and fermenters along the perimeter, the symmetric roof sheds a Panhandle snow load evenly, and the peak gives you room to install a vent or a powered exhaust fan up high where the steam collects. If you want vertical volume for a tall electric brew system, a hop-back tower, or a stacked fermentation setup, a lofted barn (gambrel) adds height and a small loft you can use to stage empty kegs, bottles, and grain sacks overhead so the floor stays clear for brewing and cleaning. A lean-to or single-slope roof reads modern and lets you pitch the tall wall toward a window for daylight and a high vent, which suits a compact one-person brewery.
A brewery shed shares most of its DNA with the other food-and-drink production builds we do, so it is worth seeing how we handle a canning kitchen shed when you are weighing rooflines and finishes, because the wet floor, the heat source, the ventilation, and the wipe-clean surfaces overlap almost completely. Whatever the roofline, a brewery is a finished, washable production space, not a dry storage box. That means a floor you can hose down and that drains, walls and surfaces that shrug off splash and steam, a heat source vented to the outside, and power and water planned in before the walls ever close up.
A single brew bench, a sink, one or two fermenters, and a kegerator, sized for five- to ten-gallon batches. A 10x12 is the tidy floor for a one-person brewery that brews, ferments, and chills in one room.
Add a dedicated temperature-controlled fermentation and keg corner so the brew zone and the cold zone are not fighting. A 10x16 or 12x16 gives room for the rig, a glycol or fridge-cooled ferment area, and serving.
If you batch big, run multiple fermenters, or want a tasting nook, step up to a 12x20 so brewing, fermentation, kegging, and a few stools each get their own zone without crowding.
Footprint is the decision everything else rides on, so size for the brew rig plus everything that has to ferment, chill, and store around it. A 10x12 shed is the sensible floor for a one-person home brewery: 120 square feet holds a brew bench with a burner or an electric kettle, a utility sink, a fermenter or two, and a kegerator, with the floor sloped to a drain so you can clean as you go. Move up to a 10x16 shed and the extra length lets you carve out a temperature-controlled fermentation and keg corner separate from the hot, steamy brew bench, which is the single biggest comfort upgrade a brewery can make. A 12x16 shed is the sweet spot for a serious home brewery: 192 square feet absorbs a full brew rig, a double sink, a glycol-chilled or fridge-cooled fermentation zone, a bank of kegs, and a stretch of counter for milling grain and packaging. The 12x20 shed is the build for club-scale brewers or anyone who wants a tasting nook, with room for multiple fermenters, a walk-in-style cold corner, bottle and keg storage, and a couple of stools at a tasting counter without any of it crowding the brew floor. Whatever you pick, plan the room around your batch size and how much you ferment at once, because fermenters and kegs claim floor faster than the brew rig itself.
These food-and-drink builds overlap in their wet floors and ventilation, but the right one depends on what you make and how you store it. A home brewery shed is optimized for fermentation and the boil: the brew rig, the water and drain, the temperature-controlled ferment zone, and the kegs are the whole point, and the space stays a warm, working production room. A canning kitchen shed is optimized for cooking and putting up food, a big heat source, large kettles and a pressure canner, prep counter, and shelving for jars, so if your main job is processing tomatoes, jam, and pickles rather than fermenting drinks, that is a canning kitchen with a brew bench at most. A root cellar shed is built around cool, stable storage, an insulated, earth-tempered room that holds produce and bottles at a steady cool temperature without much power, so if you mostly need somewhere to age and store finished bottles and kegs cold, a root cellar handles the storage side beautifully and pairs well alongside a brewery. And if the real goal is pouring and entertaining rather than making the drinks, an outdoor bar shed trades the brew rig and the floor drain for a serving window, a bar top, and stools. Many buyers land on a dedicated brewery shed precisely because brewing needs things a bar or a cellar does not, real power for the boil, water and drainage for cleaning, and tight temperature control for the yeast. If you are torn, decide whether you are mainly making the drink, storing it, or serving it, and build around that.
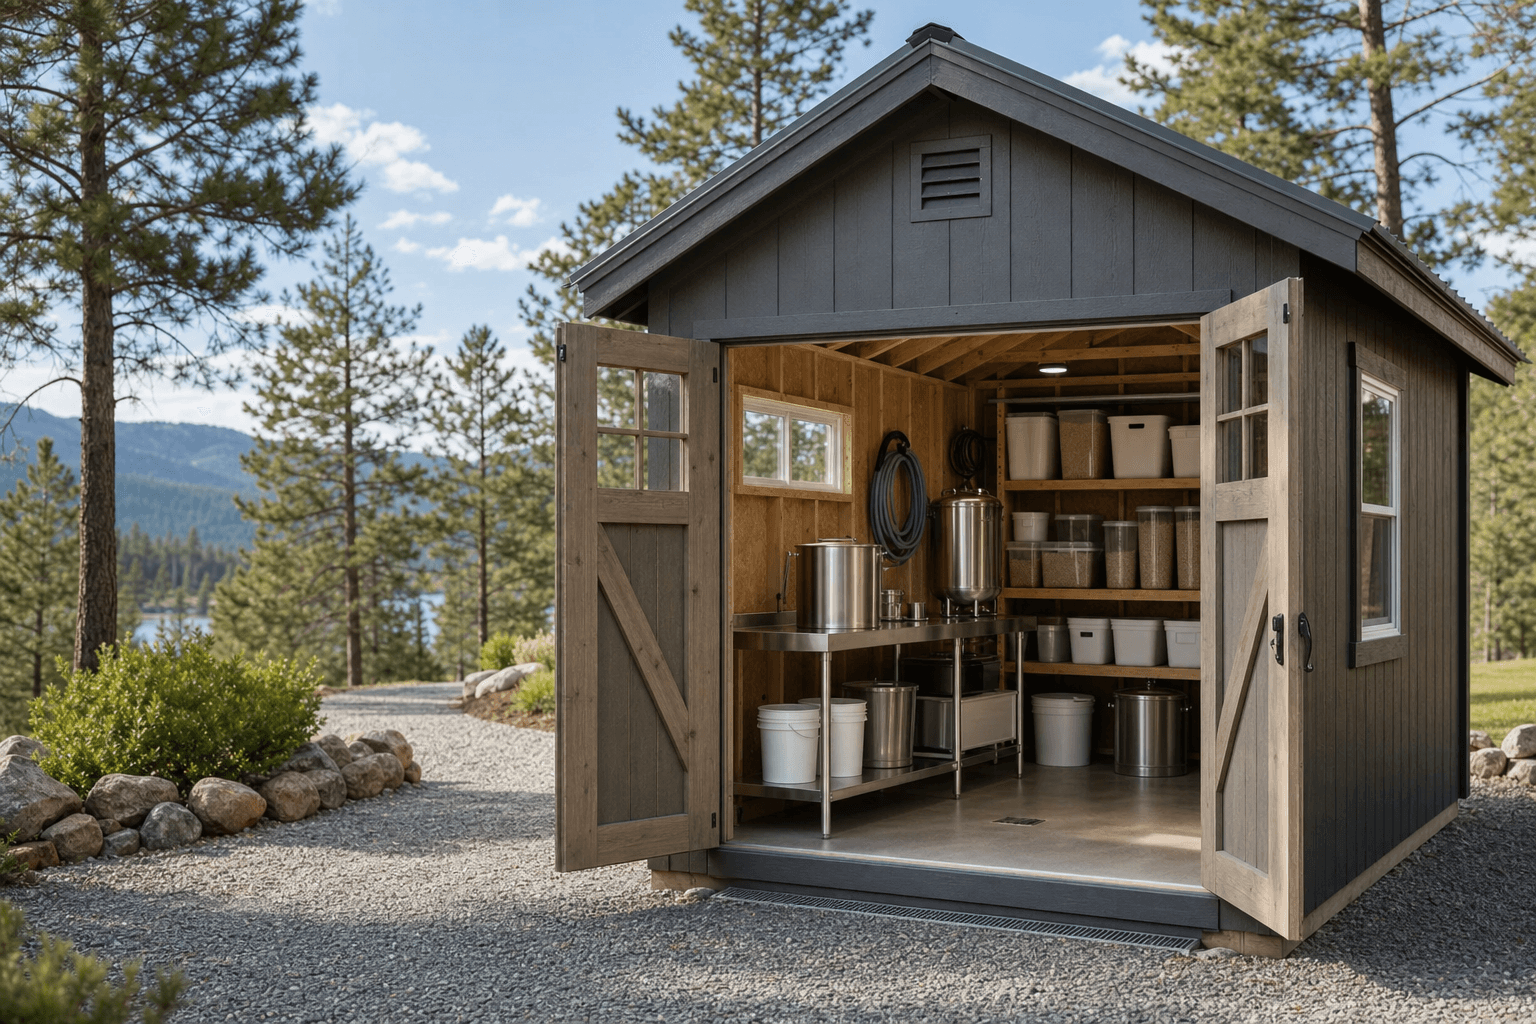
Zoned to brew: a hot brew bench with water and a drain on one side, a temperature-controlled fermentation and keg corner on the other, surfaces that wipe clean.
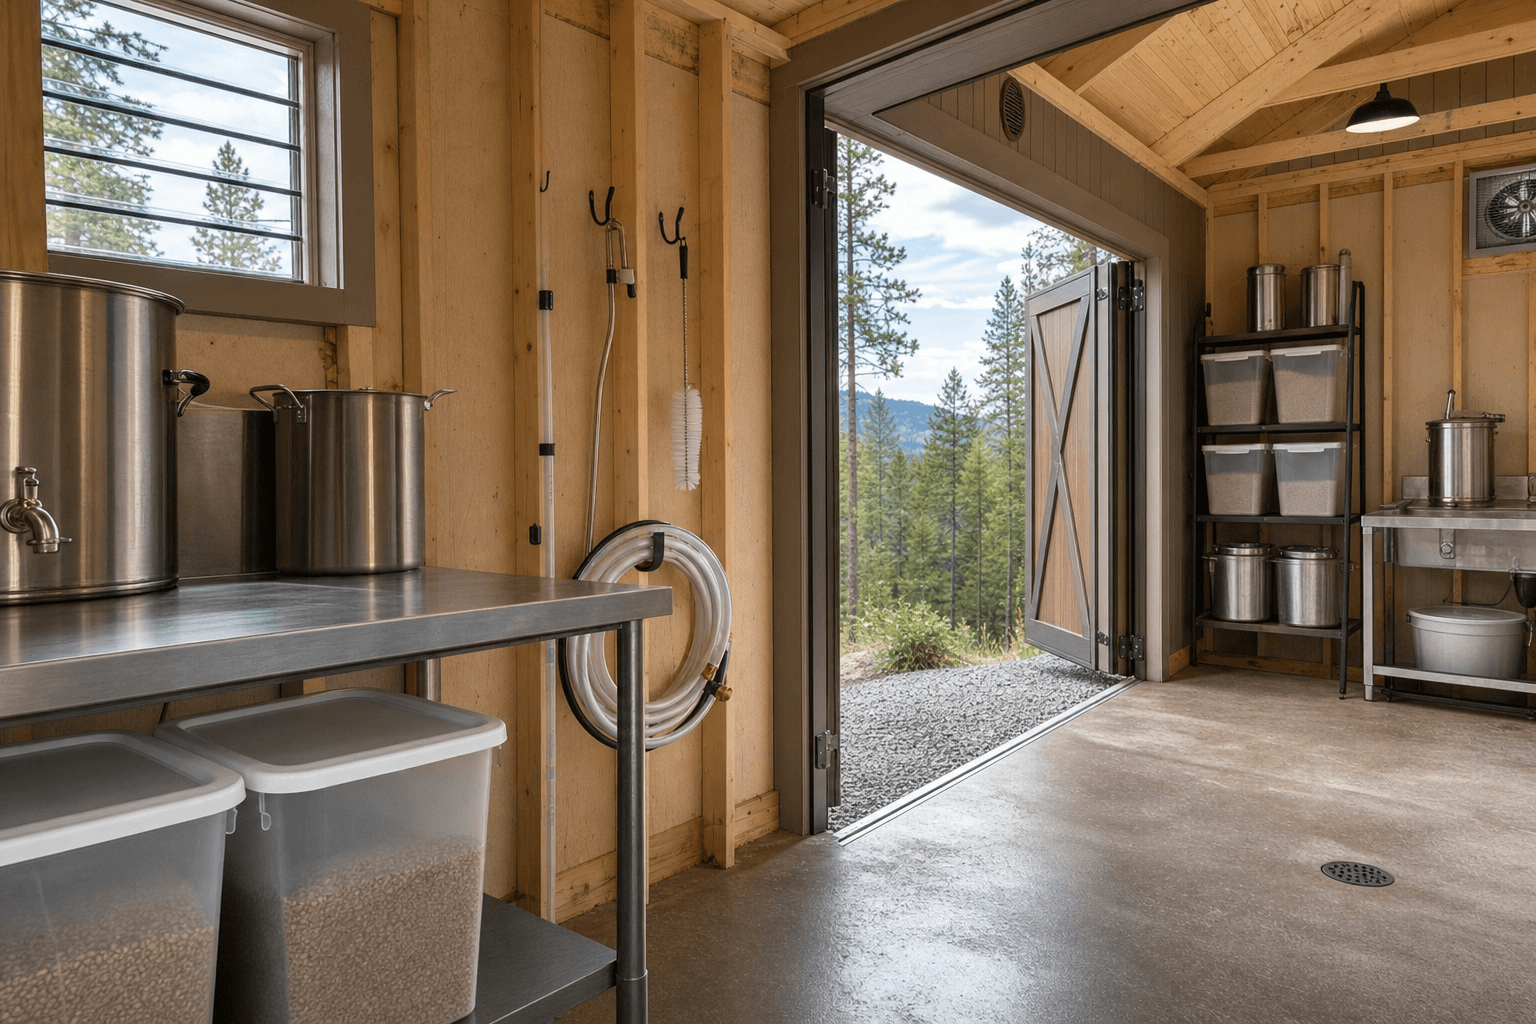
A brewery works far better when you plan it as zones instead of one open box, because brewing moves through stages and each one wants different conditions. The brew zone is the hot, wet anchor: the burner or electric kettle, the hot and cold liquor tanks, the mash tun, and the chiller live here, so it belongs near the water supply and directly over the floor drain, with the ventilation hood or fan right above it to carry off steam. The wash and water zone groups the utility sink, the supply lines, the hose bib, and the drain in one corner so plumbing lands together and you can rinse kettles, clean kegs, and hose the floor without dragging water across the room. The fermentation zone is the opposite of the brew zone in temperament, it wants to be cool, stable, and away from the heat and splash, so put your temperature-controlled fermenters, a fermentation chamber, or a glycol setup on the far wall or in a partitioned cold corner. The cold and keg zone holds the kegerator, the keg fridge, and finished kegs on tap or in cold storage, ideally next to the fermentation zone so a single cooling plan serves both. Finally, keep a dry-stock and packaging zone of shelving and counter for grain, hops, yeast, bottles, caps, and your bottling or canning gear, up off the wet floor. Sketching these zones before you pick a footprint is the fastest way to tell whether brewing and fermentation can share a room comfortably or whether you need to step up a size.
Electric brewing pulls serious current, an electric kettle or all-in-one system often wants a dedicated 240-volt circuit, while fermentation chillers, a kegerator, pumps, and a glycol unit each need their own outlets. Plan a subpanel fed by a licensed electrician so the boil, the cooling, and the lights are on separate circuits and a heating element never dims the room or trips the brew mid-batch.
A brewery runs on water and makes a wet floor, so plan a supply line and ideally hot water to a utility sink, a hose bib for filling and rinsing, and a sloped, sealed floor that drains to a center or trench drain. Cold-climate lines must be planned to drain down or stay heated for winter, because a frozen or burst line is the worst surprise a brewer can have.
Yeast wants a steady, narrow temperature band, so plan how you will hold it year-round, a fermentation chamber or chest freezer on a controller, a glycol chiller for conical fermenters, plus insulation and a small heater or mini-split so a North Idaho garage swing from 95 in summer to below freezing in winter never ruins a batch.
Sanitation is everything in brewing, so finish the floor in sealed concrete or epoxy that hoses clean, run wipe-clean wall surfaces behind the brew bench, and use sealed, non-porous counters. Vent the steam and combustion heat outside with a hood or a powered exhaust fan up high, and add a fresh-air inlet so a propane burner gets the air it needs.
The keyword for a brewery shed is process, and the fit-out is everything that takes you from grain to a finished, carbonated keg without leaving the building. For the boil: a propane burner or a high-power electric kettle, a hot and cold liquor tank, a mash tun, a brew kettle, a wort chiller or counterflow chiller, and a brew stand or rig to hold it all. For moving liquid: a pump or two, silicone hoses, a hose bib for water, and a utility sink deep enough to rinse a kettle. For fermentation: carboys, buckets, or stainless conical fermenters, a fermentation chamber or a chest freezer with a temperature controller, an airlock, a hydrometer or refractometer, and for the ambitious a glycol chiller. For cold and serving: a kegerator or keezer with taps, a keg fridge, a CO2 tank and regulator, and corny kegs for conditioning and serving. For packaging: a bottling bucket, a bottle filler and capper, bottles and caps, or a canning seamer, plus a place to store empties and finished bottles cold, which is exactly where a root cellar shed earns its keep next door. For cleaning and sanitation: a pump-driven keg and line cleaner, brushes, sanitizer and cleaner buckets, and a floor squeegee for the drain. For dry stock: bins for grain, a grain mill, sealed hop and yeast storage, and shelving for it all up off the wet floor. Walk through your own brew day like this before you settle on a size, because the brew rig, two fermenters, a kegerator, and a sink claim the perimeter faster than people expect, and that is exactly why a serious home brewery tends to land at a 12x16 shed rather than something tighter.
Detail that makes it a brewery: a sloped, sealed floor draining to a center drain, a deep utility sink with a hose bib, and a fermenter on temperature control.
| Home brewery shed planning checklist | |
|---|---|
| Best roofline | Standard gable for an even wall layout and a high vent; lofted barn for headroom and overhead grain and keg storage |
| Practical sizes | 10x12 for a one-person brewery, 10x16 to 12x16 with a separate cold ferment corner, 12x20 for club scale or a tasting nook |
| Water and drainage | Supply line and hot water to a utility sink, a hose bib, and a sloped sealed floor draining to a center or trench drain |
| Power | Subpanel with a 240-volt circuit for an electric boil, plus dedicated circuits for cooling, pumps, and lighting |
| Fermentation control | A chamber, chest freezer on a controller, or glycol chiller, with insulation and heat to hold a steady band year-round |
| Ventilation and surfaces | A hood or powered exhaust high up with a fresh-air inlet, plus sealed, washable, food-safe floors and counters |
Three utilities decide whether your brewery shed is a year-round workspace and not just a fair-weather hobby corner. Power is the one most people underestimate, because brewing has moved electric, and an electric kettle or an all-in-one system can pull as much as a kitchen range. Plan a subpanel fed from your home's panel by a licensed electrician so you have a dedicated 240-volt circuit for the boil, separate circuits for the fermentation chiller, the kegerator, and any pumps, and a lighting circuit that never dims when a heating element or a compressor kicks on. If you brew on propane instead, you trade the big circuit for a combustion-air and venting plan, which moves the problem from the panel to the ventilation, covered below. Water is the second utility, and a brewery wants a supply line and ideally hot water to a deep utility sink, a hose bib for filling kettles and rinsing kegs, and a floor that drains, so plan the plumbing run and the drain together with the slab. Winter readiness is what makes it a North Idaho brewery and not a summer-only setup: insulate the building and add a small heater or a mini-split so you can brew comfortably in January and, just as important, hold fermentation in its band when the outside temperature drops below freezing, and plan every water line and the drain to drain down or stay heated so nothing bursts in a hard freeze. We frame and build the shell tight and dry on your property, with the wet wall, the drain, and the vent locations roughed in, so it is ready for your electrician and plumber to finish.
A brewery shed has a wet floor and heavy gear, so the base matters more than it does for a dry shed. Most brewery builds sit on a poured concrete slab rather than a plain gravel pad, because a slab gives you the flat, sealed, sloped floor a center or trench drain needs and stands up to dropped kegs, splashed water, and constant cleaning, though we still set the slab on a compacted gravel base for drainage. Placement matters because the building has to reach water, power, and a way to handle drain water, so set it where a supply line and a drain or dry well can run, and where your gravel driveway or a clear path lets our crew get materials in to build it. North Idaho weather drives the rest of the plan: design for local snow load so the roof shrugs off a heavy Panhandle winter, keep the structure up out of spring melt so a building that gets wet use stays dry underneath, and account for the freeze, because a brewery's water lines and drain are the most freeze-sensitive part of the whole project. We build with weather-rated framing and finishes suited to pine-country freeze-thaw cycles, and we set the structure to drain and breathe so it lasts through years of wet, steamy use. On permits, the rule of thumb is the use: a plain storage shed under a size threshold often needs no permit, but the moment a building is finished, wired, and especially plumbed with a sink and a floor drain, your county or city will likely require a building permit, an electrical inspection, and a plumbing inspection, plus rules on how drain water is handled and adherence to setbacks. Rules vary across Kootenai County and the cities around Coeur d'Alene, so confirm with your local building department before you finalize size, placement, and your water and drain plan. We can build the structure around whatever your jurisdiction requires once you know the answer.
Water and drainage are the heart of a brewery shed, so plan them with the floor from the start. On the supply side, run a water line out from your house to a deep utility sink and a hose bib, and add hot water if you can, because rinsing kettles, cleaning kegs, and sanitizing all go faster with it. On the drainage side, the floor is the key: pour a concrete slab sloped to a center drain or a trench drain so you can hose the room down and squeegee the water away instead of mopping it, which is what makes a brewery quick to clean. Where the drain water goes depends on your property and your local rules, brewing wastewater carries spent grain, hops, and cleaners, so most counties want it tied into an approved drain, a dry well, or your septic per their code rather than dumped on the ground. In North Idaho both the supply line and the drain also have to survive a freeze, so plan them to drain down or stay heated for winter. We build the slab with the slope and the drain set, and the wet wall roughed in, so your plumber can tie everything in cleanly.
Both work, and the choice mostly comes down to power versus ventilation. Electric brewing is clean, quiet, and precise, with no open flame or combustion fumes inside, but it is hungry: an electric kettle or an all-in-one system typically wants a dedicated 240-volt circuit, much like an electric range, and your fermentation chiller, kegerator, and pumps each need their own outlets on top of that. That means planning a subpanel fed from your home's panel by a licensed electrician, with the boil, the cooling, and the lighting on separate circuits so a heating element never dims the room or trips a breaker mid-brew. Propane brewing gives you a powerful boil without the big circuit, which is appealing if running heavy power to the building is costly, but it moves the problem to ventilation, because an indoor propane burner produces combustion gases and a lot of heat and must be vented outside with a hood or exhaust and given a fresh-air inlet so it burns safely. Many home brewers go electric specifically to keep an open flame out of a closed, insulated shed. Decide which you want early, because it sets whether the build leans on a big electrical plan or a serious ventilation plan, and we rough in the shell accordingly.
Fermentation temperature control is what separates good homebrew from inconsistent batches, and it is the hardest thing to hold in an unconditioned North Idaho outbuilding, where a shed can swing from above 95 in July to well below freezing in January. Yeast wants a steady, narrow band, often in the 60s for ales, cooler for lagers, and even a few degrees of drift changes the flavor or stalls a batch, so you cannot just rely on the air temperature. The common approaches are a fermentation chamber or a chest freezer fitted with a temperature controller that both cools and, with a small heater, warms to hold a setpoint; a dedicated fermentation fridge; or, for conical fermenters, a glycol chiller that circulates coolant through the fermenter jacket. Whichever you choose, the building itself has to help: insulate the walls, ceiling, and floor, and add a small heater or a mini-split so the room stays in a workable range and your chamber or chiller is not fighting a brutal swing. Plan the fermentation zone away from the hot brew bench so the two are not working against each other. We insulate and seal the shell and wire for the cooling and heating you choose so the setup holds a steady band year-round.
Plan keg and bottle storage as its own zone, because finished beer takes up more space and needs cooler, steadier conditions than the brewing gear. For kegs, decide how many you want on tap versus conditioning, then plan a kegerator or a keezer with the number of taps you want, plus cold storage for full kegs that are carbonating or waiting their turn, ideally next to the fermentation zone so one cooling plan serves both. Keep a clear spot for empty kegs and your CO2 tank and regulator too. For bottles, you want shelving that holds full cases up off the wet, splashy floor and a cool, dark, stable place to condition and age them, since warmth and light degrade bottled beer, cider, and especially wine over time. This is where pairing the brewery with a root cellar shed shines, an insulated, earth-tempered room holds finished bottles and kegs at a steady cool temperature without much power, keeping your bottle library out of the warm production room. Plan for empties as well, because clean bottles and kegs waiting to be filled need their own dry storage. We size and lay out the building so the keg and bottle zone gets real space instead of being an afterthought wedged beside the brew rig.
Sanitation makes or breaks brewing, so a brewery shed should be built to be hosed down and wiped clean everywhere wort, yeast, and cleaners can reach. Start with the floor: a sealed concrete or epoxy-coated slab, sloped to a drain, is the standard, because it stands up to splashed water, spilled wort, and dropped gear, and it rinses clean instead of soaking up the mess like wood or bare concrete would. Behind and around the brew bench, run wipe-clean wall surfaces such as sealed or coated panels rather than bare studs and insulation, so steam and splash do not soak in or grow mold. For counters where you handle grain, yeast, and packaging, use sealed, non-porous surfaces that sanitize easily, and avoid raw wood in the wet zones. Choose materials that tolerate the heat and humidity a brewery throws off without warping or harboring bacteria, and keep dry storage for grain and hops up off the floor and sealed against pests. Good ventilation is part of sanitation too, because carrying steam and moisture out keeps surfaces dry between brew days. We finish the shell with the wet, washable production use in mind, with sealed surfaces and a floor that drains, so it stays clean batch after batch.
Ventilation is essential in a brewery shed, because a boil throws off a lot of steam and heat, and a propane burner adds combustion gases on top of that, all of which have to leave the building or they will soak the walls, fog the room, and make brewing miserable and unsafe. The core of the plan is to capture and exhaust at the source: put a vent hood or a powered exhaust fan up high directly over the brew kettle, where steam and heat naturally rise, and duct it straight outside. Size the fan to actually move the volume a hard boil produces, an undersized fan just stirs the steam around. Just as important is make-up air: any time you exhaust air out, fresh air has to come in to replace it, so plan an inlet, especially with a propane burner, which needs combustion air to burn safely and cleanly. A gable or single-slope roof helps because it gives you height to mount the exhaust where the steam collects. Beyond the brew-day exhaust, plan general ventilation, a vent or a fan that keeps humidity from lingering between batches so surfaces dry and mold never gets a foothold. We rough in the vent and exhaust locations and build the shell so your hood, duct, and make-up-air inlet install cleanly and carry the steam and heat out where they belong.
Moving a homebrew setup out of the basement or garage into its own building solves most of the friction that stalls serious hobby brewers: the heat and steam during a boil that the house doesn't want, the fermentation temperature that needs to hold steady independent of the household schedule, and the floor space that the keezer and kegs have quietly taken over.
A backyard home brewery shed built on site in North Idaho can be designed around the actual workflow — a hot side near the door with gas or electric brew power and a floor drain, a cold side along an insulated wall for fermentation, and a conditioning area for kegs. Getting those zones right at framing costs nothing extra; retrofitting them after the fact means concrete cutting or a plumber crawling under a finished floor.
Temperature stability is the variable that North Idaho weather makes interesting in both directions. Summer days near Coeur d'Alene push into the 90s, which is outside the range for most ale fermentation without mechanical cooling. Winters drop well below fermentation-friendly temperatures. A shed with wall insulation and a mini-split handles both — the heating load is small, and the cooling load in summer is real but manageable in a well-sealed building.
Floor drainage is the detail most brewers underestimate on the first build. A single floor drain with a cleanout, properly sloped concrete, lets you hose the entire shed floor after a boil-over or a keg line flush. Pouring that slope requires planning it before the slab goes down. Properties in Post Falls and Hayden on standard lots can usually run a drain line to a gravel sump; city-limit properties may need a dry well or a tie-in to the house drain.
Browse finished brewery shed builds to see how other owners have laid out the interior, then price your footprint in the shed builder. The 12x16 and 12x20 ranges cover most serious setups without wasted space.
Tell us your batch size and how you brew and ferment, and we'll help you size, lay out, and price the power, water, drainage, and temperature control for a home brewery shed on your North Idaho property.
Keep planning your build with related North Idaho shed guides.