A backyard homeschool shed gives your school day its own four walls. Instead of spreading worksheets across the kitchen table every morning and clearing them off before dinner, the kids walk out to a dedicated classroom and leave it set up between lessons. The maps stay on the wall, the science project stays on the bench, and the dining room goes back to being a dining room. That separation tells everyone, including the youngest learner, that crossing the yard means it's time to focus, and crossing back means the day is done. For a lot of North Idaho families, a purpose-built homeschool shed is the difference between a kitchen that doubles as a school and a real classroom twenty feet from the back door.
Four things make a backyard classroom work, and this guide is built around them: light, layout, climate, and storage. You want big, even daylight so kids can read and write without fighting glare on a screen; a layout that flexes between a six-year-old doing phonics and a twelve-year-old grinding through algebra at the same table; heat that holds through a Panhandle January and a way to stay cool in July; and enough organized storage that a year of curriculum and supplies has a home instead of a pile. Get those right and you have a calm, bright room your family uses every school day, all year. This guide covers the rooflines and sizes that fit a family classroom, how to zone the interior for multiple ages, the board and projector wall, and site prep. If you'd rather see it priced first, you can build and price a layout in a few minutes.
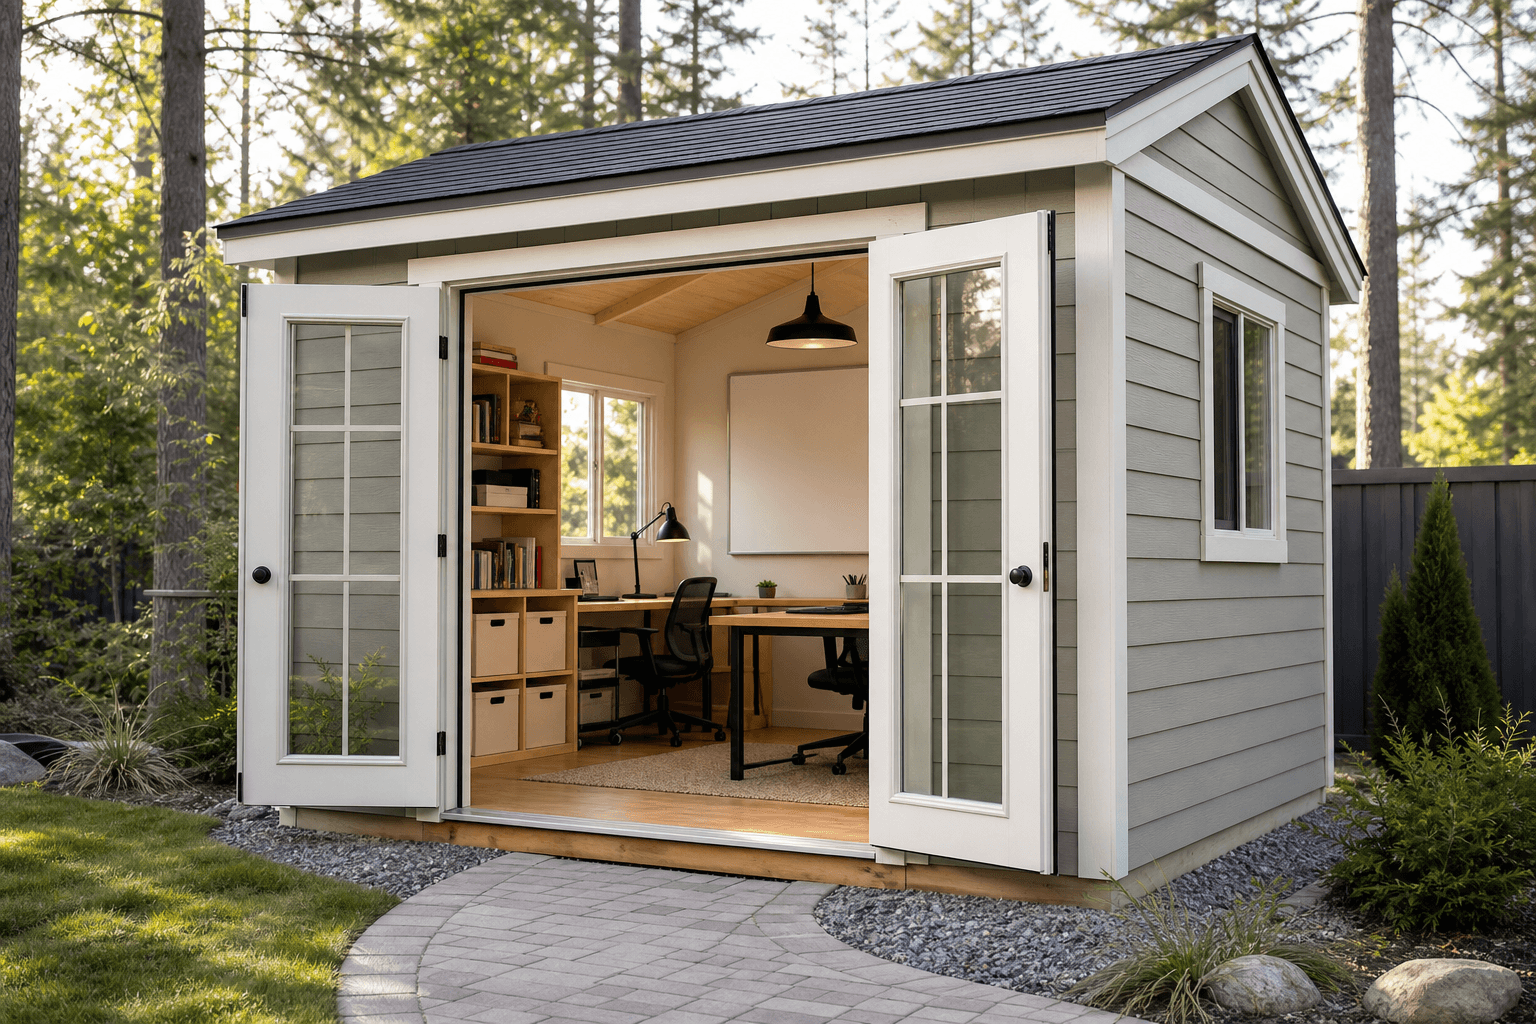
A backyard classroom built for real school days: bright, climate-controlled, and separate from the house.
Most homeschool sheds are happiest in a standard gable. Straight walls and a simple roofline give you long, flat surfaces for a whiteboard, a projector screen, bookshelves, and a row of desks, with full headroom across the whole room instead of a sloped ceiling cutting into a corner where a child sits. It's the easiest style to insulate well and the most forgiving to lay out with a board wall on one end and storage on another, which is why it's the default for a busy family classroom.
If you want the classroom to feel taller and brighter, a lofted barn (gambrel) roof adds vertical volume and an optional loft for a quiet reading nook or seasonal storage. A lean-to or modern single-slope roof pairs beautifully with a tall window wall and high clerestory glass, the move when daylight is your top priority. A model with a covered porch gives the kids a sheltered place to take a break or run an outdoor science lesson. Because a classroom is a conditioned room rather than a tool shed, the envelope choices overlap with how we build a backyard home office, so it's worth seeing how that build handles insulation, windows, and finish. If your kids lean into hands-on, messy work, also look at how an art studio handles light and durable surfaces.
A shared work table, a board wall, and a bookshelf or two for a single grade level or a pair of close-in-age siblings. A 10x12 covers a focused classroom for one or two without crowding the door.
Add desks at different heights, more shelving, and a small group table and you want a 12x16 so each child has elbow room and the teaching wall stays clear.
If you teach several ages at once, want a reading corner, a craft station, and real supply storage, step up to a 12x20 so the room has separate zones that don't run into each other.
Footprint is the decision everything else rides on, so size for the number of kids plus the stations the day needs, not just the seats. A 10x12 shed is a sensible floor for one or two learners: 120 square feet holds a shared table, a board on the end wall, and a couple of bookshelves without feeling tight. A 10x16 shed is ideal when your yard or setbacks favor a slim building along a fence line, giving you a long teaching wall, a row of desks, and a separate storage end. The 12x16 shed is the practical sweet spot for most families, with room for three or four desks at staggered heights, a group table, a full wall of shelving, and a clear board-and-projector wall everyone can see. To teach several ages at once with distinct zones, a reading nook, a craft and science station, a quiet corner, and open floor for circle time, a 12x20 shed gives you the square footage without the room feeling like a hallway. Families almost always wish they'd gone a size up once a full year of curriculum and a couple of growing kids share the room, so size for the family you'll have in three years.
These backyard rooms overlap, and the right one depends on who uses it and how. A homeschool shed is built around several people learning together: a flexible layout, lots of daylight, generous storage, and climate that holds all day with a room full of kids. A backyard home office is optimized for one adult on calls, so it leans toward sound isolation and a single hardwired desk, though the insulated, wired envelope is nearly identical and the two uses can share a building if you stagger the schedule. A playhouse is about imaginative free play and is usually simpler, often skipping the insulation, heating, and power that year-round school demands. If your school days lean heavily on painting and hands-on projects, an art studio prioritizes the same north light, wash-up space, and wipe-clean floors a busy homeschool room benefits from. Pick the use you'll do most days and build around it, then let the other uses flex into the space.
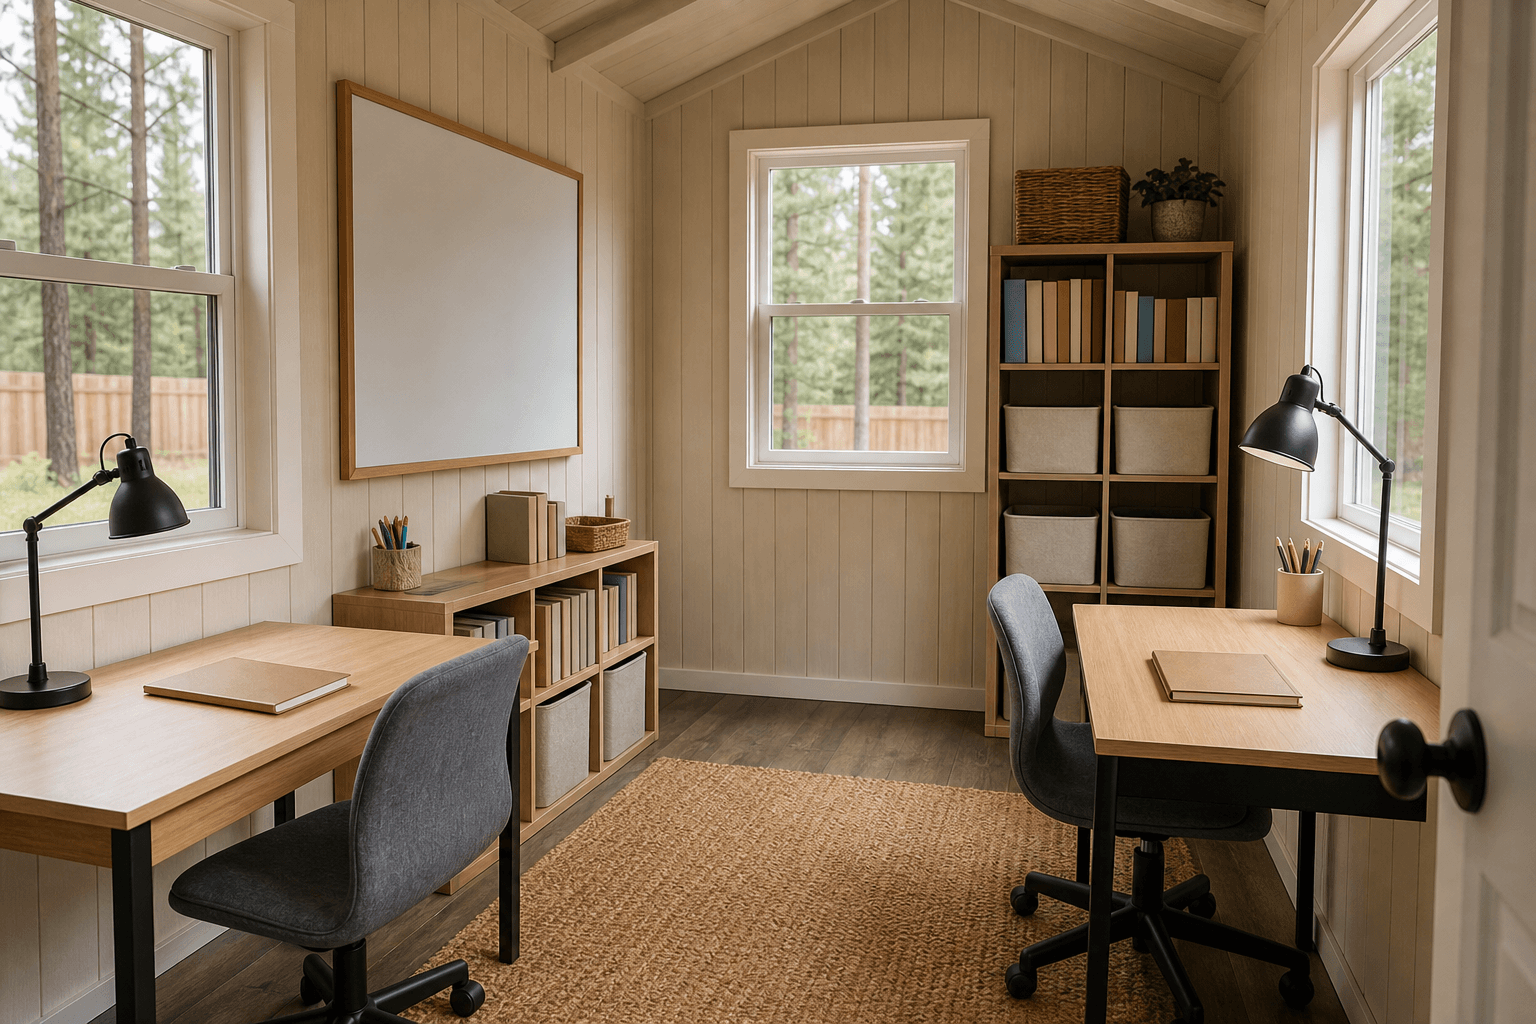
Zoned for a family: a board wall on one end, desks in the middle, books and supplies along the back.
A classroom that serves several ages at once works far better when you plan it as zones instead of one open box. The teaching zone is the anchor: dedicate one end wall to a whiteboard or chalkboard and a projector screen, and keep the desks facing it with a clear sight line for every seat, so the six-year-old and the twelve-year-old can both see the board. The independent-work zone is where older kids settle in for focused stretches, ideally desks angled away from the door and near a window for reading light. A reading and quiet zone, a rug, a chair or two, and a low bookshelf, gives the room a softer gear a kitchen table never could; a lofted model can put this up in the loft to free the floor. The hands-on zone handles art and science: a wipe-clean table with supplies and a water jug nearby, so glue and paint stay away from the worksheets. Finally, keep a storage and supply wall along one side for the books and bins, and a small landing at the door for backpacks. Sketching these zones on paper before you choose a footprint is the fastest way to tell whether a smaller room will hold your school day or whether you'll want a larger one.
Plan a full wall of adjustable shelving for textbooks, workbooks, readers, and reference sets, plus labeled bins for each child or each subject. Closed cabinets keep the year's curriculum sorted and out of reach of the youngest, while open shelves keep daily readers easy to grab.
Mix a shared group table for circle time and projects with individual desks for independent work, and choose adjustable-height desks or chairs so the same furniture fits a first grader and a teen. Leave room to roll a chair back and stand without bumping a shelf or the next desk.
Wire a dedicated circuit with outlets along the desk wall and near the board for laptops, tablets, a printer, a projector, and charging carts. Add a hardwired internet line or conduit to the house so online lessons and live classes don't drop mid-session.
A ductless mini-split heat pump heats and cools the room quietly through every season, and a continuous insulated envelope keeps it comfortable with a full room of kids. Choose wipe-clean LVP or sealed flooring and a washable wall finish so spills, paint, and muddy boots clean up fast.
The keyword for a homeschool shed is calm, organized learning, and the fit-out is all the things that protect it. On the teaching wall: a large dry-erase or chalkboard, a projector and a pull-down or fixed screen (or a wall-mounted display), a pocket chart or calendar, and a cart for markers and erasers. At the desks: laptops or tablets and a charging station, a label maker, pencil cases, headphones for kids doing audio lessons side by side, and a document camera if you teach from worksheets. For storage: adjustable bookshelves for the curriculum library, cube shelves with labeled bins for manipulatives, flash cards, blocks, and counters, a paper drawer for art paper, a craft cart for scissors and glue, and a cubby for each child's daily folder. For the hands-on and reading zones: a wipe-clean project table, a drying rack for wet art, a science-supply bin, a globe and map set, a rug, and reading chairs. For the room itself: a mini-split, a dehumidifier, and shades to manage glare. It adds up fast. None of it fits in a tiny 8x10 shed, which is why a real family classroom starts around 10 by 12, and most families want extra wall length once the board, the desks, the library, and a heat pump all share the room.

Detail that makes it a real classroom: a clear board wall, labeled supply bins, and power where the laptops live.
| Homeschool shed planning checklist | |
|---|---|
| Best roofline | Standard gable for a full board wall and headroom; lofted barn or single-slope for height and extra daylight |
| Practical sizes | 10x12 for one or two kids, 12x16 for three or four, 12x20 for a multi-age family classroom |
| Natural light | Large windows on two sides plus high or clerestory glass; shades to cut glare on the board and screens |
| Climate | Continuous insulation with a ductless mini-split heat pump for quiet year-round heating and cooling |
| Power and tech | Dedicated circuit, outlets at the desk and board walls, and a hardwired internet line for online lessons |
| Storage | A full wall of adjustable shelves, labeled bins per child or subject, and closed cabinets for the curriculum |
Three things decide whether the room actually teaches well. Natural light is first, because kids read and write for hours and nothing beats good daylight for comfort and mood. Aim for generous windows on at least two walls so the room never feels like a cave, and consider clerestory glass or a single-slope roof to pull soft light from above without sun in anyone's eyes. Then add shades, because the one place you do not want glare is the board or a screen, and North Idaho afternoon sun can wash out a projector fast. Power and tech come next: have a licensed electrician run a dedicated circuit from your panel, ideally to a small subpanel so you can add circuits later, with outlets along the desk wall and near the board for laptops, tablets, a printer, a projector, and charging carts. A hardwired internet line or fiber in conduit, feeding a mesh node inside, keeps live online classes from dropping, which household Wi-Fi won't manage across the yard. The board and projector wall ties the room together: pick one end wall, keep it clear of windows so reflections don't fight your screen, mount the board at kid-friendly height, and seat everyone with a clean sight line. Plan an outlet and a data drop on that wall so the projector wires in cleanly.
A classroom shell stays straight and dry only on a solid, level base, so most homeschool sheds sit on a compacted gravel pad sized about a foot wider than the building on each side for drainage, or on a concrete slab when you want a flat, sealed floor for rolling chairs. North Idaho weather drives the rest: we design for local snow load so the roof shrugs off a heavy Panhandle winter, keep the floor up off the ground so spring melt drains away instead of wicking in, and place the building where the gravel driveway or a clear path lets our crew bring materials in. We build with weather-rated framing and finishes suited to pine-country freeze-thaw cycles so the room lasts. On permits, the deciding factor is the use, not the size: a plain storage shed under a size threshold often needs no permit, but the moment a building is insulated, conditioned, and used as a classroom, with power, heat, and kids in it daily, your county or city may treat it as occupied space and require a building permit, an electrical inspection, and setbacks. Rules vary across Kootenai County and the cities around Coeur d'Alene, so confirm with your local building department before you lock in size and placement, and we'll plan the build around what your jurisdiction requires.
Plan the room as zones so several ages work at once without colliding. Put a whiteboard and projector screen on one clear end wall, with desks facing it so every child has a sight line for group teaching. Add an independent-work area near a window for older kids, a soft reading corner for a younger child, and a separate hands-on station so art and science stay away from the worksheets. Adjustable-height desks and chairs let the same furniture fit a first grader and a teen. A 10x12 handles one or two kids; most multi-age families want a 12x16 or 12x20 so each zone has breathing room.
More than you'd expect, because a full year of curriculum stacks up fast. Plan a wall of adjustable shelving for textbooks, workbooks, and readers, plus cube shelves with labeled bins for manipulatives, flash cards, and counters. Closed cabinets are worth it for the master curriculum and anything you want out of a toddler's reach, while open shelves keep daily readers easy to grab. Give each child a cubby for their folder and supplies, and add a craft cart for paper, scissors, glue, and paint. Keeping it all along one wall is part of why most families choose a 12x16 or larger.
Have a licensed electrician run a dedicated circuit from your home's panel, usually in buried conduit, and a small subpanel inside makes it easy to add circuits later. Plan outlets along the desk wall and near the board for laptops, tablets, a printer, a projector, and a charging cart, since a roomful of devices draws more than one outlet can handle. For internet, a hardwired Ethernet or fiber line to a mesh node inside beats counting on household Wi-Fi to reach across the yard, and it keeps live online classes from dropping. We build the shell tight and dry so your electrician and installer can run everything cleanly.
Treat the classroom as a conditioned room with a continuous insulated envelope: insulated walls, ceiling, and floor, plus a sealed door and windows. For climate, a ductless mini-split heat pump is the go-to because it heats and cools efficiently, runs quietly enough not to distract a lesson, and holds a steady temperature through North Idaho cold snaps and summer heat. Size it for a full room of kids, since bodies and equipment add heat, and add a dehumidifier for damp shoulder seasons. With a tight envelope, the room stays comfortable for school all year and your heating bill stays reasonable.
Start with daylight, because kids read and write for hours and even, glare-free light keeps them focused. Put generous windows on at least two walls, and consider clerestory glass or a single-slope roof to bring in soft light from above without sun in anyone's eyes. Add adjustable shades, since glare is the enemy of a board and a projector screen in North Idaho afternoon sun. For the teaching wall, pick one end wall, keep it clear of windows so reflections don't wash out the screen, mount the board at kid-friendly height, and seat everyone with a clean sight line. Run an outlet and a data drop to that wall so the projector wires in cleanly.
Size for the number of kids plus the stations your day needs, not just the seats. A 10x12 is a sensible classroom for one or two learners, with room for a shared table, a board wall, and a couple of bookshelves. For three or four kids, a 12x16 gives each child desk space, a group table, a full wall of shelving, and a clear board-and-projector wall. To teach several ages at once with distinct zones, a 12x20 holds them without feeling like a hallway, while a long, narrow 10x16 suits a slim building along a fence line. Families almost always wish they'd gone a size up, so plan for the family you'll have in a few years.
A dedicated school building changes how homeschooling works. When the classroom is a separate structure — not a corner of the living room — school hours have a physical boundary, and the rest of the house stays functional. Families in Coeur d'Alene and Post Falls who have made this move consistently cite the separation as the most valuable part, more than the square footage itself. A homeschool shed built on site can be sized and positioned for the yard you actually have, not a catalog footprint.
North Idaho's school year runs through cold months. A classroom that cannot hold 65°F in January is not usable for focused work with multiple kids. That means real insulation — R-21 walls minimum for Kootenai County's climate zone — and a heat source sized for the cubic footage, not just the floor area. Mini-splits work well here: they heat in winter, cool during warm September and May sessions, and run quietly enough not to interrupt read-alouds.
Natural light matters for attention and comfort. East-facing windows deliver calm morning light without afternoon glare. A skylight over a central work table is worth planning for — it eliminates shadows at desks without adding window heat gain in summer. Electrical should include at least two 20A circuits: one for a projector or monitor wall, one for desk lamps and devices.
Wooded and sloped lots in Hayden and Rathdrum that would turn away a delivered shed are no obstacle for an on-site build. The crew works around your existing landscaping and grade, and the building lands where it actually makes sense for your family's daily movement. See finished buildings for layout ideas, then price your footprint in the configurator.
Tell us how many kids you teach and how you run your days, and we'll help you size, lay out, and price a bright, climate-controlled homeschool shed for your North Idaho property.
Keep planning your build with related North Idaho shed guides.