A hot tub is a year-round pleasure in North Idaho, but the few feet between the tub and your back door are where the experience falls apart. You change in the cold, you carry dripping suits and towels inside, the chemicals live in a garage corner where they freeze, and the heavy cover ends up leaned against the house warping in the sun. A small hot tub changing shed fixes every one of those problems at once: it gives you a warm, private spot to change a few steps from the water, hooks and shelves for towels and robes, a dry home for your chemicals and test kit, a place to set the cover, and surfaces built to get wet and wipe down. For most owners it's the difference between a tub they use on warm summer nights and one they actually soak in through a Panhandle January.
What makes a changing shed work is that it's a genuinely wet, humid little building used by people in swimsuits with bare wet feet, so a handful of decisions made before the first wall goes up matter more than anything you add later. Moisture-safe finishes, real ventilation, somewhere safe for sanitizer, and a layout that keeps wet and dry apart are the whole brief, not upgrades. Get them right and you have a tidy spa room that dries fast and stays fresh for years; skip them and you have a damp box that smells musty and shows water stains by its second winter. None of it is complicated, but it has to be planned in, because you can't easily add a vent or change the finish after the build. This guide walks through the styles that suit a small spa building, the sizes that fit changing plus storage, how to lay out and finish the inside for wet use, and how we build the shell on your property so it drains and breathes. If you'd rather see options priced first, you can build and price a layout in a few minutes and come back to the details.
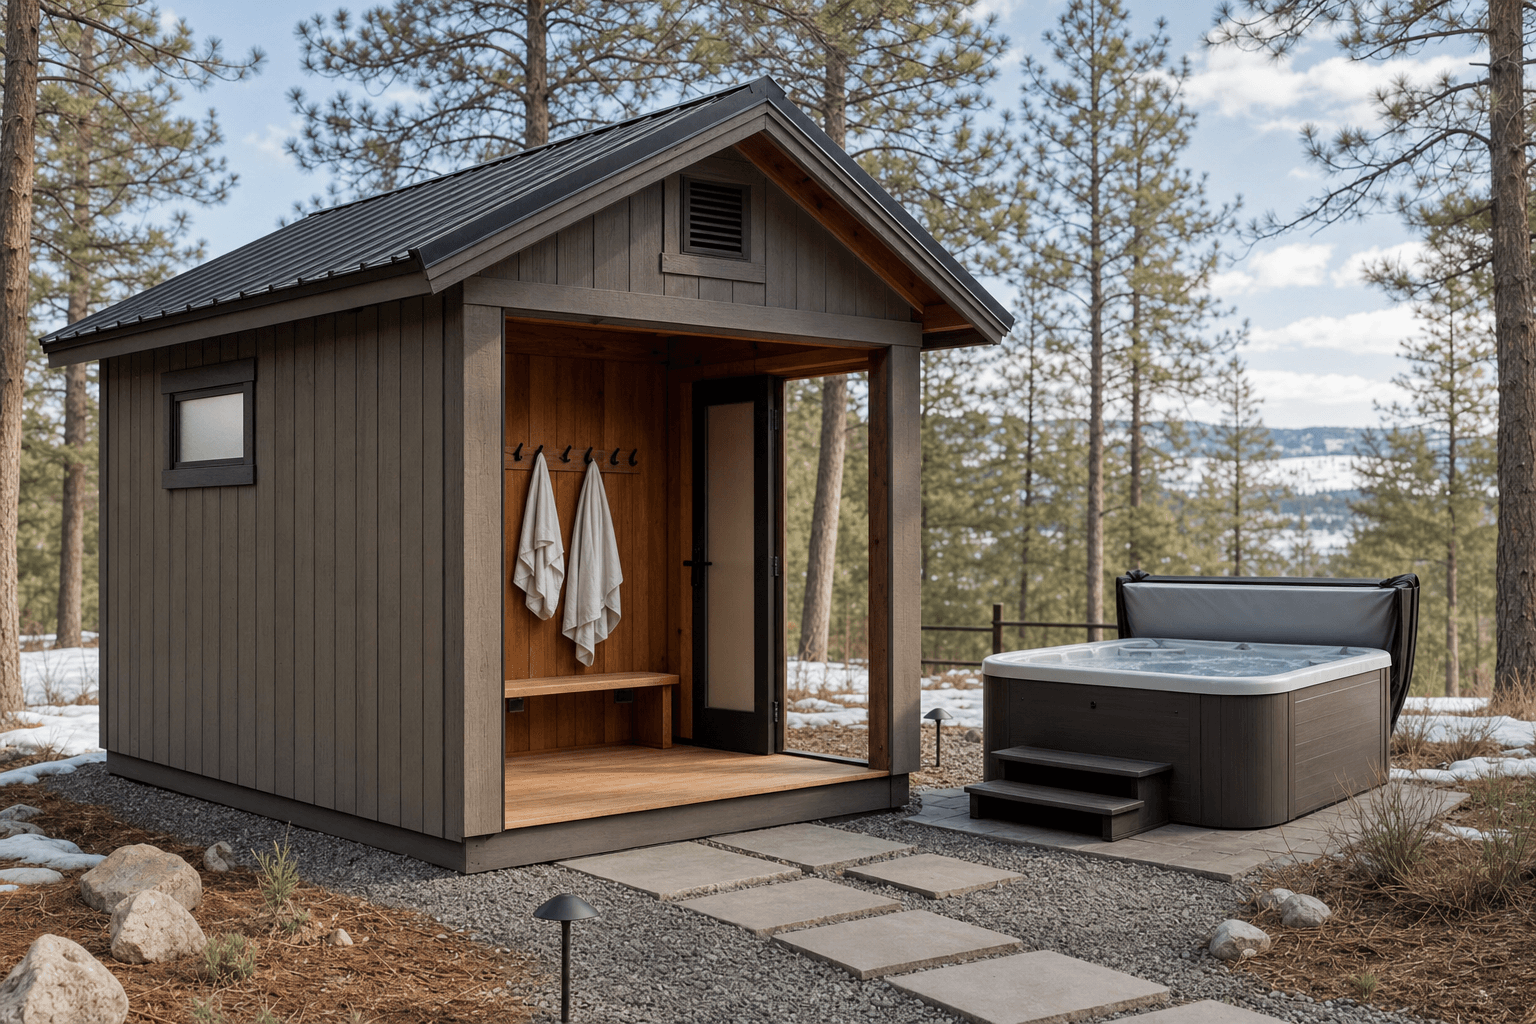
A warm, private spot to change a few steps from the water, with towel hooks, dry storage, and surfaces built to get splashed.
Most hot tub changing sheds look best as a standard gable with a small covered entry over the door. The straight walls give you flat surfaces for benches, robe hooks, and shelving inside, and they make a tight footprint feel roomier than a slanted wall would. The little roof overhang keeps rain and snowmelt off you in the step from the tub to the door, which matters a lot in winter when the last thing you want is to change in a downpour. A simple peaked roof also reads as a tidy spa cabana rather than a utility box, which counts when the building sits in full view beside the tub. If you want a more contemporary look that matches a modern deck, a lean-to or single-slope roof pairs cleanly with a wide door and a tall window, and its shed roof sheds snow toward the back where you want it. A lofted barn (gambrel) roof is usually more building than a changing shed needs, but it does buy you a small loft for off-season storage of the cover and bulky gear if your yard has room for the extra height.
Because a changing shed sits at the center of a wider backyard-wellness setup, the roofline and finish decisions overlap with the other spa buildings we do. It's worth seeing how we approach a sauna shed when you're weighing a covered entry, window placement, and a tight, well-vented interior, since the priorities of warmth, privacy, and managing moisture carry straight over even though a sauna runs far hotter and drier. Whatever roofline you pick, plan the building around water and steam moving through it, with a covered entry, a door wide enough to walk through wrapped in a towel, and an interior built to get splashed and wiped down rather than babied.
A private spot to change with a bench, robe hooks, and a shelf for towels and the test kit. A 6x8 covers the bare essentials right beside the tub when you just need somewhere dry to step into.
Once you want the chemicals, the cover, and a season of towels and robes to live out there too, step up to an 8x8 or 8x10 so the dry storage and the changing zone each get their own space.
If you want a toilet and a rinse alongside changing and storage so nobody tracks back inside, an 8x12 gives the wet fixtures, the bench, and the gear shelves room to all work at once.
Footprint is the decision everything else rides on, so size for everything the building has to hold, changing, towels, chemicals, the cover, and maybe plumbing, not just the spot to stand and dry off that you picture first. A 6x8 shed is the honest minimum for a changing shed: a bench, a row of robe and towel hooks, and a single shelf, which is plenty when you only need a private, warm place to change beside the tub and the chemicals already have a home elsewhere. Move up to an 8x8 shed and the extra width lets you keep the changing zone clear while a wall of shelving takes the towels, the sanitizer, the test strips, and a spot to lean the cover, which is the size most owners land on once they decide they want everything spa-related in one building. An 8x10 shed adds enough length for a real dry-storage end, a bench that seats two, and a vertical cover rack without anything crowding, which suits a busy household or a larger swim-spa. The 8x12 shed is the size to choose when you want a compact half-bath or a rinse shower in the building too, so soaking, changing, and a quick rinse all happen out back without a wet trip indoors. As a rule, size for the changing zone plus the dry storage plus any plumbing, because a changing shed that's all bench and no shelf turns into a wet closet, and a building packed too tight to move in gets used less, not more.
These backyard-wellness buildings overlap, and the right one depends on what happens in there most. A changing shed is the support building for a hot tub: a place to change, store towels and robes, keep the chemicals and the cover safe, and rinse off, built to handle wet feet and humidity without much fuss. If the heat itself is the point, a sauna shed is a different animal, a tightly insulated, heater-driven room built to hold high, dry heat and cycle people in and out, and it leans on cedar, a stove, and steam-tolerant finishes rather than changing-and-storage layout. If your routine pairs the hot tub with a cold dip, a dedicated cold plunge shed houses the plunge tub, its chiller, and the splashy, fully drained floor that contrast bathing needs, again a wet building but built around a tub rather than around changing. And if your backyard centers on a pool instead of a spa, a pool house is the larger cousin, sized for a changing room, a half-bath, float storage, and a shaded lounge for a whole pool day rather than the tight, tub-focused footprint a hot tub wants. Many owners start with a changing shed because it's the smallest, most useful piece and the one that makes the tub livable year-round; some later add a sauna or a plunge beside it and let the changing shed serve all three. If you're torn, build the changing shed first, because every spa setup needs the dry, warm, organized space it provides.
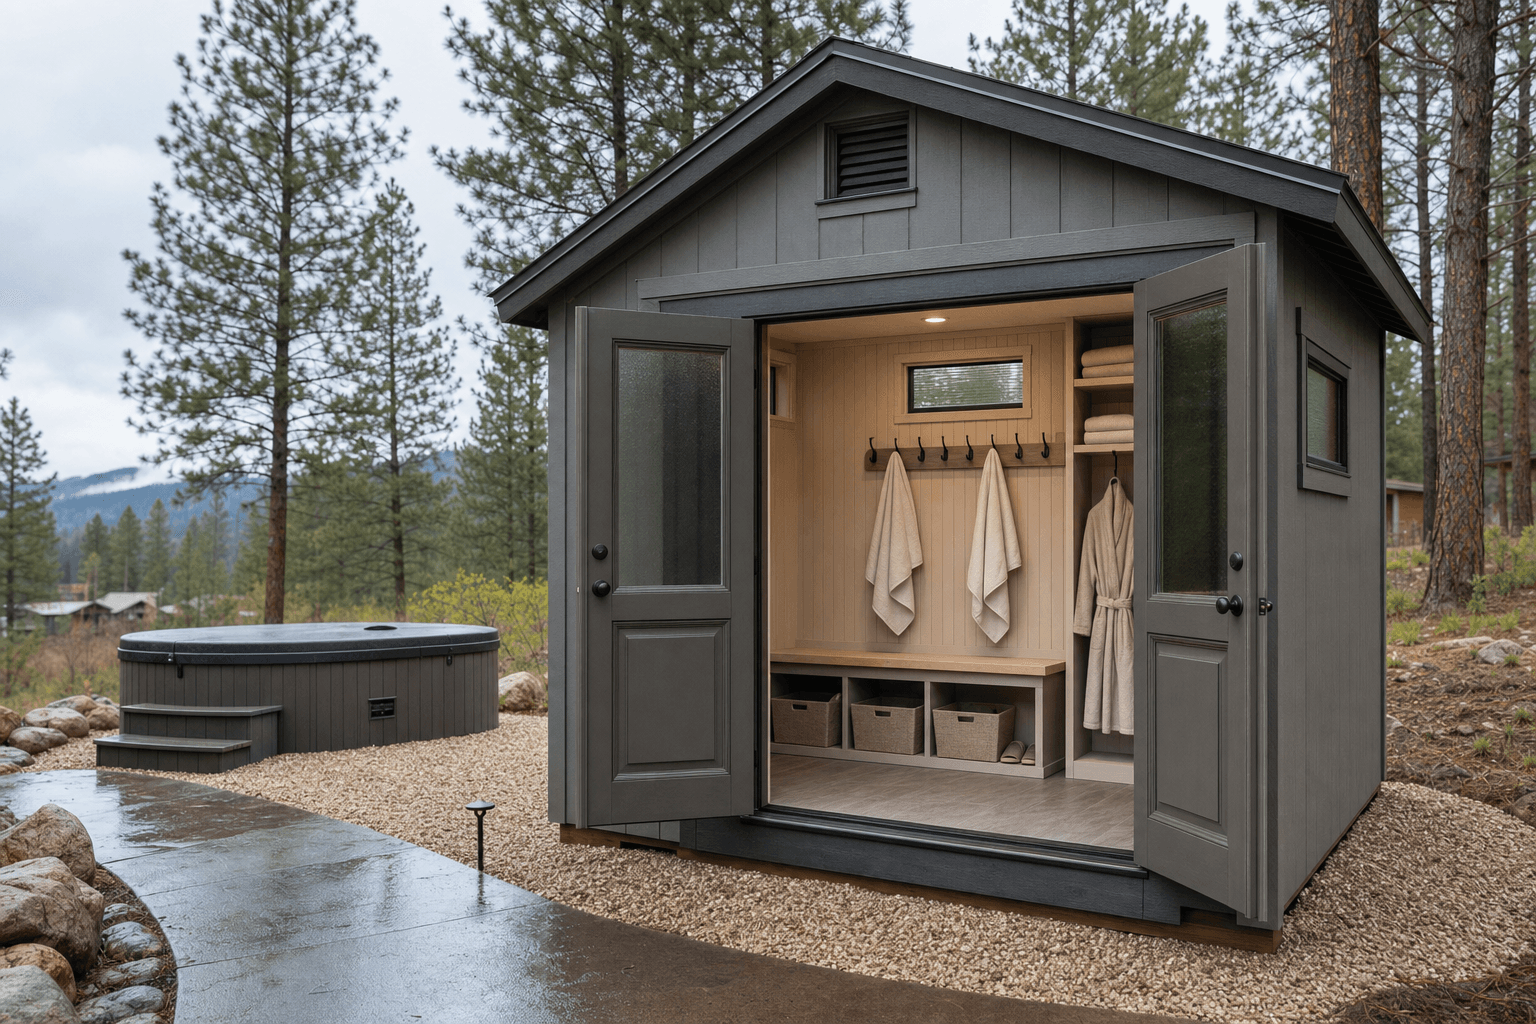
Zoned for wet use: a private changing corner, robe and towel hooks by the door, and a dry, latched cabinet for sanitizer and the cover.
A changing shed works far better when you plan it as distinct wet and dry zones instead of one open box, because the whole goal is to keep humidity and drips away from the things that have to stay dry. Start with the changing zone, a clear spot with a bench to sit on, a row of hooks at robe height, a small mirror, and a mat that drains, placed right by the door so dripping bodies don't have to cross the rest of the room. Next, set the drop zone just inside the entry, a deep peg or two and a drying rack for the wet swimsuits, towels, and robes that come off after a soak, ideally right under or beside a vent so the moisture they carry has somewhere to go. Build the dry-storage zone up the walls and into the section farthest from the door, with closed shelving or a latched cabinet for the sanitizer, shock, test kit, and spare filters, plus a labeled spot for the start-up chemicals, kept up high and out of reach if kids use the yard. Reserve a cover-and-gear zone for the bulky items, a vertical rack or a wall cradle that holds the heavy hot tub cover on its edge so it dries instead of warping flat, a hook for the cover lifter or a folding step, and room for the skimmer net and a small wet-vac. If you're plumbing the building, add a tight wet zone at one end where the floor slopes to a drain and the surfaces are fully waterproof, so a half-bath or rinse shower keeps its splashing in one easy-to-clean corner. Sketching these zones on paper before you settle on a footprint is the fastest way to tell whether a 6x8 will do or whether you'll want the extra room of an 8x10 so the wet, dry, and cover areas never compete for the same square foot.
This is the heart of a changing shed. Moisture-resistant wall panels instead of bare drywall, a sealed or vinyl floor that sheds water, semi-gloss or marine-grade paint, and rust-resistant hooks and hinges stand up to humidity and dripping swimsuits and wipe down in minutes instead of staining, swelling, or warping.
A latched, ventilated cabinet or closed shelf for chlorine or bromine, shock, pH chemicals, and the test kit keeps sanitizer dry, out of the sun, off the floor, and away from kids and pets. Storing oxidizers and acids separately and out of freeze and heat keeps them effective and avoids a dangerous mix.
A row of robe hooks and a heated towel bar or warm shelf by the door, open shelving for folded towels, a drying rack for wet suits, and a vertical rack or wall cradle that holds the heavy cover on edge to dry keep the whole spa kit organized and off the deck and lawn.
Insulation and a small heater so you change in warmth on a cold night, a moisture-rated light over the bench, a vent fan to pull steam out, and a weather-resistant outlet for a towel warmer or fan turn a cold lean-to into a building you actually want to step into in January.
The keyword for a changing shed is wet-and-dry, and the fit-out is everything that keeps those two worlds apart and easy to clean. For changing: a bench, robe and towel hooks, a curtain or partition for privacy, a small fog-resistant mirror, a draining mat, and a heated towel bar so you step out into something warm. For the wet gear: a drying rack and deep pegs for swimsuits, towels, and robes, and a foot-rinse spigot or small shower just outside or inside the door. For the chemicals: a latched, vented cabinet for chlorine or bromine, shock, pH up and down, spare filter cartridges, the test kit and strips, and a measuring scoop, kept dry and out of freeze, heat, and a child's reach. For the cover and bulky gear: a vertical cover rack or wall cradle, a hook for the cover lifter, a spot for the skimmer net, a small wet-vac, and a folding step or stool. For comfort and upkeep: a vent fan, a moisture-rated light, a clock, hooks for the spa towels, and a bin for the snacks and water bottles a long soak invites. Walk through your own version of this list before you settle on a size, because a real spa setup is more than a place to change, and a 6x8 shed fills up fast once you add the chemical cabinet, a winter's worth of towels, the cover on its rack, and somewhere to sit. That's exactly why owners who keep all their spa gear out back are rarely sorry they sized up to an 8x8 or an 8x10.

The details that keep a soak tidy: rust-resistant hooks, a warm towel bar, dry shelves, and a cradle that dries the cover on its edge.
| Hot tub changing shed planning checklist | |
|---|---|
| Best roofline | Standard gable with a small covered entry for a spa-cabana feel; single-slope for a modern look that sheds snow to the back |
| Practical sizes | 6x8 for changing only, 8x8 to add real storage, 8x10 for changing plus full gear storage, 8x12 to fit a half-bath or rinse |
| Surfaces and finish | Moisture-resistant wall panels, a sealed or vinyl water-shedding floor, semi-gloss paint, and rust-resistant hooks and hardware throughout |
| Chemical storage | A latched, ventilated cabinet kept dry and out of freeze and direct sun, with oxidizers and acids stored separately and up out of reach |
| Ventilation | A vent fan plus operable windows or vents on opposite walls to pull out steam and humidity and dry the room between soaks |
| Cover and gear | A vertical cover rack or wall cradle that dries the cover on edge, robe hooks, a wet-suit drying rack, and a heated towel bar |
Three things decide whether a changing shed stays fresh and inviting or turns damp and musty. Power usually comes from a dedicated circuit run from your home's panel by a licensed electrician, often in buried conduit out to the building, sized so it can also serve a towel warmer, a small heater, and a vent fan without tripping. Note that the hot tub itself almost always needs its own 240-volt circuit and a nearby disconnect, separate from the shed's wiring, so plan that with your electrician at the same time. Put outlets where you'll actually use them, by the bench for a fan or towel warmer and up high for a light, and use weather-resistant covers on anything near the wet zone for safety. Ventilation is what protects a steamy building, so plan it deliberately: a vent or exhaust fan to pull out the humidity that dripping suits, wet towels, and a warm body carry in, plus operable windows or wall vents on opposite sides for a cross-breeze that dries the room between soaks. Moving air is the single best defense against the mildew and musty smell that plague poorly-vented spa buildings. Staying dry ties it together: surfaces that shed water, a floor that drains or wipes clean, ventilation that pulls humidity out, and enough airflow that nothing stays wet long. Because North Idaho hot tubs run hardest in winter, an insulated shell and a small heater are worth it here, so the building is warm to change in on a ten-degree night instead of a cold box you rush through. We frame and build the shell tight, insulated, and vented on your property so your electrician can finish the wiring and you can fit out the rest.
A wet, frequently-used building stays straight, dry, and easy to clean only on a solid, level base, so most changing sheds sit on a compacted gravel pad sized about a foot wider than the building on each side so water drains away from the structure, or on a concrete slab if you want a perfectly flat, sealed, sloped floor that handles a floor drain and a rinse shower cleanly, which many owners prefer once plumbing is in the plan. Set the shed close to the tub but think about the splash line and the dripping path, so the few steps from water to door stay short and you're not carrying a soaked towel across the yard in the snow. North Idaho weather drives the rest. Design the roof for local snow load so it shrugs off a heavy Panhandle winter while you're soaking under the stars, keep the floor up off the ground so spring melt and rain drain away instead of wicking into a building that's already managing spa humidity, and place the shed where the gravel driveway or a clear path lets our crew bring materials in to build. We build with weather-rated framing and finishes suited to pine-country freeze-thaw cycles, and we set the structure to drain and breathe so it lasts and stays dry inside through the cold months when you use the tub most. On permits, the deciding factor is usually how the building is used, not just how big it is. A small detached changing shed under your jurisdiction's size threshold often needs no building permit, but the moment you add a half-bath, a shower, or finished wiring as an occupied building, your county or city will likely require a building permit, plumbing and electrical permits and inspections, and adherence to setbacks. The hot tub's own electrical hookup is its own permitted job in most jurisdictions too. Requirements vary across Kootenai County and the cities around Coeur d'Alene, so confirm with your local building department before you finalize the size, the plumbing, and where it sits relative to the tub and your property lines. Once you know what your jurisdiction requires, we plan the build around it so the structure, the rough-in, and the placement all line up.
Because a changing shed deals with constant humidity, steam, and dripping swimsuits, the finishes matter more than in a dry shed. Use moisture-resistant wall panels rather than untreated drywall, a sealed concrete, tile, or vinyl floor that sheds water rather than a porous one that swells, and semi-gloss or marine-grade paint that wipes clean and resists mildew instead of a flat finish that holds moisture. Choose rust-resistant or stainless hooks, hinges, and hardware so nothing corrodes in the damp air, and waterproof the surround anywhere you add a rinse shower. The goal is a building where every surface that gets wet can be wiped down and dries quickly, which is what keeps it fresh after years of winter soaks. We build the shell tight and use a finish package suited to a wet, steamy building so the interior stands up to the moisture instead of staining and warping.
Towels and robes are the items you grab cold and wet, so plan their storage for fast access and quick drying rather than deep shelving. Put a row of sturdy hooks at robe height right by the door for the robes and the suits you peel off after a soak, and add a drying rack or a few deep pegs so wet swimsuits and towels air out instead of sitting in a pile. Keep a stack of dry, folded towels on an open shelf within arm's reach of the bench, and if you want the real spa touch, add a heated towel bar or a warm shelf near the heater so you step out of the tub into something warm on a cold night. Locating the wet drop zone under or beside a vent helps the moisture those items carry leave the building instead of fogging it up. We can frame in blocking for the bars, hooks, and racks so they mount solidly where you want them.
Spa chemicals need a dry, ventilated, temperature-stable home out of direct sun and a child's reach, so give them a latched cabinet or a closed, high shelf rather than the open floor. Keep your chlorine or bromine, shock, and pH chemicals dry and ideally store oxidizers and acids separately, since mixing them or letting them get damp is both dangerous and a waste of product, and keep them out of hard freeze and baking heat so they stay effective. For the cover, a vertical rack or a wall cradle that holds it on its edge lets it drain and dry instead of warping or growing mildew the way it does leaned flat against a wall or laid on the ground. Add a spot for spare filter cartridges, the test kit, the skimmer net, and the cover lifter, and you have the whole maintenance kit in one organized place. We can plan the dry-storage end of the building with venting and shelving so the chemicals and the cover both have a proper, safe home.
Yes, and it's a popular upgrade because it means nobody has to trek back into the house wet. A changing area itself is simple and needs no plumbing, but adding a half-bath with a toilet and a hand sink, or a rinse shower to wash off before and after a soak, does. Group those fixtures at one end of the building over a floor drain with waterproof surfaces around the wet area, and have a licensed plumber run the supply and drain lines and make the connections; grouping them keeps the wet work contained, easier to service, and cheaper to run. In North Idaho the drain and supply lines need protection from freeze, which your plumber will plan for. An 8x12 comfortably fits a compact half-bath or rinse alongside the changing and storage zones, where a 6x8 or 8x8 is better kept to changing and dry storage. We frame the structure with the wet zone and rough-in planned from the start so the plumbing goes in cleanly.
Ventilation is essential here because the building constantly deals with steam and humidity from the open tub, dripping swimsuits, wet towels, and warm bodies, and trapped moisture is exactly what leads to mildew and a musty smell. Plan a vent or exhaust fan to pull that humidity out, and add operable windows or wall vents on opposite sides of the building so you get a cross-breeze that dries the room between soaks. Locating the wet drop zone near a vent helps the moisture leave at the source. Because a North Idaho hot tub gets used hardest in winter when you keep the building closed up against the cold, an insulated shell paired with deliberate venting matters even more, so you stay warm without sealing the humidity in. The combination of moisture-safe surfaces that shed water and good airflow that carries steam out is what keeps a spa building fresh year-round. We build the shell with ventilation planned in so you're not fighting trapped moisture in a closed-up wet room all winter.
It depends on how much you want the building to hold beyond the changing itself. If you only need a private, warm spot to change beside the tub and your chemicals already live elsewhere, a 6x8 covers a bench, robe hooks, and a towel shelf. Once you want the chemicals, the cover, and a season of towels and robes all stored out back too, step up to an 8x8 so the dry storage and the changing zone each get their own space, or an 8x10 if you have a larger household or a swim-spa and want a cover rack and a bench for two without crowding. If you also want a half-bath or a rinse shower so soaking and changing happen entirely out back, plan on an 8x12 so the wet fixtures, the bench, and the gear shelves all work at once. The honest advice is to size for the changing zone plus the dry storage plus any plumbing, because a changing shed that's all bench and no shelf turns into a wet closet, and most owners are glad they added the room once the cover, the chemicals, and a winter's worth of towels move in.
A hot tub changing shed solves the part of the outdoor spa experience North Idaho winters make genuinely uncomfortable: the forty-foot walk back to the house in wet feet at twenty degrees. Built on site next to the tub, the changing room keeps towels, robes, and chemical supplies within arm's reach and off the patio, without routing traffic through a living room.
Moisture is the dominant construction challenge. Steam off a hot tub in cold air condenses fast, and an unventilated changing shed traps that moisture in the wall assembly within a season or two. A properly detailed vapor barrier and a through-wall ventilation path — both decisions made at framing — keep the building sound through Coeur d'Alene and Post Falls winters without constant maintenance.
Interior finish choices matter here more than in a dry storage shed. Moisture-tolerant materials on the walls and floor — cement board, tile, or solid-surface panels — outlast painted drywall in this environment. If a half-bath is in the plan, the plumbing rough-in happens during framing, and the freeze protection detail for the supply line is part of the insulation spec, not an add-on after the walls are closed.
Properties in Hayden and Rathdrum with a wooded backyard often have the natural privacy screen that makes an outdoor spa area worth investing in. When the layout is clear, design the changing shed in the builder or get a free estimate. See the hot tub changing shed service page for finish and option details.
Tell us how you use the tub and we'll help you size, lay out, and price a spa building with the changing space, towel and robe storage, chemical and cover storage, and venting you want for your North Idaho backyard.
Keep planning your build with related North Idaho shed guides.