A maker space is the building where a 3D printer hums overnight in one corner, a soldering iron heats up at the electronics bench, and a laser cutter or desktop CNC throws chips into a tray while you tune a fixture two feet away. It is not a woodworking shop and it is not a casual craft room — it is a mixed-fabrication space where digital tools, hand work, and a little light fab all share the same walls. The makers who love their setup did not just buy a bigger shed; they planned for the three things mixed making actually demands: clean, abundant power for machines that run for hours, real fume and dust extraction for solder smoke, resin vapor, and laser exhaust, and bench plus storage laid out so a project can move from the printer to the bench to final assembly without a traffic jam. This guide walks through how to plan a maker space shed on a North Idaho property so the building keeps up with everything you make in it.
North Idaho On Site Sheds builds every maker space on your property, which means the plan can answer to your real grade, your driveway, and how a printer enclosure or a sheet of acrylic gets from the truck to the bench. Start with the tools you run today and the two or three you know you will add, then size, power, and ventilate the building around that list. The trap is treating a maker space like a general hobby shed and discovering a year later that the circuits trip, the resin fumes never clear, and there is nowhere to put the next machine. Plan it as a small fabrication shop from day one and it grows with your skills instead of boxing them in.
A maker space starts with the infrastructure: clean power, fume extraction, and bench room planned before the machines arrive.
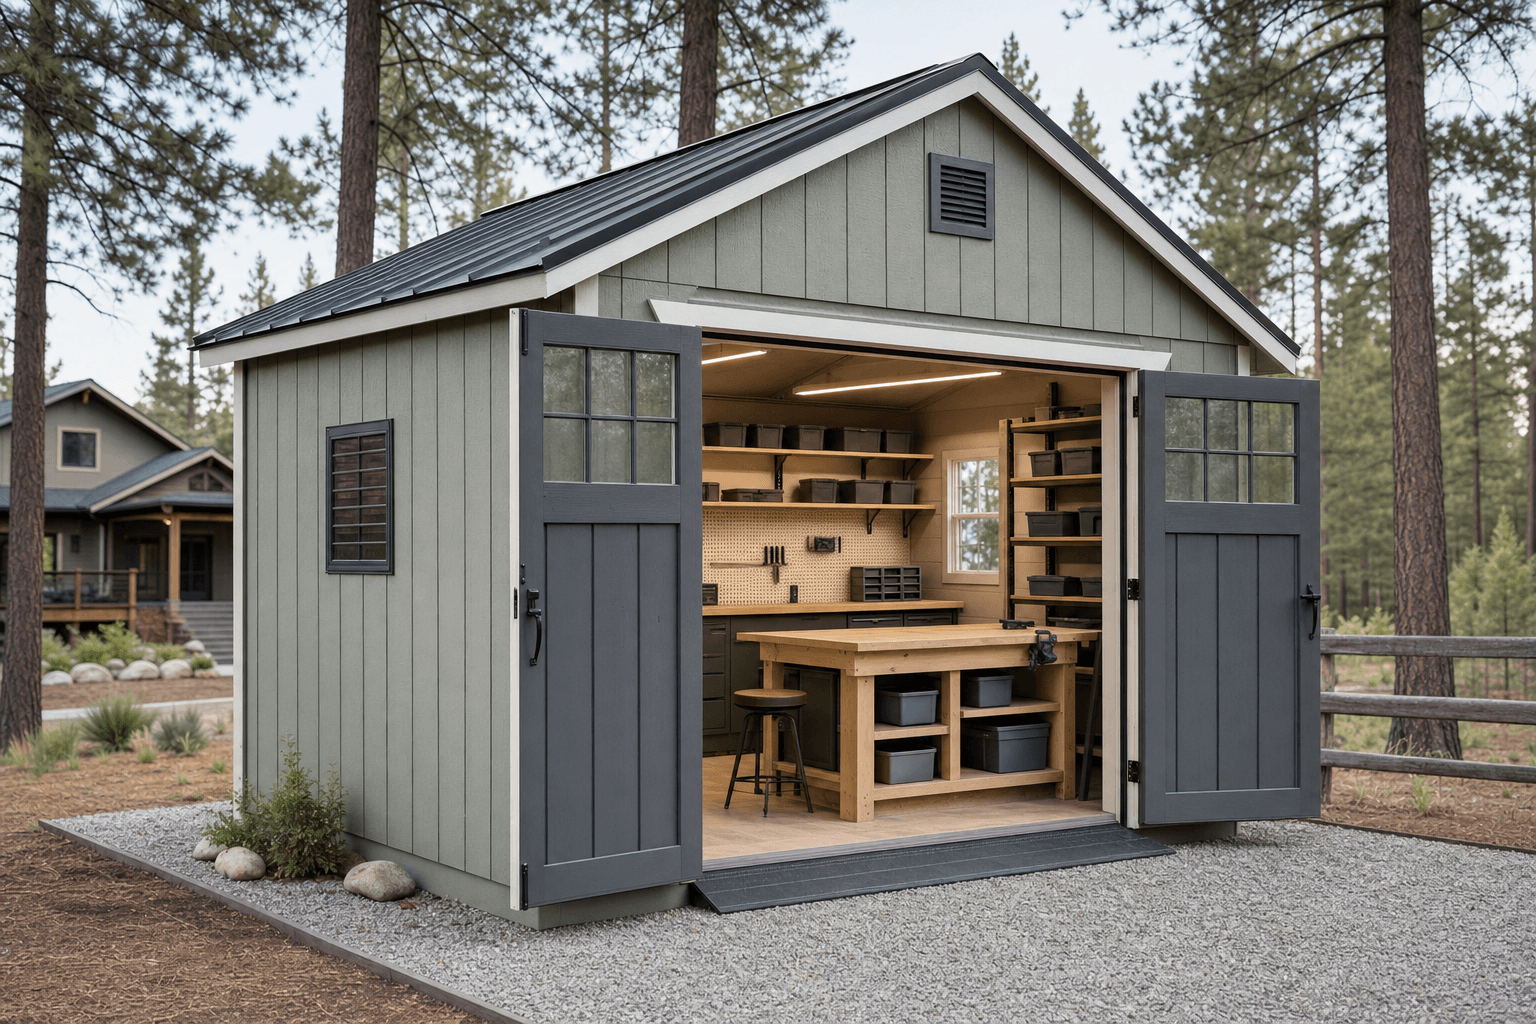
A maker space rewards usable wall space and a bright, sealed interior more than raw ceiling height, so the roofline choice is really about how you want to line and light the walls. A standard gable is the natural starting point — simple to insulate, easy to seal against dust, and tall enough at the ridge to mount a fume hood, hang spool racks, and run an enclosure shelf without crowding the floor. A lofted barn (gambrel) buys an overhead loft for filament, raw resin, stock acrylic and plywood, and the boxes every maker accumulates, keeping the bench level clear for active work. A lean-to or modern single-slope sheds North Idaho snow predictably to one side and gives you a tall front wall to fill with windows and task light over the detail bench — a real advantage when you are inspecting solder joints or a first-layer print.
Where a backyard workshop leans toward volume and 8-foot-plus walls so you can stand sheet goods on end, a maker space leans toward clean, finished, well-sealed walls you can mount shelving and extraction to, plus the power and air handling that mixed work needs. If your making overlaps with painting, finishing, or display-quality fabrication, it also borders an art or maker studio build that prioritizes daylight and a dust-controlled finish. Decide whether digital fabrication leads or messy fab leads, because that single choice drives your circuits, your ventilation, and how aggressively you seal the room.
A 10x12 holds a printer shelf, an electronics bench with a fume extractor, and wall storage for one or two core making disciplines.
A 10x16 or 12x16 splits the room into a clean digital zone, a soldering and electronics bench, and a light-fab corner for the CNC or laser.
A 12x20 fits a printer farm, a dedicated solder station, a laser or CNC with its own exhaust, and an assembly bench with clear aisles between.
Footprint decides whether your tools coexist peacefully or fight over the same bench, so compare the real dimensions before you commit. A 10x12 is a tidy solo maker space — enough for a printer shelf, one bench, and wall storage if you stay focused on one or two disciplines. Step up to a 10x16 or 12x16 and you can give 3D printing its own clean zone, set up a proper soldering and electronics bench away from the dust, and still keep a light-fab corner for a desktop CNC or laser. The extra depth on a 16-foot building is what lets a machine vent to an exterior wall while you work at a separate station, instead of breathing its exhaust. If you run a printer farm, a dedicated laser, and an assembly area all at once, size up to a 12x20 so each tool has a home and the aisles stay clear enough to wheel a cart of stock through. Width buys you parallel bench runs on two walls; length buys you separation between the dusty, fumey machines and the sensitive ones — and in a maker space, that separation is worth more than a few extra square feet of open floor.
These three overlap, and choosing the right one up front sets your power, your air handling, and your storage. A backyard workshop is built around woodworking and big stationary tools — a table saw with outfeed room, a lumber rack, tall walls, and central dust collection for coarse sawdust. It favors volume and a heavy floor over sealed, climate-stable conditions. A maker space inverts those priorities: the dust is fine (laser char, CNC chips, sanding grit), the fumes are chemical (solder flux, resin, melted filament), and the gear is sensitive to humidity and temperature, so it favors a sealed, conditioned room with clean dedicated circuits and point-source extraction over one big collector.
A general hobby shed sits at the lighter end — a comfortable space for crafts, models, or tinkering that may never need 240V or a real fume hood. The maker space is the move when your hobbies have graduated into mixed fabrication: multiple printers running for hours, a CNC or laser that demands exhaust and a circuit of its own, and an electronics bench you actually solder at. If finish quality and daylight matter most — you are building display pieces or working with paints and resins for their look — an art studio build leans that way instead. Name the priority before the walls go up, because retrofitting a maker space into a building planned as a plain hobby shed means re-wiring and re-venting after the fact.
Zone the room: a clean digital corner, a soldering and electronics bench, a vented fab station, and an open assembly surface.
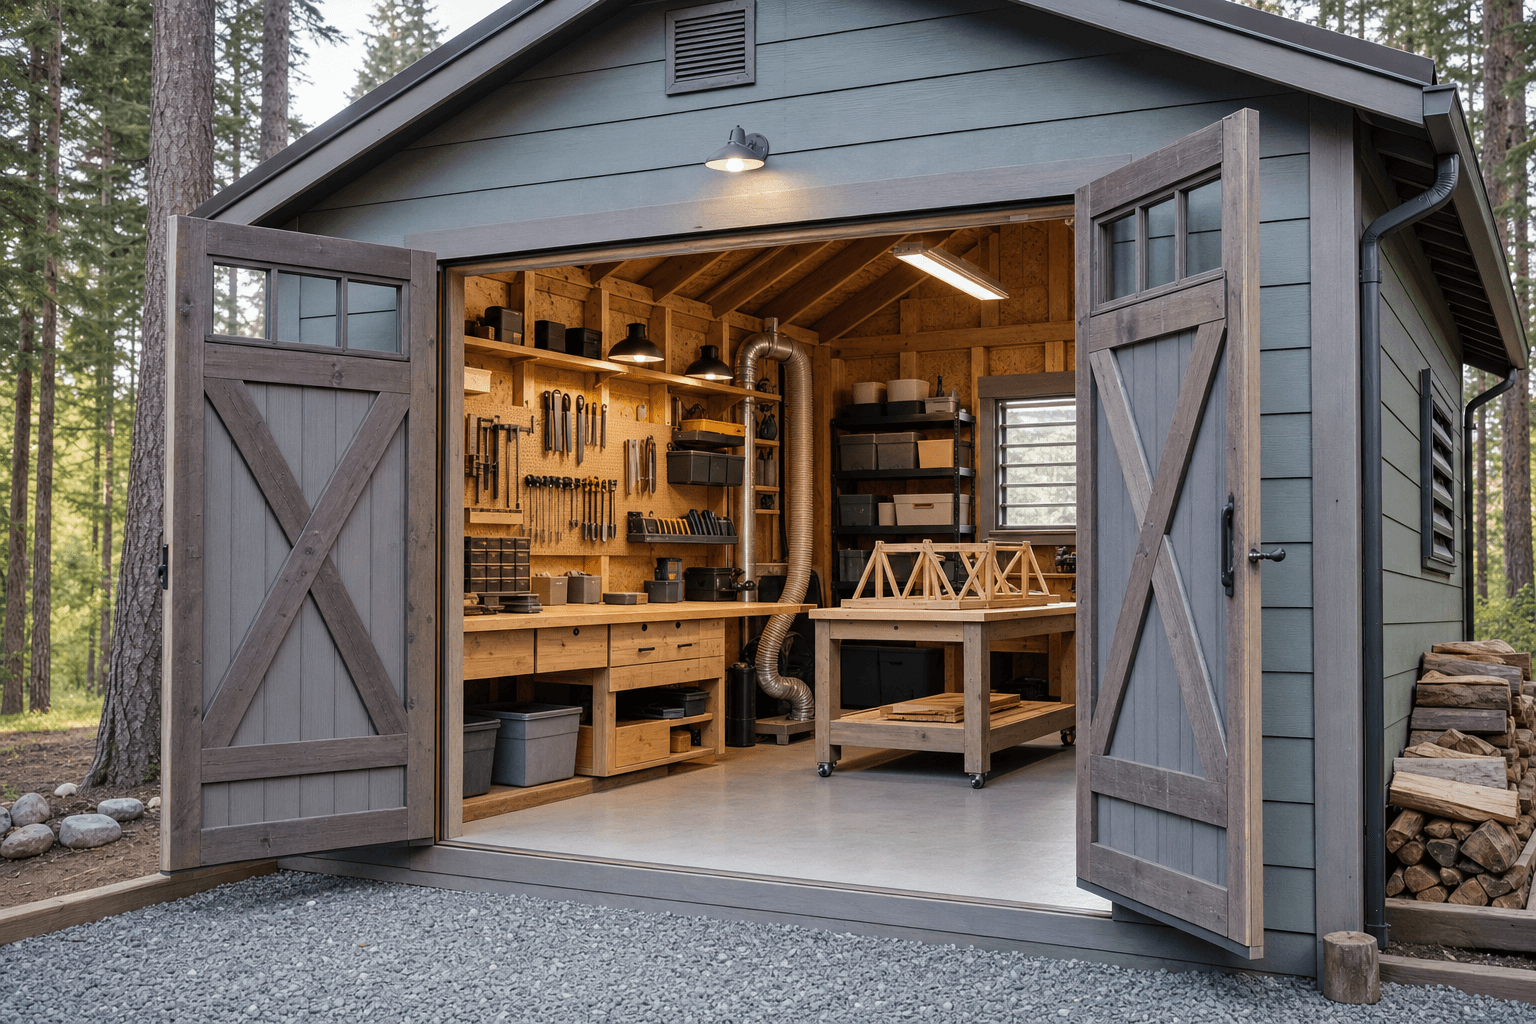
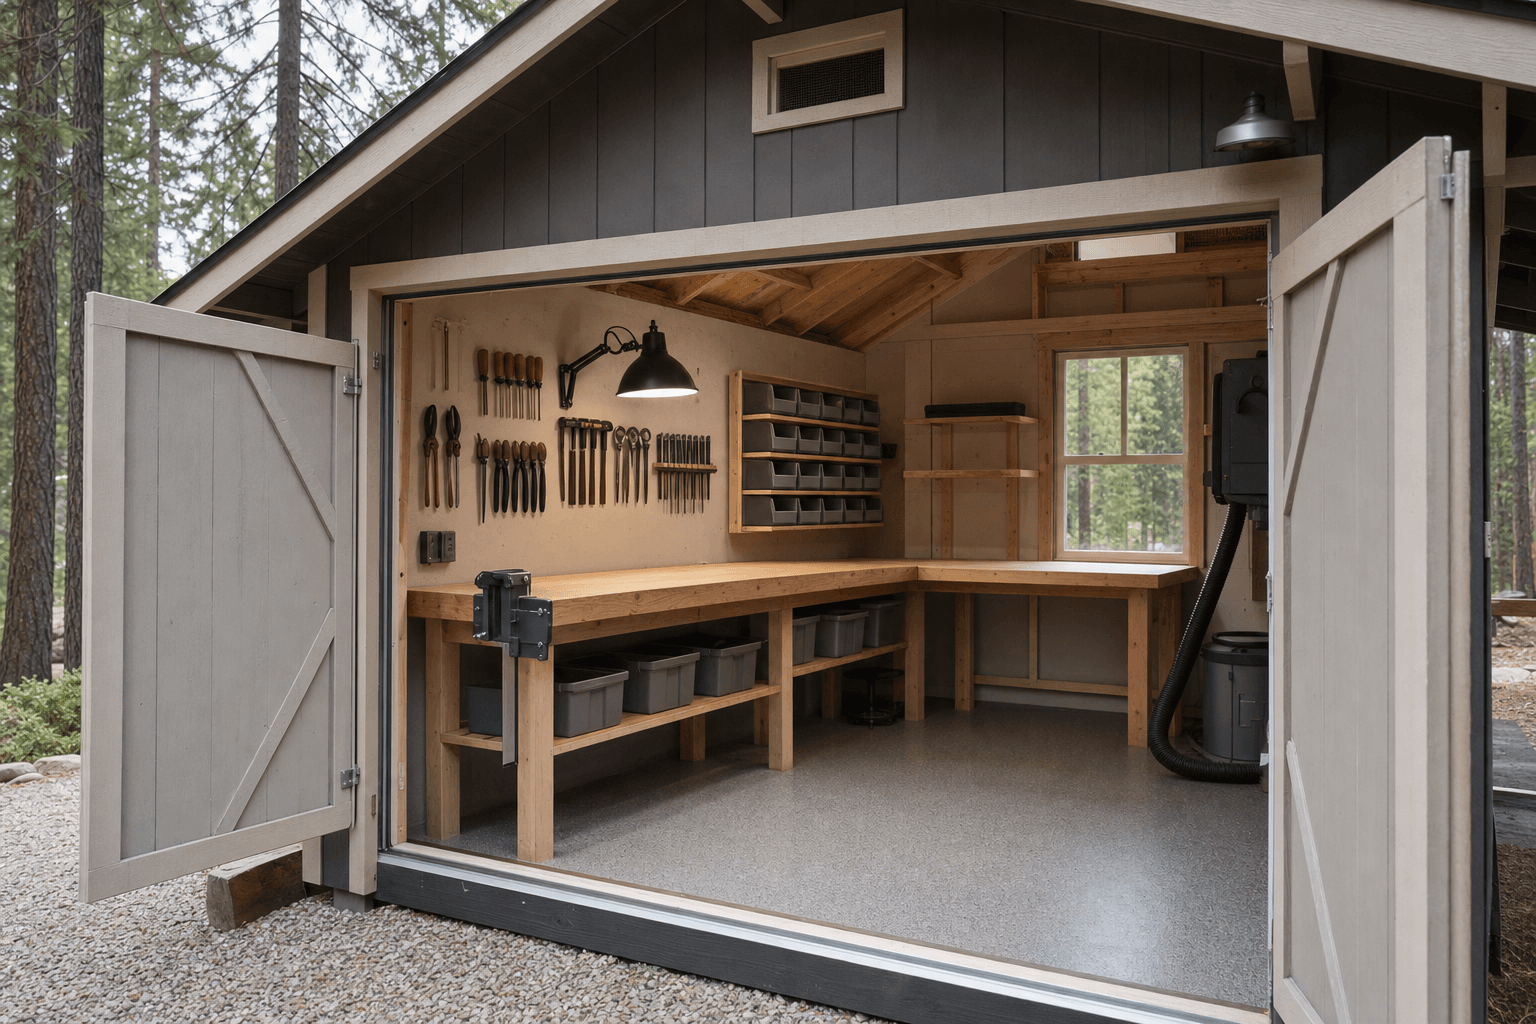
Treat a maker space as four working zones rather than one open bench, and arrange them so the dirty, fumey work stays away from the sensitive gear. A clean digital zone holds your 3D printers — ideally on a shelf or in an enclosure, on their own outlets, with the print bed at eye level so you can watch a first layer. A soldering and electronics bench runs along a wall with a fume extractor at the iron, anti-static surface, good task light, and outlets at counter height for power supplies, a scope, and chargers. A light-fab station sits near an exterior wall so a laser cutter, desktop CNC, or rotary tool can duct its exhaust and char straight outside instead of into the room. An assembly and finishing surface stays deliberately open in the middle for kitting, gluing, hand fitting, and laying out parts.
Good zoning means resin vapor and laser smoke never drift across the electronics bench, and the fine grit from a CNC never settles into a printer's rails or a reel of fine-pitch components. Keep the messiest machine closest to a window or vent and the most sensitive gear farthest from it, and leave a clear path from the door to the fab station so sheet stock and long stock come in without weaving past running equipment. Aim for at least 30 inches of standing room behind each bench seat and a clear aisle wide enough to roll a parts cart, and you will rarely have to shuffle machines to start the next job.
A standing-height bench for the laser or CNC and a seated bench for soldering and assembly, both deep enough to hold a machine and still leave working room in front.
A solder-fume extractor at the iron, a ducted hood or inline fan for the laser and resin, and a sealed enclosure for printers so vapor and char leave the room, not your lungs.
Wall bins, parts drawers, and labeled containers for resistors, fasteners, connectors, and bits keep tiny components findable instead of lost in a junk drawer.
Outlets every few feet at bench height on dedicated circuits, with surge protection and a UPS on the machines you do not want failing mid-print or mid-cut.
This is where a sealed, wired building becomes a maker space, and naming exactly what lives inside is how you size the power, the air handling, and the storage. The machines are the anchors: one or more FDM or resin 3D printers, a soldering and rework station with a fume extractor, a desktop laser cutter or CNC router, a Dremel or rotary tool, a small drill press or vise, and a heat-press or vacuum former if you sheet-form plastic. Around them sit the bench tools every maker reaches for — calipers, a multimeter, a bench power supply, an oscilloscope, hot-glue and adhesives, a hobby knife and cutting mat, files, hand drills, and a label maker that earns its keep.
Then comes the material and supply long-tail, and it is worth a shelf of its own: spools of PLA, PETG, and ABS filament; bottles of UV resin and isopropyl alcohol for cleanup; sheets of acrylic, plywood, MDF, and Delrin for the laser or CNC; bar stock and aluminum for light machining; and the electronics stock — breadboards, microcontrollers, sensors, connectors, headers, and reels of components in labeled bins. Add the consumables that pile up fast: solder and flux, nozzles and build plates, laser lenses and CNC bits, sandpaper, masking, gloves, and a fire extinguisher rated for electrical and chemical fires kept within arm's reach of the laser and the resin. Store flammables and resin away from anything that heats or sparks, give the filament a dry box or a sealed cabinet, and keep a secure, organized maker space so nothing fragile or expensive walks off or gets buried.
Fume extraction at the iron, labeled component bins, and bench tools within reach — the details that keep mixed making moving.
| Maker space planning checklist | |
|---|---|
| Power | A dedicated subpanel with several 120V circuits for printers, benches, and chargers, plus a 240V circuit if a larger CNC or laser needs it |
| Ventilation & fumes | Point-source solder extraction, a ducted hood or inline fan for laser and resin, and printer enclosures that vent outside |
| Benches | A standing-height fab bench and a seated electronics bench, both deep and sturdy, with outlets at counter height |
| Climate & dust | Insulated, sealed walls with a mini-split or heater and modest humidity control so gear and materials stay stable |
| Lighting | Bright, even LED over the whole room plus focused task light at the solder bench, the printers, and the fab station |
| Storage | Wall bins and parts drawers for components, plus shelves or a loft for filament, resin, and sheet stock |
Power is the line makers underbuild most often, because each device sips little but they all run at once. A bank of 3D printers, a laser, a CNC, a soldering station, a bench supply, a shop vac, and a space heater can easily overwhelm a single 120V circuit — and a printer that loses power 14 hours into a print just wasted a day. Plan a small subpanel fed from the house with several 120V circuits so the printers, the benches, and the lighting are on separate breakers, and add a 240V circuit if your CNC, a larger laser, or a future kiln or compressor calls for it. Space outlets every few feet at bench height so nothing runs on a daisy-chained power strip across the floor, and put surge protection on everything plus a small UPS on the machines you cannot afford to have drop mid-job. This dedicated wiring is exactly what a purpose-built maker space is meant to carry, and it is far cheaper to rough in now than to add after the walls are sealed.
Ventilation is the other system a maker space lives or dies by, and it is not one fan for the whole room — it is point-source extraction at each source. Put a solder-fume extractor right at the iron so flux smoke never reaches your face, duct the laser and any resin work to a hood or inline fan that pushes exhaust outside, and run 3D printers in enclosures that vent VOCs and ultrafine particles out rather than letting them build up in a sealed building. Then make the room work in January: insulate and seal the walls and ceiling, add a mini-split or heater to hold a stable temperature, and keep humidity in check so filament does not absorb moisture, resin behaves, and your electronics and tooling do not corrode. A conditioned, well-vented maker space is one you use comfortably year-round, not just on mild afternoons.
A maker space carries real equipment and benefits from a flat, stable, dust-free floor. A compacted gravel pad drains well and supports a lighter setup, but many makers prefer a concrete slab — it stays dead-flat for a CNC or a tall printer, keeps tracked-in grit and pine debris down, and gives a clean surface that does not shed dust into sensitive gear. Plan the approach so an enclosure, a slab of acrylic, or a crated machine can come off the truck and through the door without a muddy uphill fight, and think about where the laser and resin exhaust will exit so the duct run stays short. Read how to prep a shed site before delivery day so the pad, drainage, and access are squared away.
North Idaho winters drive several choices. The building wants a roof and anchoring rated for local snow load, insulation that keeps the room stable through a long freeze so machines and materials behave, and a clear, plowed path so you can reach it after a storm. Maker spaces also tend to add the kind of electrical work and, sometimes, footprint that triggers local rules — many small sheds skip a permit, but added circuits, a subpanel, exhaust penetrations, and setback or HOA requirements often do not. Confirm what your town and county expect on the service areas pages, and factor any electrical permit into the plan before you lock the size and where the maker space will sit.
More circuits than you would guess, because everything runs at once. Each printer or bench tool draws little on its own, but a printer farm, a laser or CNC, a soldering station, a bench supply, and a heater on one 120V circuit will trip constantly. Run a small subpanel from the house with several 120V circuits so printers, benches, and lighting are separated, and add a 240V circuit if a larger CNC, laser, or kiln needs it. Put surge protection on everything and a UPS on long-running machines so a brief outage does not ruin a 14-hour print.
Use point-source extraction at each source rather than relying on one room fan. Put a solder-fume extractor right at the iron so flux smoke never reaches your face. Duct a laser cutter and any resin work to a hood or inline fan that pushes exhaust outside the building. Run 3D printers, especially ABS and resin, in enclosures vented outdoors to clear VOCs and ultrafine particles. Because the building is sealed and insulated for winter, the fumes have nowhere to go on their own, so plan the exhaust penetrations and fans before the walls close up.
Zone the room so dirty, fumey machines stay away from sensitive gear. Give 3D printers a clean corner on a shelf or in an enclosure, set the soldering and electronics bench along a wall with a fume extractor and good light, and put the laser or CNC near an exterior wall so it can vent its exhaust and char outside. Keep an open assembly surface in the middle for kitting and hand work. The goal is that resin vapor and laser smoke never drift over the electronics bench and CNC grit never settles into a printer's rails or fine components.
Lean hard on labeled small-parts storage, because mixed making produces an avalanche of tiny pieces. Use wall bins and parts drawers for resistors, fasteners, connectors, headers, and bits, and label everything so a component is found in seconds rather than dug out of a junk drawer. Give filament a dry box or sealed cabinet, keep laser lenses and CNC bits in a protected drawer, and store consumables like solder, nozzles, and build plates where you use them. Shelves or a gambrel loft hold bulk filament, resin, and sheet stock so the benches stay clear for active work.
Yes, more than a woodworking shop does, because the gear and materials are sensitive. Insulate and seal the walls and ceiling, add a mini-split or heater to hold a stable temperature, and keep humidity modest so filament does not absorb moisture, resin behaves predictably, and circuit boards and tooling do not corrode through a North Idaho freeze. Control fine dust too: laser char, CNC chips, and sanding grit will work into printer rails and bench electronics, so a sealed room, a clean floor, and point extraction at the dusty machines keep the sensitive equipment running.
It depends on how many disciplines share the room. A 10x12 suits a solo maker focused on one or two things, like a printer shelf plus an electronics bench. Step up to a 10x16 or 12x16 to give 3D printing a clean zone, a real soldering bench, and a light-fab corner for a CNC or laser with room to vent. If you run a printer farm, a dedicated laser, and an assembly area together, a 12x20 gives each tool a home and keeps the aisles clear enough to wheel a cart of stock through without bumping a running machine.
A backyard maker space shed in Coeur d'Alene or Post Falls gives you a controlled environment for CNC work, 3D printing, laser cutting, and electronics that a garage corner never provides. Fume extraction, real lighting, and dedicated circuits on separate breakers require a building planned around those loads — not a general-purpose structure with power strips running along the baseboards. NIOS frames each shed on site, so the subpanel size, circuit layout, and exhaust penetrations are part of the construction rather than a later punch list.
Resin, solvent-based filaments, and laser cutting byproducts all produce fumes that require positive exhaust. In a North Idaho winter, balancing fresh-air intake against heat loss is the real design challenge. A recirculating fume extractor with a carbon filter handles routine printing and resin work; active exhaust with a makeup air source is needed when you're cutting or running larger volumes of material. Getting the penetrations sealed and insulated at framing keeps both air quality and heating costs manageable.
Slab or concrete pad versus a framed floor matters when you're rolling heavy equipment. A well-prepared gravel pad under a framed floor handles most maker space loads without the cost or permitting complexity of a poured slab. Hayden and Rathdrum properties with level lots are good candidates for this approach; sloped or wooded CDA lots sometimes need a longer foundation run to get level bearing.
When you know what you're building, configure it in the shed builder to size the footprint and price options, or get a free estimate. See the maker space shed service page for more on power and ventilation build-outs.
Tell us the machines you run and where the building should sit, and we will help size the shed, power, fume extraction, and site prep around your property — then you can build and price it online.
Keep planning your build with related North Idaho shed guides.