Microgreens and hydroponic growing don't need the sun the way a garden does — they need control. A tray of sunflower or pea shoots goes from seed to harvest in a week to ten days under steady light, in a room held at the right temperature and humidity, watered on a schedule that never misses. Hydroponic and vertical growing run on the same logic: feed the roots a measured nutrient solution, give the canopy the light it wants, move the air, and keep the whole thing clean. None of that depends on weather, which is why a dedicated building beats a spare bedroom or a corner of the garage. A purpose-built microgreens and hydroponics shed gives you a controlled growing environment of your own — lights, water, drainage, climate, and food-safe surfaces — sized to grow trays you actually eat or sell, twelve months a year.
North Idaho On Site Sheds builds every grow room right on your property, so the racks, the plumbing, the drainage, and the climate gear get specified around what you grow and how much of it. This guide walks the real decisions: which roofline and footprint suit a grow room, how to lay out vertical light racks, how to run a water and nutrient system with drainage that handles the runoff, how to hold humidity and temperature steady through a Panhandle winter, how to move the air, and how to finish the interior in cleanable, food-safe surfaces. Whether you're growing trays for your own kitchen or scaling toward a small market-grower operation, the building is the same idea at different volumes, and if you also start garden transplants you'll see where a seed-starting shed and a microgreens room overlap.
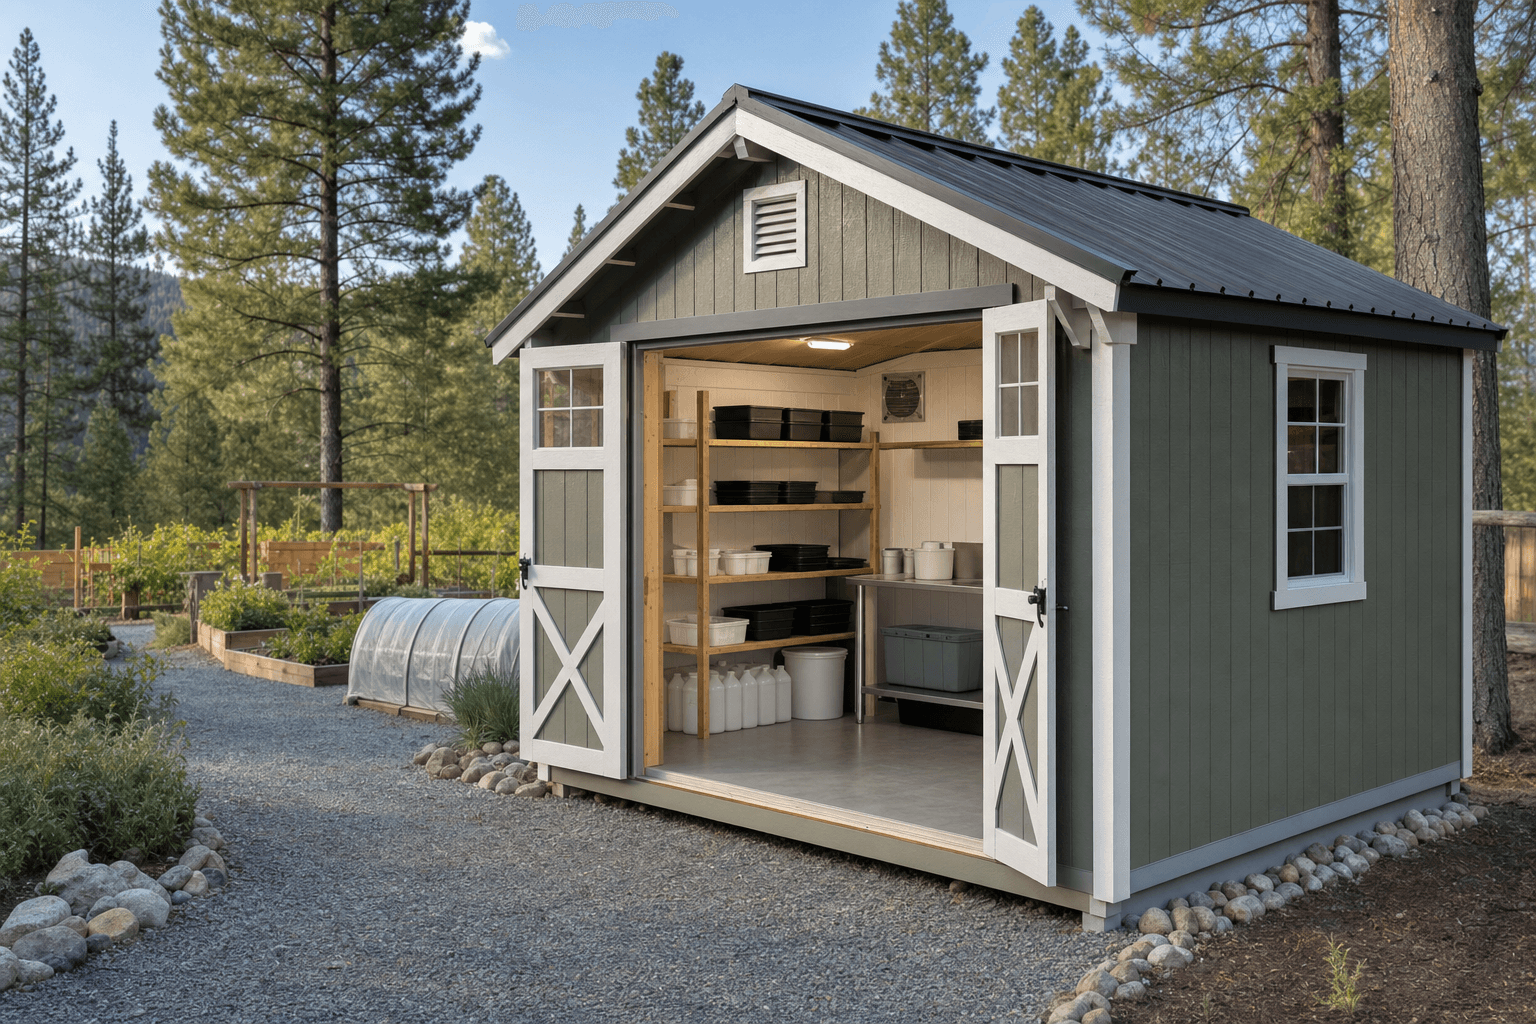
A controlled environment of its own: vertical light racks stack the canopy, a nutrient reservoir feeds the roots, and a sealed floor drains the runoff.
A grow room is judged by how much canopy you can light and feed inside it, so the roofline that earns its keep is the one that gives you the most usable wall and ceiling for racking. The standard gable is the natural starting point: straight sidewalls take floor-to-ceiling light racks on both sides with an aisle down the middle, and the peaked roof gives warm, humid air somewhere to collect and a spot for an exhaust vent or ridge fan to push it out. Spec the sidewalls taller than a basic storage shed so you can stack four or five tiers of trays per rack instead of two or three — vertical height is canopy, and canopy is yield. A stick-built shop style takes that further with full-height walls to the eave and no slope eating into the top tier, which suits a market-scale grow room where every inch of rack height counts.
A lofted barn (gambrel) raises the center for tall racks while the loft holds dry goods — seed, coir, trays, packaging — up and out of the humid grow zone, and a lean-to or modern single-slope sheds North Idaho snow to one side and puts the high wall where you mount the tallest racks and the exhaust. Whatever the roofline, the parts to spec up are insulation, a vapor-tight interior, sealed and drained flooring, ventilation, and power — a grow room runs warm, bright, wet, and humid on purpose, so it has to hold a climate, shed water, and move air far better than a plain shed. A microgreens and hydroponics shed sits right next to a seed-starting shed when you also raise garden transplants under lights, and it shares its bones with a greenhouse shed — though a greenhouse chases daylight through glazing while a grow room controls everything under electric light.
An 8x10 runs a couple of vertical racks of microgreens and a small hydroponic unit — enough fresh greens and herbs for a household year-round, with a wash sink and a reservoir.
An 8x12 or 10x12 stacks several racks, a deeper nutrient reservoir, and a dedicated harvest-and-pack bench, the size where a few market trays a week become realistic.
A 10x16 lines both walls with tall racks, separates a clean pack zone from the grow zone, and runs the water, drainage, and climate load of steady weekly market or restaurant volume.
Footprint here is really a question of how many trays you want under light at once and whether you're growing to eat or to sell, because a market schedule needs staging room a personal setup doesn't. An 8x10 is the personal grow room: two vertical racks of microgreens, a small deep-water or nutrient-film hydroponic unit for lettuce and herbs, a wash sink, and a reservoir keep a household in fresh shoots and greens through the winter. An 8x12 adds length for a third rack and a real harvest-and-pack bench, so cutting, rinsing, spinning, and packing happen on a clean surface instead of crowding the grow shelves — the size where a few trays a week for a farmers' market start to make sense. A 10x12 gives you a wider aisle and room to line both walls with racks while keeping a generous bench, the practical floor for a serious hobby edging toward steady side income. If you're aiming at a small market-grower operation supplying a stall or a couple of restaurants, step up to a 10x16: both long walls carry tall racks, a clean pack-and-wash zone separates from the grow zone, and the building carries the water, drainage, ventilation, and electrical load weekly volume demands. Height matters as much as floor area here — taller walls mean more tiers per rack, so a tall 8x12 can out-produce a short 10x12, and between sizes the deciding factor is usually drainage and pack space, not growing space.
These three buildings all grow plants, but they solve different problems, and naming the lead use keeps you from a room that does each one halfway. A microgreens and hydroponics shed leads with controlled indoor growing under electric light — vertical racks, a water and nutrient system, drainage, and tight climate control, with no reliance on the sun — and it runs the same all twelve months. A seed-starting shed leads with raising transplants to set out in the garden: heat mats and domes to germinate trays in late winter, lights to grow seedlings to transplant size, and a hardening-off step before they go outdoors. The two overlap heavily — both are lit, heated, racked rooms built around seed trays — so if you start garden plants in spring and grow microgreens the rest of the year, one well-lit, climate-controlled, drained room does both jobs.
A greenhouse shed is the different animal. It chases natural daylight through glazing and grows on the sun's schedule, which is wonderful for tomatoes and a long garden season but works against the precise, repeatable control microgreens and hydroponics want — glazing leaks heat on a cold North Idaho night, swings hot under midday sun, and hands you whatever light the season offers rather than the steady spectrum a grow rack delivers. For tray crops you eat or sell on a schedule, a sealed, insulated, electrically lit room beats a greenhouse because you set the light, the temperature, the humidity, and the watering and they don't move. And if dust, pollen, or wildfire smoke matter to a food-handling space, the filtered, sealed approach of a clean-air shed pairs naturally with a grow room — the same airtight shell and filtration that keeps a refuge clean also keeps spores and contaminants out of your trays.
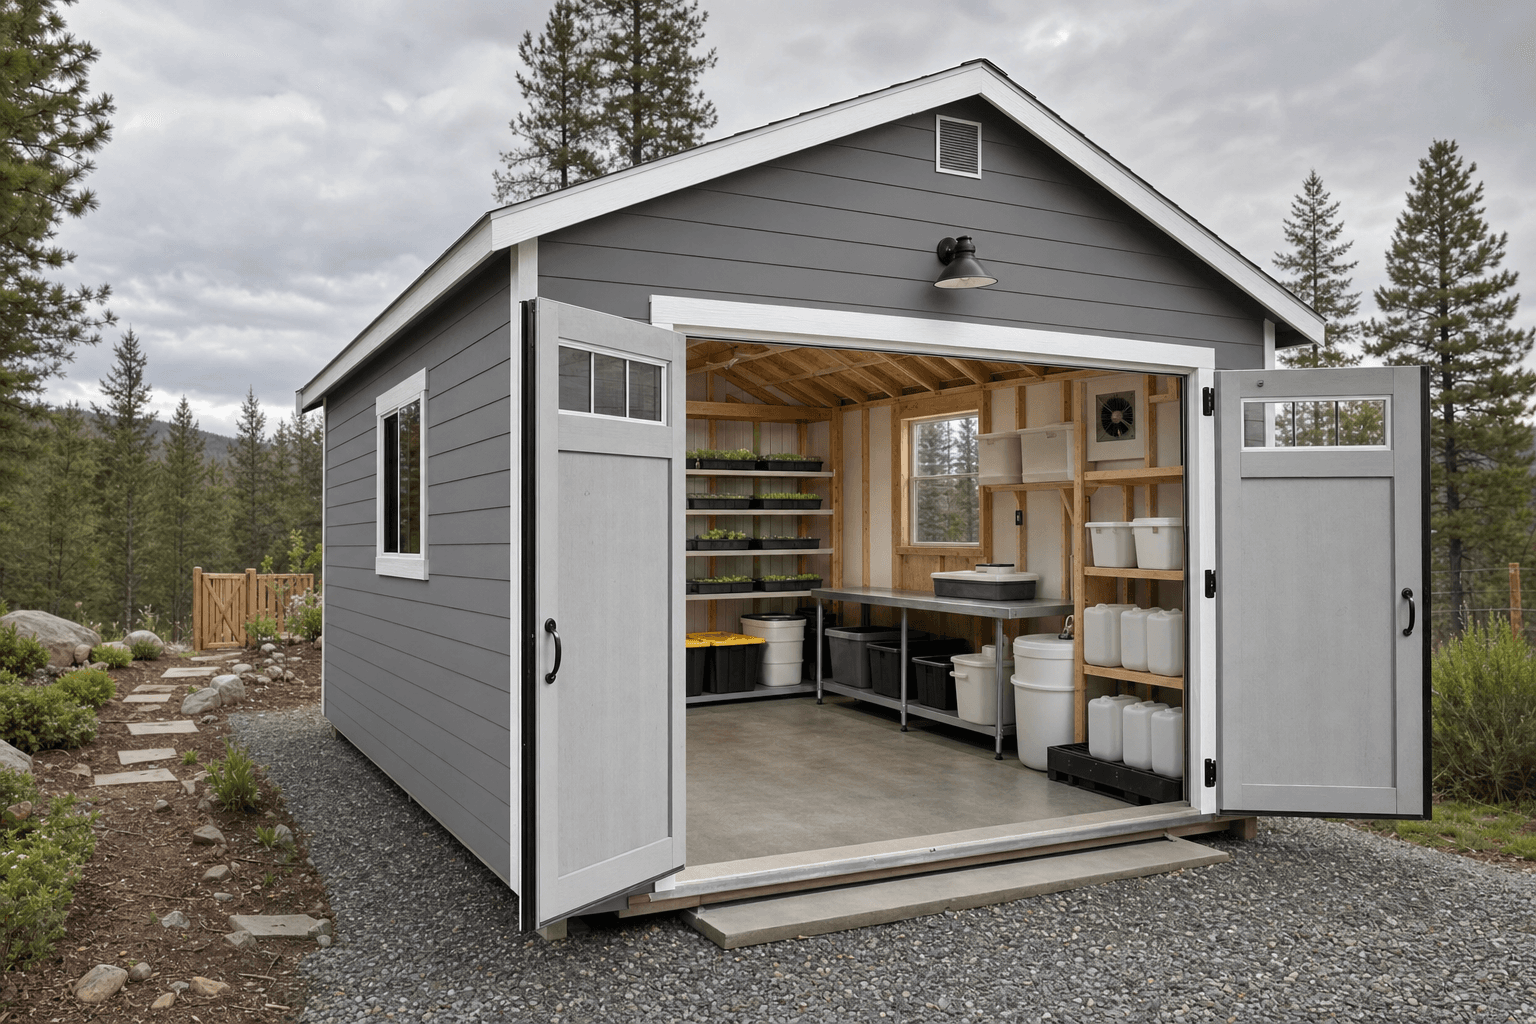
Zones at work: vertical light racks line the walls, the reservoir and pumps sit low, and a clean wash-and-pack bench stays out of the wet runoff path.
Think of a grow room as a clean loop — seed and media in, trays under light, harvest washed and packed, runoff drained out — and lay it out in zones that follow that loop so clean work never crosses wet runoff. A grow zone anchors the room: vertical light racks along the walls, each tier holding a tray flat under its own light bar, spaced so air moves between shelves and you can reach every tray, with an aisle wide enough to wheel a cart down and pull a full shelf. A water and feed zone sits low and to one side — the nutrient reservoir, a pump and dosing gear, and the lines that carry solution up to the racks — placed where a spill drains away and you can mix, test, and refill without reaching over the crop. A harvest-and-pack zone is the clean end — a stainless or sealed bench with a wash sink, a salad spinner, scales, and packaging — kept apart from the wettest growing so cut greens land on a clean surface.
Drainage is a zone you design into the floor, not an afterthought. Slope a sealed floor toward a center channel or a floor drain so daily watering, reservoir changes, and rinse water run off instead of pooling under the racks where they'd breed mold and rot the structure. Put the wettest work — reservoir, wash sink, tray rinsing — nearest the drain, and keep dry storage of seed, media, and clean trays up off the floor, away from splash. Run the air on its own logic too: an intake low on one wall and an exhaust high on the other so fresh air sweeps across the canopy and the warm, humid air leaves at its highest point.
Multi-tier wire or coated-steel racks with a full-spectrum LED bar over every shelf, set on adjustable shelves and timers, so you stack four or five tiers of trays into the floor space of one and run them on a steady light schedule.
A nutrient reservoir, a delivery pump, drip or flood-and-drain or nutrient-film lines to the racks, and a dosing and meter setup for pH and EC, so the roots get a measured, repeatable feed instead of guesswork with a watering can.
A waterproof, cleanable floor pitched to a center channel or floor drain, so daily watering, reservoir changes, and wash-down runoff leave the building instead of pooling under the racks and rotting the structure.
Insulated walls and roof, a heater and a mini-split or cooler, a humidifier and a dehumidifier, and intake-and-exhaust ventilation with circulating fans, so temperature, humidity, and air movement hold steady year-round.
It's worth naming exactly what fills a grow room so you size the racks, the plumbing, the bench, and the power around real equipment. The growing hardware comes first: 1020 propagation trays — solid bottoms for microgreens, mesh or net pots for hydroponic lettuce and herbs — plus humidity domes, blackout covers for the early phase that pushes shoots up, and the growing media you choose, whether coco coir, hemp or jute grow mats, rockwool, or a soil mix. Over every tray goes the light: full-spectrum LED bars sized to the shelf, hung at the right height and run on timers, on circuits that carry a whole wall of racks at once. The water and nutrient system is the other half of the room: a reservoir tank, a circulation or delivery pump, drip emitters or flood-and-drain trays or nutrient-film channels feeding the racks, a pH and EC meter, the nutrient bottles or salts, and dosing gear to keep the solution dialed in — plus timers, a thermostat and humidistat, and fans so the room runs on a schedule.
The harvest-and-pack gear is what turns a crop into something you eat or sell, and a market grower lives at this bench: a clean stainless or sealed work surface, a wash sink, sharp harvest knives, a salad spinner or colanders, a scale, and clamshells, bags, or boxes for packing. Keep food-contact tools sanitizable and separate from the grow media and the reservoir so what you harvest stays clean. Around the edges go the supplies: bulk seed in sealed containers, stacks of clean trays, spare media, sanitizing supplies, and labels, stored dry and up off the floor — the loft of a lofted barn or a high shelf is perfect for dry goods that shouldn't sit in the humid grow zone.
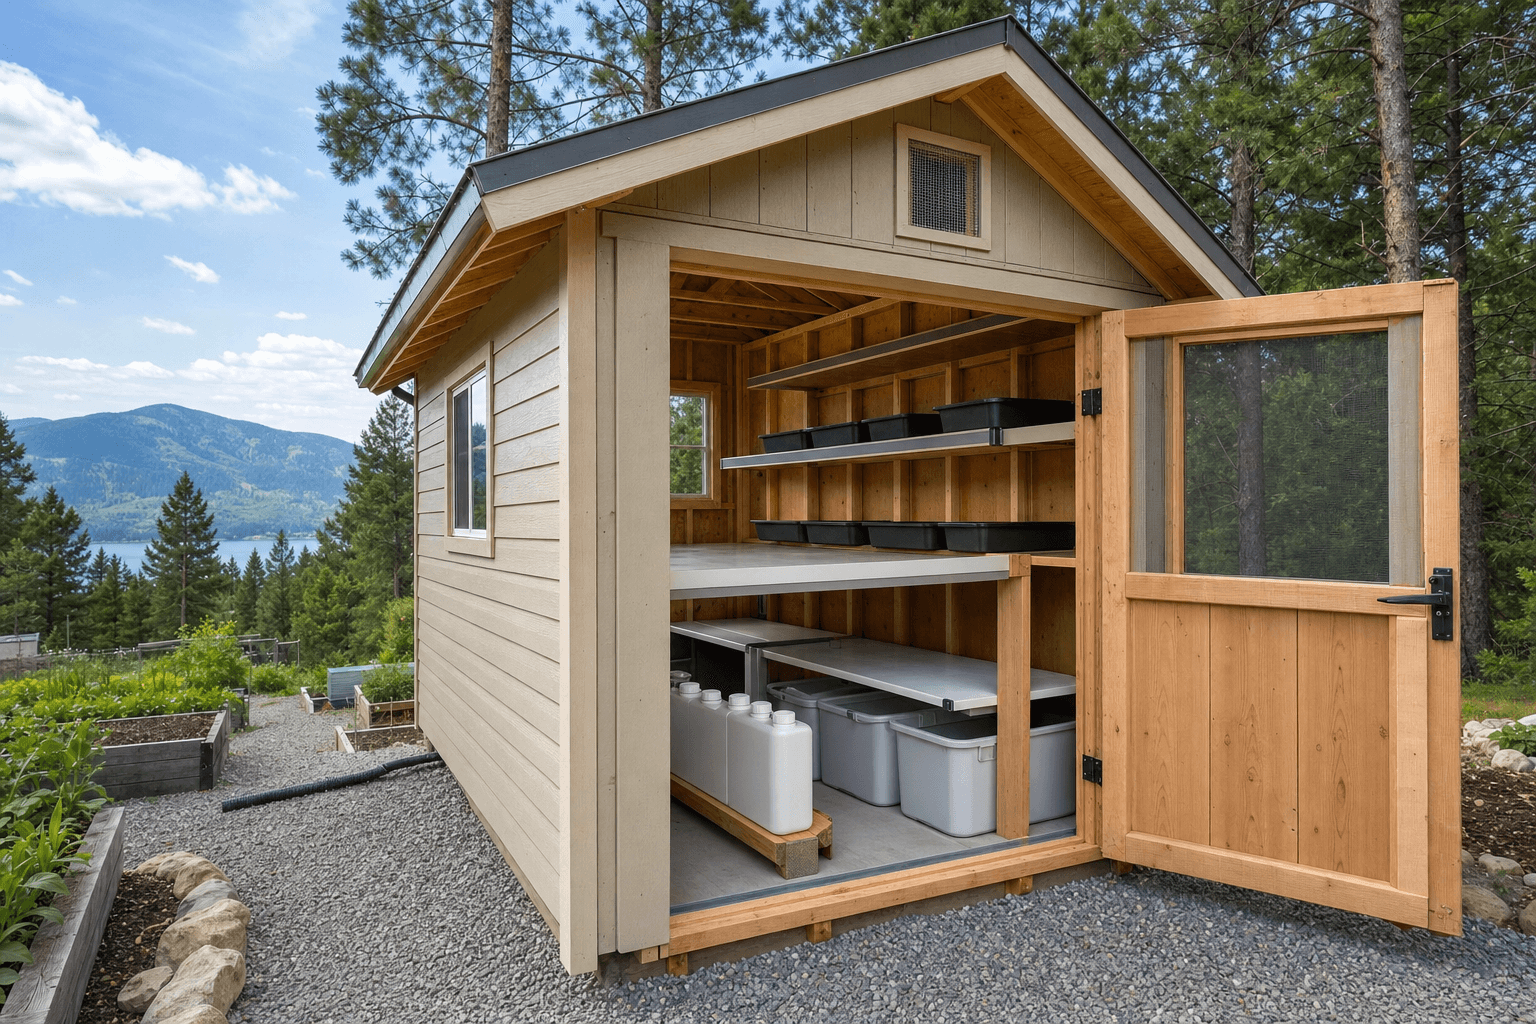
The detail that drives yield: a full-spectrum LED bar over every tray, drip lines feeding measured nutrient solution, and a meter keeping pH and EC dialed in.
| Microgreens and hydroponics shed planning checklist | |
|---|---|
| Grow-light racks | Tall multi-tier racks with a full-spectrum LED bar over each shelf on timers and dedicated circuits, so you stack four or five tiers of trays per rack and hold a steady light schedule |
| Water & nutrient system | A reservoir, delivery pump, drip or flood-and-drain or nutrient-film lines, and a pH and EC dosing setup, so roots get a measured, repeatable feed instead of hand-watering |
| Drainage | A sealed, waterproof floor sloped to a center channel or floor drain, so daily watering, reservoir changes, and wash-down runoff leave the building instead of pooling under the racks |
| Humidity & temperature | Insulation plus a heater, a mini-split or cooler, a humidifier, and a dehumidifier on a thermostat and humidistat, so the room holds its target climate through a North Idaho winter and summer |
| Ventilation & air movement | Low intake and high exhaust with circulating fans, so fresh air sweeps the canopy, CO2 and oxygen stay balanced, and warm, humid air leaves at its highest point |
| Food-safe surfaces & power | Cleanable, sanitizable bench and wall finishes, a wash sink, and the dedicated circuits to run a wall of lights, pumps, and climate gear at the same time |
A grow room runs on electricity, so plan the power before anything else, because the lights, the pumps, and the climate gear are the whole operation and they run for hours every day. Run a proper circuit from the house and size the panel feed for the real load: a full wall of LED light bars, the reservoir and circulation pumps, a heater and a mini-split, a humidifier and dehumidifier, and the exhaust and circulating fans, all potentially running at once. Plan dedicated circuits so a rack of lights and a heater don't share a breaker that trips mid-cycle, and put the lights on timers and the climate gear on a thermostat and humidistat so the room runs its own schedule whether you're there or not. Place outlets where the gear actually sits — along the racks for the light bars, low by the reservoir for the pumps, and at the bench — and keep cords up off a wet, draining floor, because steady, even light over every tray is what gives you uniform growth instead of pale, stretched trays.
Climate is what makes the room work through a North Idaho winter, when the outside air is far too cold to grow in and far too dry once you heat it. Insulate the walls and roof well and detail a vapor-tight interior so the heat stays in and the humidity you add doesn't soak into a cold shell and condense, because a poorly sealed grow room will grow mold in its own walls. Size the heat source to hold growing temperature through a hard cold snap, pair it with a humidifier so dry winter air doesn't stall germination, and add a dehumidifier and exhaust so the room can shed moisture when watering and transpiration push the humidity too high — microgreens especially turn to mold fast in a warm, still, over-humid room. Summer flips it: a wall of LEDs throws heat, so plan cooling and exhaust to keep the room from cooking on a hot August afternoon. Keep a plowed path to the door so the room stays reachable after a storm.
A grow room is small and light, but it deals with water every day, so the base and the drainage matter more here than under a dry storage shed. A compacted gravel pad drains well and keeps the framed floor dry from below, which is exactly what you want under a building where trays drip, reservoirs get changed, and a floor drain runs daily. Plan where that drain water goes before delivery — to a gravel sump, a drywell, or away from the building on grade — so winter runoff has somewhere to go instead of freezing at the threshold. Set the shed close to the house and the kitchen so harvested greens make a short trip from rack to refrigerator and the water and power runs stay manageable. Read how to prep a shed site before delivery day so the pad, the drainage path, and the access are squared away before the building arrives.
North Idaho's four seasons drive the rest of the spec. The roof and anchoring need to be rated for local snow load; the building wants real insulation, a vapor-tight interior, and working ventilation so it holds a steady climate and sheds moisture through a long, cold, wet winter instead of freezing damp and growing mildew; and a plowed path keeps it usable after a storm. The added services usually trigger the paperwork: a grow room's electrical for a wall of lights, pumps, and climate gear, and any plumbing for a water supply and a drain, often need a permit even when the shed itself doesn't, and a market-grower operation can bring food-handling and cottage-food rules into play that a personal setup won't. Confirm what your town and county require, and check setback and HOA rules, on the service areas pages, and factor any electrical, plumbing, or food-handling requirements into the plan before you lock in the size and where the shed will sit.
Grow up, not out — vertical racks are the whole reason a small building can produce a real harvest, so the layout starts with rack height and tier spacing. Plan tall multi-tier racks against both long walls with a single aisle down the middle, and spec the sidewalls tall enough to stack four or five tiers of trays per rack instead of two or three, because each tier is another full shelf of canopy in the same floor space. Space the tiers by what you grow: microgreens are short and want shelves close together with the LED bar just above the tray, while hydroponic lettuce and herbs grow taller and need more headroom per shelf, so mix tight and tall tiers on adjustable shelving. Hang a full-spectrum LED bar over every shelf and leave a few inches of air gap between tiers so air moves between trays and nothing cooks against a light. Keep the aisle wide enough to wheel a cart down and to slide a full tray out without bumping the rack opposite. The combination of tall racks, close tiers for shoots, and a light over every shelf is what turns an 8x10 or 10x12 footprint into many times its floor area in growing surface.
Two halves: a way to feed the plants and a way to get the water back out. On the feed side, plan a nutrient reservoir tank with a circulation or delivery pump and lines running up to the racks — drip emitters for trays, flood-and-drain tables, or nutrient-film channels for lettuce and herbs, depending on what you grow — plus a pH and EC meter and dosing gear so you mix a measured, repeatable solution instead of guessing. Set the reservoir low and to one side where you can test, mix, and refill it without reaching over the crop, and where a spill drains away. The drainage side is just as important and is built into the floor: a sealed, waterproof floor pitched to a center channel or a floor drain so daily watering, the water you dump when you change the reservoir, and wash-down runoff all leave the building instead of pooling under the racks where standing water breeds mold and rots the structure. Plan where that drain water goes outside — a gravel sump or drywell, or away on grade — before the build. A measured feed in and a real drain out is what keeps a hydroponic room productive and sanitary instead of soggy.
Start with the shell, because you can't control a climate you can't hold. Insulate the walls and roof well and detail a vapor-tight interior so the heat and humidity you add stay inside and don't soak into a cold shell and condense — a poorly sealed grow room grows mold in its own walls. Then add the gear to set each variable: a heater sized to hold growing temperature through a hard cold snap, a humidifier because heated winter air goes bone-dry and stalls germination, a dehumidifier and exhaust so the room can shed moisture when watering and transpiration push humidity too high, and a thermostat and humidistat so it all runs automatically to a target. Microgreens are the demanding case — they want warmth and moisture to germinate but turn to mold fast in a warm, still, over-humid room, so the dehumidifier and air movement matter as much as the heater. Summer flips it: a wall of LEDs throws real heat, so plan a mini-split or cooler and good exhaust so the room doesn't cook on a hot afternoon. A well-insulated, vapor-tight room with heat, humidity control both directions, and automatic controls holds a steady climate year-round so your trays grow the same in January as in July.
More than you'd guess, because a sealed grow room full of plants and lights goes stale and humid fast, and still, damp air is exactly what mold and rot want. Plan two kinds of airflow. First, exchange: an intake low on one wall and an exhaust high on the opposite wall so fresh air comes in, sweeps across the canopy, and the warm, humid, oxygen-poor air leaves at its highest, warmest point — size a powered exhaust fan to swap the room's air several times an hour when the lights and climate gear are running hard. That fresh-air exchange brings in CO2 the plants use and carries out the moisture they transpire. Second, internal circulation: small oscillating or clip fans that keep air moving gently between the rack tiers so no tray sits in a dead, still pocket of humid air. Microgreens in particular damp off and mold in stagnant air, so gentle constant movement across the trays is as important as the big exhaust. Pair the exhaust and the circulating fans with your dehumidifier and the room stays fresh, the humidity stays in range, and the trays grow clean instead of fuzzy with mold.
You're growing food, so the room has to wash down and sanitize like a kitchen, not just sweep out like a shed. Start with the floor — a sealed, waterproof, non-porous surface that you can hose and squeegee toward the drain, with no bare wood or carpet to soak up nutrient water and grow mold. Finish the walls in a wipeable, moisture-resistant surface rather than raw studs and OSB, so spores and grime don't take hold in a porous wall and so you can sanitize the room between crops. Make the harvest-and-pack bench a sanitizable surface — stainless or a sealed, food-grade work top — and keep it separate from the grow media and the reservoir so cut greens land somewhere clean. Use cleanable trays and tools you can run through a sanitizing rinse between uses, and store seed and media in sealed containers up off the floor. Add a wash sink so harvesting, rinsing, and cleanup happen with running water. The point is a room where every food-contact surface wipes down and sanitizes, so a tray of greens you grew can go straight to your kitchen — or a customer's — clean.
Size it to how many trays you want under light at once and whether you're growing to eat or to sell, because selling needs staging space eating doesn't. For a household's own fresh greens and herbs year-round, an 8x10 does it: two vertical racks of microgreens, a small hydroponic unit for lettuce and herbs, a reservoir, and a wash sink keep a steady personal supply coming. For a serious hobby that's edging toward a few market trays a week, an 8x12 or 10x12 adds the length and aisle width for a third rack and a real harvest-and-pack bench, so cutting, washing, and packing happen on a clean surface apart from the grow shelves. For a small market grower supplying a market stall or a couple of restaurants on a weekly schedule, step up to a 10x16: both long walls carry tall racks, a clean pack-and-wash zone separates from the grow zone, and the building can carry the water, drainage, ventilation, and electrical load that steady volume demands. Remember that height counts as much as floor area — a taller building means more tiers per rack, so a tall 8x12 can out-produce a short 10x12. When in doubt, plan for more pack and drain space than you think, since that's what fills up first as volume grows.
A controlled-environment grow shed is one of the more demanding builds we do — not because the framing is complicated, but because the mechanical systems have to stay coordinated from day one. A microgreens and hydroponics shed in Coeur d'Alene or Post Falls needs electrical capacity for grow lights and a climate system, a water supply and drain path, and enough insulation to hold temperature while those systems run. Getting those rough-ins right during framing costs far less than accessing finished walls later.
Winter operation is the real test for North Idaho growers. The shed has to hold temperature on a January night when it's 10°F outside and the grow lights cycle off — passive insulation alone won't do that in Kootenai County. Building on site means we can spec the wall assembly, ceiling depth, and heating load together rather than adapting a prefab shell that was designed for a milder climate. Rathdrum and Athol properties with longer cold snaps particularly benefit from a purpose-built thermal envelope.
Summer is the other challenge people underestimate. Grow lights generate significant heat, and a tight shed in Hayden or Sandpoint can climb past the tolerance range of most hydroponic crops on a 90-degree afternoon without active ventilation. Framing in a proper exhaust path and an intake duct during construction is the clean solution — it also keeps the interior air moving in a way that helps prevent mold in the high-humidity environment of an active grow.
Work through electrical and size options in the shed builder or get a free estimate. See real completed structures at our buildings gallery, and review pricing to understand where the cost of an insulated, wired grow shed typically lands.
Tell us what you want to grow — microgreens, hydroponic lettuce and herbs, transplants — and whether it's for your kitchen or a market stall, and we'll help spec the grow-light racks, the water and nutrient system, the drainage, the climate control, and the food-safe finishes around your property, then you can build and price it online.
Keep planning your build with related North Idaho shed guides.