If you ride the trails around Coeur d'Alene, Canfield, or Farragut, your bikes are probably worth more than the car they came home on, and right now they are likely leaning against a garage wall collecting dust, mud, and the occasional ding from a car door. A dedicated mountain bike shed fixes that in one move: it gets the fleet off the floor and onto the walls, puts a real repair stand and a tubeless station within arm's reach, and gives wet, muddy kit somewhere to dry that is not the laundry room. The sheds riders actually love are not the biggest ones — they are the ones planned around three things: vertical storage so several bikes hang clear of each other, a workbench zone built for wrenching, and enough heat and airflow that you can true a wheel or set sealant in January without freezing.
North Idaho On Site Sheds builds every bike storage shed right on your property, so the wall framing, the door height, and the bench layout can be specified for the bikes and the work you actually do instead of a generic storage box. Start by counting the fleet — full-suspension trail bikes, a hardtail, the kids' bikes, maybe an e-MTB — and plan the walls, the ceiling, and the shop corner around hanging and working on all of them at once. This guide covers which roofline buys you the height for ceiling hoists, what size fits the bikes plus a workbench, how to lay out the repair and tubeless zone, and how to wire, heat, and secure it for the long Idaho off-season.

Get the fleet off the floor: wall and ceiling hangers free up the room for a repair stand, a tubeless station, and gear drying.
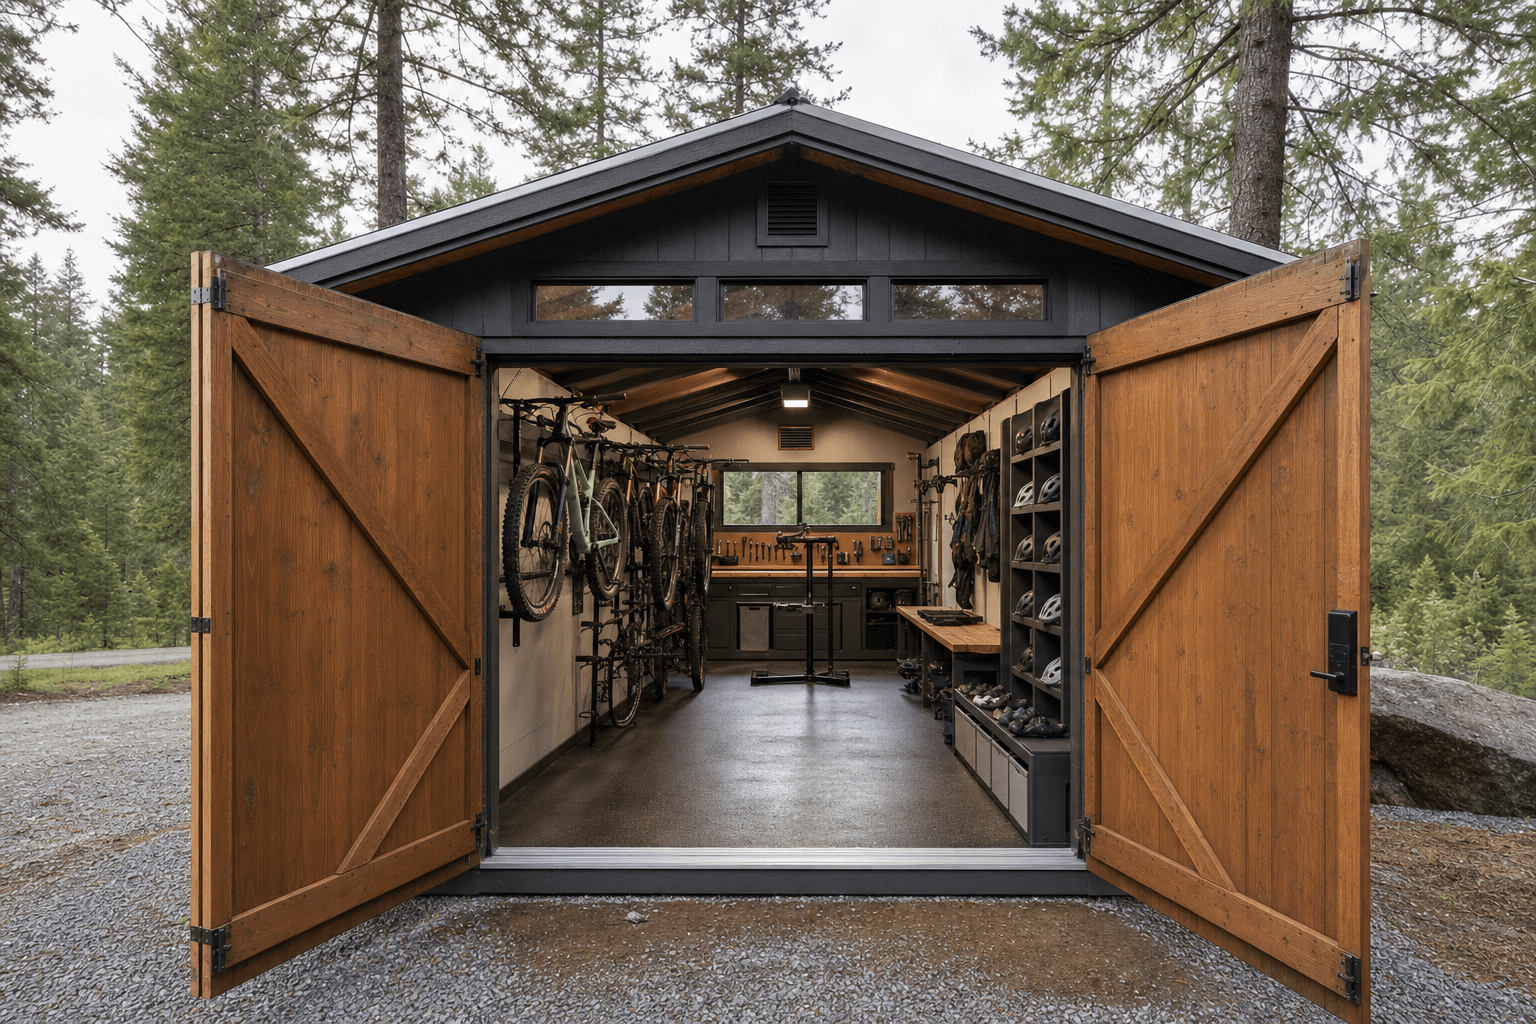
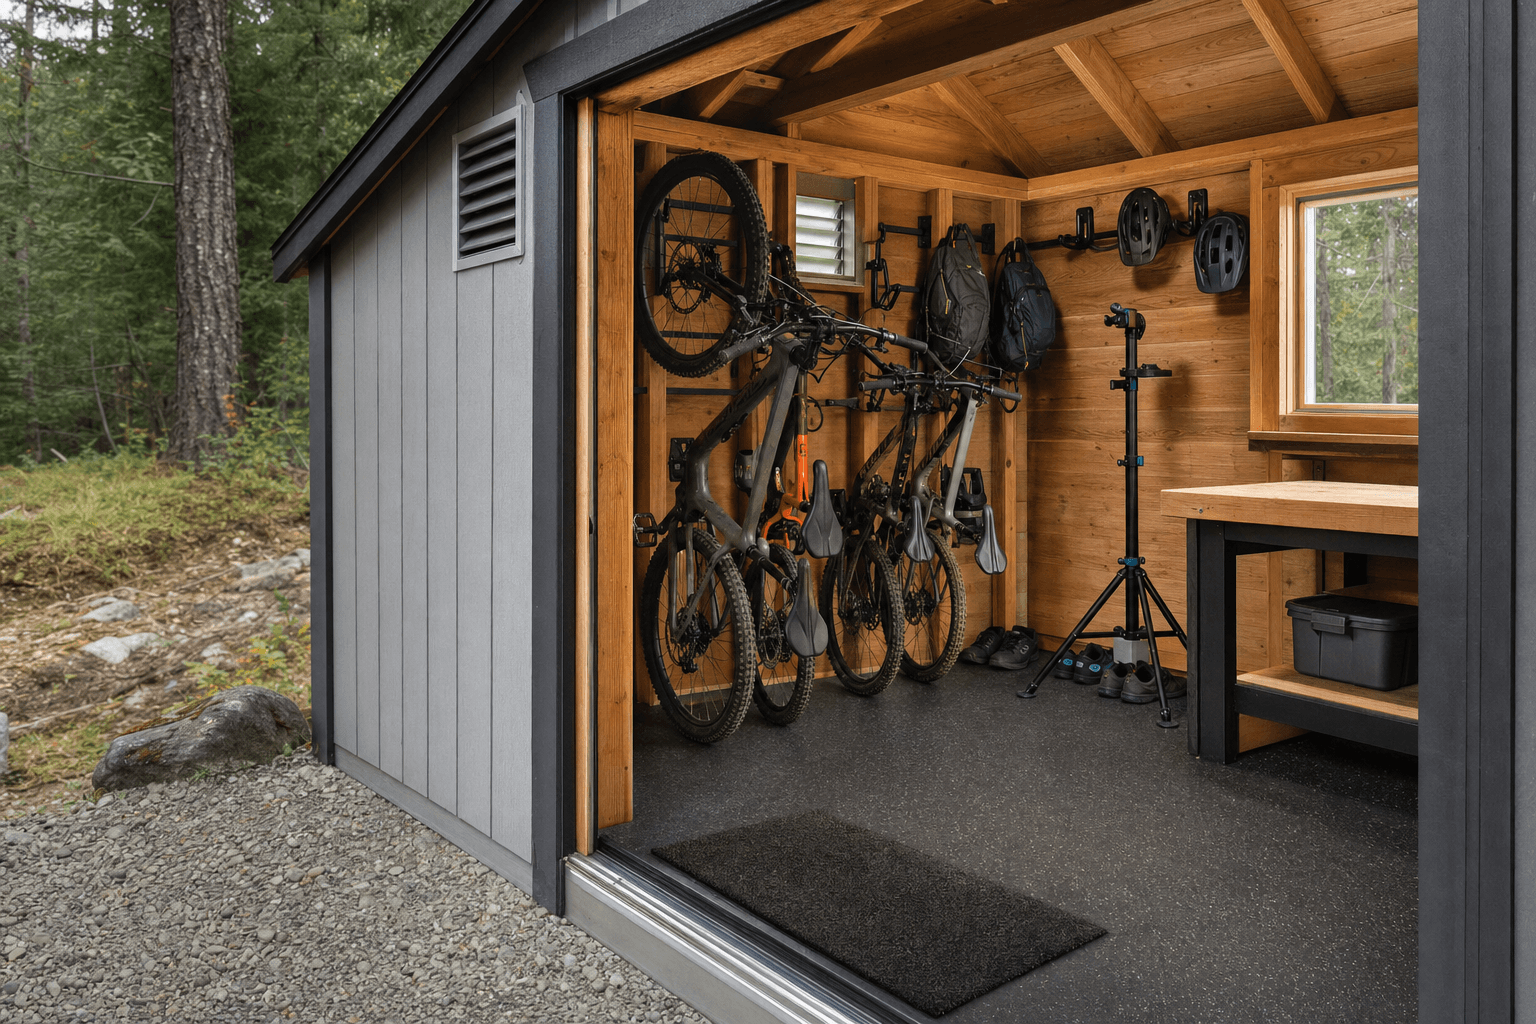
A bike shed wants two things from its shell: usable wall height for hanging bikes and a roof tall enough to hoist a few up out of the way. That makes the standard gable the honest starting point — it gives the most headroom for the money, lines easily with plywood walls you can screw a hanger into anywhere, and leaves clean sidewalls for vertical bike racks. The number that matters most is sidewall height: taller walls (8-foot-plus) let a 29er hang vertically by its front wheel with the rear tire still clear of the floor, and they give you room to stack a second bike or a wheel rack above the bench. A lofted barn (gambrel) raises the center ridge and adds a small loft that is perfect for off-season wheelsets, a spare fork, riding packs, and the kids' bikes they have outgrown — all while keeping the floor open for the working fleet.
If you do a lot of your own wrenching, a stick-built shop style with a tall, square wall is the move, since it gives you a full-height wall for a pegboard and a repair stand without the roof slope eating into the work zone. A lean-to or modern single-slope sheds North Idaho snow predictably to one side and gives you a tall front wall to fill with a window and a bench. Whatever the roofline, the wall framing and the door are the parts to spec up — plywood-lined walls hold hangers and racks anywhere, and a wide, low-threshold door lets you roll a bike straight in. A mountain bike shed sits closer to a working shop than a plain storage shed, which is why it overlaps with a dirt bike and moto shed when there is a powered machine in the mix and an e-bike charging shed the moment an e-MTB joins the fleet.
An 8x12 hangs three or four bikes on one wall, fits a compact repair stand and a small workbench, and keeps muddy gear off the floor.
A 10x12 or 10x16 hangs the whole family's bikes, adds a proper workbench, a tubeless station, and a parts wall, with floor space to work.
A 12x16 fits the fleet, a full repair bench, a tubeless and tools station, a parts cabinet, and a dedicated drying and gear-prep corner.
Footprint decides whether the shed feels like a clean shop or a crowded closet, so compare the real dimensions before you commit — a couple of feet is the difference between wheeling a bike past the repair stand and clipping a handlebar on every pass. An 8x12 hangs a few bikes on one wall with a compact bench and is plenty for a one- or two-rider household; a 10x12 opens up a second wall for the rest of the fleet plus a real workbench and a tubeless station; and a 10x16 gives you the length to line one whole wall with hanging bikes and still keep an open lane to roll them in and out. The extra length on a 16-foot building lets you have bikes on the wall, a bench at the end, and a drop zone by the door without anything overlapping. If you want the full fleet, a complete repair bench, a parts cabinet, and a dedicated wash-and-dry corner all set up at once, step up to a 12x16 so the floor stays usable with everything in place. Length matters as much as width here — a long, narrow building lets you roll a bike in a straight line to the stand instead of pivoting it around the bench.
These overlap, and the right call comes down to what is in the fleet. A pedal-powered mountain bike shed leads with vertical storage and a clean workbench — light bikes that hang easily, a repair stand, sealant and tools, and gear drying, with no fuel, no exhaust, and no battery to babysit. A dirt bike and moto shed changes the build the moment a gas machine is involved: you need a wider, taller door, a floor that takes a heavier wheeled load, and ventilation planned around fuel fumes rather than just wet gear. If your fleet is mixed — pedal bikes plus a moto — build to the heavier, fume-producing machine first and treat the pedal bikes as the easy part.
The fast-growing crossover is the e-MTB. An electric mountain bike hangs and wrenches like any other bike, but its battery wants a deliberate charging plan, which is exactly what an e-bike charging shed is built around — a dedicated outlet, a heated spot so the battery never charges at freezing temperatures, and clearance so a charging pack is not buried under wet jackets. The other natural neighbor is gear: if drying muddy kit, hanging packs, and airing out shoes is half of why you want the building, a gear drying shed shares the same heat, airflow, and hanging hardware. Naming the lead use up front keeps you from a building that stores bikes poorly and dries gear poorly both — and it locks in your door size, your power, and your ventilation before the framing is ordered.
Zone the shed: a hanging wall for the fleet, a repair stand and bench, a tubeless and tools station, and a drying corner by the door.
Think of a bike shed as four working zones instead of one open box, and lay them out so nothing has to move when you grab a bike or start a repair. A hanging zone anchors on one or two plywood-lined walls, with vertical hooks or a wall rack spaced so a handlebar clears the bike next to it and the tires never rub a frame — this is the wall you protect first, because the whole point is getting the fleet off the floor. A repair zone centers on a clamping repair stand with a workbench beside it, set where the light is best and with room to walk a full circle around a bike on the stand. A tubeless and tools station lives next to the bench: an air compressor or a charged inflator, sealant and a syringe, a tubeless kit, and a pegboard or magnetic strip with the tools you reach for most. A drying and gear zone sits by the door, where wet jackets, packs, gloves, and shoes hang and drip without soaking the working floor.
Good zoning means you never have to lift a bike down to reach a tool, and you never trip over a muddy pack to get to the stand. Put the repair stand where you can roll a bike straight to it from the door, and leave a clear lane — at least a bike length plus a couple of feet — so wheeling one in and out never means rearranging the others. Keep the dirtiest work, the wash-down and the drying, nearest the door so mud and water stay by the entrance instead of tracking across the shop. Hang the bikes you ride most at an easy reach and the off-season or kids' bikes higher or up on a ceiling hoist.
Vertical front-wheel hooks or a wall rack screwed into plywood-lined framing, spaced so handlebars clear each other, plus a ceiling hoist or pulley to lift off-season and overflow bikes out of the way.
A clamping repair stand bolted to the floor or bench, a solid work surface with a vise, and a pegboard or wall panel for hex keys, a chain tool, a torque wrench, and the tools you grab every ride.
An air compressor or charged tank inflator for seating tubeless tires, sealant and a syringe, a tubeless kit, plus labeled bins and a cabinet for tubes, brake pads, cassettes, cables, and spare chains.
Hooks and a rack by the door for wet jackets, packs, gloves, and shoes, a boot tray, good airflow, and a heat source so muddy kit dries overnight instead of staying damp and musty.
This is where a bare shell becomes a shop, and it is worth naming exactly what lives inside so you size the walls, the power, and the airflow around it. The storage hardware comes first: vertical front-wheel hooks, horizontal wall mounts, a freestanding gravity rack for renters or anyone who would rather not drill, and a ceiling-mounted hoist or pulley system for the bikes you ride least. The repair anchors are the heart of the shop — a clamping repair stand, a workbench with a vise, and a wall of tools: a set of hex and Torx keys, a chain breaker and a quick-link plier, a cassette tool and chain whip, a torque wrench, tire levers, a shock pump, and a floor pump. Underneath the wrenching goes the tubeless and inflation kit: an air compressor or a charged tank inflator to seat stubborn tires, tubeless sealant and a refill syringe, a plug kit for trailside cuts, and a bottle of degreaser with a chain-cleaning tool.
Around the anchors you fit out for the daily grind and the gear: labeled parts bins and a cabinet for spare tubes, brake pads, rotors, cassettes, cables and housing, and a few spare chains; a spares drawer for dropper posts and bottle cages; shop rags and paper towels; chain lube, fork oil, and grease on a shelf out of reach of kids. For the gear-drying corner, add a row of hooks and a drying rack for jackets, packs, and gloves, a boot and shoe tray, a helmet shelf, and a bin for knee pads. If an e-MTB is part of the fleet, give it a dedicated charging spot — a heated shelf with its own outlet — so the battery is never buried under wet kit or charging in a freezing corner. The right hooks, tools, and a real drying setup are what turn a storage shed into the shop you wrench in before every ride.
A clamping stand, tools within reach, and a tubeless station — the details that turn a bike shed into a shop you actually use.
| Mountain bike shed planning checklist | |
|---|---|
| Wall framing | Plywood-lined walls so vertical hooks, wall racks, and a pegboard can screw in anywhere and hold a loaded full-suspension bike |
| Ceiling height | Taller sidewalls (8 ft+) so a 29er hangs vertically with its rear tire clear of the floor and a ceiling hoist lifts spare bikes overhead |
| Door & access | A wide, low-threshold door so you roll a bike straight in and out without lifting it over a sill or clipping the bars |
| Repair zone | A clamping repair stand and a sturdy workbench with a vise, set where the light is best and with room to circle a bike on the stand |
| Power | Dedicated 120V outlets for an air compressor, a battery charger, lighting, and an e-MTB charging spot so nothing shares one breaker |
| Heat & airflow | Insulation, a heater, and a vent or fan so muddy gear dries, sealant sets, and you can wrench through a North Idaho winter |
A bike shed earns real power and light because half of what happens inside is detail work — seating a tubeless tire, setting a torque value, bleeding a brake, truing a wheel — and none of that goes well in a dim, cold box. Plan dedicated 120V outlets run from the house: one for an air compressor or tank inflator that can seat a stubborn tubeless tire in a single blast, one at the bench for a battery charger and shop tools, and a separate one for an e-MTB charger so a charging battery never shares a breaker with the compressor. Place the outlets where the work happens — at the bench, by the stand, and at the charging shelf — so no extension cord crosses the floor where you wheel bikes. For light, layer bright, even LED fixtures across the ceiling so there are no shadows on the stand, then add a task light or a clamp light at the bench for close work like a derailleur adjustment or a brake bleed.
Heat decides whether the shed gets used from October to May. North Idaho winters are long, and an unheated building is a problem on three fronts: tubeless sealant does not flow or set well when it is freezing, muddy gear stays damp and musty, and an e-MTB battery should never charge at sub-freezing temperatures. Insulate the walls and ceiling and add a heater — a mini-split, an electric heater, or a small wall unit — sized to take the chill off so you can wrench in comfort and gear actually dries overnight. Pair the heat with airflow: a vent or a small fan moves the damp, muddy-gear air out and brings fresh air in, which keeps the shed from smelling like a wet pack and stops condensation from forming on your bikes and tools. A heated, ventilated shed is the difference between a shop you use all winter and a cold building you avoid until spring.
Bikes are valuable and easy to grab, so security is not an afterthought in a bike shed — plan it into the build. A solid-core door with a real deadbolt beats a hollow door and a padlock hasp, and reinforced hinges and a strike plate make the door itself hard to pop. Inside, mount a ground anchor or a wall anchor in the framing so you can lock the most valuable bikes to the building with a hardened chain, not just to each other. Keep the contents out of sight with frosted or high windows or none at all on the street side, and consider a motion light and a camera covering the door. A shed that is clearly locked, anchored, and lit is a far less tempting target than bikes leaning in an open garage.
A bike shed is not heavy, but it still earns a proper base. A compacted gravel pad drains well, keeps the floor dry, and works under a framed floor — important in a building where you will hose mud off bikes and track in wet gear. Plan the approach so you can roll bikes straight in off a path without a muddy uphill fight, and so a delivery comes off the truck clean. Read how to prep a shed site before delivery day so the pad, drainage, and access are ready. North Idaho winters drive a roof and anchoring rated for local snow load, insulation that keeps the shop workable through the freeze, and a plowed path so you can reach your bikes after a storm. Most small bike sheds skip a permit, but bigger buildings, added electrical, and setback or HOA rules sometimes do not — confirm what your town and county require on the service areas pages, and factor any electrical permit in before you finalize the size and where the shed will sit.
Line the walls with plywood so you can screw hooks and racks in anywhere, then space them for the widest bars in the fleet. Vertical front-wheel hooks pack bikes tightest — alternate them high and low so a handlebar on one bike sits above or below the bars on the next, and leave enough gap that tires never rub a neighboring frame. Tall sidewalls let a 29er hang vertically with its rear tire still clear of the floor. For the bikes you ride least, add a ceiling-mounted hoist or pulley system to lift them up and out of the way, which keeps the floor open for the working fleet and the bikes you grab every day.
Start with a clamping repair stand bolted to the floor or a sturdy workbench, set where the light is good and with room to walk a full circle around a bike. Beside it, build the bench with a vise and a pegboard or magnetic strip for the tools you reach for most. For tubeless work, the key piece is air volume: an air compressor or a charged tank inflator that seats a stubborn tire in one blast, plus sealant and a refill syringe, a tubeless plug kit, and a floor pump for everyday top-ups. Add a torque wrench, a chain tool, hex and Torx keys, tire levers, and a shock pump, and you have a real shop instead of a storage room with a bike in it.
Treat the shed like a safe, not just storage. Use a solid-core door with a real deadbolt, reinforced hinges, and a strong strike plate so the door is hard to force, and skip the flimsy padlock-and-hasp setup. Inside, mount a ground anchor or a wall anchor into the framing and lock your most valuable bikes to the building itself with a hardened chain, not just to each other. Keep the bikes out of sight with high or frosted windows, or none on the street side, and add a motion light and a camera at the door. A shed that is clearly locked, anchored, and lit is a much less tempting target than bikes leaning in an open garage.
Set up a drying-and-gear corner by the door, away from the clean shop area, so mud and water stay near the entrance. Add a row of hooks and a drying rack for jackets, packs, and gloves, a boot or shoe tray, and a helmet shelf, then make the corner work with heat and airflow. A heater takes the damp chill off and a vent or small fan moves the wet, muddy-gear air out and brings fresh air in, so kit dries overnight instead of sitting musty for days. Keeping the wet zone near the door and well ventilated also stops condensation from forming on your bikes and tools across the rest of the shed.
Put tools on a wall where you can see them — a pegboard or magnetic strips at the bench mean a hex key or chain tool is grabbed, not dug for. Store small parts in labeled bins and a cabinet sorted by type: tubes and tubeless sealant together, brake pads and rotors together, cassettes and chains together, cables and housing together. Keep a few spares of anything that fails on the trail — tubes, a chain, brake pads, a derailleur hanger — at the front where you reach first. Set chain lube, grease, and fork oil on a shelf up out of kids' reach. Good organization is what lets a flat fix or a brake swap take ten minutes instead of turning into a scavenger hunt across the shed.
Yes, with a deliberate charging plan. Give the e-MTB its own dedicated 120V outlet so the charger never shares a breaker with an air compressor, and set up a charging shelf where the battery sits in the open, not buried under wet jackets or packs. The big one in North Idaho is temperature: lithium batteries should not charge at sub-freezing temperatures, so the shed needs to be insulated and heated enough that the charging spot stays well above freezing through winter. Keep the charger and battery off the floor and clear of anything flammable, and you can keep an e-MTB topped up and ready to ride year-round without dragging it into the house.
Trail access near Coeur d'Alene and Post Falls means bikes move in and out of storage more often than in many other markets — sometimes multiple times a week from spring through late fall. A shed designed for that rhythm has a door you can open with a muddy hand, floor space that tolerates dirt and water, and a layout that makes pulling a bike out fast rather than excavating it from behind other gear.
Mud and moisture are the recurring themes. North Idaho trails stay wet into June and get wet again in October. Interior surfaces that can be hosed down, a slightly sloped floor that drains toward the door threshold, and a ventilated wall section for drying kits and shoes will save the shed from the mildew problems that haunt unventilated storage in our climate.
On-site framing reaches the tight back-yard spots and sloped lots common in Hayden and Rathdrum where a drop-off unit simply won't land. The shed is also built to actual local snow loads, so the roof carries a real North Idaho winter without the owner wondering whether a heavy February snowfall is a problem.
Suspension service and tubeless work benefit from a bench at standing height and a dedicated outlet for a compressor. Browse our mountain bike shed page to see how those features come together, or design your layout in the configurator. Owners in Post Falls or Coeur d'Alene can get a free estimate any time.
Tell us how many bikes you ride and the wrenching you do, and we will help spec the hanging walls, the repair zone, power, heat, and security around your property — then you can build and price it online.
Keep planning your build with related North Idaho shed guides.