Overlanding gear has a way of taking over. A rooftop tent and an awning eat the garage rafters, the recovery kit lives in a milk crate in the truck bed, the fridge gets unplugged and shoved in a corner between trips, and every fuel can, water jug, and tote of camp cooking gear ends up wherever there was a gap last time. Then a trip comes together on short notice and you spend the first two hours not driving but hunting — for the tire deflators, the second set of traction boards, the bag with the recovery shackles. An overlanding gear shed turns that scramble into a system: one weatherproof building where the rig's whole kit lives sorted, charged, topped off, and ready, with a staging lane out front so loading the truck is a checklist instead of a treasure hunt.
North Idaho On Site Sheds builds every overlanding storage building right on your property, so the shelving depth, the door width, and the staging apron can be sized for the way you actually load and unload a fully built-out rig. Overlanding gear is heavy, bulky, awkwardly shaped, and a mix of things that must stay dry, things that must stay vented, and things that must stay cold — which is exactly why a generic storage shed fights you. Plan the building around the trip routine — pull the rig up, load in order, roll out — and the storage, the workbench, and the door all fall into place around that one flow.
One building for the whole kit: recovery gear, camp totes, fuel and water, and a staging lane so loading the rig is a checklist, not a hunt.
Overlanding gear is mostly tall and bulky, so the roofline you choose is really a question of how much vertical and overhead storage it gives you for tents, awnings, boards, and bins. A standard gable is the honest starting point — it frames a tall, wide door on the gable end so a rooftop tent or a long sealed tote carries straight in, and it leaves clean, full-height sidewalls for the deep shelving and wall systems that overlanding kit demands. Order taller sidewalls (8-foot-plus) so a rolled awning, a set of traction boards, or a rack of long-handled tools hangs on the wall without fighting the roof slope. A lofted barn (gambrel) raises the ridge and adds a loft up top — a strong move when you want the rooftop tent, the spare ground tent, sleeping bags, and off-season gear stored overhead while the floor stays clear for the fridge, the totes, and the workbench. A lean-to sheds North Idaho snow predictably to one side and makes a tidy covered spot to stage fuel cans or a trailer alongside the main building.
Whatever the roofline, build for height and a wide door, because those are the two things you cannot add after the fact, and overlanding gear is defined by tall awkward loads. An overlanding shed sits somewhere between a tidy gear room and a working garage, which is why it overlaps with an ATV and UTV shed when a side-by-side or a quad rides along on the same trips, and with a boat and gear shed when the same household stores water-sport kit that loads the same bulky, get-it-dry way. Decide early whether the building is mostly organized storage or also a place to service and pack the rig, because that one call drives how much open floor you keep clear, how much bench space you frame, and whether you build a true staging lane out front.
A 10x16 holds a single rig's complete setup — recovery gear, camp totes, a fridge on a shelf, fuel and water along one wall — with a clear lane to carry loads out to the truck.
A 12x16 or 12x20 adds a workbench, a charging station, and deep wall systems for two sets of boards and awnings, with room to lay gear out and stage it before a trip.
A 12x24 stores the kit for two rigs, or one rig plus a small overland trailer or a teardrop, with a bench, a fridge bay, and open floor to load in order.
Footprint decides whether you can lay a tent and an awning out flat to pack them, or whether you are stacking totes three high and digging for the one on the bottom — so compare the real dimensions before you commit. A 10x16 is a comfortable home for one rig's complete kit with deep shelving down one wall and a clear carry lane, but it tightens up the moment you add a workbench or a second set of gear. A 12x16 buys the width to run shelving down one side and keep a pack-and-prep bench on the other, so you can lay things out before they go in the truck. Step up to a 12x20 and the added length gives you a dedicated charging and fridge zone, a long bench, and room to walk a full duffel and a water jug out without turning sideways — the length is what separates a shed you shuffle bins around in from one you actually pack out of. If you store gear for two rigs, or you want a small overland trailer or a teardrop parked under the same roof between trips, a 12x24 gives you the floor to keep one bay clear for the trailer and still run a full wall of storage and a bench. Depth matters as much as width here: a long, deep building is what lets you stage gear in trip order along one wall and carry it straight out the door.
These overlap, and the right call comes down to what the building is built around. An ATV and UTV shed leads with the machines themselves — a wide tall door for a roll cage, a floor built for the weight of a side-by-side, fuel ventilation for the tanks — and the gear becomes a secondary zone. A dedicated overlanding gear shed leads with the kit and the loading routine: deep shelving and wall systems sized for tents, boards, and totes, a fridge and charging zone, smart fuel and water storage, and a staging lane out front so the focus is packing the rig fast and rolling out. A boat and gear shed leads with watercraft and the wet, bulky gear that goes with paddling and fishing, though plenty of North Idaho households run one building that holds overland kit in summer and crossover gear the rest of the year.
There is also real overlap with disaster readiness, because a well-stocked overlanding rig is half a bug-out kit already. An emergency preparedness shed leads with stored water, food, fuel, and gear staged to grab in a hurry — the same instincts that make a good overland shed, just aimed at staying put or evacuating instead of a weekend trip. Many buyers blend the two: a building where the camp stove, the water storage, the fuel cans, the first-aid kit, and the recovery gear pull double duty for both the next trip and the next power outage or wildfire evacuation. Naming the lead use up front keeps you from a building that organizes poorly and loads poorly both — and it locks in your shelving depth, your fridge and charging plan, and whether you frame a true staging lane before the build is ordered.
Zone it: deep shelving for sorted totes, a fridge-and-charging corner, a wall for boards and awnings, and a bench to pack from.
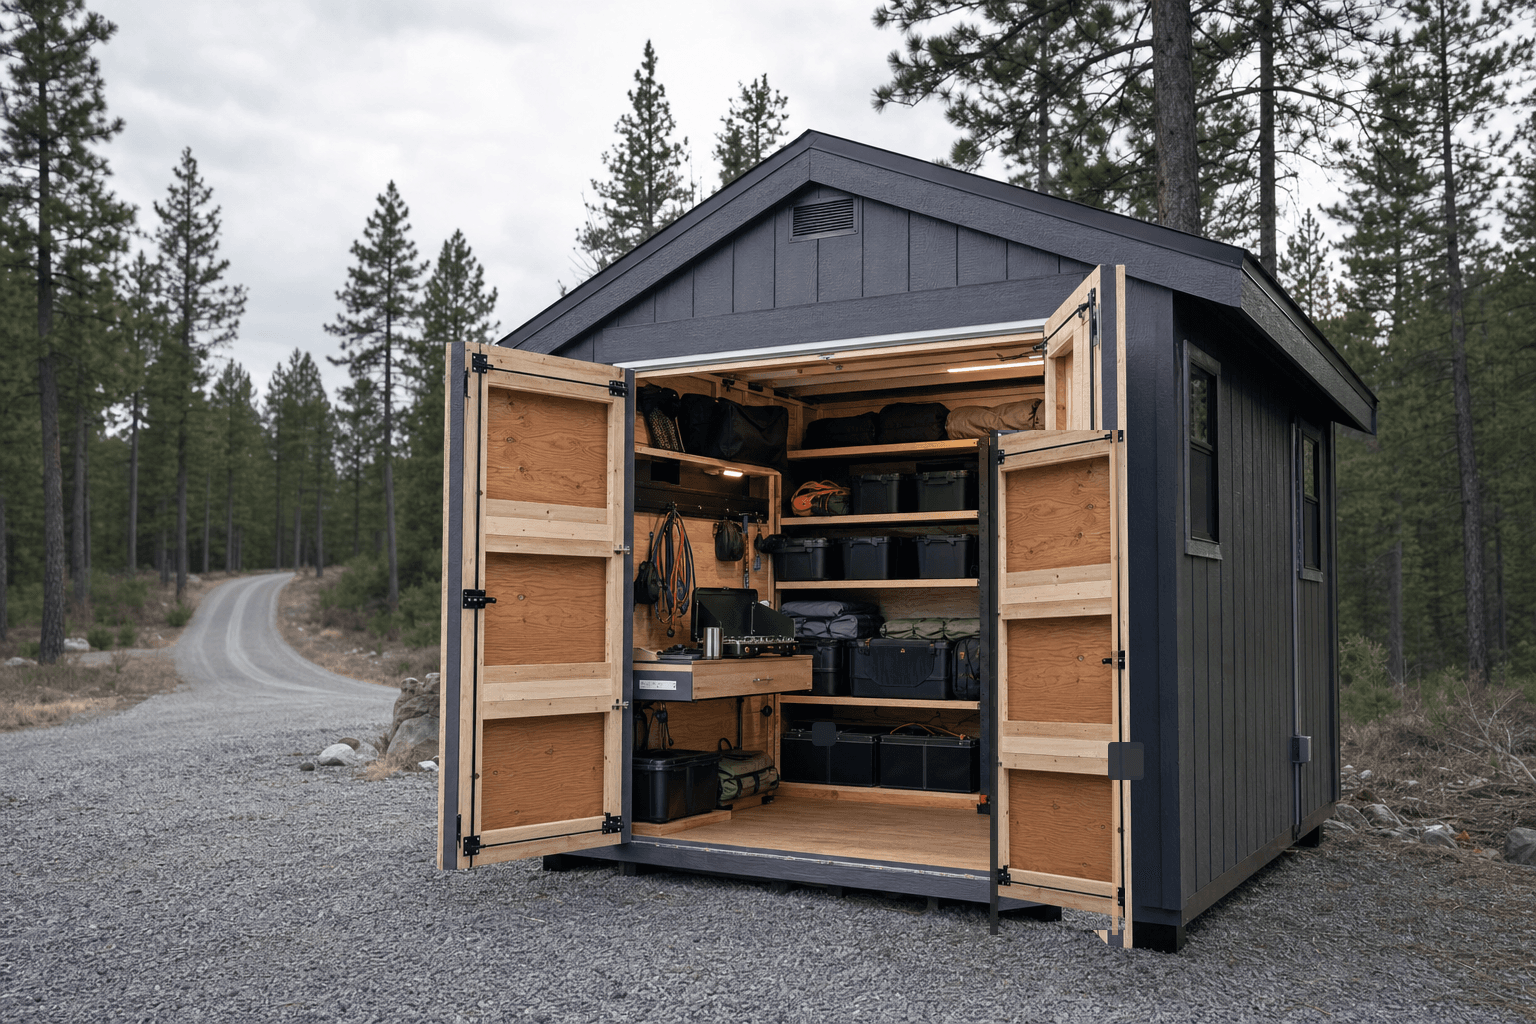
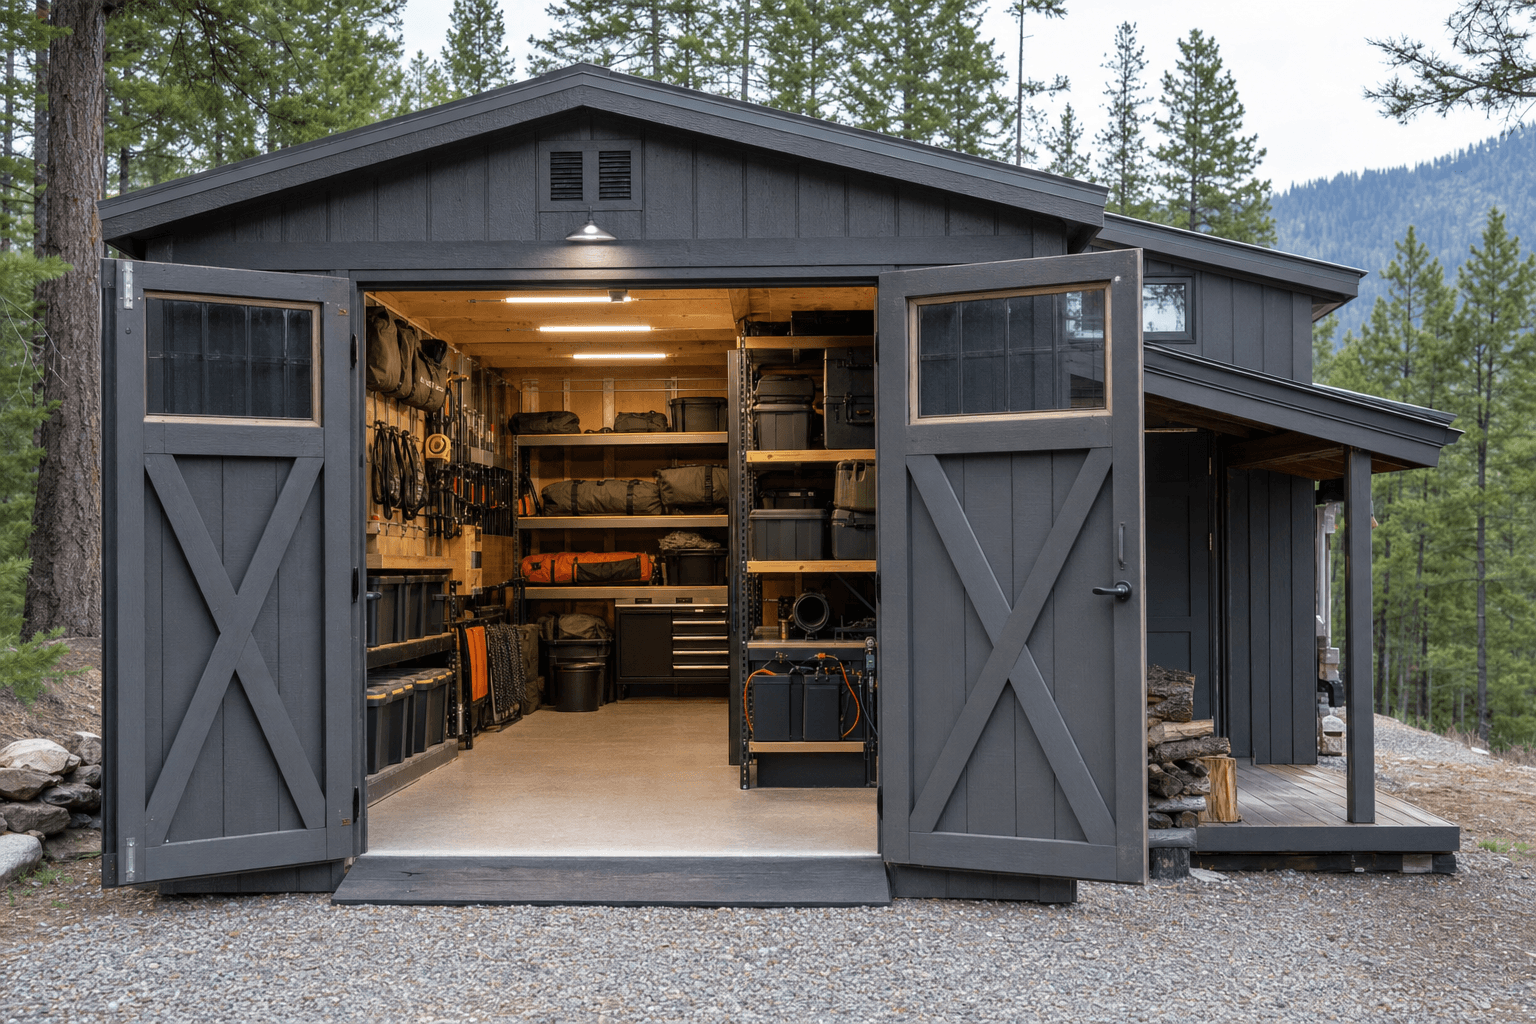
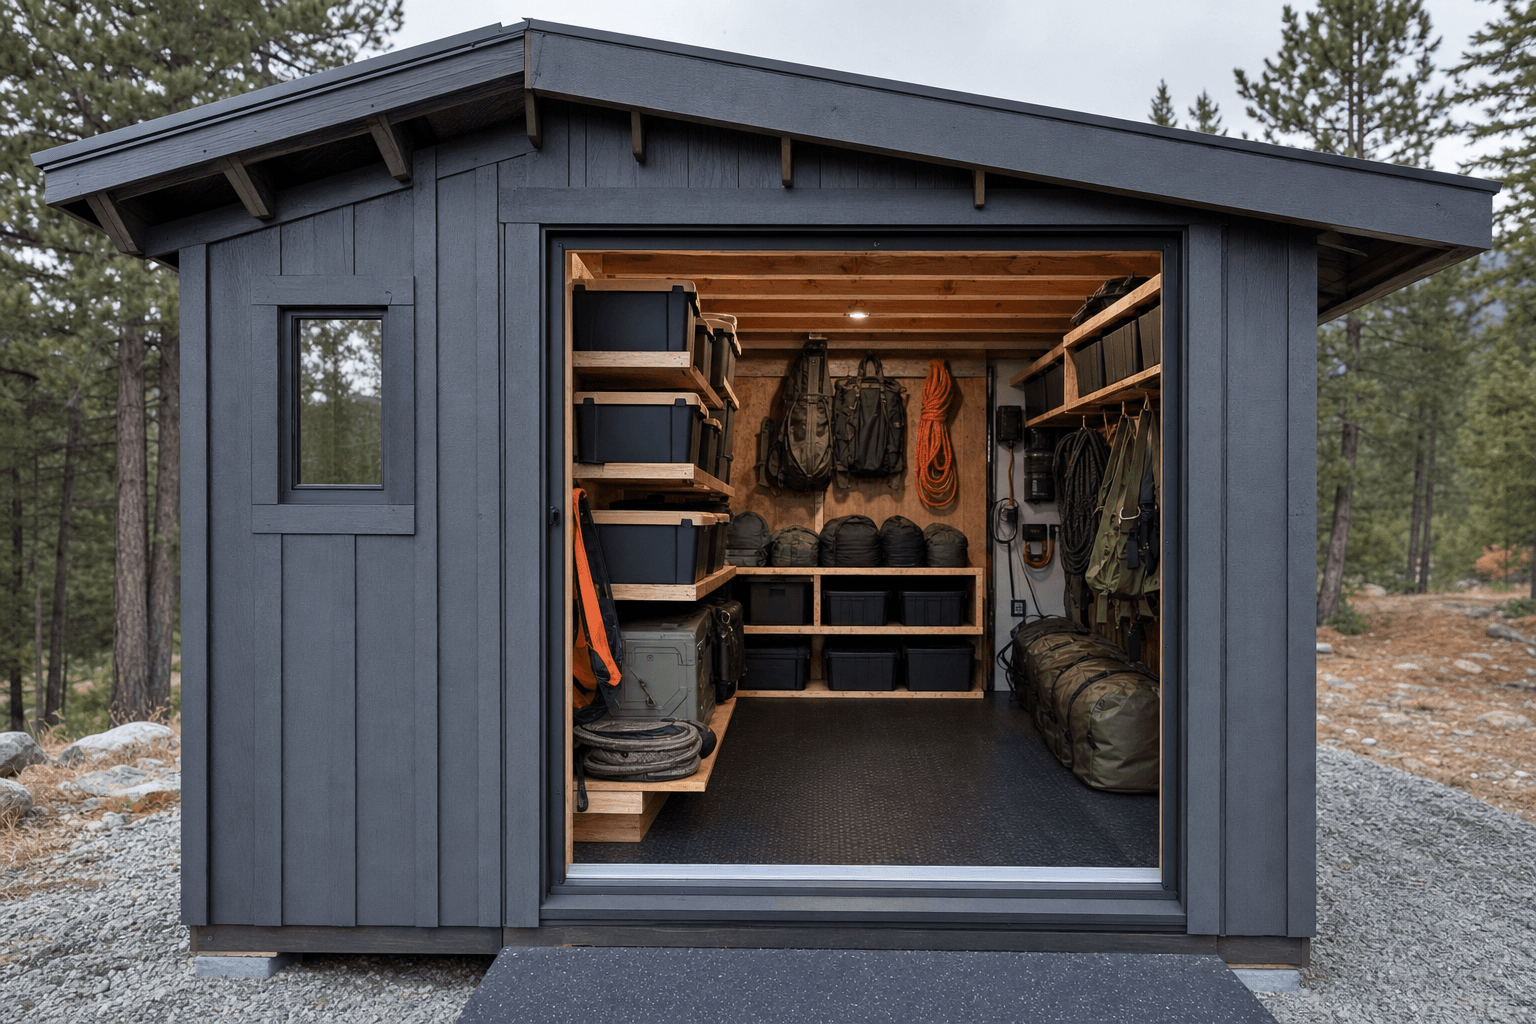
Think of the shed as four working zones instead of one open box, and lay them out in the order you load the truck so packing flows from the back of the building toward the door. A recovery and tools zone anchors one wall with the heavy, awkward gear that mounts the rig — traction boards, a winch or recovery kit, shackles, straps, a hi-lift jack, an air compressor, a shovel and an axe — hung on a slat wall or heavy hooks so it is visible and grab-and-go. A camp zone runs deep shelving for the labeled totes: cooking and kitchen, sleeping and shelter, lighting, water filtration, and clothing, each bin sized so it slides straight into the truck. A power and cold zone sits near an outlet for the fridge or cooler, the dual-battery charger, the solar controller, and the lights and devices that need topping off between trips. And a staging zone keeps the floor clear right inside the door so you can stage a full load in trip order before it ever goes in the rig.
Good zoning means you never have to unstack three totes to reach the recovery boards, and the fridge is always plugged in and cold when you grab it. Leave a clear carry lane from the shelving to the door wide enough to walk a loaded duffel and a water jug through without turning sideways, and keep the heaviest, most-used recovery gear closest to the door so it loads first and last. Put the bench where you can lay a tent or an awning out flat to fold it and still reach the totes you are filling, and keep the fridge and charging station on their own dedicated outlet so they run untouched between trips. Stage the load along one wall in the order it goes in the truck — heavy and bottom-of-the-pile first, grab-it-at-the-trailhead gear last — so loading the rig is a thirty-minute job, not a morning lost to hunting.
Deep, rated shelving and a slat or pegboard wall that carry stacked totes, traction boards, a hi-lift jack, and rolled awnings without sagging, sized so each labeled bin slides straight into the truck.
A sturdy bench to fold a rooftop tent, repack totes, and service gear, with a vise, recovery-gear maintenance tools, tire-repair and air kit, and bins for shackles, straps, fuses, and spares.
A loft or overhead rack for the rooftop tent, a spare ground tent, sleeping bags, chairs, and off-season kit, with long-handle hooks for the shovel, axe, and traction boards to keep the floor open.
A dedicated outlet wall for the fridge, dual-battery and device chargers, and a solar controller, plus shadow-free LED light over the bench and the staging lane so you can load and check gear after dark.
This is where a bare shell becomes a working basecamp, and it is worth naming exactly what lives inside so you size the shelving, the door, and the power around it. The shelter and sleep kit is the bulkiest anchor: a rooftop tent and its cover, an awning and walls, a spare ground tent, sleeping bags, pads, pillows, and camp chairs and a table. Right beside it lives the recovery and traction gear — traction boards, a winch or a recovery kit with shackles and a snatch block, kinetic and tow straps, a hi-lift or bottle jack, a tire-repair and plug kit, tire deflators, and an air compressor — the heavy, must-be-reachable stuff that earns the wall closest to the door. Then come the camp totes, labeled and stackable: a kitchen box with a stove, fuel, pots, and a water filter; a lighting and electronics box; a clothing and layers duffel; and a tools-and-spares bin.
Around that, you store the consumables and the power that keep a rig trip-ready. Fuel and water take a planned, vented spot: jerry cans of gas and diesel, a propane or isobutane supply for the stove, and several jugs or a tank of fresh water for drinking, cooking, and washing. The power and cold gear — a 12V fridge or a quality cooler, a portable power station or a dual-battery setup, a solar panel and controller, and chargers for headlamps, radios, and devices — wants a dedicated outlet and a cold-stable corner. Round it out with the navigation and safety kit: paper maps and a GPS, radios, a first-aid and trauma kit, a fire extinguisher within reach of the door, headlamps and a lantern, a tool roll, and the small consumables — fuses, zip ties, tape, fluids, and a spare for everything you would hate to break two hours from pavement. That full fit-out is what turns a storage shed into the place every trip starts and ends.
Recovery gear and the most-used totes ride the wall nearest the door, so they load first and you never dig for them.
| Overlanding gear shed planning checklist | |
|---|---|
| Door width & a staging apron | A wide door plus a flat, hard apron right outside so you can stage a full load and walk bulky gear and water jugs straight from the shelving to the rig |
| Deep shelving & wall systems | Deep, rated shelving for stacked totes and a slat wall for boards, awnings, and recovery gear, sized so labeled bins slide straight into the truck |
| Fuel & water storage | A vented, fire-aware spot for jerry cans, propane, and water jugs or a tank, kept away from heaters and any ignition source, with fresh water protected from freezing |
| Power & charging | Dedicated 120V outlets for a fridge, dual-battery and device chargers, and a solar controller, with a cold-stable corner so the fridge runs between trips |
| Climate & insulation | Enough insulation to hold a stable temperature for a running fridge, batteries, and electronics through North Idaho heat and freeze |
| Security | Solid doors with quality locks, hidden hinges, and an option for an alarm, motion light, or camera to protect expensive recovery, camp, and power gear |
Power and climate decide whether the shed actually keeps a rig trip-ready or just holds gear that needs a full charge and a defrost before you leave. A built-out overland kit runs on electricity between trips: a 12V fridge or freezer you keep cold so it is ready to load, a portable power station or a dual-battery bank on charge, a solar panel and controller, and the steady drip of headlamps, radios, drone, and device batteries that all need topping off. Plan several dedicated 120V circuits run from the house with outlets along a charging wall so the fridge and the chargers run untouched and no cord crosses the staging lane. A fridge and a battery bank also want a stable temperature — North Idaho summers cook an uninsulated shed and winters freeze it — so insulate enough to hold an even climate, which protects the batteries, keeps the fridge from overworking, and stops fresh water and any liquids from freezing solid.
North Idaho winters drive the rest. Lithium batteries and power stations lose capacity and can refuse to charge in hard cold, so a heated or well-insulated corner keeps the power gear healthy through the off-season. Stored water freezes and bursts cheap jugs, so keep your drinking and washing water in a protected, above-freezing spot or plan to drain it down for winter. Fuel stored over a long cold stretch wants a stabilizer and a tight, vented setup. And gear you grab on a cold morning — the tent, the awning, the recovery kit — lives better in a dry, insulated building than in a damp shed where condensation rusts the hardware and grows mildew on the canvas. A vented, insulated, well-powered shed is one where the rig comes out of winter ready to load instead of needing a charge-and-thaw day first.
An overlanding shed earns a real base and a real approach, because everything about it is heavy and bulky to move. A compacted gravel pad drains well and works under a properly built framed floor, but if you want a surface you can roll a loaded handcart of totes and water across and hose mud off, a concrete slab is worth it — it gives a dead-flat, washable floor and takes the weight of stacked gear and a full fridge without flex. Just as important is a flat, hard staging apron right outside the door: a stretch of gravel or concrete where you pull the rig up close and stage a full load before it goes in, so you are not carrying duffels across a muddy yard. Plan the approach so the truck or trailer can pull right up off a gravel driveway, and grade the pad so snowmelt and rain drain away from the door rather than pooling at the threshold. Read how to prep a shed site before delivery so the pad, drainage, and the staging apron are ready.
North Idaho weather drives several choices. Plan a roof and anchoring rated for local snow load, and detail the door and threshold so drifting snow does not block you in when a spring trip finally lines up. Keep the gravel approach plowed and passable so you can actually get the rig and the gear out after a storm. Drainage matters year-round — a building you carry wet, muddy gear into needs a floor and a pad that shed water, and a gravel pad that channels snowmelt away keeps the threshold from icing. These buildings also tend toward larger footprints with added power and fuel storage, which can trigger local rules: many small sheds skip a permit, but bigger buildings, electrical work, and setback or HOA requirements often do not. Confirm what your town and county require on the service areas pages, and factor any electrical permit into the plan before you finalize the size and where the shed will sit.
Sort the building the way you load the truck, and keep the heavy, must-be-reachable recovery gear on the wall closest to the door. Hang traction boards, straps, shackles, a hi-lift jack, an air compressor, a shovel, and an axe on a slat wall or heavy hooks so each piece is visible and grab-and-go instead of buried in a crate. Run the camp gear in labeled, stackable totes on deep shelving grouped by job — kitchen, sleep and shelter, lighting, clothing — each bin sized to slide straight into the truck. Then stage a full load along one wall in trip order before it goes in the rig: heavy bottom-of-the-pile gear first, grab-it-at-the-trailhead gear last. Building on-site means the shelving depth and the door get sized for your totes and your loading routine instead of a generic shelf layout.
Give fuel and water their own planned, vented spot, away from heaters and any ignition source. Jerry cans of gas and diesel and a propane or isobutane supply give off vapors, so store them low in a ventilated corner, ideally near the door, with no water heater, furnace, or open flame nearby, and keep a fire extinguisher within easy reach of the exit. Stabilize fuel that sits through a long North Idaho winter and keep cans tightly sealed. For water, store your drinking and washing jugs or tank in a protected spot, because water freezes and bursts cheap containers in hard cold, so either keep that corner above freezing or plan to drain the water down for winter. Keeping fuel, propane, and water grouped, vented, and away from heat keeps the whole building safer.
Plan for height and overhead storage, because a rooftop tent, an awning, and a spare ground tent are the bulkiest, most awkward things in the kit. A loft or a sturdy overhead rack is the best home for the rooftop tent and its cover, the spare tent, sleeping bags, and chairs, keeping that volume up high while the floor stays clear for the fridge, the totes, and the bench. Awnings, traction boards, and long-handled tools hang flat on a tall sidewall, which is why 8-foot-plus walls and a wide door matter so much for an overland shed. If you pull the tent off the rig between trips, leave a clear lane and a bench long enough to lay it out flat to fold and store it. Sizing the building around tall, bulky loads up front means the tent has a real home instead of eating your garage rafters.
Yes, and a staging lane is one of the best reasons to build a dedicated overland shed instead of cramming the gear in a garage. Inside, keep the floor clear right in front of the door so you can stage a full load in trip order before any of it goes in the rig. Outside, plan a flat, hard apron of gravel or concrete where you pull the truck or trailer up close, so you carry totes and water jugs a few steps from the shelving to the tailgate instead of across a muddy yard. Keep a wide carry lane from the shelving to the door, and lay the building out so the most-used gear loads first and last. With a staging zone inside and an apron outside, loading the rig becomes a thirty-minute checklist rather than a morning of hunting and back-and-forth trips.
You need a stable temperature more than full climate control, and in North Idaho that means insulating the building. A 12V fridge or freezer you keep cold and ready to load, a portable power station or dual-battery bank on charge, and a solar controller all run better in an even climate — summer heat in an uninsulated shed makes a fridge overwork and stresses batteries, and hard winter cold can make lithium batteries refuse to charge and lose capacity. Insulate enough to hold a steady temperature, plan a cold-stable charging corner, and consider a small heat source for the power gear through the off-season. Keeping the fridge, the batteries, and the electronics in a dry, temperature-stable building is what lets you grab a charged, cold rig and roll out instead of spending a day charging and thawing first.
Treat security as part of the build, because a full overland kit — a rooftop tent, recovery gear, a power station, a fridge, and tools — is a lot of value in one building. Start with solid, well-built doors fitted with quality locks and hidden or protected hinges so the door cannot be lifted off or pried easily. Add a motion-activated light over the door and the staging apron, and consider a simple alarm or a camera, especially on a rural property set back from the road on a gravel driveway. Inside, you can lock the most valuable gear in a cabinet or a job box and keep it out of sight from windows. Building on-site lets you spec the door, the locks, and the wiring for a security light or camera from the start, so the gear that makes a trip possible stays protected between trips.
North Idaho is genuine overland country — the Selkirk foothills, Forest Service two-tracks above Rathdrum, and the logging roads north of Sandpoint all reward a rig that is staged and ready. A dedicated overlanding gear shed built on site in Coeur d'Alene or Post Falls puts your recovery gear, camp kit, and rooftop tent exactly where you need it: at the truck, not buried in the garage.
The staging lane is the feature that makes the biggest practical difference. Framing the door opening wide enough to back the truck in or pull alongside lets you load systematically rather than carry gear across the yard. On sloped Kootenai County lots, a gravel pad leveled during site prep gives you a firm, mud-free surface to work from — something a delivered shed can't account for because it arrives before anyone has looked at the ground.
North Idaho winters mean your shed needs to handle real snow loads and freeze-thaw cycles. Fuel cans and water jugs left in an uninsulated space can freeze and crack; even modest wall insulation and a sealed floor keep stored fluids stable and gear dry through a Coeur d'Alene winter. Four-season access also means the door hardware and latch need to work at twenty below, not just in October.
Permits for accessory structures in Kootenai County depend on size and whether you're inside city limits — worth confirming before you commit to a footprint. When you're ready to size it out, design your overlanding shed in the builder or get a free estimate. You can also browse our completed builds to see how other North Idaho properties have handled a similar layout.
Tell us what you run and what you store, and we will help spec the shelving, the fridge and charging plan, the fuel and water storage, the staging lane, and the site prep around your property — then you can build and price it online.
Keep planning your build with related North Idaho shed guides.