A potting shed is built around one job that a general storage building only dabbles in: propagation. This is where you sow flats, prick out seedlings, mix your own media, pot up divisions, and nurse cuttings until they root — all at a deep bench under good light, with a sink at your elbow and soil that lives in bins instead of bursting bags on the floor. Where a garden shed splits its footprint between storage and a little bench work, a potting shed gives most of the room to the work surface, the light, and the water. Plan it that way and you get a four-season propagation room, not a place to park the wheelbarrow.
North Idaho On Site Sheds builds every potting shed on your property, so the bench, the windows, and the sink line up with your sun, your hose, and the path you carry trays in and out. This guide walks the real decisions: which roofline puts daylight over a deep bench, what size actually fits serious propagation, how to lay out a clean-to-dirty workflow, and the grow lights, drainage, ventilation, and shelving that keep germination steady through a gray northern winter. If you mostly start seeds and grow them on, a focused seed starting shed layout pushes even harder in this direction.

A potting shed plan starts with a deep bench, daylight over the work surface, and water close at hand.
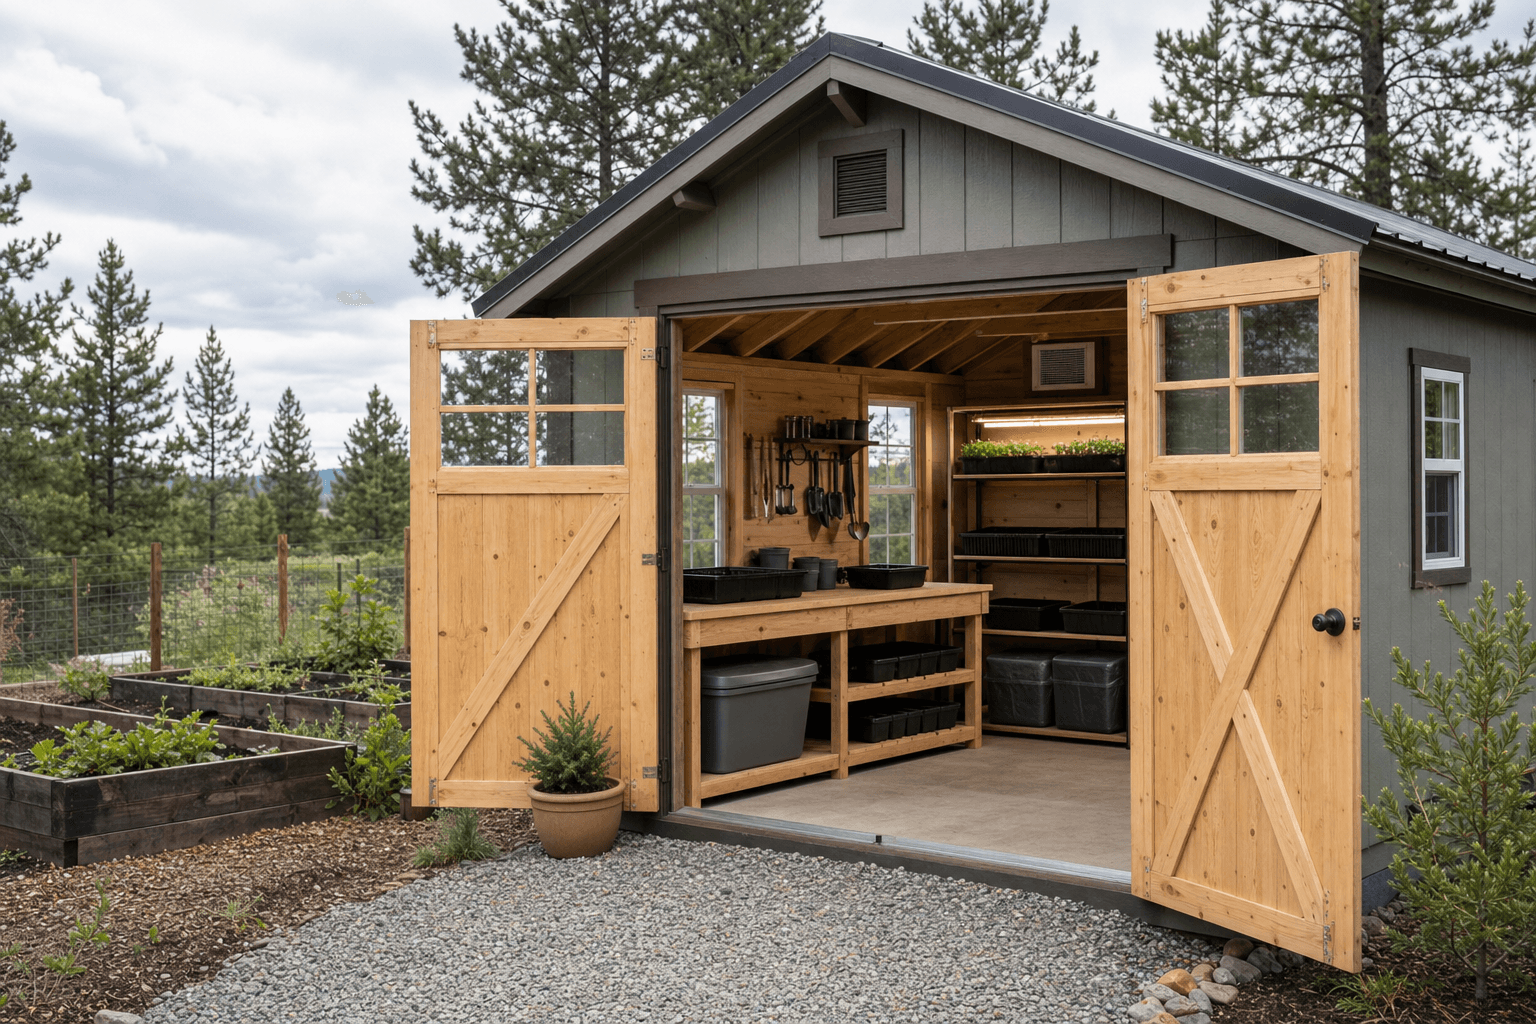
Light is the deciding factor, so the roofline you pick is really a glazing decision. A standard gable is the dependable choice: windows on both eaves wash even daylight across a potting shed bench, and a third window on the gable end keeps germinating flats bright on the overcast days North Idaho hands you from November through February. A lean-to or modern single-slope is the other strong option — its tall front wall lets you run a near-continuous band of glass over the bench, which is why it pairs so well with, or sits right beside, a greenhouse shed when you want even more growing light.
A lofted barn (gambrel) trades some of that wall glass for an upper bay, useful if you need to stash empty nursery pots, dormant bins, and off-season trays overhead while keeping the bench and sink clear below. Skylights or a clear roof panel rescue a shaded lot no matter which roof you choose. Whatever the style, plan the bench wall on the sunniest exposure and the door wide enough to carry a loaded tray rack through without tipping flats. Unlike a garden shed, you are not designing around a wheelbarrow lane here — you are designing around daylight, a long counter, and a sink, so let glazing and bench depth lead.
Reserve one full wall for a bench 24 to 30 inches deep so flats, a soil bin, and a sink all fit on the surface. Bench depth drives the whole footprint.
Bulk media — potting mix, seed-starting mix, perlite, compost — belongs in slide-out bins under the bench. Plan that cavity in, and the floor stays clear for trays.
Serious propagation means tiered grow-light shelving. Leave a wall or end for a multi-shelf rack so germination is not fighting the everyday bench for space.
For one grower with a deep bench, a sink, and a couple of light shelves, an 8x10 potting shed is the honest minimum — a 8-foot bench on one wall, soil bins beneath, and a narrow light rack across from it, though you will be choosing your moments to mix media. An 8x12 buys the breathing room that matters: a clear stand-and-work aisle so you can sow, pot up, and tend the light rack without shuffling trays. The sweet spot for most serious propagators is a 10x12 — a deep bench with a dedicated soil-mixing end, a real sink with drainage, a full tiered grow-light rack, and floor enough to set a tray cart down while you work.
If you propagate at volume, overwinter stock plants, or want a clean potting-up zone kept separate from the messy mixing zone, step up to a 10x14. The extra length lets you split the room into a wet end (sink, soil bins, mixing) and a grow end (heat mats, domes, tiered lights) without the two colliding — the same zoned thinking a seed starting shed is built on. That depth also leaves a natural home for a second light rack and a humidity-controlled corner for cuttings without crowding the bench you work at every day.
These three get confused constantly, and picking the right one keeps you from building the wrong room. A garden shed is the generalist — it stores the wheelbarrow, hoses, long-handled tools, and bagged amendments and gives a modest bench on the side. A potting shed flips that ratio: the deep bench, the sink, the soil bins, and the grow lights take center stage, and bulk yard storage gets pushed elsewhere. If you find yourself wanting more counter, more glass, and a place to actually mix media and raise seedlings rather than park equipment, you want a potting shed.
A greenhouse shed is a different animal again: it is glazed for growing plants under glass at high light and humidity, tuned for the plants rather than for you standing at a bench. Many North Idaho growers run both — start and pot up in the potting shed, then move trays out to the greenhouse to grow on. And if your whole focus is germination and growing seedlings to transplant size, a seed starting shed narrows the same footprint even further around heat mats, light racks, and humidity. The potting shed is the workhorse in the middle: the room where the hands-on propagation actually happens.
Zoning a clean-to-dirty workflow keeps soil mixing, potting up, and growing on from crowding each other.
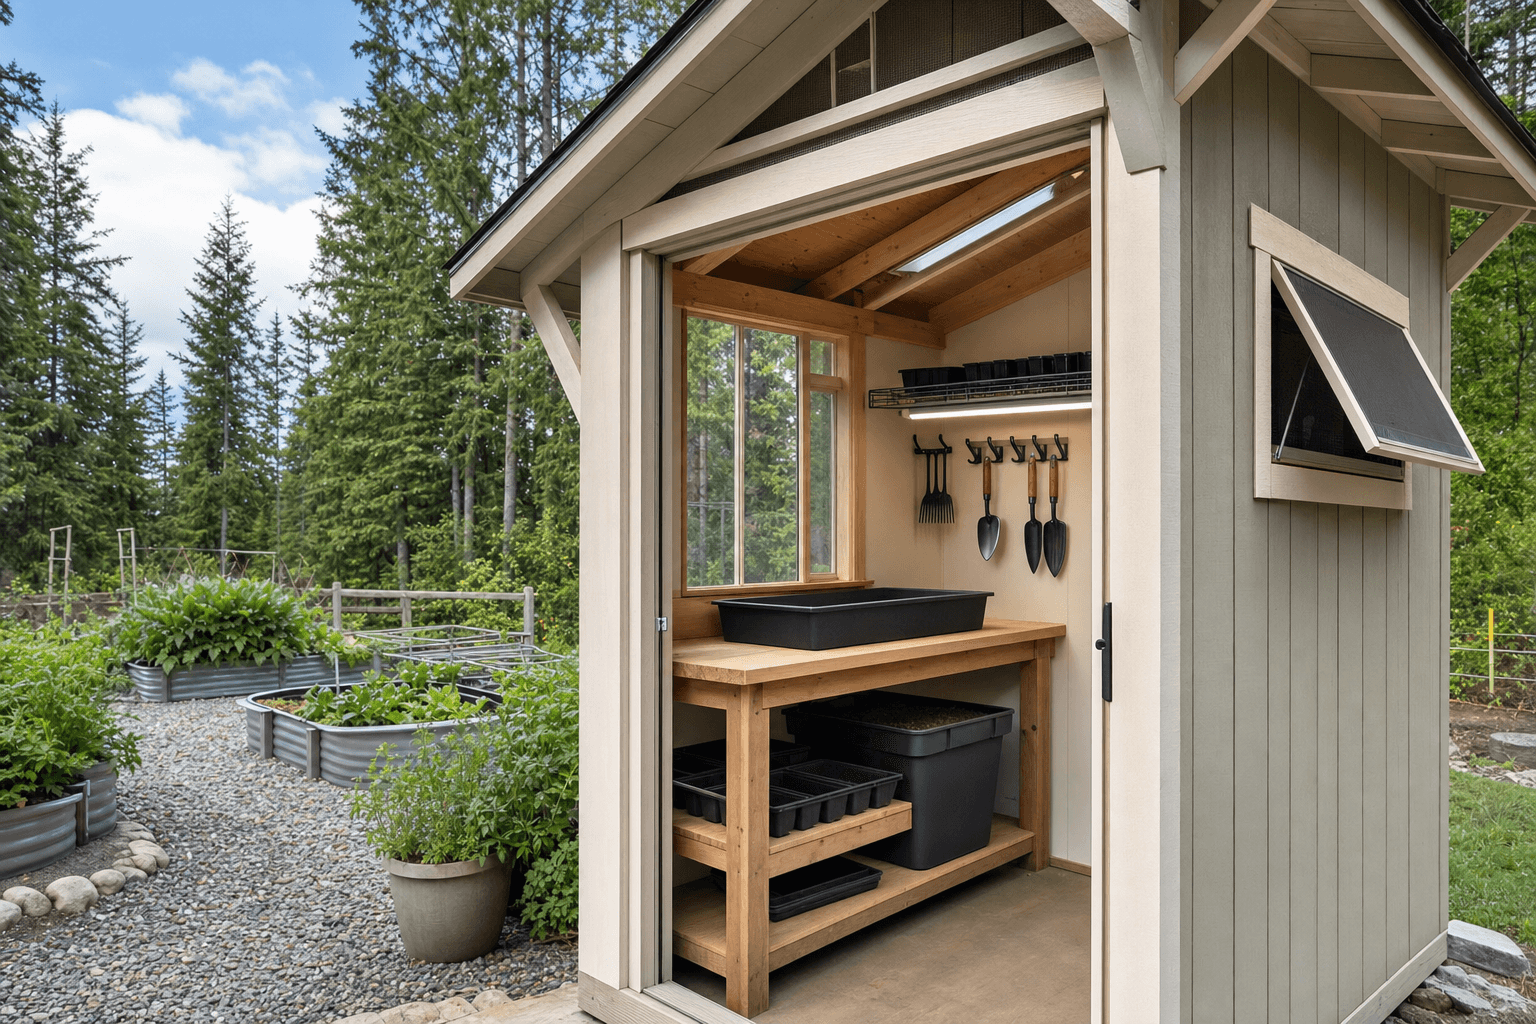
A potting shed works when the messy and the clean stop fighting over the same counter. Lay it out as a clean-to-dirty workflow and give propagation four zones. The soil-mixing zone is the dirty end: a bin or tub for blending media set into or beside the bench, the slide-out bulk bins underneath, and a surface you can scrape and rinse. Next to it, the potting-up zone is the heart — a deep bench at counter height (about 36 inches) where you fill cells, prick out seedlings, and pot on, with a back lip to corral spilled mix and the sink within a step.
The growing-on zone is a tiered light rack against the brightest wall or a dedicated end, sized for heat mats, humidity domes, and shelf lights so germinating flats and rooting cuttings have a stable home off the bench. The wet zone anchors the workflow: a sink with a real drain, a hose bib or filling tap, and floor that sheds water. Lay the zones out so you move trays in one direction — mix, fill, sow, set under light — and keep daily tools at the bench with bulk supplies low and overflow up high. Plan the door at 4 feet or a double so a loaded tray rack or a tall light cart clears without you tilting flats and dumping seedlings.
A sturdy bench 24 to 30 inches deep at 36 inches high, with a sealed or stainless top, a back lip, and a recessed soil tub. The extra depth is what lets flats, a mixing bin, and the sink share one surface.
Bulk media in covered, slide-out bins under the bench — potting mix, seed-starting mix, perlite, vermiculite, and compost — kept dry and rodent-sealed so bags never end up split on the floor.
Wire shelving with adjustable LED shop lights and a heat-mat tier, so propagation runs on its own schedule and stays off the working bench. Run dedicated outlets and a timer to each shelf.
Open slat shelving sized to nest nursery pots by diameter and stack 1020 trays flat, plus labeled bins for cell packs, domes, labels, and ties so small supplies never migrate onto the bench.
The accessories are where a potting shed earns its name, so plan storage for the exact propagation kit you reach for. On and around the deep bench: a soil scoop, a dibber and widger, a pricking-out tool, hand trowels and transplanters, bypass pruners and a clean knife for taking cuttings, plant labels, a paint pen, twine and plant ties, a spray mister, and a watering can with a fine rose. In the slide-out bins: potting mix, seed-starting mix, perlite, vermiculite, coarse sand, compost, and worm castings, with lime, bone meal, and a balanced granular feed sealed against rodents.
The propagation rack is the keyword core: 1020 trays and inserts, plug and cell flats, humidity domes, heat mats with a thermostat, a soil thermometer, rooting hormone, capillary matting, plus 4-inch and 1-gallon nursery pots and a sorted seed box. Run the tiered grow lights on a timer for the long North Idaho winter — the same lighting backbone a seed starting shed is built around. At the sink, plan for a fine-rose hose end, a fill bucket, and a draining drainboard for rinsed pots. Hang a wire rack for drying seed heads and curing bulbs where air moves freely. Sort by how often you grab it: daily propagation tools at the bench, bulk media low, and off-season trays and empty pots up high. Storing the wheelbarrow, long-handled tools, and yard gear is a garden shed job — keep that bulk out so the potting bench stays a propagation surface.
Keep daily propagation tools at the bench and off-season trays up high so the work surface stays clear.
| Potting shed planning checklist | |
|---|---|
| Best all-round size | 10x12 for a deep bench, a soil-mixing end, a sink, and a full tiered grow-light rack |
| Potting bench | 24 to 30 inches deep at 36 inches high, sealed top, back lip, recessed soil tub, slide-out bins below |
| Natural light | Windows on two or three sides over the bench, plus a skylight or clear roof panel on a shaded lot |
| Grow lights | Tiered LED rack with a heat-mat tier on a timer, on dedicated outlets, for winter propagation |
| Sink and drainage | Utility sink with a drain you can run to a dry well or gravel, plus a hose bib or filling tap |
| Ventilation and humidity | Operable window plus a gable or ridge vent, and a small fan to keep domes and flats from damping off |
Light, air, and water are the working systems of a potting shed, not extras. Plan windows over the bench on at least two sides and add a gable-end window or skylight to rescue a shaded site, because germination and seedling color both suffer in gloom. For winter propagation, run real power: dedicated outlets and a timer for the tiered grow lights and heat mats, a couple of LED fixtures so the bench is usable on short gray days, and a GFCI circuit since you are working with water and electricity in the same room. Even one well-placed outlet per light shelf changes how reliably the shed germinates seed.
Ventilation and humidity need active management here, more than in any dry storage building. Misting, watering, a running sink, and a wall of domed flats push humidity high, and stagnant damp air is exactly what brings on damping-off and mildew. Pair an operable window with a passive gable or ridge vent for cross-flow, then add a small clip fan near the light rack to keep air moving across seedlings — gentle airflow also stiffens young stems. The sink earns its own planning: a utility basin with a drain you can route to a dry well or a gravel bed, a backsplash, and a drainboard for rinsed pots, so messy media work cleans up in place. For overwintering stock plants or cuttings, insulate one bay and keep it frost-free with a small thermostatic heater — a draft-free, above-freezing pocket is what carries tender propagation through a cold North Idaho night.
Because we build on your property, the pad and placement are part of the propagation plan. A level, well-drained gravel pad is the standard base: it keeps the floor framing off wet ground, drains the constant water a potting shed throws, and gives you somewhere to route the sink drain into a dry well or gravel bed rather than puddling at the door. Set the building where a gravel path or driveway reaches the door so trays, flats, and a bulk soil delivery roll right up, and orient the bench wall and its windows toward the sun so germinating flats catch every hour of winter light.
North Idaho weather drives the structure. We build for local snow load, so the roofline and framing carry a heavy winter without sagging, and we use treated and pine materials suited to the freeze-thaw swings that come with a humid, water-using building. Site the shed so snow sliding off the roof clears the door and the bench windows instead of burying the light you depend on, and keep it off the lowest, soggiest spot in the yard. Permitting depends on size and your jurisdiction in Kootenai County or your city, and adding a sink can bring plumbing or graywater rules into play — most smaller potting sheds stay under the structural threshold, but confirm setbacks, drainage, and any HOA rules before the build. When you are ready, get a free estimate or build and price a shed to see your size, glazing, and bench layout come together.
Run the bench along the brightest wall and build it 24 to 30 inches deep at about 36 inches high so flats, a mixing bin, and a sink can share the surface. Give it a sealed or stainless top, a back lip to keep mix from spilling behind it, and a recessed soil tub for blending media. Underneath, plan covered slide-out bins for bulk potting mix, seed-starting mix, perlite, and compost so bags never split on the floor and everything stays dry and rodent-sealed. In a 10x12 you can give the bench 8 feet, keep a soil-mixing end, and still leave a stand-and-work aisle.
Plan windows on at least two sides over the bench so seedlings get even daylight, and add a gable-end window or skylight on a shaded lot. But in North Idaho, daylight alone is too short and weak from November through February to germinate and grow seedlings well, so a potting shed used for real propagation needs grow lights. Run a tiered rack of adjustable LED shop lights with a heat-mat tier on a timer, on dedicated outlets, so flats get 14 to 16 hours of consistent light through winter. Combine the daylight for working and the racks for reliable germination, and keep a clear shelf at the brightest spot for the light-hungriest starts.
A sink is one of the biggest reasons to build a potting shed instead of a plain garden shed, since propagation is constant messy water work. Plan a utility basin near the bench with a hose bib or filling tap, a backsplash, and a drainboard for rinsed pots. For drainage, the simplest path on a rural North Idaho lot is to route the drain to a dry well or a gravel bed away from the foundation, which keeps soil-laden water out of the building. Adding a sink can trigger plumbing or graywater rules depending on your jurisdiction, so confirm those before the build, and put the whole wet zone on a washable, draining floor.
Use a mix sized to what propagation actually stacks. Open slat shelving lets nursery pots nest by diameter and 1020 trays stack flat while still draining and drying. Put a tiered wire rack on its own wall for the active propagation — heat mats, domes, and cell flats under lights — so it never competes with the working bench. Add labeled bins for cell packs, humidity domes, labels, ties, and rooting hormone so small supplies stay sorted. Reserve a high shelf or loft for empty pots and off-season trays you only touch a few times a year, and keep the seed box cool, dry, and within reach of the bench.
A potting shed runs humid because of misting, watering, a sink, and walls of domed flats, and stagnant damp air is what causes damping-off and mildew. Pair an operable window with a passive gable or ridge vent so moist air escapes and fresh air crosses the bench even when the shed is closed. Add a small clip or oscillating fan near the light rack to keep gentle airflow over seedlings, which both fights fungal problems and stiffens young stems. Vent domes once seeds sprout, avoid overwatering, and keep the floor draining so the room dries between sessions rather than staying soggy.
For one grower an 8x10 is the honest minimum — a deep bench, soil bins below, and a narrow light rack — but media mixing gets cramped. Most serious propagators land on a 10x12, which fits a deep bench with a soil-mixing end, a real sink, and a full tiered grow-light rack with room to set a tray cart down. If you propagate at volume, overwinter stock plants, or want the messy mixing zone kept separate from a clean potting-up and growing-on area, step up to a 10x14 so the wet end and the light racks do not collide. Size up one increment if you expect your propagation to grow, since light shelves and trays fill space fast.
Most potting shed content focuses on bench height and sink placement — useful, but it skips the question that matters most in North Idaho: can you actually work in it from March through November? An uninsulated potting shed in Coeur d'Alene or Post Falls is a warm-weather-only space, and a lot of the work that benefits most from a dedicated shed — starting seeds, hardening off transplants, overwintering tender plants — happens on the cold shoulder of the season. Insulating the walls and ceiling and running a small heat source turns the same footprint into a genuinely useful year-round workspace.
On-site framing makes a real difference on North Idaho lots where the garden already has a preferred layout. NIOS positions the shed to maximize the southern light exposure a potting bench needs, works around existing garden beds, and adapts to whatever grade the lot presents — something a delivered box on standard skids can't do on a sloped Hayden or Rathdrum property. The gravel pad we build under the foundation also keeps mud out of the floor and lets water drain away from the base through spring thaw.
Window placement matters more in a potting shed than in most other structures. A deep bench under a wide east- or south-facing window gives you working light without afternoon glare that wilts seedlings. Operable windows on opposite walls — or a ridge vent paired with a low intake — keep the interior from overheating on a 90-degree North Idaho summer afternoon, which is more common than newcomers expect.
Use the shed builder to price out size and window options, or get a free estimate. The Post Falls service area page has detail on how we work across Kootenai County, and our buildings gallery has finished examples to browse.
Size your bench, light, and sink, then get a free estimate or price it in the configurator.
Keep planning your build with related North Idaho shed guides.