Hunting gear has a way of taking over a garage. Packs and bows lean in corners, optics ride loose in a bin, base layers and outerwear share a tote with cleaning supplies, and every season you waste an evening hunting for the one thing you swore you put back. A dedicated hunting gear storage shed fixes that for good: one organized, secure building on your North Idaho property where packs, optics, clothing, blinds, stands, and a locked cabinet for valuables each have a home you can find in the dark before a 4 a.m. start. This guide walks through how to plan one — the layout that keeps scent-sensitive clothing separate, the shelving and racks that hold bulky gear, the secure locker that keeps high-value items protected, and the climate control that looks after optics and electronics through a hard winter.
North Idaho On Site Sheds builds every gear shed on your property, so the plan answers to how you actually hunt — the species you chase, the seasons you run, and the gear that piles up between trips. The goal here is a practical, durable, well-organized space, not a showroom. Finishes are tough and wipeable, the layout favors fast in-and-out and clean separation between dirty and clean zones, and every wall earns its keep. Whether you keep this shed near the house as an organized staging point or set it out closer to where you hunt, the planning starts the same way: take inventory of what you own, group it by how it is used, and size for the gear you actually store, not the gear you wish you had room for. A little planning here turns the pre-dawn scramble into a calm, grab-and-go routine.
A gear shed starts with an honest inventory: group everything by how you use it, then size for what you actually store.
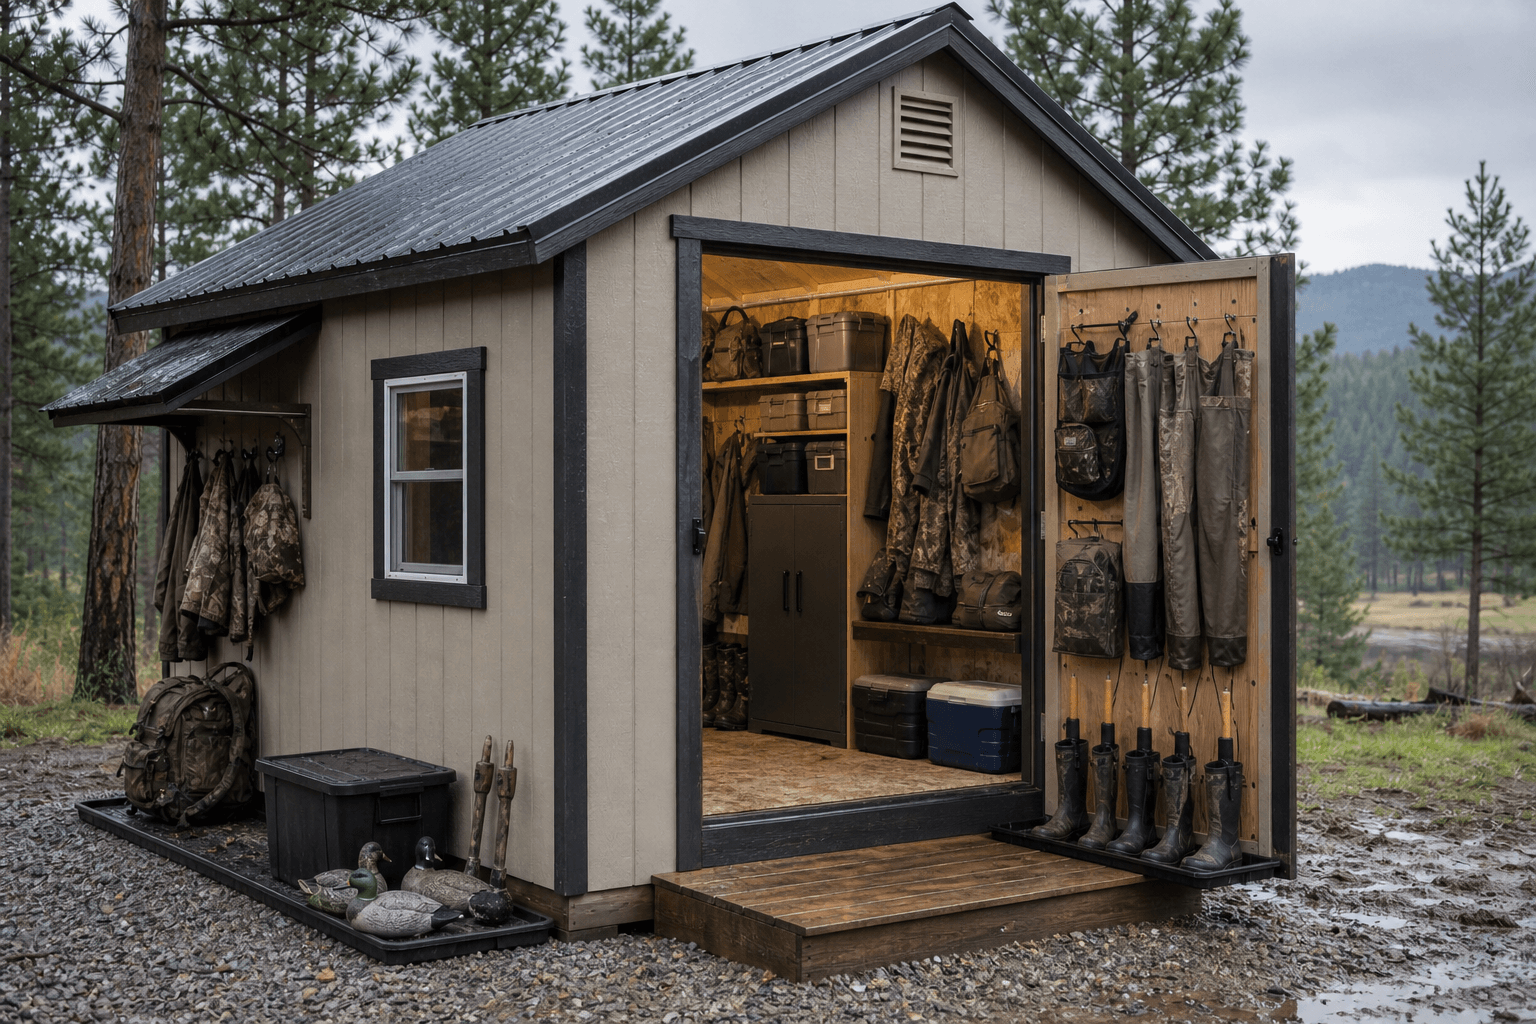
Organization and a dry, secure interior matter more here than curb appeal, but the roofline still shapes how much you can fit. A standard gable is the workhorse for a hunting gear storage shed: the symmetrical roof sheds heavy North Idaho snow cleanly, the tall center gives you headroom to hang long gear and stand a treestand upright, and the straight walls take full-height shelving and pegboard end to end. It is the easiest shape to fit out, and the easiest to keep organized once you do.
A lofted barn (gambrel) goes a step further by opening overhead loft space, which is a smart move for the bulky, seasonal items you only touch a few weekends a year — ground blinds, decoy bags, climbing sticks, and off-season clothing can ride up in the loft while the floor stays clear for packs, optics, and the gear you grab every trip. A lean-to single-slope is the simplest, most economical shell and works well as a compact staging shed or as an add-on bay beside another building. If wet boots and rain-soaked outerwear are your real headache, plan the shed alongside a gear drying shed approach with ventilation and a drying rack built in, or borrow ideas from an overlanding gear shed if the same building also stages packs, totes, and recovery gear for the truck. And if you want a place to sleep on the property too, a gear shed pairs naturally with a separate hunting cabin so scent-heavy equipment stays out of the bunkroom.
Lay out everything you store — packs, optics, clothing, blinds, stands, totes — and group it. The volume of bulky seasonal gear, not the small stuff, is what decides whether an 8x12 works or you need a 10x16.
A locked cabinet for valuables wants a dedicated, anchored spot away from the door and out of sight. Block out that secure corner before placing shelving, because it is far easier to build in than to retrofit.
Scent-sensitive clothing needs its own zone away from fuel, solvents, and field gear. Plan that clean-air corner early so odors and chemicals never share a wall with your hunting clothes.
For one hunter with packs, optics, a rack of clothing, and a few totes of accessories, an 8x12 shed is a tight but workable staging point — enough wall for shelving and hooks down one side and a clothing zone on the other, with a clear lane to the door. Add a second hunter, more bulky blinds and stands, or a real workbench for sorting and maintenance, and the extra depth of a 10x12 pays off fast: now the clean clothing zone, the gear wall, and a small bench each get their own corner instead of overlapping. This is the size many North Idaho hunters land on for an organized one-or-two-person setup.
If you store gear for a whole group, run multiple species and seasons, or want room for full-size ground blinds, several treestands, decoy bags, and a dedicated workbench, step up to a 10x16 — the added length gives you a full gear wall, a separate clothing-and-scent-control corner, a bench for maintenance, and a secure cabinet without anything crowding the door. And when the shed stages gear for a hunting party, doubles as a small workshop for repairs and reloading-adjacent tasks, or holds quads-and-trailer accessories alongside the hunting kit, a 12x16 gives you room to walk a cart through, zone the interior cleanly, and still keep a clear path from the door to the secure corner. Let the bulk of your seasonal gear set the size, not the urge to fill space you will only half-use.
A few buildings get confused here, and picking the right one saves money and frustration. A hunting gear storage shed is an organized, secure home for equipment: shelving, racks, a clothing zone, and a locked cabinet, built to keep gear protected, sorted, and ready between trips. A dedicated gear drying shed solves a narrower problem — it is built around airflow and heat to dry soaked boots, waders, and outerwear fast — and many hunters fold that capability into the gear shed by adding ventilation and a drying rack rather than building two structures. If your single biggest pain point is wet gear that never dries between back-to-back hunts, lead with the drying setup; if it is clutter and security, lead with the gear shed and build drying in.
A hunting cabin, by contrast, is a place you sleep — bunks, a wood stove, a cook corner — and it is a much bigger, more involved build than a gear shed. Keeping the two separate is often the smarter plan: scent-heavy, muddy equipment stays in the unheated or lightly conditioned gear shed, while the cabin stays clean and comfortable for sleeping. Some hunters attach a gear bay to a cabin to get both; others build the gear shed first near the house and add a cabin later out on the parcel. And if the same building also has to stage truck and trailer gear, an overlanding gear shed layout — wide door, cart-friendly aisle, heavy-duty shelving — overlaps heavily with a hunting gear shed, so it is worth planning them together if your kit spans both worlds.
Zoning the interior — clothing and scent control, the gear wall, a maintenance bench, and a secure corner — keeps everything findable before a pre-dawn start.
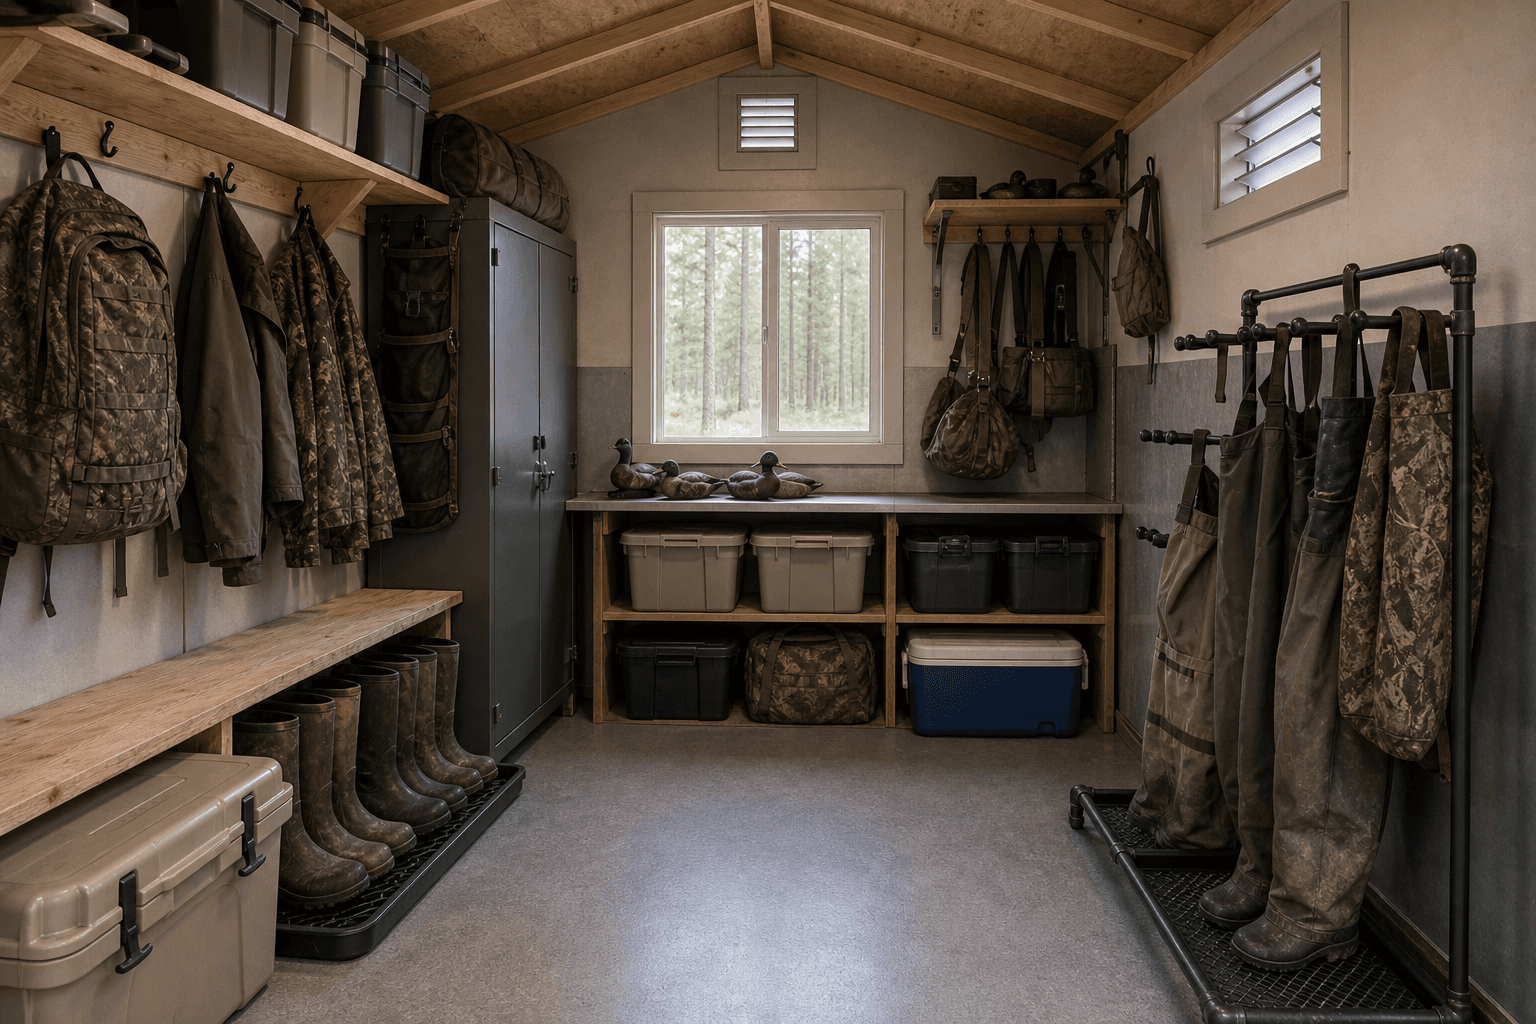
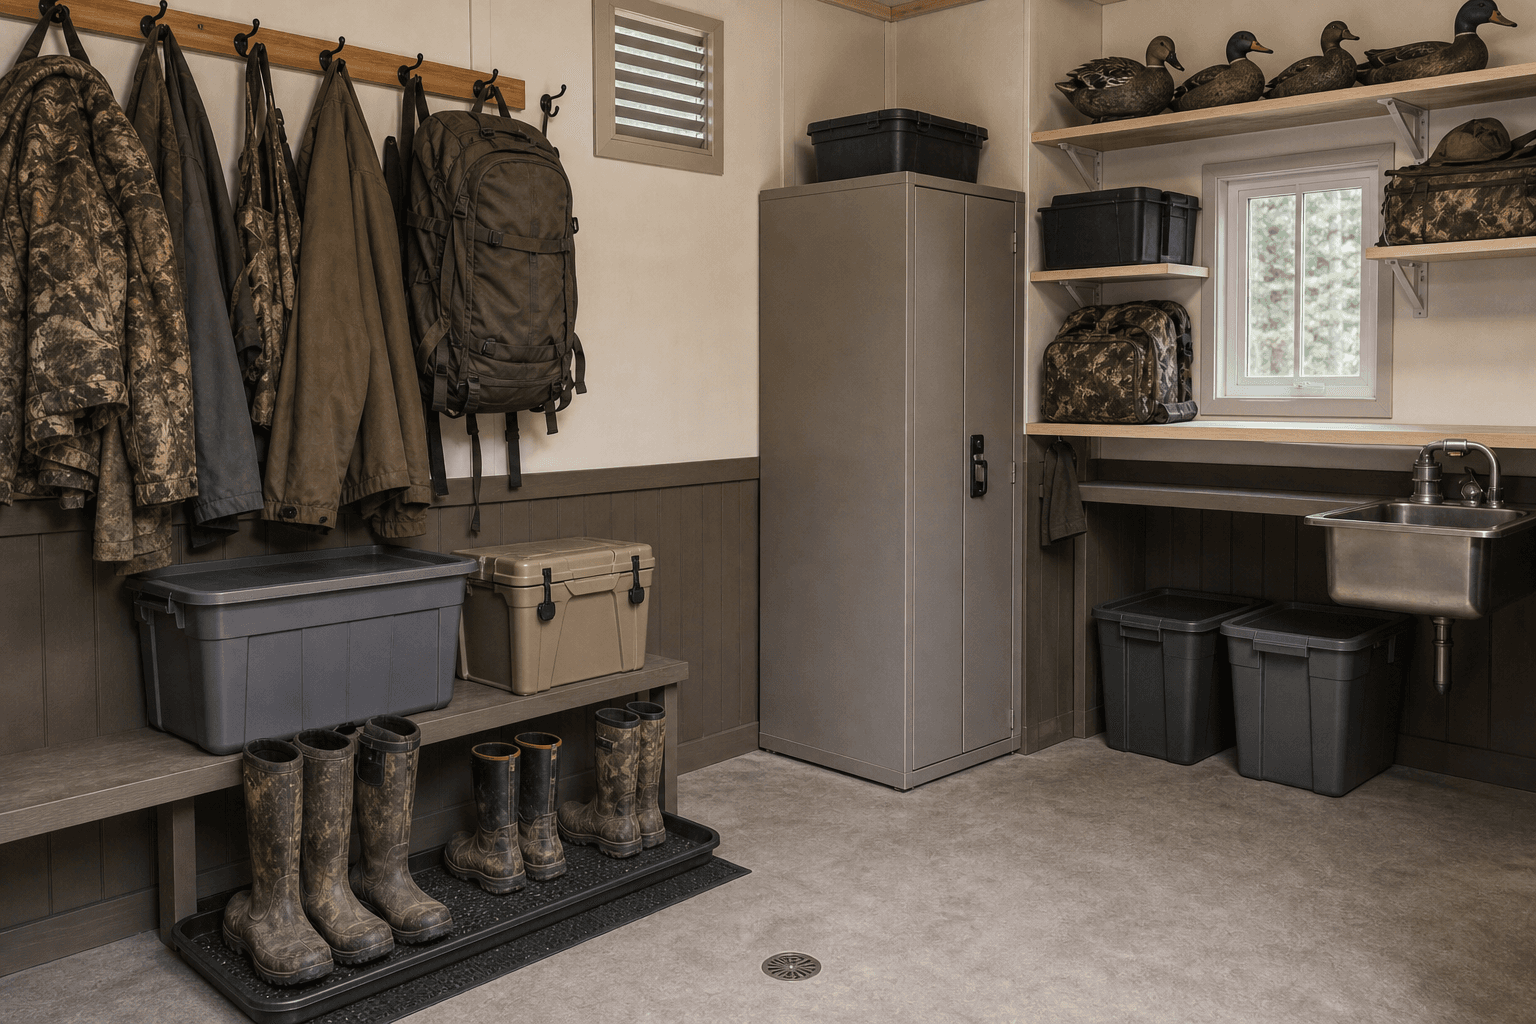
A gear shed works when every category has a defined home instead of piling onto the nearest shelf — and that pays off most at 4 a.m. when you are loading out in the dark. Build it around four zones. The clothing and scent-control zone anchors one wall, kept away from fuel and solvents: a rod or rack for outerwear and base layers, ventilated shelving or breathable bins so fabrics air out instead of trapping moisture, and a spot for scent-control sprays and storage bags. Hanging clothing in a ventilated, odor-isolated corner keeps it fresh and ready, which is the whole point of storing it separately from field gear in the first place.
The gear wall runs along another wall: heavy-duty hooks and racks for daypacks and frame packs, a row of cubbies or a glass-front cabinet for optics — binoculars, a spotting scope, a rangefinder — and labeled bins for calls, game bags, knives, and field-dressing supplies. The maintenance and staging zone centers on a workbench with a vise and good light for sighting-in adjustments, repairs, fletching, and broadhead work, with a pegboard above for tools and small parts. The secure zone is a dedicated, anchored corner — out of sight from the door and windows — for a locked cabinet that holds high-value items. Keep a clean lane from the door through the gear wall to the secure corner so you can load a pack and grab what you need without weaving past blinds and totes.
Line the walls with adjustable steel or wood shelving rated for weight, plus hooks and wall racks for packs, bows, and long gear. Adjustable shelves let you re-zone as your kit changes; pegboard keeps small tools and accessories visible and off the bench.
Hang outerwear and base layers on a rod in a ventilated, odor-isolated corner away from fuel and solvents. Use breathable bins or shelving so fabrics air out, and keep scent-control sprays and storage bags right there so clothing stays fresh between hunts.
Build in a sturdy, lockable cabinet or locker, anchored to the framing in a corner out of sight, for high-value items and anything you want kept secure. Back it up with a solid locking exterior door and window security so the whole shed buttons up tight between trips. Treat secure storage as a core part of the build, handled responsibly.
Reserve a loft or high shelving for the bulky, seasonal items — ground blinds, decoy bags, climbing sticks, off-season clothing — so they stay up and out of the way while everyday gear stays at hand. Sturdy wall brackets handle treestands and ladders stored upright.
A gear shed earns its keep by holding the specific things your hunts revolve around, so plan storage around real equipment. On the gear wall: hooks and racks for daypacks and frame packs, cubbies or a padded cabinet for optics like binoculars, a spotting scope, and a rangefinder, wall brackets for a bow or for treestands and climbing sticks stored upright, and bins for game bags, knives, a pack saw, calls, scent control, trail-camera gear, and field-dressing supplies. Give ground blinds, decoy bags, and ladder stands their own bulk storage — a loft, high shelving, or a back corner — so they do not eat into your everyday lane.
Set up the clothing corner so outerwear, base layers, and pac boots hang and air in a ventilated, scent-isolated spot, with room for scent-control sprays, ozone or carbon storage bags, and a boot rack or tray. The maintenance bench rounds things out: a vise and good light for sighting-in, fletching, broadhead work, and general repairs, with pegboard for tools and labeled drawers for small parts. Anything high-value or sensitive — and ammunition, stored responsibly and separately — belongs in the locked cabinet, kept out of sight and secured whenever the shed is unattended, as a matter of safety and theft prevention rather than an afterthought. Round it out with the staging essentials: totes of staples that live at the shed, a charging shelf for headlamps and rangefinders, a first-aid kit, and a clipboard or whiteboard for your pre-trip checklist. The building keeps it all dry, organized, and secure between hunts, which is the whole point of having a gear shed instead of a cluttered garage.
Padded shelving for optics, dedicated pack hooks, and labeled bins keep sensitive and everyday gear organized, protected, and easy to grab.
| Hunting gear storage planning checklist | |
|---|---|
| Best all-round size | 10x12 to 10x16 for one or two hunters with a full gear wall, a clothing and scent-control zone, a maintenance bench, and a secure corner |
| Clothing storage | Ventilated, odor-isolated corner away from fuel and solvents, with a rod for outerwear and breathable bins so fabrics air out and stay scent-free |
| Gear organization | Heavy-duty adjustable shelving, pack and bow hooks, padded optics cubbies, and labeled bins, with a loft or high shelving for bulky seasonal items |
| Secure storage | Anchored lockable cabinet out of sight for high-value items, ammunition stored separately, plus a locking exterior door and window security |
| Climate control | Insulation and ventilation to limit condensation and temperature swings, protecting optics, electronics, and clothing through North Idaho winters |
| Drying and maintenance | Ventilation and a drying rack for wet boots and outerwear, plus a workbench with a vise and good light for sighting-in and repairs |
Optics and electronics are some of the most expensive gear you own, and North Idaho's cold, damp winters are hard on them. Big temperature swings and unmanaged humidity invite condensation, and condensation is what fogs lenses, corrodes contacts, and shortens the life of rangefinders, trail cameras, and batteries. The fix is a building that stays stable rather than tracking the outside air. Insulating the walls, ceiling, and floor slows the swings and keeps the interior from deep-freezing or spiking, while good ventilation — a vent pair, a small fan, or a gable vent — lets moisture escape instead of settling on cold glass and metal. For sensitive gear, store optics in padded cases and add desiccant where humidity runs high, and keep a thermometer-hygrometer on the wall so you can see what the space is actually doing.
Power makes the shed far more useful. Even a modest electrical plan supports LED task lighting over the bench and gear wall, outlets and a charging shelf for headlamps, rangefinders, and trail-camera batteries, and the option of a small heater or dehumidifier to hold the climate steady through the wettest, coldest stretches. If a grid run is impractical out on the parcel, the same thinking behind a solar and battery shed covers lights and charging quietly and fuel-free, and a generator shed approach handles heavier or backup loads. Plan climate and power together before the walls close up, because protecting a few thousand dollars of optics and electronics is far cheaper than replacing them after a season of condensation and freeze.
Because we build on your property, placement, the pad, and access are part of the plan. A level, well-drained gravel pad is the standard base: it keeps the floor framing off wet ground, drains snowmelt away from the shed, and gives you a solid, mud-free approach for loading a cart or a pack. Site the shed on high, firm ground rather than the lowest, soggiest spot, orient the door so roof snow sheds clear of the entry and your loading lane, and place it for an easy, short haul between the shed, the house, and wherever you stage the truck. Leave room beside the door to swing a wide door open and back a cart up to it.
North Idaho weather shapes the structure. We build for local snow load, so the roofline and framing carry a heavy winter without strain, and we use treated and pine materials suited to hard freeze-thaw swings. If access runs back across a parcel, a passable gravel driveway that is firm enough and clear of low limbs helps our crew and materials reach the build site smoothly — talk it through early if it is rough. Permitting and setbacks vary by parcel: an unheated storage shed often carries lighter requirements than a building with plumbing or sleeping space, but size, placement, and setbacks still matter, so confirm the rules with Kootenai County or your jurisdiction before you finalize placement. When you are ready, get a free estimate or build and price a gear shed to see your size, roofline, and door layout come together.
Give clothing its own corner, kept well away from fuel, solvents, and field gear so it never picks up odors in storage. Hang outerwear and base layers on a rod and use breathable bins or open, ventilated shelving rather than sealed plastic, so fabrics air out instead of trapping moisture and mildew. Build in ventilation — a vent pair, a gable vent, or a small fan — so the whole shed exchanges air and the clothing corner stays dry and fresh. Keep your scent-control sprays and ozone or carbon storage bags right there, and avoid storing clothing next to a heater or anything that off-gasses. The goal is a clean-air zone where your hunting clothes hang ready and odor-neutral, separated from the dirty, scent-heavy side of the shed.
Zone the shed by category so nothing competes for the same shelf. Run a gear wall with heavy-duty hooks and racks for daypacks and frame packs, with padded cubbies or a glass-front cabinet nearby for binoculars, a spotting scope, and a rangefinder so optics stay protected and visible. Keep clothing in its own ventilated, scent-isolated corner on a rod with breathable bins. Add labeled bins for calls, game bags, knives, and field-dressing supplies, and reserve a loft or high shelving for bulky seasonal items so they stay out of your everyday lane. Use adjustable shelving so you can re-zone as your kit grows, and keep a clear path from the door through the gear wall so loading a pack in the dark is fast and frustration-free.
Treat secure storage as a core part of the build, handled responsibly. Build in a sturdy, lockable cabinet or locker, anchored to the framing in a corner that is out of sight from the door and windows, for high-value items and anything you want kept secure. Store ammunition separately, and keep everything sensitive locked and out of view whenever the shed is unattended — this is about safety and theft prevention as much as organization. Back the cabinet up with a solid, locking exterior door and window security such as shutters or locking sashes so the whole shed buttons up tight between hunts. Designing the secure corner in from the start is far better than retrofitting it later, and it keeps your most valuable gear protected through the off-season.
Wet gear that never dries is one of the most common storage headaches, and a few features fix it. Build in ventilation so humid air escapes instead of settling, and add a drying rack or boot dryer near a heat source or vent so boots, waders, and outerwear dry overnight rather than staying clammy for the next morning. A boot tray or rack keeps mud off the floor and lets soles air out, and a small heater or fan speeds things up on the wettest stretches. Many hunters fold a dedicated drying-shed approach into the gear shed rather than building a separate structure — the same airflow and heat that protect your optics also dry your clothing, so plan ventilation and a drying corner together with the rest of the fit-out.
Give the bulky, seasonal items their own space so they do not eat into your everyday lane. A loft in a lofted-barn (gambrel) shed or a run of high shelving is ideal for ground blinds, decoy bags, climbing sticks, and off-season clothing — things you only touch a few weekends a year ride up and out of the way. Store treestands and ladders upright on sturdy wall brackets rather than flat on the floor, where they take up walking room, and keep the gear you grab every trip — packs, optics, daypack accessories — down low at hand height. Plan this bulk storage early when you size the shed, because the volume of blinds and stands, more than the small stuff, is what decides whether a smaller footprint works or you should step up to more length.
Optics, rangefinders, trail cameras, and batteries are sensitive to the temperature swings and condensation that come with cold, damp North Idaho winters, so build the shed to stay stable rather than tracking the outside air. Insulate the walls, ceiling, and floor to slow the swings and keep the interior from deep-freezing, and add ventilation so moisture escapes instead of condensing on cold glass and metal. Store optics in padded cases, add desiccant where humidity runs high, and keep a thermometer-hygrometer on the wall to watch the conditions. A small heater or dehumidifier, run on grid power or a solar-and-battery setup, holds the climate steady through the worst stretches. Stable temperature and managed humidity are what keep your most expensive gear fog-free and working season after season.
Most North Idaho hunters end up with hunting gear spread across a garage, a closet, and the bed of a truck. A purpose-built hunting gear storage shed on your Coeur d'Alene or Post Falls property puts packs, optics, blinds, and stands in one secured, organized space — and keeps scent-contaminated clothing separate from the house.
Scent management is the detail most gear sheds get wrong. Airtight wall sheathing and a controlled-ventilation design let you manage airflow deliberately: air comes in through a filtered intake, not through random gaps that pick up lawn chemicals and exhaust. That is only achievable when a building is framed specifically for it, not converted from a basic storage box.
A secure locker for firearms is best framed into the wall during construction — blocking and anchor points built into the studs rather than drilled into drywall after the fact. The same principle applies to heavy cabinet runs for optics and ammunition: a framed backing wall distributes load properly. On North Idaho properties with wooded or uneven lots, the on-site build process means the foundation prep can handle slopes that a delivered shed would simply leave unlevel.
Kootenai County elk, deer, and bird seasons run from late summer through December, which means your shed also needs to open easily after the first hard freeze. Door hardware and a properly sealed threshold matter here. When you're ready to size a footprint, configure it in the shed builder or get a free estimate for your Coeur d'Alene area property.
Size the gear wall, the clothing zone, and the secure corner, then get a free estimate or price it in the configurator.
Keep planning your build with related North Idaho shed guides.