A greenhouse shed is a hybrid building: one side is glazed to grow plants, the other side is solid to work and store. Gardeners call the solid half a headhouse, and pairing it with the growing side is what turns a fragile glass box into a building you actually use through a North Idaho year. The glazed side catches the low winter sun, holds the day's heat, and gives seedlings, starts, and overwintered plants the light they need; the solid side keeps your potting bench, soil, pots, tools, and a heater out of the weather and out of the glare. Instead of running a flimsy greenhouse in summer and a separate shed for the gear, you get one weather-tight building that grows on one end and works on the other. A greenhouse shed suits anyone who wants to start seeds early, harden off transplants, push the season at both ends, and keep tender plants alive through a cold snap.
North Idaho On Site Sheds builds every greenhouse shed right on your property, so the glazing, the vents, the heater, the benches, and the water can all be specified around your climate zone and what you actually grow. That on-site build matters here more than for a plain storage shed, because a greenhouse shed handles two hard problems at once: it has to let light in and hold heat through a long, cold winter, and it has to dump heat and moisture fast on a hot summer afternoon. This guide walks the real planning decisions — which roofline carries our snow and still lets light in, how big the growing side and the headhouse each need to be, what glazing to choose, how to vent and heat it, where the benches and water go, and how to keep a glazed roof standing under a heavy snow load. If you mainly start seeds or pot up, you will also see where a seed-starting shed and a potting shed overlap with this build.
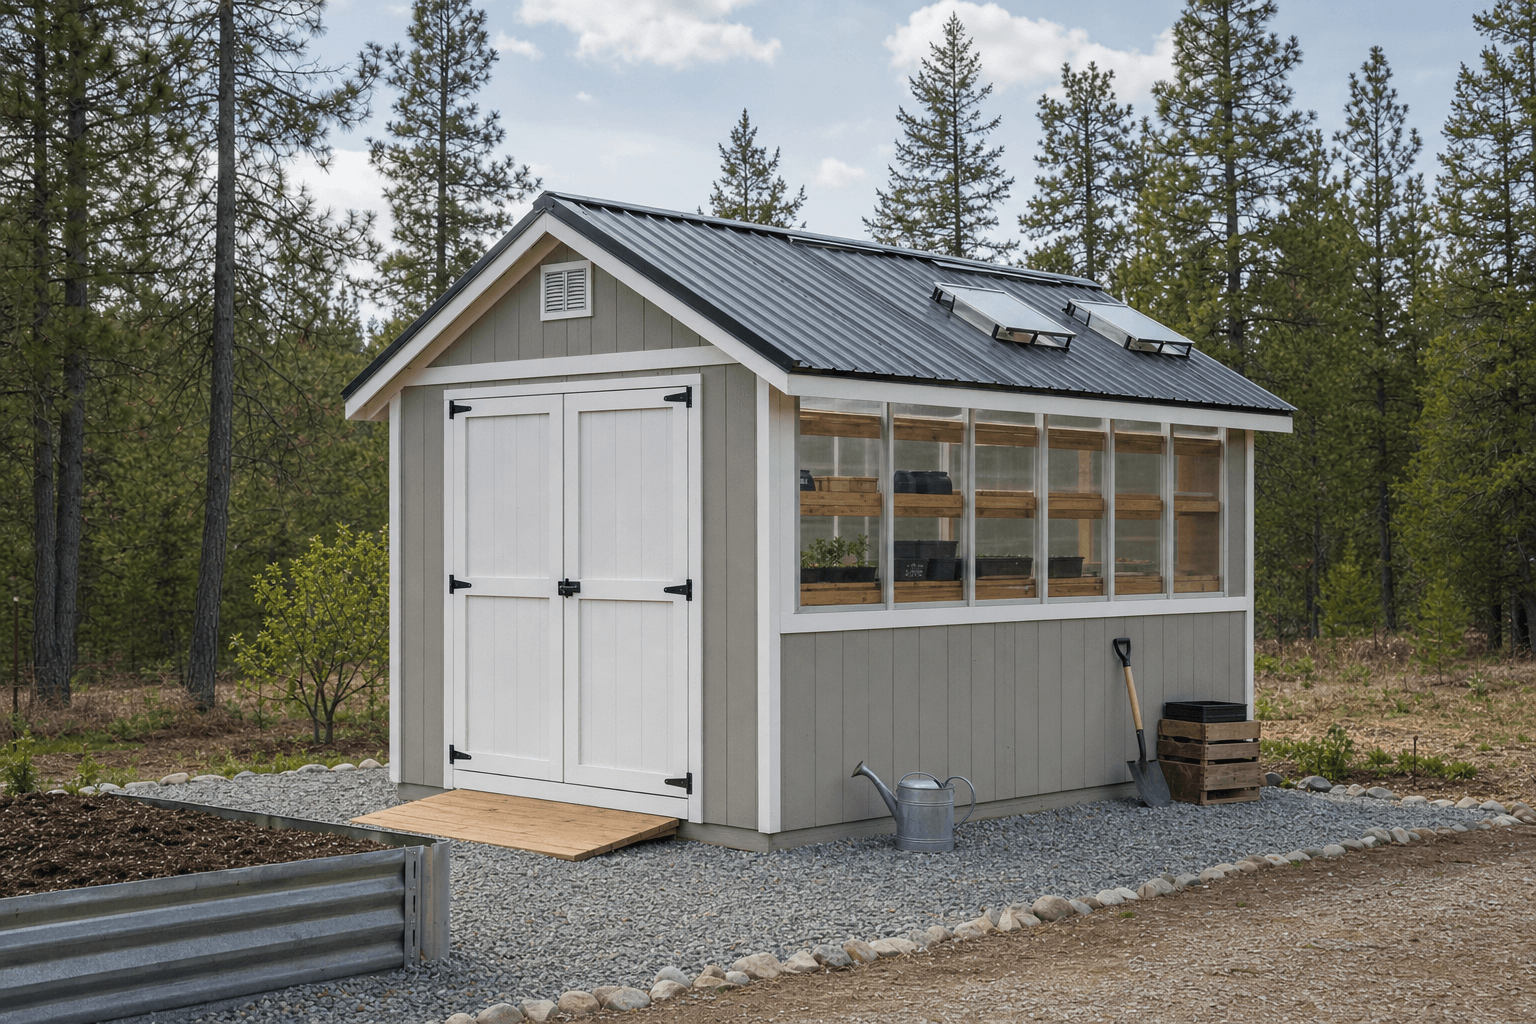
A building of two halves: a glazed growing side that catches winter sun and a solid headhouse that keeps the bench, soil, and heater out of the weather.
A greenhouse shed lives or dies on its roof, because the roof has to do two opposing jobs in North Idaho: let light reach the growing side and shed a heavy snow load without sagging or shattering glazing. That makes roof pitch the first decision. A standard gable with a steeper-than-usual pitch is the natural starting point — the peak sheds snow predictably, the steep slope sloughs it off the glazed side before it can pile and crush the panels, and the ridge gives you a clean place for a roof vent so hot air escapes at the top. Glaze the south-facing slope and upper south wall to pull in the low winter sun, and keep the headhouse end under solid, insulated roofing so the working side stays weather-tight. A lean-to or modern single-slope is the other strong choice: a steep single pitch facing south or southwest catches sun across the whole growing side, sheds snow hard to one side away from the door, and puts a tall vent wall at the high end — a sun-trap that also clears snow fast.
For a larger building with a full headhouse and a roomy growing bay under one roof, a lofted barn (gambrel) raises the center for headroom and tall plants and adds a small loft over the solid end for off-season pots, row cover, and bagged soil, keeping the growing floor clear. A stick-built shop style with straight, tall walls suits a grower who wants full-height glazing on the south wall and solid, insulated walls on the north and headhouse end — the framing carries the snow load while the glazed south wall does the light-gathering. Whatever the roofline, the parts to spec up for our climate are the roof pitch, the glazing on the sun side, the vents, the insulation on the solid side, and the heat: a greenhouse shed has to gather and hold heat in winter and dump it in summer, which a plain shed never does. It sits right beside a potting shed when the bench work is the main draw, and shares most of its growing-side needs with a seed-starting shed the moment trays of starts become the reason you built it.
An 8x12 splits into a glazed growing bay and a compact headhouse — a potting bench, a heater, shelves, and a few rows of seed trays and starts, with room to turn around.
A 10x12 or 10x16 gives a real growing side with bench seating for trays and pots and a separate solid end for soil, tools, a sink, and a heater that runs all winter.
A 12x16 runs a full glazed growing bay down one side and a true headhouse down the other, with a deep potting bench, a wash sink, bulk soil, and overwintering space.
Footprint here is really two footprints — the glazed growing side and the solid headhouse — so size each to what it holds and add them together. An 8x12 is the compact starting point: a glazed bay with bench-top room for seed trays and starts on the sunny end, and a small headhouse with a potting bench, a heater, and shelves for pots and soil on the other — enough to start seeds, harden off transplants, and overwinter a few tender plants. A 10x12 is the comfortable all-rounder, with the extra width to run a growing bench along the glazed wall and still walk a clear aisle to a real headhouse with a sink, tool storage, and a heater that holds the room through a cold snap. Step the length to a 10x16 for a longer growing run — more bench feet for trays, pots, and overwintered perennials — plus a generous solid end for bagged soil and a wash station. For a serious grower who wants a true headhouse, a 12x16 runs a full glazed growing bay down one side and a deep working side down the other, with room for a wash sink, bulk soil bins, a heater, and overwintering shelves at once. The split between glazed and solid matters more than raw square footage — plan the feet of growing bench and the working space you need, then pick the size that gives you both without crowding the aisle.
These three buildings overlap because they all serve a gardener, but they lead with different jobs, and naming the lead use keeps you from a building that does two things poorly. A greenhouse shed leads with growing under glass: a glazed side that gathers light and holds heat so plants live and grow across the season, paired with a solid working side. A potting shed leads with work and storage — a deep potting bench, soil and pot storage, tool walls, and a sink — and it is mostly solid, with maybe a window for light rather than a full glazed growing wall. The two combine naturally: a greenhouse shed essentially is a potting shed with a glazed growing bay bolted on, so it gives you both the bench and the growing light in one footprint where a potting shed alone gives you the bench but not the light.
A seed-starting shed leads with propagation: a tightly controlled, often heated and grow-lit room built to germinate seeds and raise young starts, where you may rely on lights and bottom heat more than on sunlight. A greenhouse shed can start seeds on its glazed side too, but it also keeps growing plants on through the season, where a seed-starting shed focuses on the early weeks. And a garden shed is the general-purpose building for tools, mowers, and yard gear with no growing function — the right call if you want storage near the garden but not a place to grow. Decide which job leads: if it is growing under light through the season, build the greenhouse shed and fit a bench and storage into the solid end; if it is purely benching and storage, a potting or garden shed is simpler.
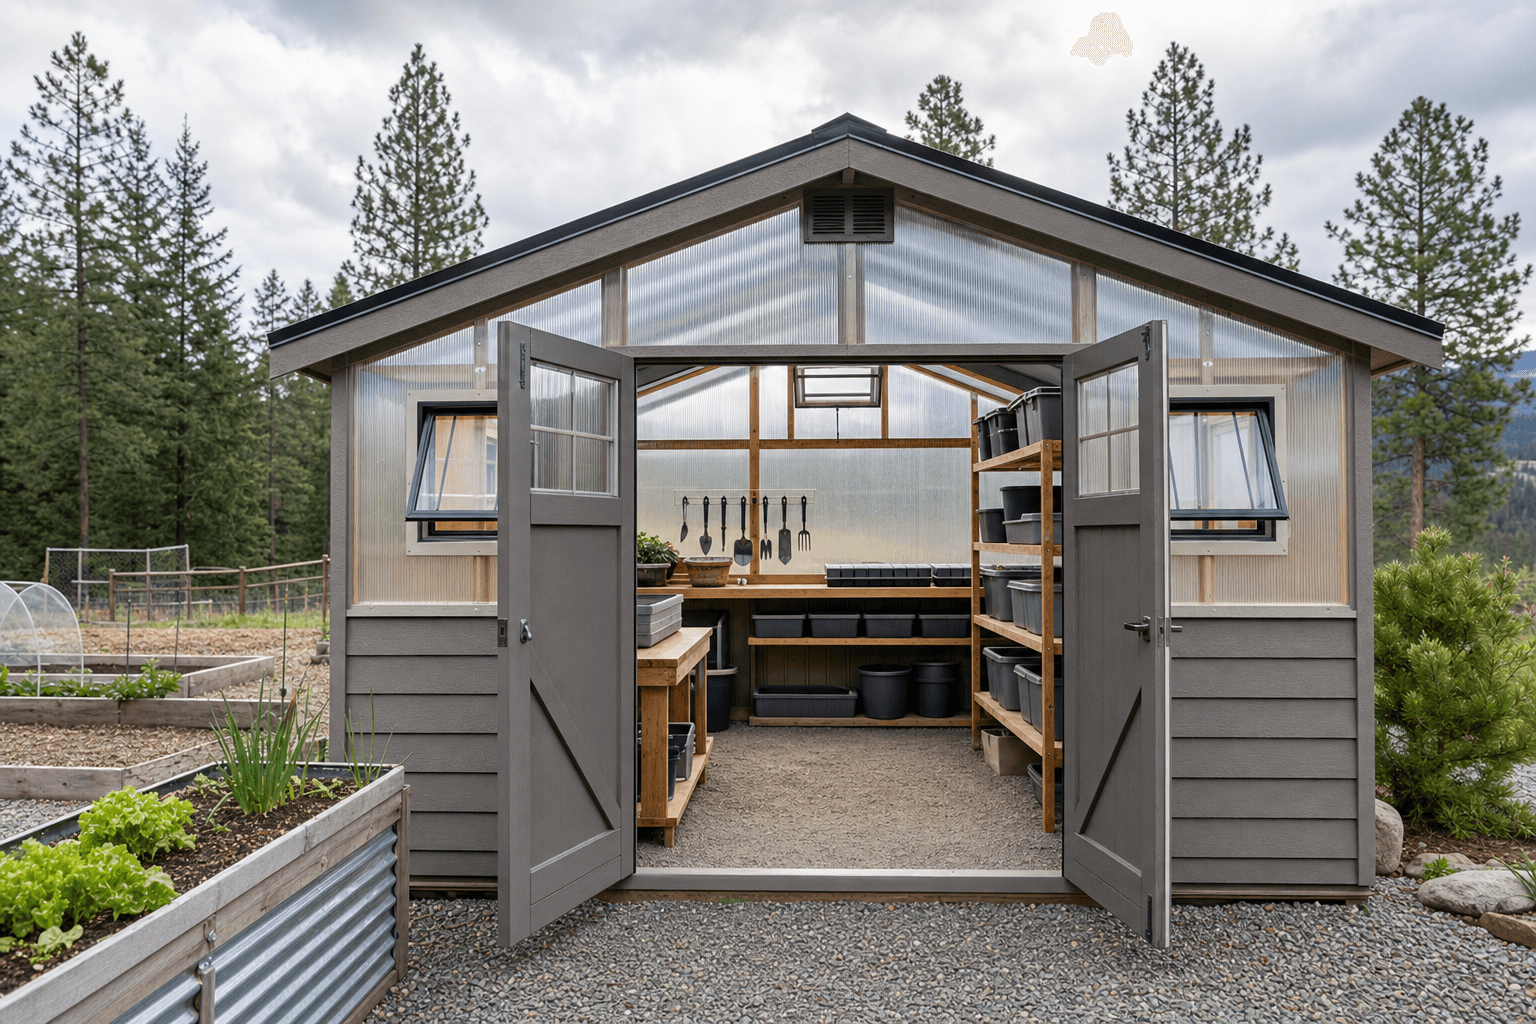
Two zones under one roof: tiered growing benches along the glazed wall, and a solid headhouse end with the potting bench, soil, and tools out of the glare.
Think of a greenhouse shed as two rooms sharing a wall — a growing room and a work room — and lay it out so each does its job without fighting the other. The growing zone runs along the glazed side, where the light is: tiered, waist-high benches put trays and pots at the light and at a workable height, with the sun-hungry plants on top and shade-tolerant ones below. Leave headroom over the benches for tall plants and a grow light, and keep the glazing clear so nothing blocks the low winter sun. The headhouse zone is the solid end, out of the glare and the temperature swings: this is where the potting bench, the soil and pot storage, the tool wall, and the heater live, so you can pot up, mix soil, and store gear without baking in the sun or chilling the plants. Put a clear aisle between the two so you can carry trays from bench to rack without squeezing past the soil bin.
The climate itself is a zone you design, not an afterthought. Place the heat source low and central so warm air rises through the growing benches, and put the roof or ridge vent and an upper-wall vent high so hot, humid air escapes at the top on a sunny day — that low-heat, high-vent path keeps the building from cooking the plants in summer and freezing them in winter. Set the water within reach of both the headhouse and the growing benches so watering is a short reach, not a trek, and keep the door and main aisle on the solid end so you bring soil and gear in without losing growing-wall light to a doorway. If you also start seeds, dedicate a warm, lit corner of the growing zone to trays with bottom heat, the way a seed-starting shed does, so germination has its own controlled spot.
Waist-high and stepped benches along the glazing put seed trays, starts, and potted plants at the light and at a workable height, with the sun-hungry plants up top and shade-tolerant ones below, and headroom left for tall plants and hanging baskets.
A deep, sturdy potting bench on the solid end with a soil-mixing surface, bins for potting mix and amendments, hooks and shelves for hand tools, and pot and tray storage underneath — your work surface, out of the glare and the temperature swings.
An electric or propane heater sized to hold the room through a cold North Idaho night, paired with a high roof or ridge vent and an upper-wall vent to dump summer heat, and a circulating fan to keep air moving so no corner cooks or freezes and humidity does not pool.
A hose bib, a wash sink, or a filled tank set within reach of both the potting bench and the growing benches, with a drainage path or floor that handles spills and runoff, so watering and washing pots are a short reach instead of a haul across the yard.
This is where a glazed shell becomes a real growing space, and the glazing comes first because it sets how much light gets in and how much heat stays. Twin-wall or multi-wall polycarbonate is the common choice for our climate: it diffuses light evenly across the benches, insulates far better than single glass so the room holds heat overnight, and it shrugs off hail and a snow slide that would crack glass. Single-wall polycarbonate or corrugated glazing is cheaper and passes more direct light but holds less heat, while real glass gives the clearest light and best looks but insulates poorly and is most fragile under snow. Many greenhouse sheds mix it — clear glazing on the south wall for maximum winter light, insulated twin-wall on the roof for heat retention and snow resistance, and solid insulated walls on the north and headhouse end. Lean to twin-wall and insulated walls for heat retention, or to clearer single-wall or glass on the sun side for maximum light.
On the growing side, the benches are the bulk of the fit-out: waist-high staging or tiered shelves for seed trays, plug trays, and 4-inch pots, an upper shelf for the sun-lovers, and a lower shelf or under-bench space for shade-tolerant plants, dormant bulbs, and overwintered pots. Add a grow light or two over a propagation corner for the dark months, heat mats under the seed trays for germination, and a misting or drip line if you raise a lot of starts. In the headhouse, the potting bench anchors a soil-mixing surface, bins for potting mix, compost, perlite, and amendments, a rack for pots and trays by size, a tool wall for trowels, pruners, and dibbers, and shelves for fertilizer, labels, and twine — the same layout a potting shed uses. Round it out with a max-min thermometer and humidity gauge, a rain barrel or filled tank for tempered water that will not shock the plants, and shade cloth to roll over the glazing in high summer. The right glazing, tiered benches, a real potting bench, heat and light for the dark months, and water within reach turn a cold glass box into a building that grows year-round.

The details that make it grow: insulating twin-wall glazing that holds heat and sheds snow, heat mats under the trays, and a roof vent to dump summer heat.
| Greenhouse shed planning checklist | |
|---|---|
| Glazing | Twin-wall polycarbonate on the roof and sun side for heat retention and snow resistance, with clearer glazing where you want maximum winter light and solid insulated walls on the north and headhouse end |
| Roof pitch & snow load | A steeper-than-usual pitch rated for North Idaho snow load that sheds snow off the glazing before it can pile, with framing and glazing spec'd to carry a heavy wet load |
| Ventilation & cooling | A high roof or ridge vent plus an upper-wall or louvered vent to dump hot, humid air on a sunny day, a circulating fan to keep air moving, and shade cloth for high summer |
| Winter heat | An electric or propane heater sized to hold the growing side above freezing through a cold North Idaho night, paired with insulated walls and twin-wall glazing so the heat stays in |
| Benches & growing layout | Tiered, waist-high growing benches along the glazed wall and a deep, solid potting bench in the headhouse, with soil and pot storage, a tool wall, and an aisle between the two zones |
| Water & power | A hose bib, sink, or filled tank within reach of both benches with a drainage path, and dedicated outlets for the heater, fan, grow lights, and heat mats running together |
A greenhouse shed that grows through a North Idaho winter runs on power and heat, so plan both up front. Run a proper circuit from the house and plan dedicated outlets for the things that run at once on a cold night — a heater, a circulating fan, grow lights over the propagation corner, and heat mats under the seed trays — so a full setup never trips a breaker. A larger electric heater usually wants its own dedicated circuit sized to its load; if you heat with propane instead, plan the tank, the clearances, and proper combustion venting, and still wire the fan and lights. Add a thermostat that kicks the heater on before the room drops to freezing, and a simple alarm or battery-backup on the heat is cheap insurance for the nights a power blip would otherwise cost you a bench of plants.
Insulation is what makes that heat go far, since a clear, glazed box loses warmth fast after dark. Insulate the solid walls, the headhouse end, and the un-glazed roof, and choose twin-wall glazing over single-pane so the room holds the day's warmth into the night. Then plan the growing list around the building: a heated, insulated greenhouse shed overwinters tender perennials, keeps cold-hardy greens going, and starts seeds weeks early, but pushing tomatoes through January takes more heat and light than most backyard builds want to run. Keep a plowed path to the door after a storm, and clear snow off the glazed roof slopes promptly so the panels carry only what they are rated for.
A greenhouse shed needs a level, well-drained base and, above all, the sun, so site it before you spec it. Set the glazed side facing south or southwest with a clear shot at the low winter sun — away from the shadow of the house, the garage, tall pines, or a fence line that would block the December light when you need it most. A compacted gravel pad drains the watering, washing, and snowmelt that a growing building produces and keeps the framed floor dry from below, and it gives the heavier, glazed structure a stable, level base. Plan the door and the headhouse end toward your path from the house and the garden so you carry soil, trays, and harvests in and out on a short, even approach rather than across the yard. Read how to prep a shed site before delivery day so the pad, the drainage, the solar exposure, and the access are all squared away before the building arrives.
North Idaho's weather drives the rest of the spec, and a greenhouse shed feels it more than any other shed because its roof is partly glazed. The roof pitch, framing, and glazing all need to be rated for local snow load — a steep pitch sheds snow off the glass before it piles, and the panels and rafters carry the wet load the slope cannot shed. Insulation, twin-wall glazing, and a sized heater keep it growing through the freeze; high vents, a fan, and shade cloth keep it from cooking in July. Most backyard greenhouse sheds skip a building permit, but the added electrical for a heater, lights, and mats, any propane install, and a plumbed sink often need one, and setback and HOA rules can apply — confirm what your town and county require on the service areas pages, and factor any electrical or plumbing permit into the plan before you finalize the size and where the shed will sit.
Glazing is the single biggest growing decision, because it controls both how much light reaches your plants and how much heat the building holds. Twin-wall or multi-wall polycarbonate is the workhorse for North Idaho: the two layers trap an insulating air gap so the room holds the day's heat into a cold night, the panels diffuse light evenly across the benches instead of casting hard shadows, and they shrug off hail and a snow slide that would crack glass. The trade-off is that twin-wall passes a little less total light than clear glazing, but diffused light actually reaches the lower and inner leaves better, so plants often grow more evenly under it. Single-wall polycarbonate or corrugated glazing lets in more direct light and costs less, but it insulates poorly and the room cools fast after dark. Real glass gives the clearest, most direct light and the best looks, but it insulates worst and is the most fragile under snow. Many greenhouse sheds mix glazing on purpose — clearer glazing on the south wall for maximum winter light, insulating twin-wall on the roof for heat retention and snow resistance, and solid insulated walls on the north and headhouse end where you do not need light. Match the glazing to your goal: lean to twin-wall and insulated walls if winter heat retention matters most, or to clearer single-wall or glass on the sun side if you want maximum light for starts.
A glazed building turns into an oven on a sunny day faster than people expect, so cooling is just as important as heating, and the fix is a low-in, high-out airflow path. Hot air rises, so put the exhaust high — a roof vent, a ridge vent, or vents at the top of the upper wall — so the hottest, most humid air escapes at the peak, and bring cooler air in low through a door, a louvered intake, or a low side vent so it sweeps up across the plants as it warms. On a small greenhouse shed, passive roof and wall vents that you crank open handle a mild day, but a building that bakes in full North Idaho summer sun usually wants a powered exhaust fan up high, sized to swap the room's air several times a minute when it is hot, plus a circulating fan inside so no corner stalls into a hot, still pocket. Automatic vent openers that pop the vents as the room warms are worth it, since they protect the plants on a hot afternoon when you are not there. For the hottest stretches, roll shade cloth over the south glazing to cut the direct sun and the heat load without cooking the plants. The test is simple: on a sunny afternoon the room should be warm but not stifling, the air should feel like it is moving, and the glazing should not be dripping with condensation.
Heating a greenhouse shed through a North Idaho winter is about holding the growing side above the temperature your plants can take, on nights that run well below freezing, in a building that loses heat through its glazing after dark. Start with the envelope, because every bit of heat you keep in is heat you do not have to make: choose insulating twin-wall glazing over single-pane, insulate the solid walls, the headhouse end, and the un-glazed roof, and seal the gaps so the wind does not strip the warmth out. Then size the heat source to the job. An electric heater on a thermostat is the simplest and cleanest — it kicks on before the room hits freezing and needs no venting — and for a small, well-insulated greenhouse shed it is often enough to keep the room above freezing or warmer for tender plants. Propane and natural-gas heaters put out more heat for less running cost on a big space, but they need proper combustion venting and clearances, so plan that in from the start. Pair whatever you choose with a circulating fan so the warm air reaches every bench instead of pooling at the peak, and add a max-min thermometer so you can see how cold the room actually got overnight and adjust. Be realistic about the growing list for the heat you want to run: a heated, insulated greenhouse shed easily overwinters tender perennials, keeps cold-hardy greens and herbs going, and starts seeds weeks early, but pushing heat-loving summer crops through deep winter takes far more heat and supplemental light than most backyard builds want to pay for.
The whole point of a greenhouse shed over a plain greenhouse is that it splits into two zones under one roof — a glazed growing side and a solid headhouse — so plan the split deliberately. Put the growing side on the sunny end, glazed on the south wall and roof slope, with tiered benches at the light for trays and pots. Put the solid side on the shaded or north end, walled and insulated, for the potting bench, soil and pot storage, the tool wall, and the heater, all out of the glare and the temperature swings that would bother both you and the plants. A short solid wall or just an open aisle separates them; many builds leave it open so heat and humidity share between the zones, while some add a partial partition so the headhouse stays cooler and drier for storing soil, fertilizer, and tools. Size each zone to its job — count the feet of growing bench you need on the glazed side and the bench, storage, and working space you need on the solid side, then add them — rather than splitting a fixed box down the middle. Put the door and the main aisle on the solid end so you carry soil and gear in without shading the growing wall, and keep the water within reach of both. Done this way, you pot up and store gear in a comfortable, weather-tight work room on one end and grow plants under light on the other, instead of running a fragile greenhouse and a separate shed.
Lay out the benches and water around how you actually move plants and soil through the building. The growing benches belong along the glazed wall where the light is, built waist-high so trays and pots sit at a workable height, and tiered or stepped so the sun-hungry plants ride up top and shade-tolerant ones, dormant bulbs, and overwintered pots tuck onto a lower shelf or under-bench space. Leave headroom over the benches for tall plants and a grow light, and keep the glazing clear so nothing shades the bench below it. The potting bench belongs on the solid headhouse end, out of the glare, deep and sturdy enough to mix soil and pot up at, with bins for potting mix and amendments underneath, pot and tray storage by size, and a tool wall above. Set a clear aisle between the growing benches and the potting bench so you can carry a flat of starts from the bench to the growing rack without squeezing past the soil bin. Water wants to reach both zones: a hose bib, a wash sink, or a filled tank set near the potting bench for mixing and washing pots and within an easy reach of the growing benches for daily watering, with a gravel floor or a drainage path under it so spills and runoff drain away instead of pooling. A filled rain barrel or tank inside also tempers the water to room temperature, which is gentler on plants than icy hose water in winter.
Snow load is the make-or-break engineering question for a greenhouse shed in North Idaho, because a partly glazed roof has to carry or shed a heavy, wet snowpack that would crush or shatter panels that are not planned for it. The first defense is roof pitch: build the glazed slopes steeper than a typical shed roof so snow slides off the slick glazing before it can pile and load the panels, and orient the steep slope so the snow sheds clear of the door and the path, not onto them. The second is the structure itself — the rafters, purlins, and glazing all have to be rated for the local ground snow load, with the glazed sections spec'd to carry the load the pitch does not shed, which is exactly the kind of thing building on-site lets us match to your site rather than guessing. Twin-wall polycarbonate helps here too, because it is far tougher than glass under a snow slide or a hail storm and far less likely to crack, which is a big reason it is the common choice for our climate over real glass. After a heavy storm, plan to clear snow off the glazed slopes promptly with a roof rake or a broom so the panels only ever carry what they are rated for, and keep ice from damming at the eave where a glazed roof meets a solid overhang. Plan a steep, rated, twin-wall roof from the start, keep the glazed slopes clear after big snows, and the building stands through a North Idaho winter instead of failing under the first deep snowpack.
The Coeur d'Alene area sits in hardiness zone 6a, with last frost dates that typically run into mid-May and first fall frosts that can arrive in early October. A greenhouse shed built on your property does one job: extend both ends of that window. The headhouse side gives you a dry workspace with potting bench and storage; the glazed growing side gets the light and holds the heat.
Snow load is the structural question that separates a North Idaho greenhouse shed from a kit greenhouse assembled from a catalog. A low-pitched polycarbonate roof under 24 inches of wet Panhandle snow is a structural failure waiting to happen. A greenhouse shed framed on site is designed for local roof loads — the same framing standards that apply to any permitted Kootenai County structure — so the glazed side doesn't collapse in February.
Ventilation is as important as heating. Glazed panels collect heat rapidly on clear April and May days even when outdoor temperatures are still cold, and a growing space that swings between 35°F at night and 95°F at midday stresses plants and accelerates disease. Roof vents and side operable windows, framed in during construction, control that swing without constant manual intervention.
Winter heat for year-round use typically comes from a small electric or propane heater with a thermostat — enough to keep the growing zone above freezing on cold Rathdrum Prairie nights without running continuously. The shed's wall insulation quality matters here: a well-insulated headhouse wall adjacent to the glazed bay acts as a thermal buffer and cuts heating costs noticeably.
On wooded or sloped Bonner County and Sandpoint-area lots where a delivered greenhouse kit can't be positioned correctly, on-site framing lets the builder orient the glazed panels to the south regardless of site access constraints. See how a greenhouse shed is priced and start the layout in the configurator to spec the glazed bay width and headhouse depth.
Tell us your climate zone and what you want to grow — early starts, overwintered plants, season-long greens — and we will help spec the glazing, the vents, the winter heat, the snow-rated roof, the benches, and the water around your property, then you can build and price it online.
Keep planning your build with related North Idaho shed guides.