A hobby shed gives your craft a room of its own, so the work stops migrating across the dining table and the half-finished project no longer has to be cleared away before dinner. Whether you build scale models, paint, sew and quilt, solder electronics, work leather, tie flies, or organize a growing collection, the thing that makes the hobby frustrating at home is rarely the hobby itself. It's the lack of a stable surface you can leave set up, good light aimed where your hands actually are, and a place to keep supplies so they're visible and within reach instead of boxed in a closet. A purpose-built hobby shed fixes all three at once, and because it's detached from the house, the soldering fumes, the airbrush overspray, the fabric lint, and the late-night work light stay out there with you.
The difference between a shed you tinker in occasionally and a workshop you use every week comes down to a handful of decisions you make before the first wall goes up: the footprint, where the bench and tables go, how the room is lit, how supplies are stored, and how warm, dry, and dust-controlled you keep it for the materials you work with. Get those right and you have a focused, comfortable space that works through a North Idaho winter and protects everything you keep inside. This guide walks through each choice in order, the sizes that genuinely fit one hobby or several, and how we build the structure on your property so it's solid, dry, and ready to finish. If you'd rather see the options priced first, you can build and price a layout in a few minutes and come back for the details.
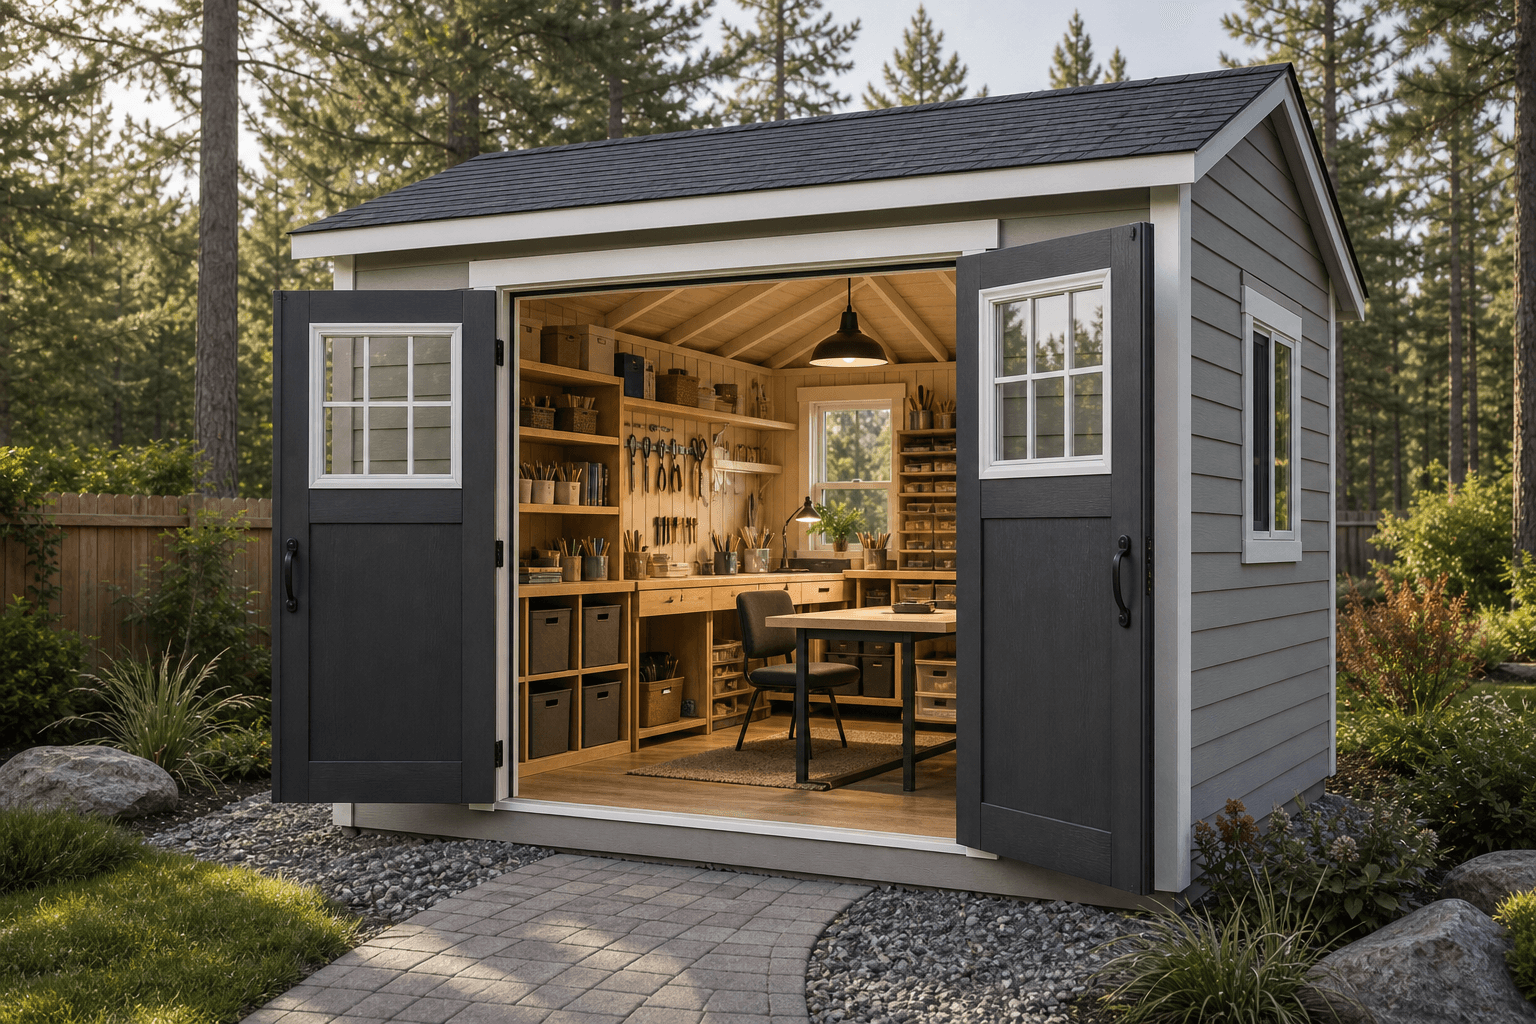
A dedicated hobby shed: stable bench surface, bright task light, and supplies kept in reach.
Most hobby sheds are happiest in a standard gable. The straight walls and simple roofline give you long, uninterrupted runs for benches, tables, and wall storage, with full headroom over your work surface and no slope eating into the corner where you sit. It's the easiest style to insulate and the most efficient to line with shelving and pegboard, which matters when storage is half the battle.
If your hobby grows upward as much as outward, a lofted barn (gambrel) roof adds vertical volume and an optional loft, which is a smart place to stash seasonal supplies, completed projects, or bulky materials you only reach for occasionally, freeing the main floor for active work. A lean-to or modern single-slope roof reads contemporary and pairs well with a tall window wall and clerestory glass, which is the move if natural light matters most to you, as it does for painting and other color-critical work. A model with a covered porch gives you a sheltered spot to spray, stain, or simply step out for air between sessions. Many of the fit-out priorities here, the bright light, the durable floor, and the bench-lined walls, carry straight over to a maker space shed or an art studio, so it's worth looking at how we approach those when you're weighing rooflines.
Whatever the roofline, plan a hobby shed as a finished, conditioned room rather than a bare storage box. That means an insulated envelope, real lighting and power, and an interior you trim out so it's pleasant to spend hours in, because the whole point is that you'll want to.
A single workbench or table, a chair with room to roll back, and a wall of supply shelves. A 10x12 covers one well-organized craft without crowding.
Add a separate cutting or assembly table, a cabinet, and more shelving and you want 10x14 to 12x12 so the second surface doesn't block the door or your chair.
If two people work, or one room has to hold sewing, painting, and electronics zones, step up to 12x16 so each setup gets its own wall and stays set up.
Footprint is the decision everything else rides on, so size for the surfaces plus the storage that surrounds them, not just the bench. A 10x12 shed is the sensible floor for a single focused hobby: 120 square feet holds a generous bench, a rolling chair, and a full wall of shelving without feeling tight. Step up to a 10x14 shed and the extra two feet absorb a separate cutting table or a second work surface so your main bench stays clear for the build in progress. A 12x12 shed gives you a square room that's easy to lay out in an L of benches around two or three walls, which suits hobbies that spread sideways like quilting and model railroading. The 12x16 shed is the sweet spot when the room has to do double duty, sewing on one wall, painting and an airbrush booth on another, electronics on a third, and it's the size most people wish they'd chosen once a second hobby moves in. If your yard or setbacks favor a slim building along a fence line, a long, narrow plan still gives you one continuous bench wall and a separate storage zone, so the shape works as hard as the square footage.
These creative builds overlap, and the right label depends on what you make and how messy or precise it is. A hobby shed is the flexible middle: good light, stable surfaces, organized supply storage, and enough climate control to keep materials happy, tuned for detail work you do sitting down. A maker space shed leans toward heavier tools, a sturdier bench, dust collection, and the power to run a 3D printer, a CNC, or a small saw, so it's the better fit if your hobby throws sawdust or chips rather than thread and paint. If your work is fine-art production, an art studio prioritizes north light, wash-up space, and floors that shrug off spills, while a she shed puts the emphasis on a personal retreat where the comfort and the vibe matter as much as the workflow. Plenty of buyers land on a hobby shed precisely because it flexes: it's calm enough to read and sketch in, organized enough to leave a project mid-build, and conditioned enough to protect paints, fabric, and electronics year-round, without the tool noise of a full workshop. If you're torn, build for the hobby you do four days out of five and let the room flex around the rest.
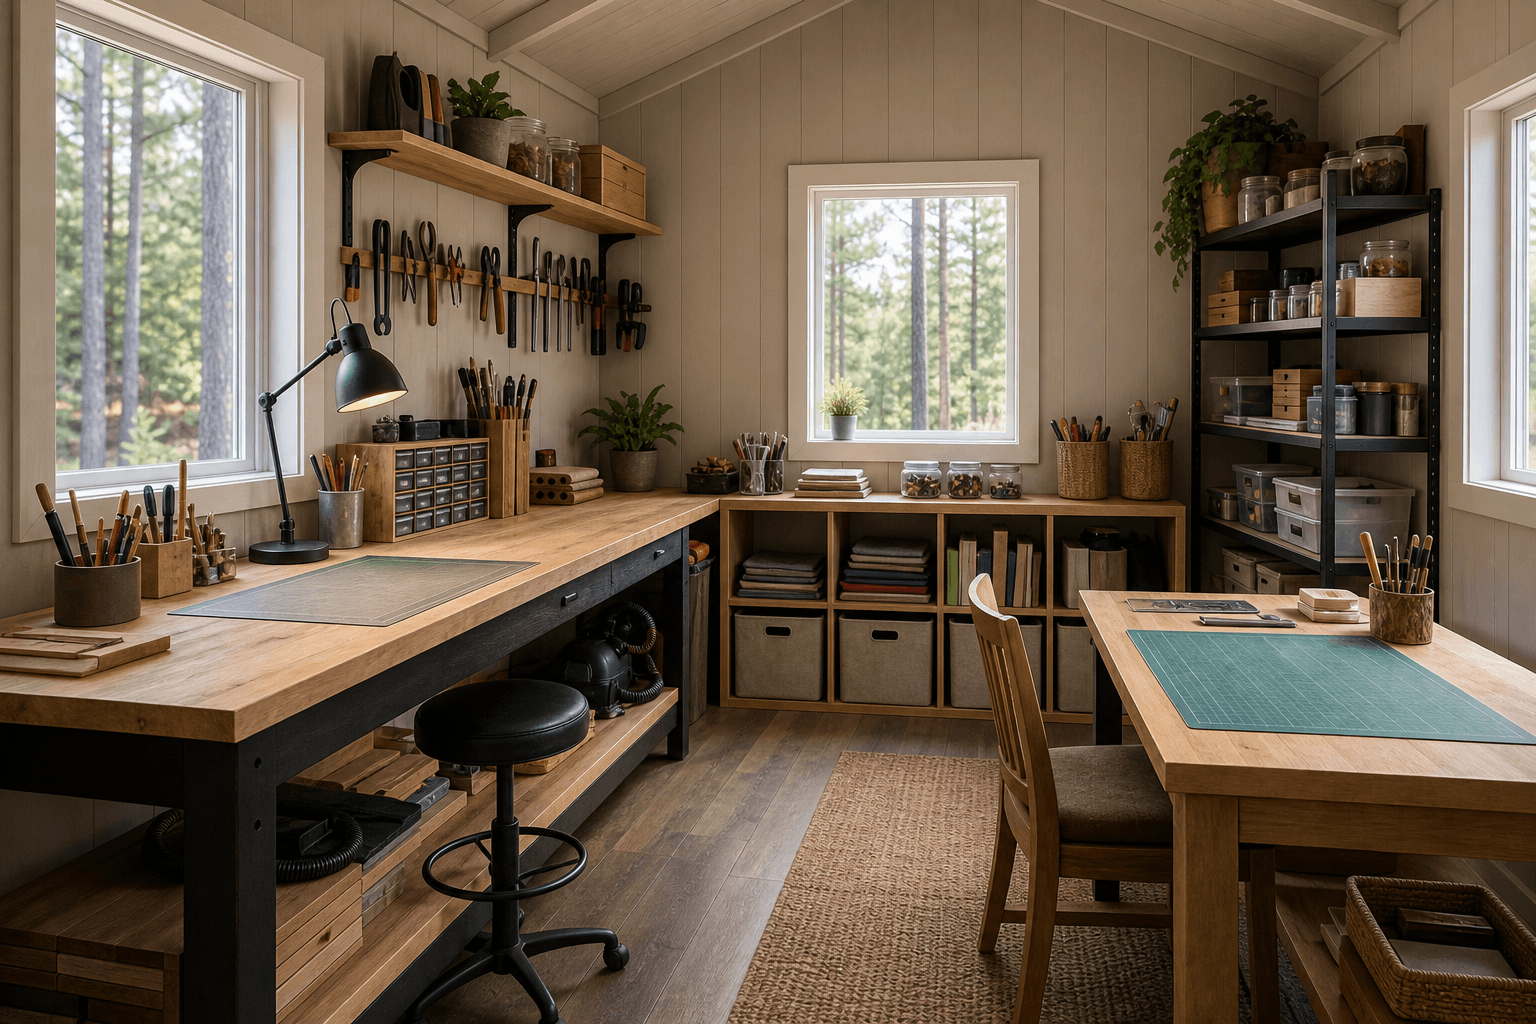
Zoned for a craft: a lit bench wall, a separate worktable, and supplies sorted within arm's reach.
Even a small hobby room works better when you plan it as zones instead of one open box. The bench zone is the anchor: put your main work surface under the brightest light and, where you can, against a window so daylight backs up your task lamps for detail work. Give yourself depth behind the chair to push back and stand without hitting a shelf. The secondary surface zone is for the work that needs to spread out, a cutting mat for quilting, an assembly table for models, a curing or drying area for paint, so it stays separate from the bench and you're not clearing one job to start another. The storage zone runs the walls around both surfaces: open shelves and pegboard for the tools and supplies you reach for constantly, closed cabinets for what should stay dust-free, and labeled bins for small parts. The utility zone holds the power, the heat source, and any ventilation or spray setup, placed so cords run short and fumes vent away from where you sit. Sketching these four zones on paper before you pick a footprint is the fastest way to tell whether a smaller building works or whether a second hobby means you want the extra wall length of a larger one.
Match the surface to the work: a hardwood or laminate top for cutting and assembly, a self-healing mat for hobby knives, or a sealed top you can wipe down for paint and resin. Build it to elbow height for seated detail work, with a sturdy front edge for clamps and a vise.
Pegboard and slat-wall keep tools in sight, while shallow drawers, small-parts organizers, and labeled bins sort paints, threads, fasteners, and components so you find a thing in seconds. Closed cabinets protect anything that hates dust, light, or humidity.
Combine bright, even overhead light with adjustable task lamps and an LED magnifier right at the bench. Use high-CRI bulbs around 4000K to 5000K so colors read true for painting and matching, and so fine detail stays crisp on a long evening.
A small heat source and a dehumidifier keep paint, glue, fabric, and electronics from swinging with the seasons, and a window or vent fan clears fumes from solder, adhesives, and finishes. A wipeable floor or anti-fatigue mat finishes a room you can actually clean.
The keyword for a hobby shed is keep it set up and within reach, and the fit-out is all the things that protect that. Name the specific things you store and use, because that list decides the size. For a model builder: paints and primers, an airbrush and compressor, a spray booth, hobby knives and cutting mats, files, clamps, a pin vise, sprue cutters, decals, and shelves of kits and finished builds. For painting and fine art: tubes and bottles of paint, brushes and palette knives, an easel, canvases and panels, a taboret, solvents, and a drying rack. For sewing and quilting: a machine and serger, a cutting table with mats and rotary cutters, an ironing station, thread racks, bins of fabric and notions, and a design wall. For electronics: a soldering station, a fume extractor, a bench power supply, a multimeter and oscilloscope, anti-static mats, and parts drawers full of components. For collecting: lit display cases, archival sleeves and boxes, label makers, and adjustable shelving. Whatever the craft, walk through your own list like this before you settle on a size, because supplies and surfaces add up faster than people expect. Very little of it fits in a 6x8 shed, which is exactly why a real hobby room starts at 10 feet deep, and most people end up happiest with extra wall length once the bench, a second table, the storage, and a comfortable chair all have to share the same room.
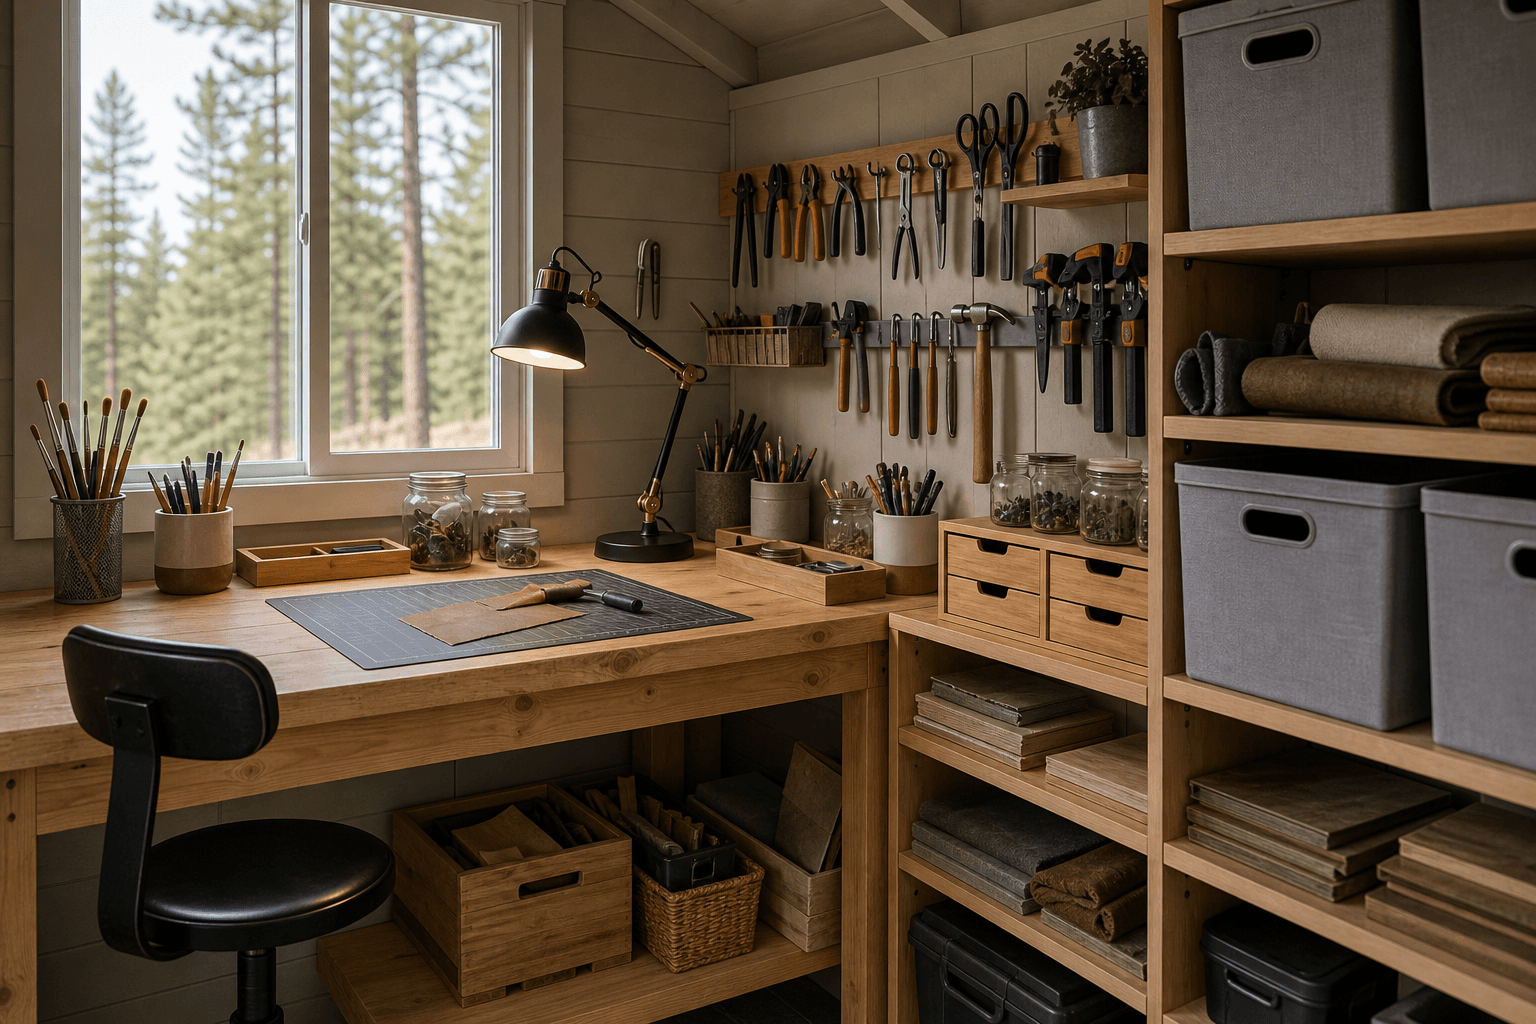
Detail that makes it work: task light at the bench, parts sorted and labeled, and power where your hands are.
| Hobby shed planning checklist | |
|---|---|
| Best roofline | Standard gable for long bench walls; lofted barn for overhead supply storage; single-slope for high windows and daylight |
| Practical sizes | 10x12 for one focused hobby, 10x14 to 12x12 with a second surface, 12x16 for several hobbies or two people |
| Work surfaces | A main bench at elbow height plus a separate worktable, with tops matched to your craft and a clamp-ready front edge |
| Lighting | Bright high-CRI overhead light plus adjustable task lamps and a magnifier at the bench for detail work |
| Storage | Pegboard and open shelves for daily tools, closed cabinets and labeled bins for dust- and humidity-sensitive supplies |
| Climate and air | Insulated envelope, a small heat source, a dehumidifier for materials, and a window or vent fan for fumes and dust |
Three systems decide whether your hobby shed is usable in February as well as June. Power should come from a dedicated circuit run from your home's panel by a licensed electrician, ideally feeding a small subpanel in the shed so you can add circuits later without re-trenching. Plan plenty of outlets at bench height around your work walls, because a compressor, a soldering station, a sewing machine, task lamps, a space heater, and a battery charger add up, and a heater on the same circuit as your tools is how a breaker trips mid-project. Lighting is the upgrade that separates a hobby room from a garage: layer bright, even overhead fixtures with adjustable task lamps and an LED magnifier at the bench, and choose high-CRI bulbs so paint colors, fabric shades, and solder joints all read true under the light you actually work by. Winter readiness ties it together: an insulated envelope, a small heat source sized to the room, and weatherstripped openings keep the space comfortable through North Idaho cold snaps and, just as important, keep your materials stable, since paints, adhesives, and electronics all dislike freezing and wide temperature swings. We frame and build the shell tight and dry on your property so it's ready for your electrician to wire and for you to light and finish.
A hobby shed stays straight, dry, and pleasant to work in only on a solid, level base, so most sit on a compacted gravel pad sized about a foot wider than the building on each side for drainage, or on a concrete slab if you want a perfectly flat, sealed floor that's easy to sweep up dropped pins, paint, and parts. North Idaho weather drives the rest of the plan: design for local snow load so the roof carries a heavy Panhandle winter, keep the floor up off the ground so spring melt and rain drain away instead of wicking in and raising the humidity around your supplies, and place the building where the gravel driveway or a clear path lets our crew bring materials in to build. We build with weather-rated framing and finishes suited to pine-country freeze-thaw cycles, and we set the structure to drain and breathe so it lasts and so the inside stays dry for sensitive materials. On permits, the rule of thumb is the use: a plain storage shed under a size threshold often needs no permit, but the moment a building is wired, conditioned, and used as a finished room, your county or city may treat it differently and require a permit, an electrical inspection, and adherence to setbacks. Rules vary across Kootenai County and the cities around Coeur d'Alene, so confirm with your local building department before you finalize size and placement, and we'll plan the build around whatever your jurisdiction requires once you know the answer.
Plan light in layers and aim the best of it at your hands. Start with bright, even overhead fixtures so the whole room is well lit and shadow-free, then add adjustable task lamps and an LED magnifier clamped right at the bench for close work like seams, decals, fine brushwork, and solder joints. The bulb quality matters as much as the brightness: choose high-CRI LEDs in the 4000K to 5000K range so paint colors, fabric shades, and finishes read true under your work light and match what you'll see in daylight. Put your main bench near a window where you can, so natural light backs up the lamps during the day, and keep the task light on a separate switch so you can brighten just the work area for a long detail session.
Treat the bench and any worktables as separate zones so you never have to clear one job to start another. Run your main bench along the brightest wall, built to elbow height for seated detail work, with a sturdy front edge for clamps and a vise and outlets at bench height behind it. Put a second surface, a cutting table for quilting, an assembly or curing table for models, on a different wall so it stays set up independently. In a square room like a 12x12, an L-shape of benches around two or three walls gives you the most usable surface while keeping the center open to move around. Leave clear floor behind your chair to roll back and stand, and keep the walls above each surface free for the shelving and pegboard that put your tools within arm's reach.
Organize by how often you reach for something and how much it needs protecting. Keep daily tools in sight on pegboard or slat-wall right above the bench, and sort small items, paints, threads, fasteners, electronic components, into shallow drawers, parts organizers, and labeled bins so you can find one thing in seconds instead of digging through a tote. Use closed cabinets or drawers for anything that hates dust, light, or humidity, and reserve open shelving for bulkier supplies and bins. If you build kits or collect, plan dedicated shelf space for work in progress and finished pieces so they're not competing with active supplies for bench room. A lofted roof or overhead shelf is the place for seasonal or bulk supplies you only reach for occasionally, which keeps the main walls free for what you use every session.
Start with an insulated, sealed envelope so the room doesn't swing with the weather, then add a small dehumidifier to hold humidity steady, since paints and glues can separate, fabric can mildew, and electronics and metal tools can corrode in a damp, unconditioned shed through a North Idaho winter. Keep the floor up off the ground and the building draining well so spring melt doesn't raise the humidity inside. For dust, store dust-sensitive supplies in closed cabinets and bins, choose a wipeable floor you can sweep and damp-mop, and add a window or vent fan to clear fumes from solder, adhesives, airbrushing, and finishes while pulling fine lint and dust out with them. A simple air filter on the bench helps if you sand, cut, or spray. Together these keep both your materials and your lungs in good shape.
More than a standard shed outlet, and on its own circuit. Plan a dedicated circuit run from your home's panel by a licensed electrician, with a small subpanel in the shed so you can add circuits as your setup grows. Then put outlets every few feet at bench height around your work walls, because the loads stack up fast: an airbrush compressor, a soldering station, a sewing machine and iron, a bench power supply, multiple task lamps, a battery charger, and a space heater can easily overlap. Keep the heater and any heavy tool on separate circuits from your delicate electronics and lighting so a startup surge doesn't trip a breaker in the middle of a build. Surge-protected strips at the bench protect sensitive gear. We build the shell tight and dry so your electrician can run and terminate everything cleanly.
For a single focused hobby, a 10x12 is the practical floor, with room for a full bench, a rolling chair, and a wall of supply shelves without feeling boxed in. Add a second work surface, a cutting table, an assembly table, a drying or curing area, and you'll want a 10x14 or a 12x12 so the extra surface doesn't crowd your bench or block the door. Once a room has to hold several hobbies at once, say sewing on one wall, painting and an airbrush booth on another, and electronics on a third, or two people share the space, plan on a 12x16 so each setup gets its own wall and stays set up between sessions. Sizing for the surfaces plus the storage that surrounds them, rather than the bench alone, is how you avoid outgrowing the room the moment a second hobby moves in.
The detail that separates a useful hobby shed from a converted storage box is task lighting placed for the actual work — and that means deciding where benches and worktables land before the electrical rough-in is done. Whether the craft is scale modeling, stained glass, leatherwork, or fly tying, the overhead fixture position and the outlet height are both structural decisions. An on-site build in Coeur d'Alene or Post Falls lets those decisions happen during framing, when they cost next to nothing to dial in.
North Idaho's four-season climate forces a real insulation choice for any hobby shed intended for year-round use. A lightly built structure that's fine for June through September becomes uncomfortable by October and genuinely cold by December. Wool-insulated walls and an efficient heat source — even a compact electric wall heater on a thermostat — make a meaningful difference in how many months the space actually gets used. That's a factor worth thinking through before choosing a footprint, not after.
Storage layout is craft-specific in a way general shed planning rarely accounts for. A quilter needs flat bolt storage and a cutting table with open floor clearance on three sides. A painter needs a solvent-safe cabinet and a utility sink. A model builder needs deep shelving and a dust-free case. Framing dedicated storage into the walls — rather than relying on freestanding furniture — keeps the floor footprint efficient and the workspace cleaner. On sloped lots in Rathdrum or on Hayden's hillier parcels, on-site construction handles the site prep that a delivered unit can't.
Browse hobby and studio builds in our portfolio to see how other North Idaho customers have laid out similar spaces, then design your shed in the builder to price the footprint and features you need.
Tell us what you make and we'll help you size, light, and lay out a bench-ready, climate-controlled hobby shed for your North Idaho property.
Keep planning your build with related North Idaho shed guides.