In North Idaho, gear comes home wet for most of the year. Ski and snowboard boots, jackets, and gloves soak through on the mountain; waders and wading boots come out of the river dripping; wetsuits, drysuits, and paddling layers come off the lake heavy with water; hiking boots, packs, and rain shells come back caked and damp from a fall day in the woods. Pile all of that on the mudroom floor or hang it over the furnace and it never really dries — it just stays clammy, starts to smell, and is still wet the next morning when you want to head back out. A dedicated gear drying shed fixes that by giving wet outdoor gear a warm, moving-air room of its own: heat to drive off the moisture, airflow to carry it away, and an exhaust path so the damp leaves the building instead of soaking back into your gear.
North Idaho On Site Sheds builds every drying shed right on your property, so the heat source, the fans, the vents, and the racks can be specified around the gear your family actually puts through it each season. This guide is about the three things that make a drying room work — heat, airflow, and moisture exhaust — and how to build them into a small shed that turns soaked boots and dripping waders around overnight. We will cover which roofline suits a drying room, what footprint fits a family's wet gear, how to zone the interior around drying instead of long-term storage, how to wire it for boot dryers and a heater, and how to keep the building itself from going mildewed through a long, wet North Idaho winter. If you also tune skis or rig rods, you will see where a ski tuning shed and a drying room overlap.
A warm, vented room of its own: heat dries the gear, fans move the air, and a roof vent pushes the damp out instead of letting it soak back in.
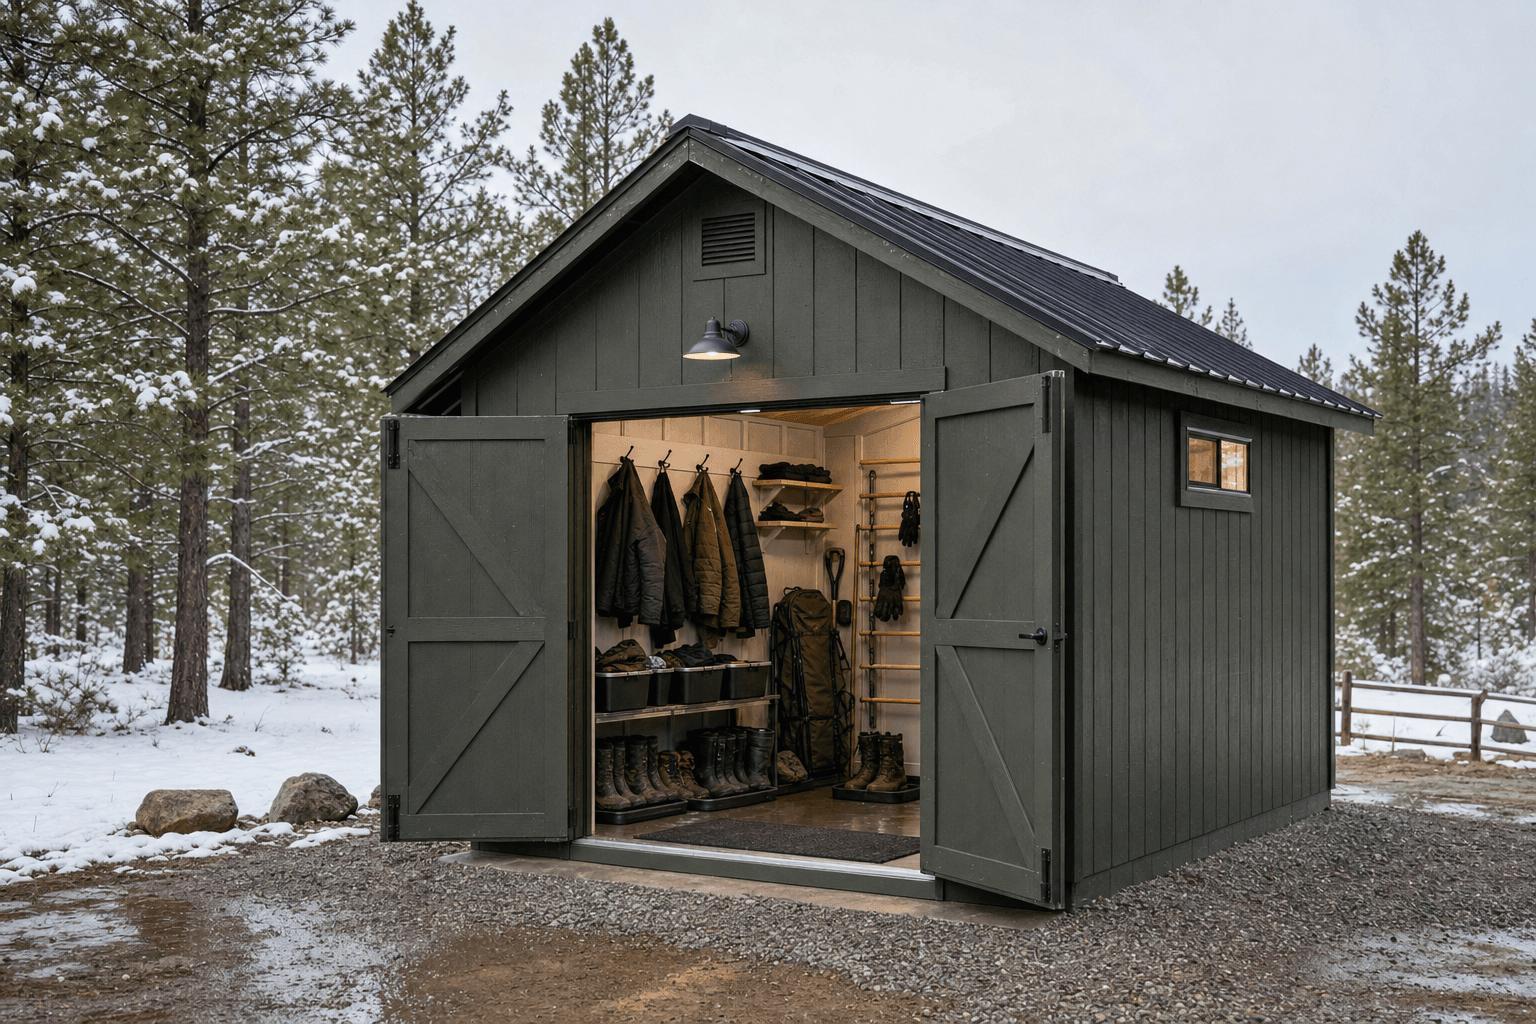
A drying shed asks less about square footage than it does about height and airflow, because hot, wet air rises and you want it to climb away from the gear and out a vent rather than hang at head height. That makes the standard gable the natural starting point: the peaked roof gives you a high ridge for warm air to collect and a clean spot for a gable or ridge vent to exhaust it, while the straight sidewalls take rows of hooks, a hanging rod, and a wall of boot dryers. Spec the sidewalls a little taller than a basic storage shed so long gear — waders, drysuits, full-length jackets — hangs free and drips into a tray instead of folding on the floor, and so a high shelf or upper rod gives you a second tier of drying space above the boots. A lofted barn (gambrel) raises the center even more and adds a small loft, which is useful for off-season storage of the gear you are not drying right now, keeping the heated floor space clear for what is actually wet.
If you want a taller, squarer room — say you are drying packs and long waders and want full-height hanging on every wall — a stick-built shop style gives you straight walls to the eave with no slope eating into the hanging space. A lean-to or modern single-slope sheds North Idaho snow predictably to one side and puts the high wall where you can mount a tall vent and a row of upper hooks, which suits a drying room well. Whatever the roofline, the parts to spec up are insulation, a vent path, and power: a drying shed runs warm and humid on purpose, so it needs to hold heat, move air, and dump moisture better than a plain storage box. A gear drying shed sits right next to a ski tuning shed when waxing and edge work join the routine, and it shares a wall's worth of needs with a fishing tackle shed the moment dripping waders and a soaked vest become half of what you hang.
A 6x8 or 8x8 dries a couple of people's ski kit or waders — boots on dryers, jackets and gloves on a rod, a tray underneath, a heater, and a vent — in a compact, warm room.
An 8x10 hangs a family's jackets, gloves, and base layers, lines up four to six boot dryers, dries waders and packs, and still leaves a clear lane to load and unload.
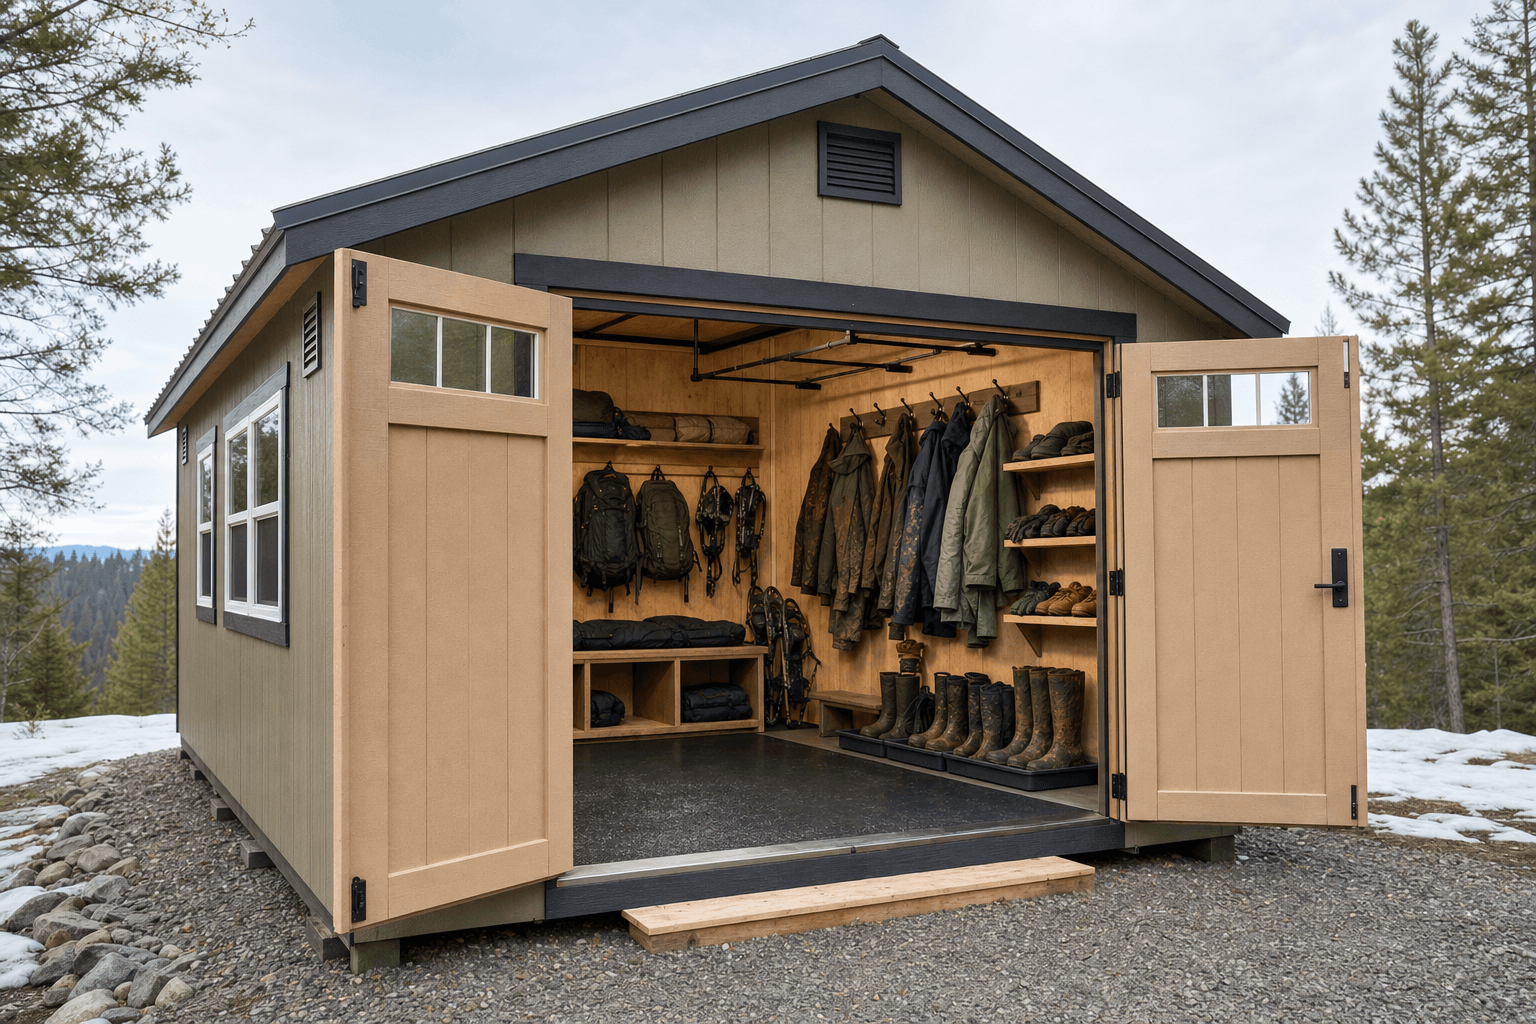
An 8x12 dries ski gear, waders, wetsuits, and hiking kit at once, with a wall of dryers, two tiers of hanging, a bench, and room for a bigger heater and fan.
Footprint here is about how much gear can dry at one time without crowding the airflow, so size to a peak day — a powder Saturday when the whole family comes home soaked, or a weekend when waders, wetsuits, and hiking boots all need to turn around at once. A 6x8 is the compact drying room: it handles one or two people's ski kit or a couple of sets of waders, with boots on dryers, jackets and gloves on a rod, a drip tray below, a small heater, and a vent overhead. An 8x8 gives you a square room with hanging on two or three walls and space for several boot dryers, which suits a couple who ski and fish without overlapping the wet gear. An 8x10 is the family workhorse — long enough to line up four to six boot dryers, hang a row of jackets and a row of gloves and hats, dry waders and packs, and still keep a clear lane to come in and out without brushing wet gear. If you run multiple sports across all four seasons and want ski kit, waders, wetsuits, and hiking gear all drying at once, step up to an 8x12 so two tiers of hanging, a full wall of dryers, a bench, and a larger heater and fan all fit with the air still moving freely. Depth matters more than width in a drying room — a longer building lets warm air run the length of the gear, and it keeps the wet drop zone by the door separate from the gear that is nearly dry at the back.
These sheds overlap because they all deal with wet, seasonal outdoor gear, but they solve different problems, and naming the lead use keeps you from a building that does two jobs poorly. A gear drying shed leads with drying — heat, airflow, hanging space, and boot dryers built to turn soaked gear around fast — and it stays useful year-round because something is always coming home wet in North Idaho. A ski tuning shed leads with work: a sturdy bench and vise for waxing and edge tuning, an iron and a brush station, tool storage, and good light over the bench. The two are close cousins, and many people build one room that does both — you dry the boots and gloves on one wall while you wax skis on the bench against the other — so if winter sports are your main driver, plan a heated, vented room with a tuning bench and you get a drying shed and a tune shop in one footprint.
If your wet gear comes mostly from the water, the natural neighbor is a fishing tackle shed: it is built around rod racks, a tackle-box wall, and a rigging bench, but a fly fisherman's waders, boots, and vest come home soaked every trip and need exactly the drying setup this guide describes — so a tackle shed with a heated drying corner covers both. Mountain bikers face the same wet-gear problem from a different sport: a mountain bike shed hangs the bikes and holds a wash-and-tune station, but the muddy shoes, gloves, packs, and rain layers that come off a wet North Idaho ride dry best in the same kind of warm, vented room. Decide which gear comes home wet most often and build the drying around that first, then fit the storage or workbench for the neighboring sport into the same shed — that order locks in your heat, your fans, your vent, and your hanging layout before the framing is set.
Zone for drying: boot dryers along a low bench, two tiers of hanging above, drip trays underneath, and a fan moving warm air toward the vent.
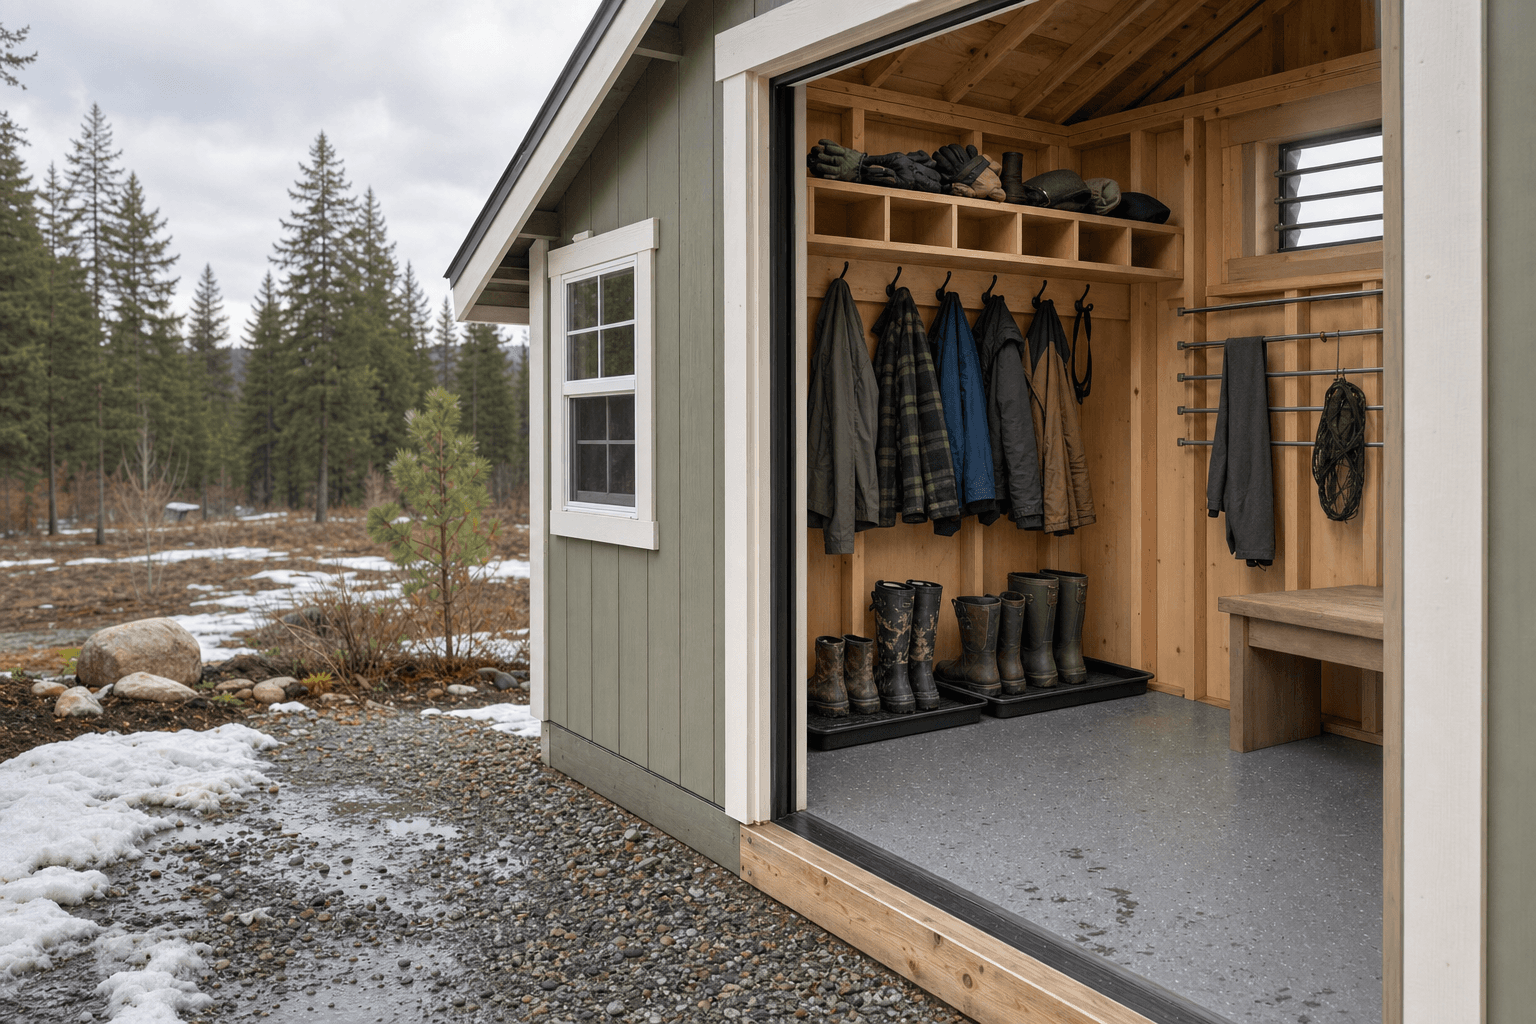
Think of a drying shed as a path the moisture takes — in wet at the door, dry by the back wall — and lay it out in zones that follow that path so air moves with the gear instead of fighting it. A boot-and-shoe zone anchors a low bench near a power strip, where ski boots, wading boots, hiking boots, gloves, and helmets sit on dryers that push warm air up into them; this is the wettest, heaviest gear, so put it where the airflow starts and where drips land on a tray, not the floor. A hanging zone runs along the walls and overhead: a sturdy rod or two tiers of hooks for jackets, bibs, waders, drysuits, wetsuits, and base layers, spaced far enough apart that warm air reaches every surface and nothing dries pressed against the next piece. A drop-and-drip zone sits right inside the door with a boot tray, a mat, and a few quick hooks, so the soaked stuff drips there before it moves deeper into the room.
The airflow itself is a zone you design, not an afterthought: place the heat source and a circulating fan low and to one side so warm air sweeps across the boots and up through the hanging gear, and put the exhaust vent high on the opposite wall or at the ridge so the moisture-laden air leaves at its highest, warmest point. That low-in, high-out path is what actually dries gear — heat without airflow just bakes a humid room, and airflow without an exhaust just moves the damp around. Keep a clear lane down the middle so you can carry an armload of wet gear to the back without dragging it across what is already drying, and put tomorrow's boots and gloves nearest the door and the fan where they dry quickest. If you also tune or rig in the room, set the bench against a wall out of the drip path so your tools stay dry.
A low bench or shelf lined with forced-air boot and glove dryers wired to dedicated outlets, so ski boots, wading boots, gloves, and helmets dry from the inside out overnight instead of staying damp for days.
A sturdy upper rod and a lower row of hooks for jackets, bibs, waders, drysuits, and wetsuits, spaced so warm air reaches every surface, with trays or a mat below to catch the drips off the longest gear.
An electric heater or a mini-split sized to warm the room, paired with a low circulating fan that sweeps warm air across the boots and up through the hanging gear so nothing dries in a still, cold corner.
A ridge or gable vent, or a powered exhaust fan, mounted high on the far wall so the warm, moisture-heavy air leaves the building instead of condensing on the walls and soaking back into the gear.
This is where a warm shell becomes a real drying room, and it is worth naming exactly what goes in it so you size the bench, the hanging, and the power around it. The boot and footwear dryers come first, because wet boots are the slowest thing to dry and the worst thing to leave damp: a multi-port forced-air dryer or a row of single units for ski and snowboard boots, wading boots, hiking boots, and pac boots, plus glove and mitten attachments and a helmet port so headgear dries too. The hanging gear is the bulk of the room: a row of heavy hangers or hooks for ski jackets and bibs, a spot for waders and wading jackets, drysuits and wetsuits, rain shells, fleece and base layers, and a high rod for the long stuff that needs the most air. Underneath and beside it goes the drip management — boot trays, a drainage mat, or a tray under the hanging rod — so a season of meltwater and river drips runs off instead of pooling on the floor.
Around the dryers you fit out for the gear that comes off every sport. Packs and bags hang open on hooks to dry inside; goggles, sunglasses, and headlamps go on a small shelf; wet socks, buffs, and liner gloves clip to a line strung across the warm zone. If you also work on gear, a ski tuning bench with a vise, an iron, and a wax-and-brush station tucks against a dry wall, and a tackle shed-style rod rack and a rigging spot fit the same building if the river is your main draw. A small dehumidifier earns its keep on the wettest stretches when the vent alone cannot keep up, and a timer or thermostat on the heater and fan lets the room run a drying cycle overnight and shut off once the gear is dry. The right dryers, two tiers of hanging, a real exhaust path, and a bit of automation turn a cold storage shed into a room that hands you dry boots and gloves every morning.
Forced-air dryers push warm air up into boots and gloves from the inside out — the detail that turns soaked footwear around by morning.
| Gear drying shed planning checklist | |
|---|---|
| Heat source | An electric heater or mini-split sized to warm the room above outdoor temps and hold it, so moisture evaporates off boots, waders, and jackets fast instead of slowly |
| Airflow | A low circulating fan that sweeps warm air across the boot bench and up through the hanging gear so nothing dries in a still, cold corner of the room |
| Moisture exhaust | A ridge or gable vent or a powered exhaust fan mounted high on the far wall so the warm, damp air leaves the building rather than condensing on the walls |
| Boot dryers & power | Dedicated 120V outlets along a low bench for forced-air boot, glove, and helmet dryers, placed where the wettest footwear and headgear sit |
| Hanging & drip control | Two tiers of rods and hooks for jackets, waders, and wetsuits, spaced for airflow, with boot trays and a drainage mat to catch a season of drips |
| Insulation | Insulated walls and roof so the heat stays in, the room holds temperature through a cold snap, and condensation does not bead on a cold shell |
A drying shed runs on electricity, so plan the power before anything else, because boot dryers and a heater are the whole point of the room. Run a proper circuit from the house and plan dedicated 120V outlets along the boot bench — enough for a multi-port dryer or several single units plus glove and helmet attachments — and a separate outlet for the circulating fan so a full bench of dryers never trips a breaker. A larger electric heater or a mini-split usually wants its own dedicated circuit sized to the load, so plan the electrical capacity around running the dryers, the heater, and the fan at the same time on a wet weekend, not one at a time. Place the outlets where the wet gear actually sits — at the boot bench and along the hanging wall — so no cord crosses the lane you carry dripping gear through, and put the heater and fan on a timer or thermostat so the room runs a drying cycle overnight and shuts off once the gear is dry.
Heat and exhaust are what make the room work through a North Idaho winter, when gear comes home frozen and soaked and the outside air is too cold and damp to dry anything on its own. Insulate the walls and roof so the heater holds the room warm and the shell does not turn into a cold surface that condensation beads on, size the heat source to actually raise the room temperature and keep it there through a cold snap, and pair it with a fan and a high vent so the moisture the heat drives off has a way out. The combination matters: heat plus airflow plus an exhaust path dries gear overnight, while heat alone in a sealed room just makes a warm, humid box that sweats on the walls and never gets the gear truly dry. Keep a plowed or shoveled path to the door so the shed stays reachable after a storm — a drying room you cannot get to on a powder morning is not doing its job.
A drying shed is small and light, but it still earns a proper base, and drainage matters more here than in a dry storage shed because the whole room deals with water. A compacted gravel pad drains well and keeps the framed floor dry from below, which is what you want under a building where boots drip and trays catch meltwater all winter. Set the shed close to where you come and go from the mountain, the river, or the trailhead — near the mudroom door, the garage, or the driveway — so soaked gear gets inside and onto a dryer in a short carry rather than a trek across the yard, and plan the approach so you can walk in with an armload of wet kit without fighting a step or a narrow gate. Read how to prep a shed site before delivery day so the pad, the drainage, and the access are squared away before the building arrives.
North Idaho's four seasons drive the rest of the spec. The roof and anchoring need to be rated for local snow load; the building wants real insulation and a working vent so it holds heat and sheds moisture through a long, wet winter instead of freezing damp and growing mildew; and a plowed path keeps it usable after a storm. Plan the off-season into the layout too — when ski season ends and waders take over, or when the wet gear thins out, a loft or high shelf holds the out-of-rotation kit so the heated floor stays clear for whatever is actually wet. Most small drying sheds skip a building permit, but the added electrical for dryers, a heater, and a vent fan often needs one, and setback or HOA rules can apply — confirm what your town and county require on the service areas pages, and factor any electrical permit into the plan before you finalize the size and where the shed will sit.
Drying is evaporation, and evaporation needs two things working at once: heat to lift the moisture off the gear, and moving air to carry that moisture away before it settles back. Heat on its own warms the room and the gear, which helps water evaporate, but in a still, closed shed the air just gets warm and humid and the gear stays damp because the moisture has nowhere to go. Airflow on its own moves cold, already-damp winter air around, which barely dries anything. Put them together and the room works: a heater raises the temperature so moisture evaporates quickly, and a low circulating fan sweeps that warm air across the boots and up through the hanging jackets and waders so it keeps picking up moisture and moving it toward the exhaust. Aim the fan so warm air flows from the heat source, across the wettest gear, and toward a high vent. That moving, heated air is what turns soaked boots and dripping waders around overnight instead of over several days.
Match the equipment to the gear. For footwear and handwear, use forced-air boot dryers — units that push warm air up into the boot from the inside, which is the only way to dry the deep, wet lining of ski boots, wading boots, and hiking boots in a few hours; get a multi-port model or a row of single units, and add glove, mitten, and helmet attachments so headgear and handwear dry on the same system. For everything that hangs, plan two tiers: a sturdy upper rod for long, heavy gear like waders, drysuits, bibs, and full-length jackets that need the most air around them, and a lower row of hooks for shells, fleece, base layers, and packs hung open to dry inside. String a clip line across the warm zone for socks, buffs, and liner gloves. Underneath, run boot trays or a drainage mat so the drips have somewhere to go. The combination of forced-air dryers for footwear and well-spaced two-tier hanging for everything else dries a whole family's wet kit at once.
More than you would think, because every piece of gear you dry releases its water into the room air, and that moisture has to leave the building or it just condenses on the walls and soaks back in. Plan the room to move air low-in and high-out: bring fresh air in low and exhaust the warm, moisture-heavy air high, at the ridge or near the top of the far wall, where it naturally collects. A passive ridge or gable vent handles a light load, but a drying shed that turns around a family's soaked gear usually wants a powered exhaust fan up high to actively push the damp out, sized to swap the room's air several times an hour when the dryers and heater are running hard. Pair that exhaust with a circulating fan inside so no corner stays still and humid. On the wettest stretches, when waders, wetsuits, and ski gear all hit the room at once, a small dehumidifier backs up the vent and pulls the last of the moisture out. The test is simple: if the walls and windows stay dry and the air does not feel muggy, the ventilation is keeping up.
Mildew grows wherever moisture sits without moving air, and a drying shed is full of moisture on purpose, so the whole design has to keep that moisture moving out rather than letting it settle. First, never let gear dry slowly in a cold, still room — heat, airflow, and exhaust working together dry it fast, and gear that dries overnight does not grow mold. Second, get the moisture out of the building: a high exhaust vent and a circulating fan keep the damp air leaving instead of condensing on the walls, and insulation keeps the shell warm enough that condensation does not bead on a cold surface. Third, manage the drips — trays and a drainage mat under the boots and hanging gear keep standing water off the floor where it would otherwise feed mildew. Hang gear with space around each piece so air reaches every surface; do not pack wet jackets tight. Let everything dry fully before it goes into a tote or onto a closed shelf for the off-season. A warm, ventilated, well-drained room simply does not grow the mildew that takes over a cold, sealed shed full of wet gear.
A drying shed is an electrical room first, because the dryers, the heater, and the fan are what make it work, so plan the power around running all of them at once on a wet weekend. Run a proper circuit from the house and plan dedicated 120V outlets along the boot bench — enough to power a multi-port dryer or several single units plus glove and helmet attachments — and a separate outlet for the circulating fan so a full bench of dryers does not trip a breaker mid-cycle. A larger electric heater or a mini-split typically wants its own dedicated circuit sized to its load, separate from the dryer outlets, so size the panel feed for the heater, the dryers, and the fan running together rather than one at a time. Place the outlets where the wet gear actually sits so no cord crosses the path you carry dripping gear through. Put the heater and fan on a timer or thermostat so the room runs a drying cycle overnight and shuts off once it is warm and dry. Plan all of this up front, since the added electrical is also what usually triggers a permit.
Size it to a peak day, not an average one — the powder Saturday when everyone comes home soaked, or the weekend when ski gear, waders, and wetsuits all need to turn around at once. For one or two people's ski kit or a couple of sets of waders, a 6x8 or 8x8 does the job: boots on dryers, jackets and gloves on a rod, a drip tray below, a heater, and a vent in a compact, warm room. A whole family that skis and plays in the water usually needs an 8x10, which is long enough to line up four to six boot dryers, hang a full row of jackets and a row of gloves and hats, dry waders and packs, and still keep a clear lane to come and go without brushing wet gear. If you run multiple sports across all four seasons and want ski kit, waders, wetsuits, and hiking gear all drying at the same time — plus a bench to tune or rig — step up to an 8x12 so two tiers of hanging, a full wall of dryers, and a bigger heater and fan all fit with the air still moving freely. When in doubt, go up a size: gear and people both multiply, and the extra depth lets warm air run the full length of the gear.
Wet ski gear, soaked waders, and damp boots left in a cold garage don't dry — they mildew. A dedicated gear drying shed built on your property gives you a heated, ventilated space where a Coeur d'Alene ski season's worth of gear is ready by morning. Because NIOS builds on site, the electrical rough-in for boot dryers and the exhaust vent for moisture removal are part of the construction plan rather than improvised with extension cords after the fact.
The drying loop depends on three things working together: a low-level heat source to raise the air temperature, racks and hangers that hold gear away from walls, and a high exhaust path that pulls saturated air out of the building. In a North Idaho winter, the heat source also needs to maintain a minimum temperature to prevent gear from re-freezing overnight — a detail that matters in Sandpoint and Bonners Ferry more than it does in Post Falls.
Wall finish and floor surface deserve attention in a wet-gear shed. Moisture-tolerant paint or a panel system on the walls handles the daily damp without peeling. A sealed or coated concrete board floor drains and cleans better than OSB or bare wood. These are inexpensive choices at the build stage that add real service life in regular use.
When the layout is clear, configure your gear drying shed in the builder to size it and price electrical options, or get a free estimate. The gear drying shed service page covers standard rack and heating build-outs.
Tell us what comes home wet — ski boots, waders, wetsuits, gloves, and packs — and how often, and we will help spec the heat, the airflow, the exhaust, the boot dryers, and the racks around your property, then you can build and price it online.
Keep planning your build with related North Idaho shed guides.