Animal feed is expensive, perishable, and a magnet for trouble the moment it leaves the store. Sacks of grain stacked in a corner of the barn draw mice and rats within days; a bale of hay against a damp wall heats up, molds, and becomes wasted money and a colic risk; an open bin of sweet feed in a humid stall clumps, sours, and grows mold you cannot always see. If you keep horses, goats, cattle, chickens, or any mix of animals, the feed quickly outgrows whatever spot you first tucked it in, and losses to rodents and moisture add up fast. A dedicated feed storage shed fixes the whole problem at once: a dry, rodent-proof, well-ventilated building sized to hold bagged and bulk feed and a working supply of hay in good condition, set close enough to the barn or coop that the daily chore is a short carry instead of a trek.
North Idaho On Site Sheds builds every feed building right on your property, so the bin layout, the pallet space, the hay room, the ventilation, and the rodent sealing get specified around exactly which animals you feed. This guide is about the three things a feed room has to get right — keeping rodents out, keeping feed dry, and moving air so hay and feed never mold — and how to build them into a shed that protects grain, pellets, supplements, and hay through a North Idaho year. We will cover which roofline suits a feed building, what footprint matches your herd, how to zone and fit out the interior, how to stack and ventilate hay, and where to place it. Because feed storage shares a yard with the rest of the operation, you will also see where it overlaps with broader farm storage and a chicken coop shed.
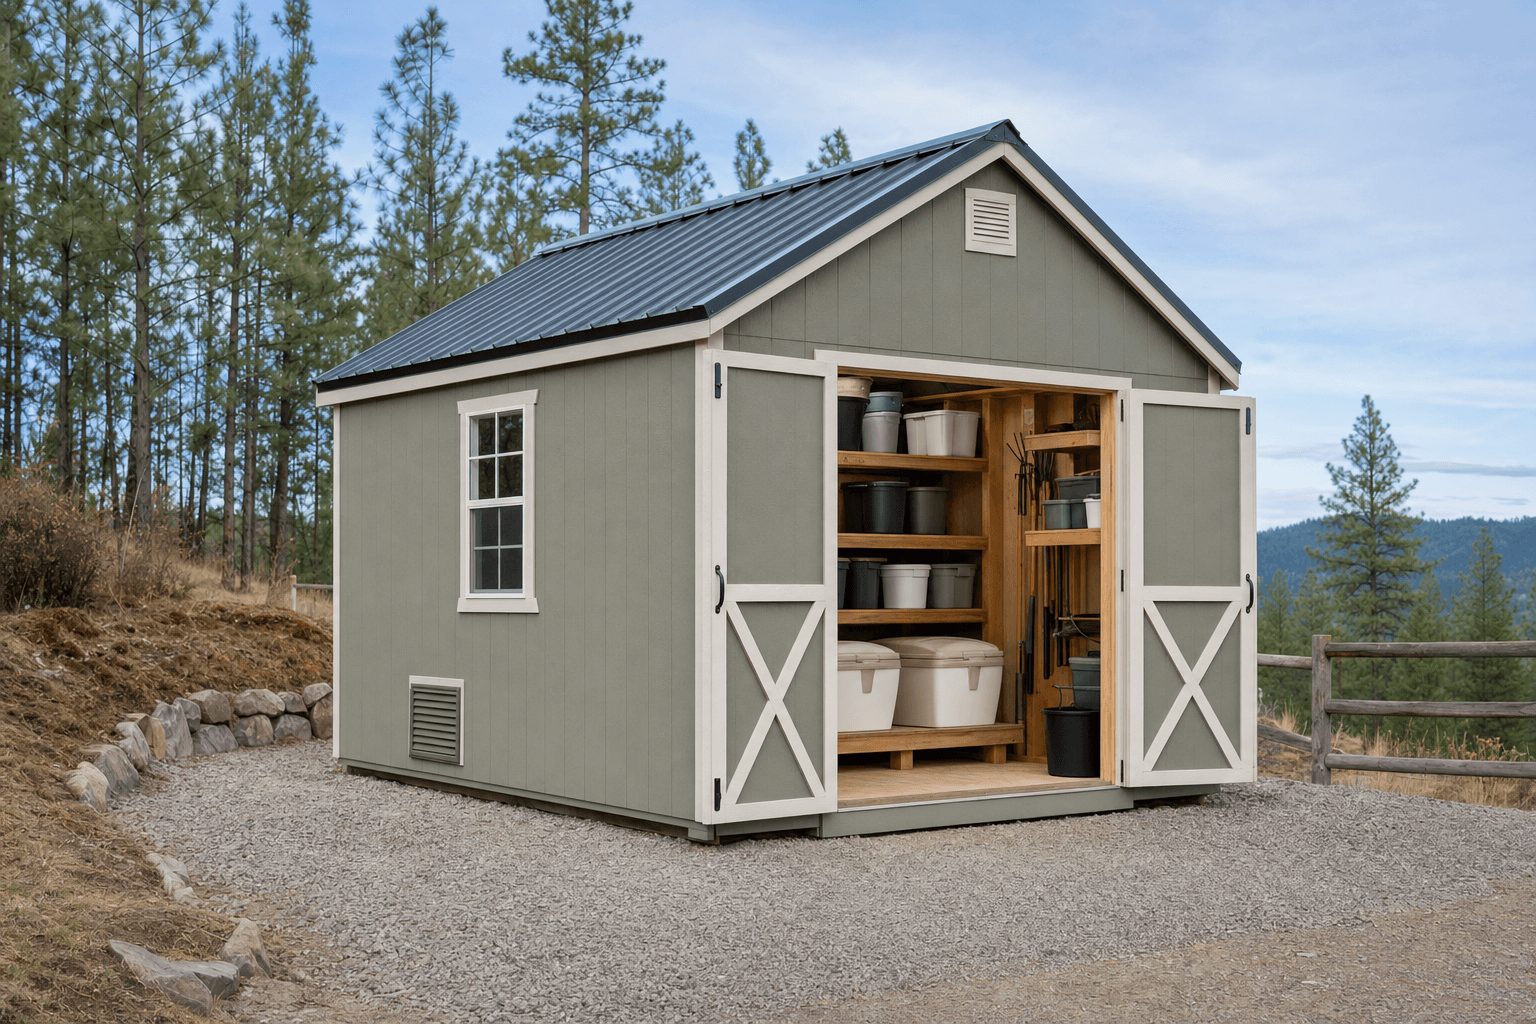
Dry, rodent-proof, and close to the barn: sealed metal bins for loose feed, bagged grain up off the floor on pallets, and hay stacked where air can move through it.
A feed shed is less about a fancy roofline than about a tight, sealable shell, usable floor space for bins and pallets, and headroom to stack hay, because the whole job is keeping feed dry and rodents out while letting air move through. That makes the standard gable the natural starting point: the straight sidewalls take a row of sealed feed bins and a wall of shelving for buckets and supplements, the peaked roof gives headroom to stack hay a few bales high, and a simple, well-built box is easy to seal tight against mice and easy to vent at the eaves and ridge. Order taller sidewalls if hay is a big part of the plan, because every extra foot of wall is another course of bales. A lofted barn (gambrel) raises the center and adds a loft, a smart, dry spot to stack hay overhead while the floor below stays clear for bins and bagged feed.
If you want a wide, drive-up feed room with a big door so you can wheel in pallets of bagged feed or fork hay off a truck, a stick-built shop style gives you straight walls to the eave and room for a tall, wide opening. A lean-to or modern single-slope sheds North Idaho snow predictably to one side and tucks neatly against the barn or coop, keeping the feed steps from the animals it feeds. Whatever the roofline, the parts to spec up are the rodent sealing, the floor, and the ventilation. A feed building sits alongside broader farm storage when you also keep tools and equipment on the place, and it pairs naturally with a tack room shed when saddles, halters, and grooming gear need a clean, dry home of their own next to the feed.
An 8x10 holds a couple of sealed bins, a pallet of bagged grain, a small hay stack, and the feeding gear for a backyard flock, a few goats, or one or two horses, with a clear lane to scoop and carry.
An 8x12 or 10x12 adds a full row of bins, more pallet space for bulk bags, and room to stack several weeks of hay, so a small horse or livestock operation can buy ahead and still walk the room.
A 10x16 holds bulk bins, a wall of bagged feed and supplements, and a real hay stack a few bales high — a true feed barn you drive up to, load by the pallet, and work out of all season.
Footprint here is about how many mouths you feed and how much hay and feed you keep ahead, so size to your real herd and your buying habits, not a single trip to the feed store. An 8x10 is the starting point for a few animals: two or three sealed bins along one wall, a pallet of bagged feed off the floor, a small hay stack against the back, and a clear lane to scoop and carry — plenty for a backyard flock, a few goats, or one or two horses fed from bags. An 8x12 adds length for a full row of bins, pallet space to buy bagged feed by the half-ton, and room for several weeks of hay, which is where most small horse and livestock keepers land. A 10x12 buys real width so you can wheel a cart down the middle and swing a hay bale off the stack — a feed room you work in rather than reach into. If you run a bigger herd, buy bulk, or store serious winter hay the way many North Idaho places do, step up to a 10x16: bulk bins, a long wall of bagged feed and supplements, a hay stack a few bales high, and a drive-up lane, all loaded by the pallet. Headroom matters as much as floor area for hay, and the heaviest loads belong low and near the door.
These buildings all serve the animals and the land, but they hold different things and want different conditions, and naming the lead use keeps you from a room that does several jobs poorly. A feed storage shed leads with feed and hay kept dry and rodent-proof — sealed bins of grain, bagged feed and supplements on pallets, and a ventilated hay stack — in a tight, airy, bone-dry room mice and rats cannot get into. Broader farm storage leads with tools, equipment, and supplies: fencing, posts, sprayers, hand tools, and the general gear of running a property, where feed is just one of many things on the shelves. The two overlap, but feed has stricter needs — total rodent exclusion, real ventilation, and dryness from the ground up — so if you store feed alongside equipment, wall off a dedicated feed corner with its own sealing and venting rather than leaving open sacks among the tools.
If poultry are part of the operation, the natural neighbor is a chicken coop shed: the coop houses and protects the birds, while the feed shed stores their layer pellets, scratch, and grit dry and sealed away from the very rodents a coop tends to attract. Keeping feed in its own tight building a short carry from the coop — rather than in or under the coop itself — is one of the best ways to cut the rodent pressure that open feed creates around poultry. And if you keep horses or working livestock, a tack room shed is the clean, dry companion to the feed room, so the saddles and grooming kit live next door rather than sharing the feed's dust and pests. Decide which job leads — store feed and hay, hold general farm gear, house the flock, or keep the tack — and build the sealing, ventilation, and layout around that first.
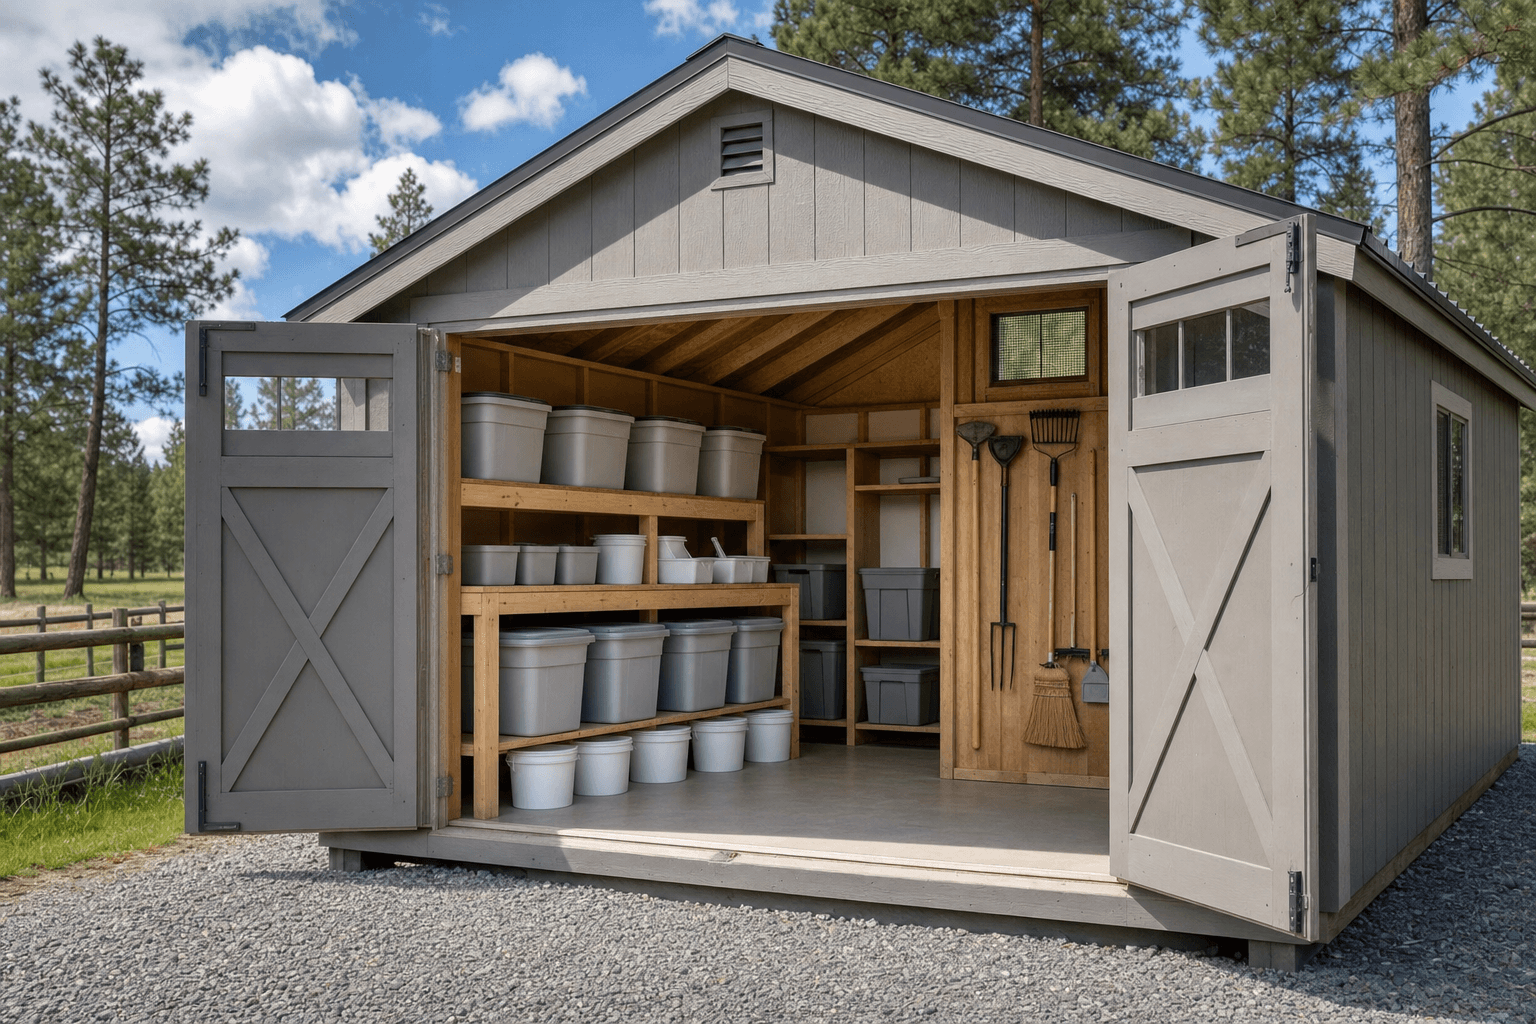
Zone it: sealed metal bins for loose feed, bagged grain up on pallets, supplements on shelving, and hay stacked off the floor where air can circulate.
Think of a feed shed as a working chore room laid out by how feed and hay move through it — feed comes in by the bag or load, gets emptied into bins, gets scooped daily, and gets restocked — so zone it for fast daily work and easy restocking. A bulk-bin zone anchors one wall with sealed galvanized or heavy-duty plastic bins for the loose grain, pellets, and crumbles you go through fastest, lids latched against rodents and moisture, set where you scoop straight into a bucket. A bagged-feed-on-pallets zone sits beside it, where unopened sacks stack on pallets a few inches off the floor so no bag touches the slab and wicks up damp. A hay zone takes the back or a corner with bales stacked off the floor on pallets and held a hand's width off the walls so air moves around the stack and the hay never sweats against a cold surface. And a gear-and-supplement zone of shelving and hooks holds buckets, scoops, supplement tubs, minerals, and the daily kit so nothing gets buried.
Good zoning is what makes feeding fast and restocking painless. Keep the bins and the daily-scoop gear nearest the door and the path to the barn so the twice-a-day chore is a few steps, and keep the bulk reserve — pallets of bagged feed and the deep hay stack — further back where you only go to restock. Group like with like — poultry feed together, equine feed and supplements together, minerals and any medicated feed on their own shelf — so a glance tells you what is running low. A feed room laid out in clear zones is one you can chore through in the dark of a winter morning and restock by the pallet without rearranging the whole building.
Galvanized steel or heavy-duty rodent-proof bins with tight, latching lids for loose grain, pellets, and crumbles, so mice and rats cannot chew in and so moisture stays out and feed stays fresh between deliveries.
Wood or plastic pallets, or a low slatted platform, so every bag of feed and every bale of hay sits up off the slab on airflow rather than wicking ground moisture, the single biggest cause of moldy, caked feed.
Screened soffit and ridge or gable vents that pull a steady current of air through the building, so hay cures and stays cool, humidity never builds, and grain and pellets do not sweat and grow mold in the bin.
Sturdy shelving and wall hooks for feed buckets, scoops, supplement tubs, minerals, and the daily kit, keeping the chore gear up off the floor, organized, and clear of the bins and the hay.
It is worth naming exactly what goes in a feed room so you size the bins, pallets, and hay stack around it. The loose feed is the backbone, and it lives in sealed bins: whole and cracked corn, oats, sweet feed, complete pelleted rations, goat and cattle pellets, poultry layer pellets and crumbles, and scratch grain, each in a latched bin you scoop from daily. Alongside the bins sit the bagged feed on pallets — the unopened fifty-pound sacks you buy ahead and rotate into the bins as they empty, including complete feed, ration balancers, beet pulp, and alfalfa cubes — all stacked off the floor so the bottom bags stay dry. Then come the supplements and minerals: loose and block minerals, salt, electrolytes, joint and hoof supplements, diatomaceous earth, and any medicated feed, kept on shelving and labeled and dated so nothing expires unseen.
Around the feed, you plan the hay and the daily gear. The hay is its own bulk load — grass, alfalfa, and mixed bales, plus any straw for bedding — stacked off the floor on pallets and stored so you pull the oldest bales first. The feeding gear earns the shelving and the hooks: feed buckets and scoops, a marked scoop or scale for measuring rations, a wheelbarrow or feed cart, hay nets and slow feeders, water buckets and heated cords for winter, and a broom for the spilled grain that draws pests. Add sealed bait stations and traps as a rodent backstop, and that full fit-out turns a storage shed into the room your animals actually eat out of, dry and pest-free, every day of the year.
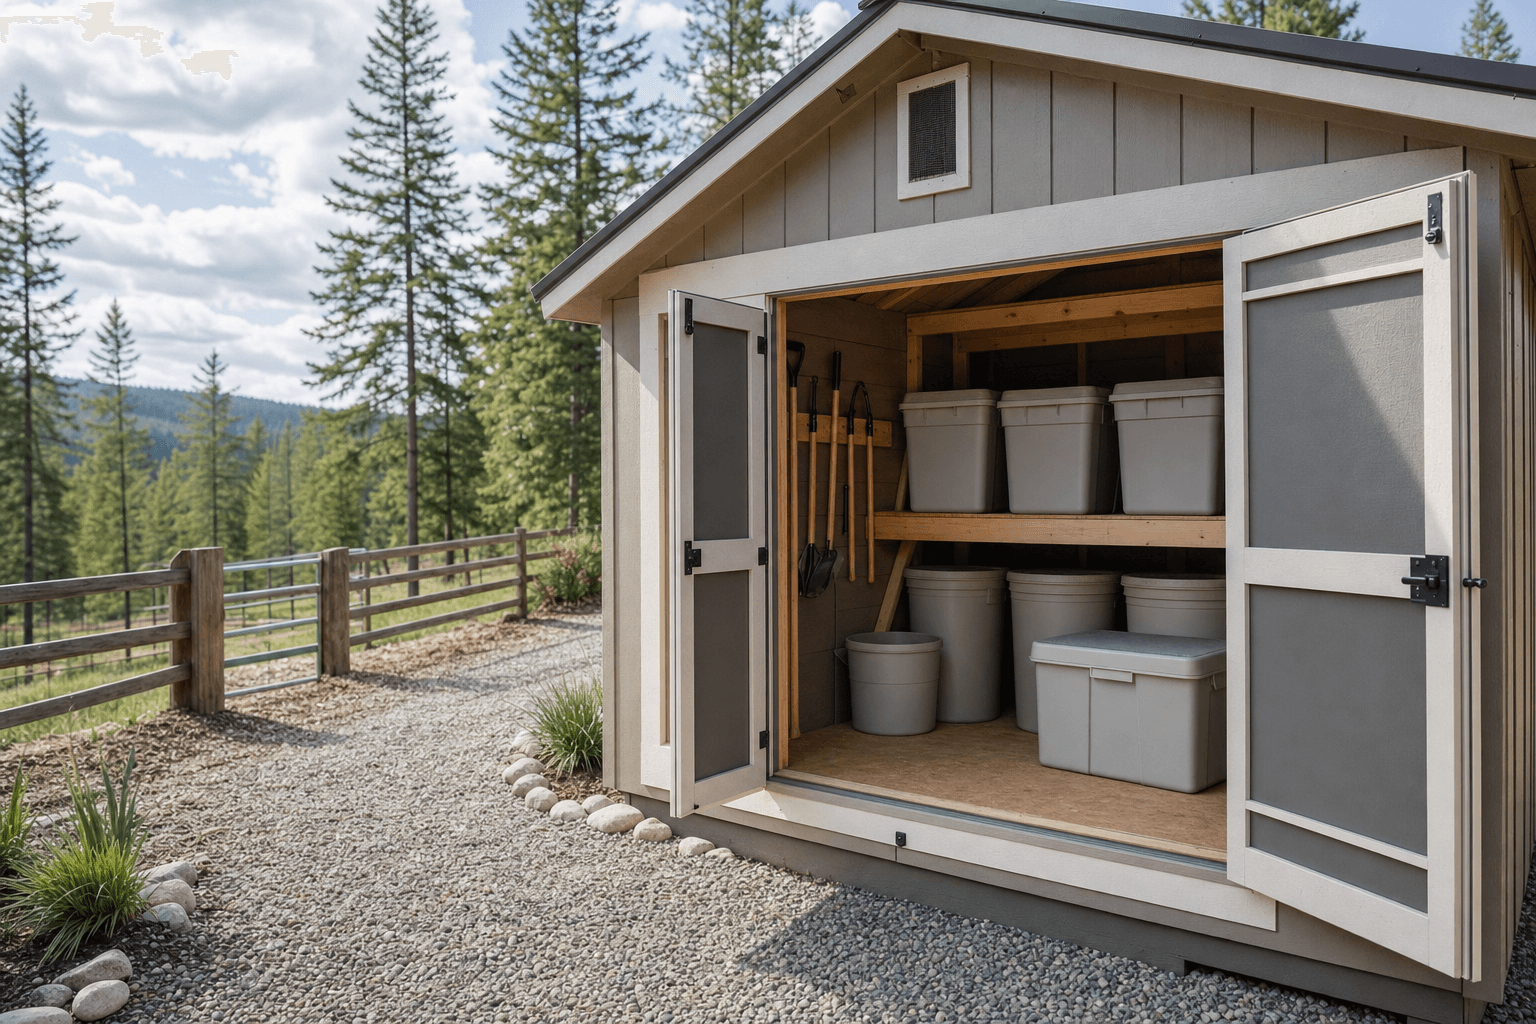
A latched metal bin and bagged feed up on a pallet — the detail that keeps grain rodent-proof and dry, while screened vents above keep the air moving.
| Feed storage shed planning checklist | |
|---|---|
| Rodent and pest proofing | A tight, sealed shell with metal flashing or hardware cloth at the base, sealed gaps and utility penetrations, fine screening on every vent, and all loose feed in latched metal bins off the floor so mice and rats are shut out |
| Dry from the ground up | A well-drained gravel pad or sealed slab, a vapor barrier, pallets under every bag and bale, and a roof and grading that send rain and snowmelt away so feed and hay never sit in or wick up moisture |
| Ventilation against mold | Screened eave and ridge or gable vents that pull a steady current of air through the building so hay cures and stays cool, humidity never builds, and grain and pellets do not sweat and grow mold |
| Bins, pallets, and shelving | Sealed latching bins for loose feed, pallets or dunnage to hold bags and hay off the slab, and shelving and hooks for supplements, buckets, scoops, and the daily feeding gear |
| Hay stacking room | Headroom and wall space to stack bales off the floor and off the walls a few courses high, with a layout that lets you pull the oldest hay first and keeps the stack from leaning into the roof slope |
| Easy access to the barn and coop | A wide door and a clear, plowable path set a short carry from the barn, the [chicken coop](/services/chicken-coop-shed), and the loading spot so chores are fast and restocking by the pallet is easy in every season |
A feed shed does not need much power, but a little goes a long way for a building you chore in before dawn and after dark through a North Idaho winter. Plan good, even LED lighting over the bins, pallets, and hay so you can measure a ration, read a supplement label, and spot a spilled bag or a chewed corner when it is still black outside. A couple of outlets earn their keep: one for a heated-bucket cord or a stock-tank de-icer in winter, and one for the occasional fan you run on a humid stretch to keep air moving over the hay. Keep the wiring and outlets sealed and rodent-proofed like everything else, because mice will chew wiring as readily as a feed bag.
North Idaho's hard winters are exactly what a well-built feed shed is meant to ride out, and dryness and airflow are what carry it through. Cold itself does not hurt dry feed or cured hay, but freeze-thaw and damp do: condensation on a cold metal bin can dampen the grain inside, a bale against a frosty wall can sweat and mold, and snowmelt at the threshold can wick into the bottom bags. So vent the roof to keep condensation down, keep the bins and bales off cold surfaces, and grade and seal the base so meltwater drains away. Keep a plowed, sanded path to the door, and stack the hay and the bagged reserve before winter so you are not hauling a pallet across an icy yard in January. A feed shed that stays dry, vented, and easy to reach is one where your grain stays fresh and your hay stays green even in the worst of the cold.
A feed shed earns a proper base, because it carries concentrated weight — full bins of grain, pallets of bagged feed, and a stack of hay — and has to stay dry and rodent-tight. A compacted gravel pad drains well and keeps a framed floor dry from below. For a heavy, drive-up feed room a concrete slab is often worth it: it takes the weight of loaded bins without flex, sheds spilled grain cleanly so it does not feed pests, and leaves no gap underneath for rodents to nest. Whichever you choose, keep every bag and bale up on pallets, add a vapor barrier so ground moisture never wicks into the feed, and grade the pad so rain and snowmelt drain away from the door. Set the shed a short, level carry from the barn, the coop, and where the feed truck unloads, and read how to prep a shed site before delivery.
North Idaho's four seasons drive the rest of the spec. Plan a roof and anchoring rated for local snow load, and seal and vent the building so it stays dry and condensation-free through the cold without trapping the moisture that molds hay and feed. Detail the shell to be rodent-proof from the start — mice and rats are relentless around stored feed — so plan tight construction, metal flashing or hardware cloth at the base, fine screening on every vent, sealed penetrations, and all loose feed in latched metal bins. Keep the surrounding ground mowed and the gravel approach plowed so rodents have no brush, tall grass, or woodpile to nest against the wall. Most small sheds skip a building permit, but a slab, added electrical, and setback or agricultural-zoning rules can apply — confirm what your town and county require on the service areas pages.
Treat rodent-proofing as two layers, because feed draws mice and rats harder than almost anything else you can store: keep them out of the building, and keep them out of the feed even if one slips in. Start with the shell. Build tight, seal every gap where the walls meet the foundation, add metal flashing or hardware cloth at the base so nothing can chew or burrow under, screen every eave, ridge, and gable vent with fine metal mesh rather than soft plastic, and seal around every wiring or utility penetration — mice need only a gap the width of a pencil. A concrete slab helps because it leaves no crawl space to nest in. Then protect the feed itself: keep all loose grain, pellets, and crumbles in sealed galvanized steel or heavy-duty rodent-proof bins with tight latching lids, never in the paper or plastic bags they came in, which a mouse chews through in seconds. Stack bagged feed up on pallets off the floor, sweep up every spill immediately because loose grain is what draws and feeds a population, and set sealed bait stations and traps around the outside as a backstop. Keep the ground around the shed mowed and clear of brush and woodpiles so rodents have no cover against the wall. Building on-site lets you seal the base, the vents, and the penetrations against rodents from the start rather than chasing gaps later.
Keeping feed dry is about stopping moisture from three directions: up from the ground, in from the weather, and out of the air as condensation. Start from the ground up — set the building on a well-drained gravel pad or a sealed slab with a vapor barrier, grade the pad so rain and snowmelt drain away from the door rather than pooling at the threshold, and keep every single bag of feed and bale of hay up off the floor on pallets or dunnage so nothing wicks damp from the slab, which is the single most common way feed cakes and molds. Stop the weather with a sound roof and sealed walls so no leak or wind-driven rain reaches the feed. Then handle the air: a feed shed needs real ventilation, because grain and pellets can sweat and hay can heat in a closed, humid building, so screened eave and ridge or gable vents that pull a steady current of air through keep humidity down and keep feed cool and dry. Keep loose feed in sealed bins so a damp spell in the air does not reach the grain, rotate stock so nothing sits long enough to spoil, and watch for clumping, off smells, or a warm bin as early warning. Dry from below, dry from the weather, and dry through good airflow together are what keep feed and hay fresh and mold-free through a North Idaho year.
Hay needs more ventilation than almost anything else you store, because even properly cured bales give off some moisture and can heat up if the air around them is still and humid — and damp, heating hay molds and, in the worst case, can even pose a barn-fire risk. So a feed shed that stores hay should be built to breathe. Plan screened soffit or eave vents low and ridge or gable vents high so air enters cool and low and exhausts warm and high, pulling a steady natural current through the building without letting rain or pests in. Inside, stack the hay off the floor on pallets and hold it a hand's width off the walls so air can circulate around and through the stack rather than trapping moisture against a cold surface, and leave a gap between rows if you can. Make sure the hay is fully cured and dry before it ever goes in the shed, because no amount of ventilation rescues hay that was baled wet. On a humid stretch, an outlet for a fan helps move air over the stack. The same airflow that protects the hay also keeps grain and pellets from sweating in their bins, so building generous, screened ventilation into the shed protects every kind of feed at once — and it is far easier to size the vents right when the building goes up than to add them later.
The key is to give bagged feed and bulk feed separate, purpose-built zones and to let one flow into the other so nothing sits too long. Set up a bulk-bin zone along one wall with sealed metal bins for the loose grain, pellets, and crumbles you go through fastest — this is what you scoop from daily, so keep it nearest the door and the path to the barn at a comfortable scooping height. Beside it, build a bagged-feed zone where unopened sacks stack on pallets off the floor; this is your reserve, the feed you bought ahead, and you rotate it into the bins as they empty, pulling the oldest bags first so nothing goes stale. Keep supplements and minerals on their own labeled shelving so they do not get buried among the sacks. The bins keep your working feed sealed and rodent-proof for daily use, while the pallets keep your reserve dry and easy to restock by the half-ton or the ton. Label and date everything, group like feeds together — all the poultry feed in one spot, all the equine feed and supplements in another — and load new bags behind the old so you naturally use the oldest first. A clear split between the daily bins and the bulk pallet reserve is what keeps a feed room fast to chore and easy to restock, and sizing both zones to how you actually buy is one of the best reasons to plan the building on-site.
Size the feed shed to your herd and to how far ahead you like to buy, not to a single trip to the feed store. For a few animals fed mostly from bags — a backyard flock, a couple of goats, or one or two horses — an 8x10 holds two or three sealed bins, a pallet of bagged feed, a small hay supply, and the feeding gear, with a clear lane to work in. For a small herd where you buy ahead and store several weeks of hay, an 8x12 or 10x12 adds a full row of bins, more pallet space for bulk bags, and real room to stack hay and wheel a cart down the middle. For a bigger operation, bulk feed buying, or serious winter hay storage, a 10x16 gives you bulk bins, a long wall of bagged feed and supplements, and a hay stack a few bales high in a drive-up feed barn you load by the pallet. The two things that drive the size are how much hay you keep — hay eats floor space and headroom fast, so a hay-heavy plan wants a bigger or taller building — and how often you want to restock, since buying by the ton means more pallet space but fewer trips. Because we build on-site, you can size the bins, the pallet area, and the hay room to your exact animals and buying habits rather than forcing your operation into a stock footprint.
Place the feed shed close enough that feeding is a short, easy carry, but as its own tight building rather than tucked inside or under the animals' housing — that separation is what keeps the rodents that feed attracts away from the livestock and the birds. The ideal spot is a short, level, plowable walk from the barn and the chicken coop, on the path you already take for chores, so the twice-a-day trip with a feed bucket is quick in every season, including a snowy North Idaho morning. Keep it near the spot where the feed truck or your trailer can pull up and unload, so restocking a pallet of bagged feed or a load of hay is a short haul rather than a trek across the yard. Set it on well-drained ground, graded so snowmelt and rain run away from the door, and leave room around it to mow and keep clear so brush and tall grass give rodents no cover against the walls. Keeping feed in its own dedicated building a few steps from the coop — instead of storing it in or beneath the coop, where open feed draws mice right to the birds — is one of the simplest, most effective things you can do to cut rodent pressure around poultry. Plan the placement so daily chores are fast, restocking is easy, and the feed stays a clean, sealed step removed from the animals it feeds.
Feed storage fails in two ways in North Idaho: moisture gets in and spoils grain or hay, or rodents get in and do the same. A feed storage shed built on site near the barn can be framed with a vapor barrier, sealed floor assembly, and tight door gaskets that a thin-walled delivered shed typically cannot match. The goal is a dry interior even through the sustained cold and freeze-thaw cycles that run from November into March across Kootenai and Bonner counties.
Roof pitch matters for snow. A steep pitch — 6:12 or greater — sheds heavy wet snow without letting it accumulate to the point it stresses the structure or blocks the eaves. In areas around Sandpoint and Priest River where snowfall totals run higher, that pitch also affects whether drifting snow blocks the door after a storm. Planning door orientation relative to prevailing wind during construction costs nothing and prevents a recurring nuisance.
Interior organization is easier when the building is sized right from the start. A common mistake is building the minimum footprint and discovering there is no room to maneuver around sealed metal bins, stacked hay, and a loaded pallet jack at the same time. A 12x16 or larger footprint with a wide door — framed in during the on-site build — gives you working room without paying for unnecessary square footage.
Rural properties in Rathdrum, Athol, and the east county where livestock operations are common often have irregular approaches that rule out delivered-shed cranes. On-site framing reaches those locations without requiring a cleared pad of specific dimensions. Design a feed shed footprint in the configurator or request a free estimate when you have your dimensions in hand.
Tell us what you feed — bins of grain and pellets, pallets of bagged feed, supplements, and a winter's worth of hay — and which animals you keep, and we will help spec the bins, the pallets, the ventilation, and the rodent-proofing around your property, then you can build and price it online.
Keep planning your build with related North Idaho shed guides.