On a working farm or ranch, gear lives wherever it landed last. The brush hog and the tiller sit out in the weather because nothing covers them. Bags of feed slump against the barn wall where mice find them, and hand tools, fencing pliers, and spare T-posts scatter across three buildings, with the spool of barbed wire always in the one you are not standing in. Then a job comes up — a fence to repair before the cattle find the gap, a field to disc before the rain — and you burn the first hour hunting for the implement, the wrench, and the staples. A farm storage shed ends that scramble: one rugged, multi-purpose building where implements, small equipment, tools, feed, and fencing supplies all live under a roof, sorted and dry, with a door wide enough to drive the big stuff straight in and a floor tough enough to take it.
North Idaho On Site Sheds builds every farm and ranch storage building right on your property, so the door width, the floor, and the shelving can be sized for the implements you actually own and the way you actually work. Farm storage is its own animal — bigger, heavier, dirtier, and more varied than a backyard shed — because it has to swallow a tiller and a tote of feed and a wall of hand tools at once, and stand up to mud, manure, and a loaded handcart every day. Plan the building around three things first — wide access, a durable floor, and flexible storage you can rearrange as the operation changes — and the rest falls into place.
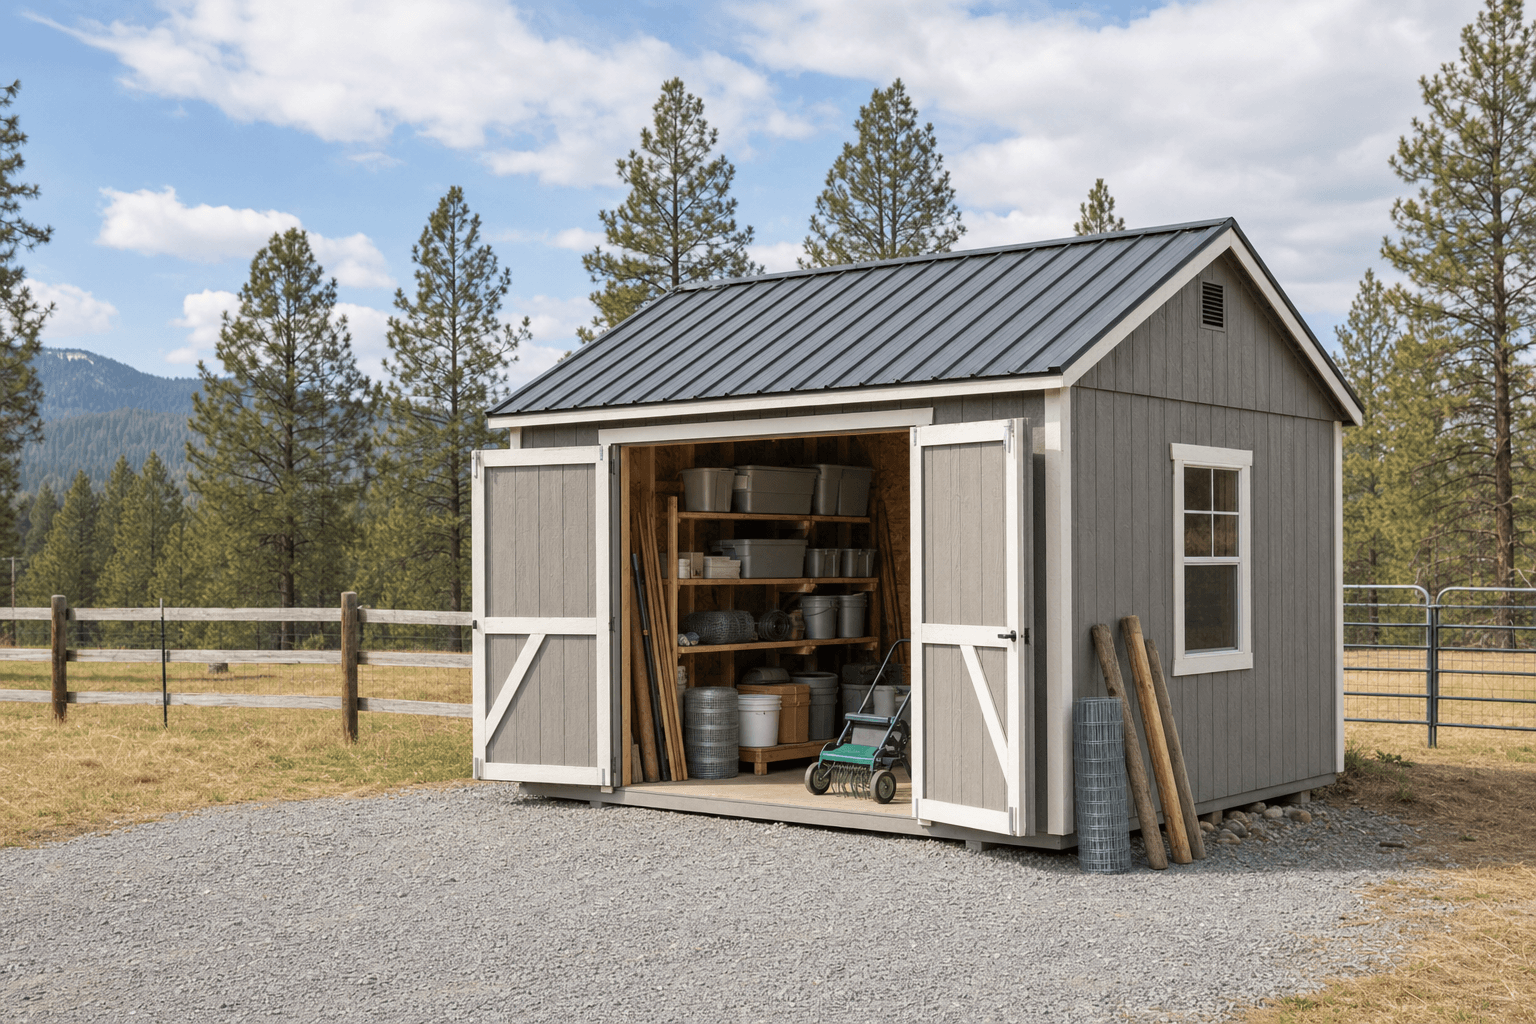
One rugged building for the whole operation: implements and small equipment, feed, hand tools, and fencing supplies, behind a door wide enough to drive into.
Farm storage is defined by what has to fit through the door and how much vertical room you get above it, so the roofline you pick is really a question of access and headroom. A standard gable is the honest workhorse — it frames a tall, wide door on the gable end so a tiller, a brush hog, a small tractor implement, or a loaded cart drives straight in, and it leaves clean full-height sidewalls for the deep shelving, the feed bins, and the wall-hung tools that a farm demands. Order a double door or a wide overhead-style opening and 8-foot-plus sidewalls so the bulky stuff clears and the long-handled tools and rolls of fencing hang without fighting the roof slope. A lofted barn (gambrel) raises the ridge and adds a loft, a strong move on a farm — you keep seldom-used gear and off-season equipment overhead while the floor stays clear for the implements, the feed, and a work area. A lean-to sheds North Idaho snow predictably to one side and makes a tidy covered spot to back a trailer under or keep T-posts and field gates out of the weather alongside the main building.
Whatever the roofline, build for a wide door, real headroom, and a tough floor, because those are the three things you cannot add after the fact, and farm gear is heavy, bulky, and unforgiving. A farm storage building sits between a barn and a workshop, which is why it overlaps with a dedicated feed storage shed when grain and hay drive the plan, and with a set of tool sheds when hand tools and small implements are the real load. Decide early whether the building leans toward equipment parking or supply storage, because that one call drives how much open floor you keep clear and how much wall goes to shelving and bins.
A 12x16 holds the supply side of a small operation — hand tools, fencing materials, several feed bins, and shelving down both walls — with a clear lane and room for a small implement or two.
A 12x20 or 12x24 adds the length to park a tiller, a brush hog, and a cart inside, run feed and tool zones along the walls, and still keep a workbench and open floor to wrench on gear.
A 16x24 stores implements, small equipment, feed, and a full wall of tools and fencing supplies at once, with a drive-through lane, a work area, and room to grow as the operation does.
Footprint decides whether you drive implements in and park them or leave them in the weather, and whether feed, tools, and supplies each get their own zone or fight for the same shelf — so compare the real dimensions before you commit. A 12x16 is a comfortable home for the supply side of a smaller operation — shelving down both walls for tools and fencing materials, a row of feed bins, a clear lane — but it tightens up the moment you try to park a real implement inside. A 12x20 buys the length to back a tiller or a brush hog in along one side, keep feed and tool zones on the walls, and walk a loaded cart through. Step up to a 12x24 and you gain a work area with a bench, room for two or three implements, and a feed bay clear of the tools. For a genuine do-everything farm building, a 16x24 gives you the width for a drive-through or side-by-side lane plus deep storage on both walls, and the floor to rearrange it as the operation changes. Width matters as much as length here: the extra feet let you swing a long implement through the door and still pass it to the bench.
These overlap, and the right call comes down to what the building is built around. A dedicated feed storage shed leads with grain, hay, and supplements — rodent-tight feed bins, a dry, ventilated space that keeps feed from molding, and easy access to scoop and haul — and equipment becomes a secondary concern. A set of tool sheds leads with hand tools, small implements, and organized wall storage, sized more for reaching a wrench than driving a tractor in. A true farm storage building leads with all of it at once: a wide door to drive implements in, a durable floor that takes the weight and the abuse, feed bins and a tool wall and fencing supplies each in their own zone, and the flexibility to shift the layout as the operation grows. The point of a farm shed is that it refuses to specialize — it is the one rugged building that holds the implement, the feed, and the fence staples together.
There is also real overlap with a working tool crib if the operation runs like a small business. A contractor tool crib leads with secured, checked-out tools and gear staged for crews — heavy-duty shelving, a lockable layout, and an inventory you can account for — exactly the instinct a larger ranch wants when hired hands and shared equipment are in the mix. Many operations blend the two: a farm building that stores the implements and feed but also keeps the valuable power tools, chainsaws, and fencing gear locked and organized like a crib. Naming the lead use up front locks in your door width, your floor spec, and how much wall goes to feed bins versus tool storage before the build is ordered.
Zone it: an implement lane down the middle, feed bins and tools along the walls, and a work area with a bench for repairs and maintenance.
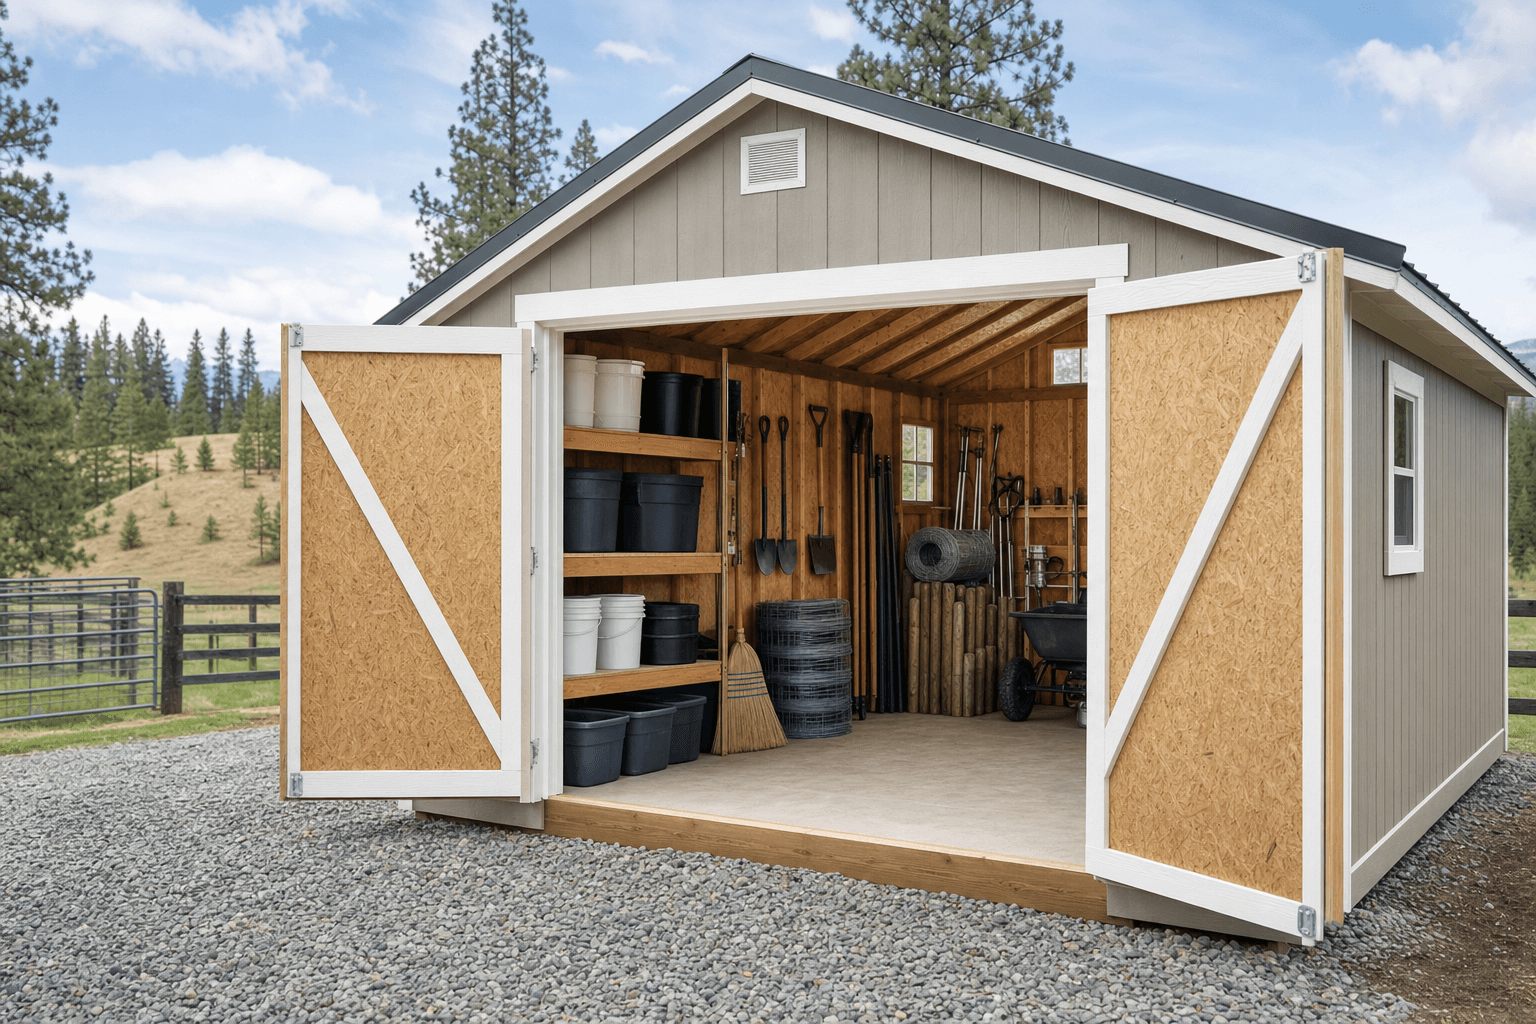
Think of the shed as four working zones instead of one open box, and lay them out so the heavy, dirty stuff stays near the door and the clean, dry supplies sit back and protected. An equipment and implement zone anchors the floor — a clear, durable lane to drive in the tiller, the brush hog, the tractor attachments, and the cart — kept right inside the wide door so you back in and out without threading past everything else. A feed zone runs along one wall with rodent-tight bins or barrels for grain and supplements, off the floor on a pallet so air moves under them and spills sweep up clean. A tool and fencing zone takes the opposite wall with deep shelving, a slat wall, and bins for the fencing materials — staples, clips, wire, a roll of field fence, a bundle of T-posts — so the gear for a quick repair is visible and reachable. And a work zone keeps a bench, a vise, and open floor where you can pull a wheel, sharpen a blade, or splice wire without dragging it into the yard.
Good zoning means the feed never sits where a leaking implement can drip on it, the fencing supplies are not buried behind the tractor, and the bench is clear when a job comes up. Leave a clear drive lane from the door to the implement zone wide enough to back gear straight in, and keep the heaviest, dirtiest equipment closest to the door so it tracks the least mud. Hang the most-used hand tools and fencing gear at eye level over the bench, store the seasonal stuff up in a loft, and keep the floor under the implements open so you can roll a creeper or a jack anywhere you need it.
Deep, rated steel or built shelving and a slat or pegboard wall that carry loaded feed totes, fencing supplies, fluids, and hand tools without sagging, on adjustable standards so you can rearrange the layout as the operation changes.
A sturdy bench with a vise for repairs, blade sharpening, and fence splicing, plus a chest or job box and a tool wall for wrenches, fencing pliers, a grinder, and the spares you reach for during a fast field fix.
A loft or overhead racks for off-season implements, extra fencing, seed and supply stock, and the gear you only touch a few times a year, with long-handle hooks to keep shovels, rakes, and post drivers off the floor.
A floor specced to take a parked implement, a loaded handcart, and daily mud and manure — a tough framed floor on a solid pad, or a concrete slab you can roll across, hose down, and never worry about flexing under the load.
This is where a bare shell becomes a working farm building, and it is worth naming exactly what lives inside so you size the door, the floor, and the shelving around it. The implements and small equipment are the bulkiest anchor and the reason the door is wide: a tiller, a brush hog or mower, a disc or harrow, small tractor attachments, a wheelbarrow and garden cart, a push mower and string trimmer, a chainsaw, a post-hole digger, and a sprayer. Right beside them lives the fencing and field gear — rolls of field fence and barbed or woven wire, a bundle of T-posts and wood posts, a post driver, fencing pliers, a come-along, staples and clips, insulators and a hot-wire charger, and spare gates — the heavy, awkward stuff that earns the wall and a floor corner. Then comes the feed and supply stock: bagged or binned grain and pellets, mineral and supplements, bedding, and totes that keep it rodent-tight and dry.
Around that, you store the consumables and the hand tools that keep the place running. Hand tools and shop gear fill the bench and the tool wall — wrenches, sockets, a grinder, a drill, shovels, rakes, forks, loppers, a sharpener, and bins of bolts and small spares. Fluids and consumables take a planned, separated spot: fuel and oil for the equipment, chain oil, grease, hydraulic fluid, sprayer product, and the chemicals that must stay away from the feed. And the seasonal and bulk stock — seed, fertilizer, extra fencing, irrigation parts, and the supplies you buy ahead — wants a loft or high shelving until the season turns. Naming that full fit-out up front is how you make sure the implement fits, the feed stays dry, and the fence staples are where you left them.

Fencing supplies and the most-used hand tools ride the wall by the bench, so a fast field repair starts with grabbing, not hunting.
| Farm storage shed planning checklist | |
|---|---|
| Wide door & drive-in access | A double or wide overhead-style door and a flat, hard apron outside so you can drive a tiller, a brush hog, or a small implement straight in and back it out without threading past everything else |
| Durable floor for heavy equipment | A floor specced for the weight — a tough framed floor on a solid pad or a concrete slab — that takes a parked implement and a loaded cart, sheds mud and manure, and hoses down clean |
| Flexible, heavy-duty shelving | Deep, rated shelving on adjustable standards plus a slat or pegboard wall, so feed bins, fencing supplies, tools, and fluids can all be carried and rearranged as the operation changes |
| Feed separated and rodent-tight | Rodent-tight bins or barrels off the floor in their own zone, kept away from fuel, chemicals, and treated materials, in a dry, ventilated spot that keeps grain and pellets from molding |
| Ventilation & weatherproofing | Vents and a tight, dry envelope that move out moisture and equipment fumes, keep feed and tools dry through North Idaho wet and freeze, and stop condensation from rusting the gear |
| Security | Solid doors with quality locks and protected hinges, plus an option for a motion light, an alarm, or a camera to protect implements, power tools, and feed on a rural property |
Power, airflow, and a dry envelope decide whether the shed keeps your gear ready to work or just holds rusty equipment and moldy feed. A farm building earns real wiring: dedicated 120V outlets along the bench and walls for a battery charger, a grinder, a drill, a trickle charger on a mower battery, and a heater for the work area, plus bright shadow-free LED light over the bench and the implement lane so you can wrench, sharpen, or load before dawn and after dark through the short winter days. Just as important is ventilation — passive vents low and high, or a fan — because feed and bedding hold moisture, equipment off-gasses fuel and exhaust, and an unvented building grows condensation that rusts tools and molds grain. A few well-placed vents keep the feed dry, the tools clean, and a freshly parked implement from sweating water onto the floor overnight.
North Idaho winters drive the rest. A tight, dry envelope and enough insulation to break the worst of the cold keep stored feed from freezing into a block, keep tools and fluids workable on a cold morning, and stop the daily freeze-thaw swing that drives condensation and rust. Equipment batteries lose cranking power in hard cold, so an outlet for a trickle charger is worth planning, and stored water bursts cheap containers, so keep it protected or drain it for winter. Gear you grab on a cold morning — a chainsaw, a post driver, the fencing kit — lives better in a dry, insulated building than in a damp shed where everything rusts and the feed draws moisture. A vented, dry, well-powered shed is one where the implements start and the tools come off the wall ready to work.
A farm storage building earns a real base and a real approach, because everything about it is heavy and you are driving in and out of it. A compacted gravel pad drains well and works under a properly built framed floor, but if you want a floor you can park a loaded implement on, roll a handcart across, and hose mud and manure off, a concrete slab is worth it — it gives a dead-flat, washable surface that takes the weight without flex and stands up to daily farm abuse. Just as important is a flat, hard apron right outside the wide door, where you line an implement up and drive it straight in instead of fighting a muddy, rutted approach every time. Plan the approach so a tractor and trailer can pull right up off a gravel driveway, and grade the pad so snowmelt, rain, and field mud drain away from the door rather than pooling at the threshold. Read how to prep a shed site before delivery so the pad, the drainage, and the apron are ready for a building this heavy.
North Idaho weather drives several choices. Plan a roof and anchoring rated for local snow load, because a wide farm building carries a lot of roof, and detail the door and threshold so drifting snow does not block you out of your own implements. Keep the gravel approach plowed and passable so you can get a tractor and gear out after a storm, and channel snowmelt and runoff away so the threshold does not ice and the floor does not stay wet. These buildings also tend toward larger footprints with added power, which can trigger local rules: many small sheds skip a permit, but bigger farm buildings, electrical work, and setback or HOA requirements often do not — though agricultural buildings are sometimes treated differently. Confirm what your town and county require on the service areas pages, and factor any electrical permit into the plan before you finalize the size and siting.
Size the door around the widest, tallest implement you own, then add clearance, because the door is the one thing you cannot widen later. A single walk-in door is fine for a supply-and-feed building, but the moment you want to drive in a tiller, a brush hog, a disc, or a small tractor attachment, you need a double door or a wide overhead-style opening and 8-foot-plus headroom so the machine and any raised arms or a roll bar clear the frame. Measure your bulkiest piece — width, height, and how it sits on the cart or the three-point — and build the opening wider than that so you are not jockeying it through every time. Pair the wide door with a flat, hard apron outside so you line the implement up and drive it straight in. Building on-site means the door gets sized for your actual equipment instead of a stock opening, so the big stuff goes in clean.
Farm gear is heavy and the floor takes daily abuse, so spec it for the load and the mud, not for a backyard shed. A tough framed floor built on a solid, well-compacted gravel pad handles a lot, but if you are parking implements, rolling a loaded handcart in and out, and tracking mud and manure every day, a concrete slab is the upgrade that pays off — it gives a dead-flat, washable surface that takes the weight without flexing and stands up to years of farm use. A slab also lets you roll a creeper or a jack anywhere to wrench on equipment and hose the whole floor down when it gets filthy. Whichever you choose, the pad underneath has to be solid and graded to drain, because a heavy building on a soft or wet base is the thing that fails first. Plan the floor around the heaviest thing you will park on it.
Build for change, because a farm's storage needs shift with the season and the herd, and a fixed layout you specced this year fights you next year. Use deep, heavy-duty shelving on adjustable standards or steel racks you can move, rather than shelves nailed in at one height, so you can raise a shelf for taller feed totes, drop one for a row of bins, or pull a section out to park a new implement. Add a slat wall or pegboard so hand tools and fencing gear rehang anywhere in minutes, and keep one stretch of wall and floor open as a flex zone you can re-task. Standardize on stackable totes and bins so the storage scales up and down without a rebuild. Sizing the building with a little room to grow, on shelving you can rearrange, is what keeps it useful as the operation evolves instead of forcing a new shed in three years.
Give feed its own clean zone and keep everything that can contaminate it well away. Store grain, pellets, and supplements in rodent-tight bins or barrels off the floor on a pallet or low platform, along one wall near the door for easy hauling, where air moves under them and a spill sweeps up clean. Keep that feed zone separated from the fuel, oil, chain oil, sprayer products, and any treated or chemical-smelling materials, ideally on the opposite side of the building, so nothing leaks, drips, or off-gasses into what the animals eat. Park leaking-prone implements away from the feed too, and put the fluids on a contained shelf with a drip tray. Ventilation helps the whole building, but separation is what protects the feed. Planning the zones up front — feed here, tools and fluids there, implements down the middle — keeps one rugged building from turning into a contamination problem.
Size it around what you have to park, store, and reach all at once, then leave room to grow. For the supply side of a smaller operation — hand tools, fencing materials, feed bins, and shelving — a 12x16 holds it with a clear lane, but it tightens up fast if you try to park a real implement inside. To park a tiller or a brush hog and a cart while keeping feed and tool zones on the walls and a work area, step up to a 12x20 or 12x24, where the length is what separates a shed you shuffle around in from one you work out of. For a true multi-purpose farm building that holds implements, small equipment, feed, and a full wall of tools and fencing supplies together, a 16x24 gives you a drive-through or side-by-side lane plus deep storage on both walls. Building on-site means the footprint and the layout get matched to your implements and your stock instead of a stock plan.
Treat weather and security as part of the build, because a farm shed sits out in North Idaho wet, snow, and cold and holds a lot of value on a property set back from the road. For weatherproofing, build a tight, dry envelope with good vents low and high so feed and tools stay dry, condensation does not rust the equipment, and fumes clear out, and plan a roof and anchoring rated for local snow load with a threshold detailed so drifting snow does not block the door. Enough insulation to break the cold keeps feed from freezing and tools workable on a cold morning. For security, start with solid doors, quality locks, and protected hinges, add a motion light over the door and the apron, and consider an alarm or a camera, since implements, power tools, chainsaws, and feed are all worth protecting. You can lock the most valuable tools in a cabinet or a job box inside. Building on-site lets you spec the envelope, the vents, the door, the locks, and the wiring from the start.
A farm storage shed in North Idaho serves a different workload than a residential storage building. Implements, ATV equipment, and bulk supplies cycle in and out seasonally under time pressure — during spring ground prep, mid-summer irrigation work, and fall harvest. The building needs wide doors, a floor that takes the weight of heavy equipment without cracking, and enough interior height to clear a loaded tractor bucket or a raised UTV bed. A farm storage shed built on site is framed to the actual clearances the equipment requires, not to a catalog standard.
Kootenai County farmland sits at elevations where snow accumulation is real and roof loads are not trivial. A structure built to residential-grade engineering for local snow loads carries that weight safely through a North Idaho winter, year after year. Delivered metal buildings sized for southern markets sometimes underspec for the loads common here — a discrepancy that shows up as deflection or fastener fatigue after a few winters.
Rural properties in Coeur d'Alene's east county and out through Rathdrum, Hauser, and Athol routinely have soft ground, seasonal standing water, and approach roads that cannot accommodate a crane or flatbed. On-site construction uses a compacted gravel pad and treated-sill framing that lifts the floor off ground contact, then builds around whatever the approach looks like — fence lines, existing buildings, grade changes.
Zoning for agricultural buildings varies between Kootenai County unincorporated land and city limits. County agricultural parcels often have more permissive setbacks and size allowances than in-city lots. See finished farm and utility buildings for scale reference, or run a footprint in the configurator before committing to a final size.
Tell us what you run, what you store, and what has to fit through the door, and we will help spec the wide access, the durable floor, the feed and tool zones, the flexible shelving, and the site prep around your property — then you can build and price it online.
Keep planning your build with related North Idaho shed guides.