A welding shed is one of the few backyard buildings where the plan has to start with fire. You will strike an arc that throws sparks ten feet, run a torch that cuts steel, and store compressed gas under pressure in the same room — so a welding shop is not a storage shed with an outlet added later. It is a building designed around heat, fumes, and power from the first sketch. This guide walks through how to plan a real metal fabrication shop for a North Idaho property: how to build it fire-resistant, how to wire it for a 240V machine, how to clear the smoke, and how to lay out a steel table, a non-combustible floor, and safe cylinder storage so the work is clean and the shop does not become a hazard. Start with the welding and metal fabrication shop spec, not a generic shed, and the rest of the plan falls into place.
North Idaho On Site Sheds builds every welding shed on your property, so the layout can answer to your real grade, your power drop, and where sparks and exhaust will actually go relative to the house, the trees, and the fence line. Decide up front whether this is a hobby fab corner or a full working shop, because that single choice drives the wall and floor materials, the size of the electrical service, and how hard the ventilation has to work. Get fire safety, power, and air right first; the bench layout and tool storage are the easy part once the shell is built to take the heat.
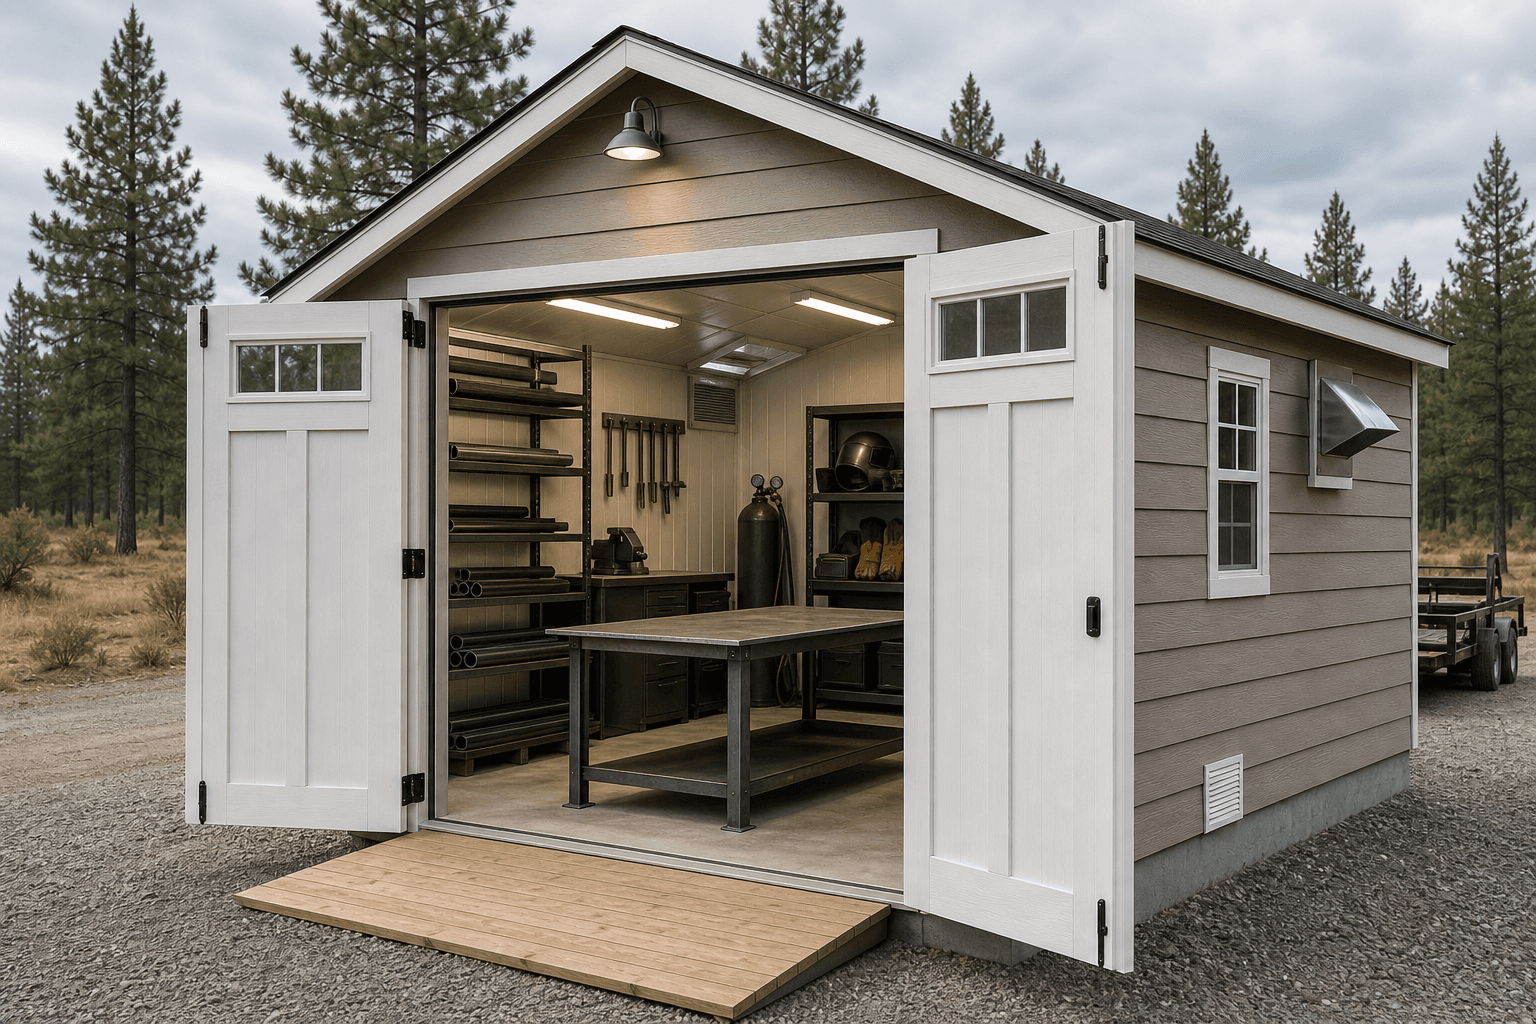
A welding shop starts with the shell: fire-resistant surfaces, heavy power, and a way to clear the smoke before the first arc.
A welding shop wants volume, ventilation, and non-combustible surfaces more than charm, so favor the build that gives you headroom and air. A standard gable with taller sidewalls is the honest starting point — the high ridge lets smoke and fumes rise away from your face, gives room for an overhead exhaust hood, and keeps a hot ceiling well clear of the arc. A stick-built shop layout lets you line the walls behind the welding zone with cement board or steel sheet instead of bare wood, which is the single most important fire detail in the building. A lean-to or single-slope sheds North Idaho snow to one side and gives you a tall wall to mount a fume extractor and a row of windows for cross-ventilation. Skip a tight, low-ceiling barn loft directly over the weld zone — you do not want stored material baking above an open flame.
If you also grind, paint, run a plasma cutter, or build with wood as well as steel, a welding shed sits right next to a flexible maker space shed and overlaps a serious backyard workshop — the difference is that the welding build plans the fire-resistant surfaces and heavier ventilation from the start. A pro who hauls a portable welder, gas bottles, and steel stock between job sites may want it paired with a contractor tool crib so the rig, the cylinders, and the consumables all lock up in one secured, fire-aware building. Decide whether steel fabrication leads or mixed making leads, because that choice sets your wall lining, your floor, and your air handling.
A 12x16 holds a steel welding table, a 240V welder, a grinder station, and a small cylinder rack with safe clearance to a fire-rated wall.
A 12x20 or 14x20 adds room for a chop saw and metal bandsaw, a stock rack of long steel, and an overhead fume hood over the table.
A 16x24 fits a full machine lineup, a layout table, trailer or gate fabrication room, and clear non-combustible aisles around hot work.
Footprint matters more in a welding shop than almost anywhere, because hot work needs clearance — sparks and slag travel, and you never want them landing on a gas hose, a fuel can, or a combustible wall. A 12x16 is a workable hobby fab corner with a table, a welder, and a grinder, as long as you keep a fire-rated zone around the arc. Step up to a 12x20 or 14x20 and you gain length for a horizontal metal bandsaw or chop saw with an infeed runout, a stock rack of long steel and tube, and a real spark-safe buffer between the welding table and anything that can burn. The extra width on a 14-foot building is what lets you swing an 8-foot length of angle iron without sweeping it across a cylinder or a wall. If you fabricate gates, trailers, or large weldments and want to roll a project all the way around it, size up to a 16x24 so the hot zone, the layout table, and the storage each get their own clear, non-combustible footprint. In a welding shop, the clearance you build in is a fire-safety feature, not wasted floor.
These overlap, and the right call comes down to whether open flame and hot metal are central to the work. A backyard workshop is built for woodworking and projects — it favors wall height, dust collection, and outlets, but its plywood-lined walls and sawdust are exactly what you do not want around a welding arc. A welding shed flips the priorities: non-combustible wall lining behind the arc, a non-combustible floor, heavy 240V power, and fume extraction come first, and tool storage works around them. A flexible maker space shed is the move when steel fabrication shares the room with wood, electronics, or 3D printing, because it plans separate zones and the ventilation for mixed, sometimes-hot work.
Plenty of buyers want one building that welds, grinds, and builds, and that works — as long as fire safety leads the spec. If you weld and cut metal regularly, build a welding shed and add a project bench; if woodworking leads with the occasional repair, a workshop with a small, well-isolated weld corner may be enough. For a tradesperson, pairing the shop with a secured contractor tool crib keeps the welder, the cylinders, the leads, and the consumables locked and organized between jobs. Name the fire-and-metal priority up front, and it sets your wall and floor materials, your circuits, and your air handling before the walls go up.
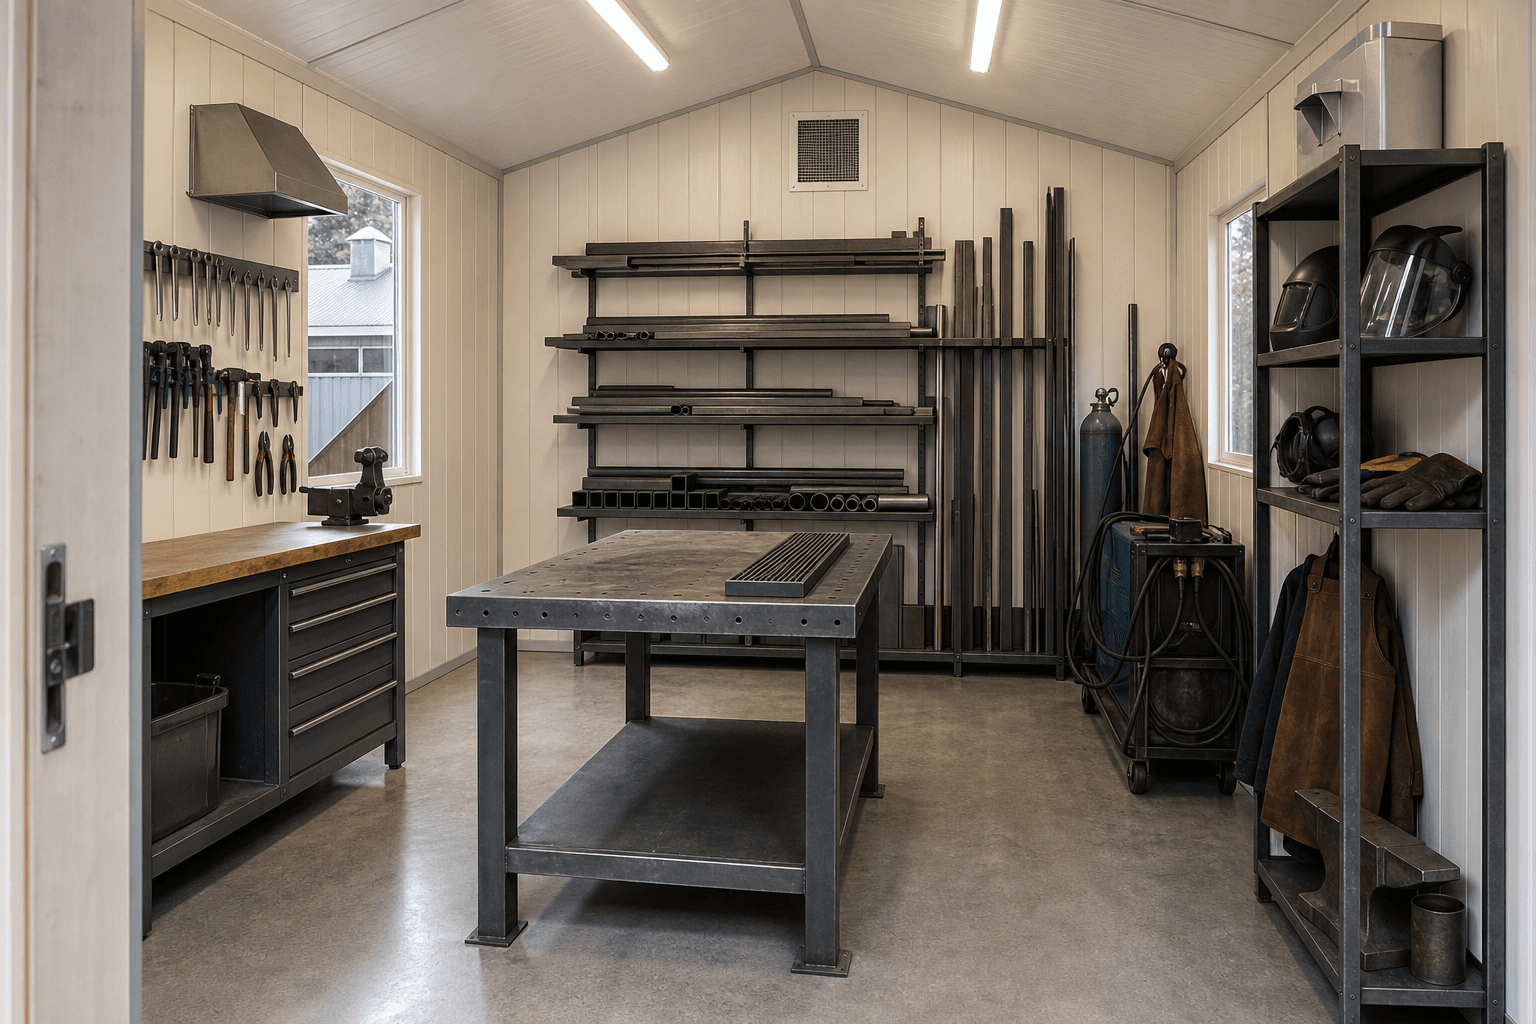
Zone the shop around the arc: a steel table under an exhaust hood, fire-rated walls behind it, and cylinders chained clear of the heat.
Think of a welding shop as four zones organized around one hot center, and separate the heat from everything that can burn. The welding zone is the protected core: a heavy steel table centered under an overhead fume hood, with fire-resistant wall lining behind it and a clear, non-combustible floor beneath and around it. The cutting and grinding zone sits a few feet away with the chop saw, the bandsaw, and the bench grinder, angled so the shower of sparks throws toward a bare wall or a steel screen, never toward gas or stock. A stock and storage zone holds the steel rack, the tooling, and the consumables, kept back from the arc so sparks never reach raw material. A gas storage zone parks the cylinders upright, chained to the wall, capped when idle, and positioned away from the heat and ideally near a doorway for quick removal.
Good zoning in a welding shed is literally a fire break: it means a spark from the grinder never finds a torch hose, and the cylinders never sit in the line of slag. Keep a clear, swept path between the table and the door so you can carry a hot part out or get a cylinder clear fast, and mount the fire extinguisher — an ABC and ideally a CO2 unit for electrical and metal fires — right by the exit where you can reach it without crossing the hot zone. Leave a few feet of bare, fire-rated buffer around the welding table, and the shop stays safe even on a busy day with the arc running and the grinder throwing sparks.
A thick steel-top fabrication table with a flat, gridded surface for clamps and fixtures gives you a non-combustible work surface and a solid ground for the machine.
Line the weld zone with cement board or steel sheet over the studs, and add weld curtains or a steel screen to block UV flash and stray sparks from the rest of the shop.
A cantilever rack keeps long bar, tube, and angle off the floor and sorted, while metal cabinets and a tool chest store grinders, clamps, and consumables out of the spark path.
A wall-anchored cylinder rack holds gas bottles upright and chained, and an overhead hood or portable fume extractor pulls weld smoke away from your breathing zone.
This is where a fire-rated shell becomes a working fab shop, and it is worth naming exactly what lives inside so you size the power, the floor, and the ventilation around it. The welding machine anchors the room — a MIG welder for fast steel fabrication, a TIG welder for clean aluminum and stainless work, or a stick (arc) welder for heavy outdoor repairs, often with a multiprocess unit covering all three. Beside it run the metal-cutting and prep tools: a chop saw or abrasive cut-off saw, a horizontal metal bandsaw, an angle grinder and bench grinder for cleanup, a drill press, and a plasma cutter for fast freehand cuts. A steel welding table with clamps, magnets, and fixtures is the heart of the layout.
Around the machines you store the consumables and the gas that make hot work go, and every one of them needs a fire-aware home. Shielding-gas cylinders — argon, CO2, or an argon mix for MIG, plus oxygen and acetylene for a cutting torch — stand upright, chained, and capped on a dedicated rack away from the arc. Stock the racks with mild steel, tube, angle, flat bar, and sheet, plus spools of MIG wire, boxes of stick electrodes, TIG filler rod, and grinding and cut-off wheels kept dry. Round it out with the safety kit that a welding shop cannot run without: an auto-darkening helmet, leather jacket and gloves, fire-resistant welding blankets, a metal slag bucket, a quench bucket of water, and a fire extinguisher rated for the work. A secured tool crib layout keeps the leads, the regulators, and the consumables locked, organized, and clear of the spark zone between jobs.

The details that keep a welding shop safe: cylinders chained upright and capped, steel stock racked, and leads off the floor.
| Welding shed planning checklist | |
|---|---|
| Fire-resistant build | Cement board or steel sheet lining behind the weld zone, a non-combustible floor, and clear buffer space around the arc |
| Power | A subpanel from the house with a 240V circuit (often 50A) for the welder plus 120V circuits for grinders, lights, and the extractor |
| Ventilation | An overhead fume hood or portable extractor over the table, plus operable windows or a wall fan for cross-ventilation |
| Gas storage | A wall-anchored rack with cylinders upright, chained, and capped when idle, sited away from the heat and near a door |
| Flooring | A bare concrete slab or fire-rated, non-combustible floor — never wood or vinyl under the welding and cutting zone |
| Fire safety kit | An ABC and CO2 extinguisher by the door, welding blankets, a slag bucket, and a swept, combustible-free hot zone |
Three things make a welding shed safe to use, and all three are cheaper to build in now than to retrofit. First, fire-resistant construction: line the studs behind the welding and cutting zone with cement board or steel sheet so a stray arc or a shower of slag meets a non-combustible surface instead of bare framing, keep a clear buffer of a few feet around the table, and store nothing flammable — fuel, solvents, paint, sawdust, or rags — anywhere a spark can reach. Second, power: a welder is a heavy load, so plan a subpanel fed from the house with a dedicated 240V circuit, commonly 50 amps for a mid-size MIG or multiprocess machine, plus 120V circuits for grinders, the fume extractor, and lighting on their own breakers. Size the service for the biggest machine you will run, because adding a 240V circuit after the walls are closed and lined is exactly the work you want to avoid in a fire-rated room. This kind of dedicated 240V service is what a true welding and fabrication build is meant to support.
Third, ventilation, which protects your lungs as much as the building protects against fire. Welding fumes — especially galvanized steel, stainless, and flux-cored work — are genuinely hazardous to breathe, so plan to pull the smoke away at the source. An overhead fume hood or a portable fume extractor with an articulating arm captures smoke right at the arc, while operable windows, a louvered vent, or a wall-mounted exhaust fan give you cross-ventilation to clear the room. Position the intake low and the exhaust high so air sweeps up and out the way smoke naturally rises. Pair the extraction with bright, even LED lighting so you can see the puddle and the part clearly, and add a heat source — a mini-split or a clearance-rated heater placed well away from gas and flammables — so the shop is usable through a North Idaho winter without crowding a flame against anything that burns.
A welding shop is heavy and it generates heat, so it earns a real floor and a smart location. A concrete slab is the right answer under a welding and cutting zone — it is non-combustible, carries the weight of a steel table and machines, gives a dead-flat surface to roll big weldments across, and takes anchor bolts for the table and the cylinder rack. A bare gravel pad alone will not do for the hot zone; if you build over gravel, the welding area still needs a non-combustible floor surface. Plan the approach so a heavy welder, a bundle of steel, or a fabricated gate can come straight off the truck and through wide doors. Read how to prep a shed site before delivery so the pad, drainage, and access are ready.
North Idaho weather and local rules both shape the plan. Build the roof and anchoring for local snow load, insulate so the shop holds heat through a long freeze without you having to crowd a heater against flammables, and keep the gravel driveway and doors plowed so you can move steel and clear cylinders after a storm. Site the shed so sparks, slag, and exhaust vent away from the house, the fence, dry grass, and the pine that surrounds many local lots — a serious consideration during fire season. Welding sheds also tend toward larger footprints and added electrical service that can trigger local requirements: many small sheds skip a permit, but bigger buildings, a 240V subpanel, and setback or HOA rules often do not. Confirm what your town and county require on the service areas pages, and factor any electrical permit into the plan before you finalize the size and where the shop will sit.
Start by lining the studs behind the welding and cutting zone with cement board or steel sheet so a stray arc or shower of slag meets a non-combustible surface instead of bare wood. Keep a clear buffer of a few feet of bare, fire-rated floor and wall around the table, and store nothing flammable — fuel, solvents, paint, sawdust, or rags — anywhere a spark can reach. Add weld curtains or a steel screen to contain UV flash and sparks, keep an ABC and a CO2 extinguisher by the door, and never weld directly under a low combustible loft.
Almost certainly yes. Most MIG, TIG, and multiprocess welders run on 240V, so plan a subpanel fed from the house with a dedicated 240V circuit — commonly 50 amps for a mid-size machine, more for a heavy stick welder or plasma cutter. Add separate 120V circuits for grinders, the fume extractor, and lighting so the welder is not sharing a breaker. Size the service for the biggest machine you will run, since adding a 240V circuit after the fire-rated walls are lined is exactly the work you want to avoid. Detached-building wiring usually needs a permit.
Capture the smoke at the source and give the room a way to clear. Welding fumes — especially from galvanized steel, stainless, and flux-cored wire — are hazardous to breathe, so plan an overhead fume hood or a portable fume extractor with an articulating arm right over the welding table. Back it up with cross-ventilation: operable windows, a louvered vent, or a wall-mounted exhaust fan, with low intake and high exhaust so air sweeps up and out the way smoke rises. Good ventilation is a health requirement in a welding shop, not an upgrade.
Store every cylinder upright and chained to a wall-anchored rack so it cannot tip, with the valve cap on whenever the bottle is not in use. Keep oxygen and fuel gases like acetylene separated per safe practice, site the rack away from the welding heat and any open flame, and ideally near a doorway so a bottle can be moved out quickly in an emergency. Never store cylinders lying down or loose on the floor, and keep them clear of the spark and slag path from the grinder and the torch.
Use a non-combustible floor under the welding and cutting zone — a bare concrete slab is the standard, since it shrugs off sparks and slag, carries the weight of a steel table and machines, and takes anchor bolts. Never run wood, vinyl, rubber mats, or carpet under the arc, because hot slag will scorch or ignite them. If you build over a gravel pad, the hot zone still needs a concrete or fire-rated surface. A bare slab also gives you a clean electrical ground and a flat surface to roll heavy weldments across.
Size around the table, the spark clearance, and the steel you handle. A 12x16 fits a hobby fab corner — a steel welding table, a 240V welder, a grinder, and a small cylinder rack with a fire-safe buffer. A 12x20 or 14x20 adds a chop saw or metal bandsaw with runout, a stock rack of long steel, and an overhead fume hood. If you fabricate gates, trailers, or large weldments and want to walk fully around a project, a 16x24 gives the hot zone, the layout table, and storage each their own clear, non-combustible footprint.
A welding shed has to be right from the foundation up — non-combustible floor, 240V service roughed in during framing, and fume exhaust positioned where it actually draws. Getting those elements correct in a delivered or kit shed usually means cutting in after the fact. When the shed is built on site, the electrical conduit path, exhaust penetration location, and floor slab or concrete anchor points are all planned before a single wall goes up.
North Idaho winters introduce a specific welding problem: metal surfaces in an unheated bay reach ambient temperature overnight, and cold steel doesn't take a weld the same way warm steel does. Coeur d'Alene and Post Falls welders who work through winter need an insulated envelope and a reliable heat source — both of which are straightforward to include during an on-site build but awkward to retrofit.
Kootenai County permit requirements apply to structures with electrical service and over certain square footages. Because NIOS builds within the local permit framework by default, a welding shed that needs a sub-panel or dedicated ground rod gets treated correctly from the start rather than discovered as a problem during a later inspection.
See the pricing page for structure and option costs, browse shop builds for real examples, or start a free estimate for your Post Falls, Hayden, or Coeur d'Alene property.
Tell us the welder you run, the gas you store, and where sparks should vent on your property, and we will help size the building, the fire-resistant build, the 240V power, and the ventilation — then you can build and price it online.
Keep planning your build with related North Idaho shed guides.