If you live on a forested lot in the North Idaho wildland-urban interface — up a gravel driveway in the pines near Coeur d'Alene, out in the Kootenai County foothills, or anywhere the timber runs right up to the yard — fire is part of the planning, not a someday worry. The summers that bury the Panhandle in smoke are the same summers that put crews on the fire lines, and the buildings that survive an ember storm are almost never the ones that got lucky. They are the ones built to resist ignition, sited inside a cleared defensible space, and detailed so wind-blown embers find nothing to catch. A purpose-built wildfire-readiness shed does two jobs at once: it is itself an ignition-resistant outbuilding that won't become a torch next to your home, and it is the staging point for the gear that lets you defend the property or leave it fast — the go-kits, the hand tools, the pump and hoses, and the irreplaceable valuables you can't lose.
What separates a real wildfire-ready building from an ordinary storage shed is the order the decisions get made in. You don't bolt fire safety onto a finished box; you design the shell, the roof, the vents, and the siting for embers and radiant heat first, then fit the inside out around evacuation and defense. Get that order right and you have a hardened structure that protects your tools and documents through a smoke season, gives you a calm place to grab a packed kit and go, and quietly raises the fire resilience of the whole parcel. Get it wrong and you have a wood-sided, open-vented shed full of fuel cans sitting in the dry grass — the exact thing that carries fire from the treeline to the house. This guide leads with what actually matters in a wildfire: ignition-resistant construction and defensible-space siting, then ember-resistant details, interior zones for go-kits and fire tools, protecting valuables, and how we build the structure on your property so it's ready to harden and stock. If you'd rather see options priced first, you can build and price a layout in a few minutes.
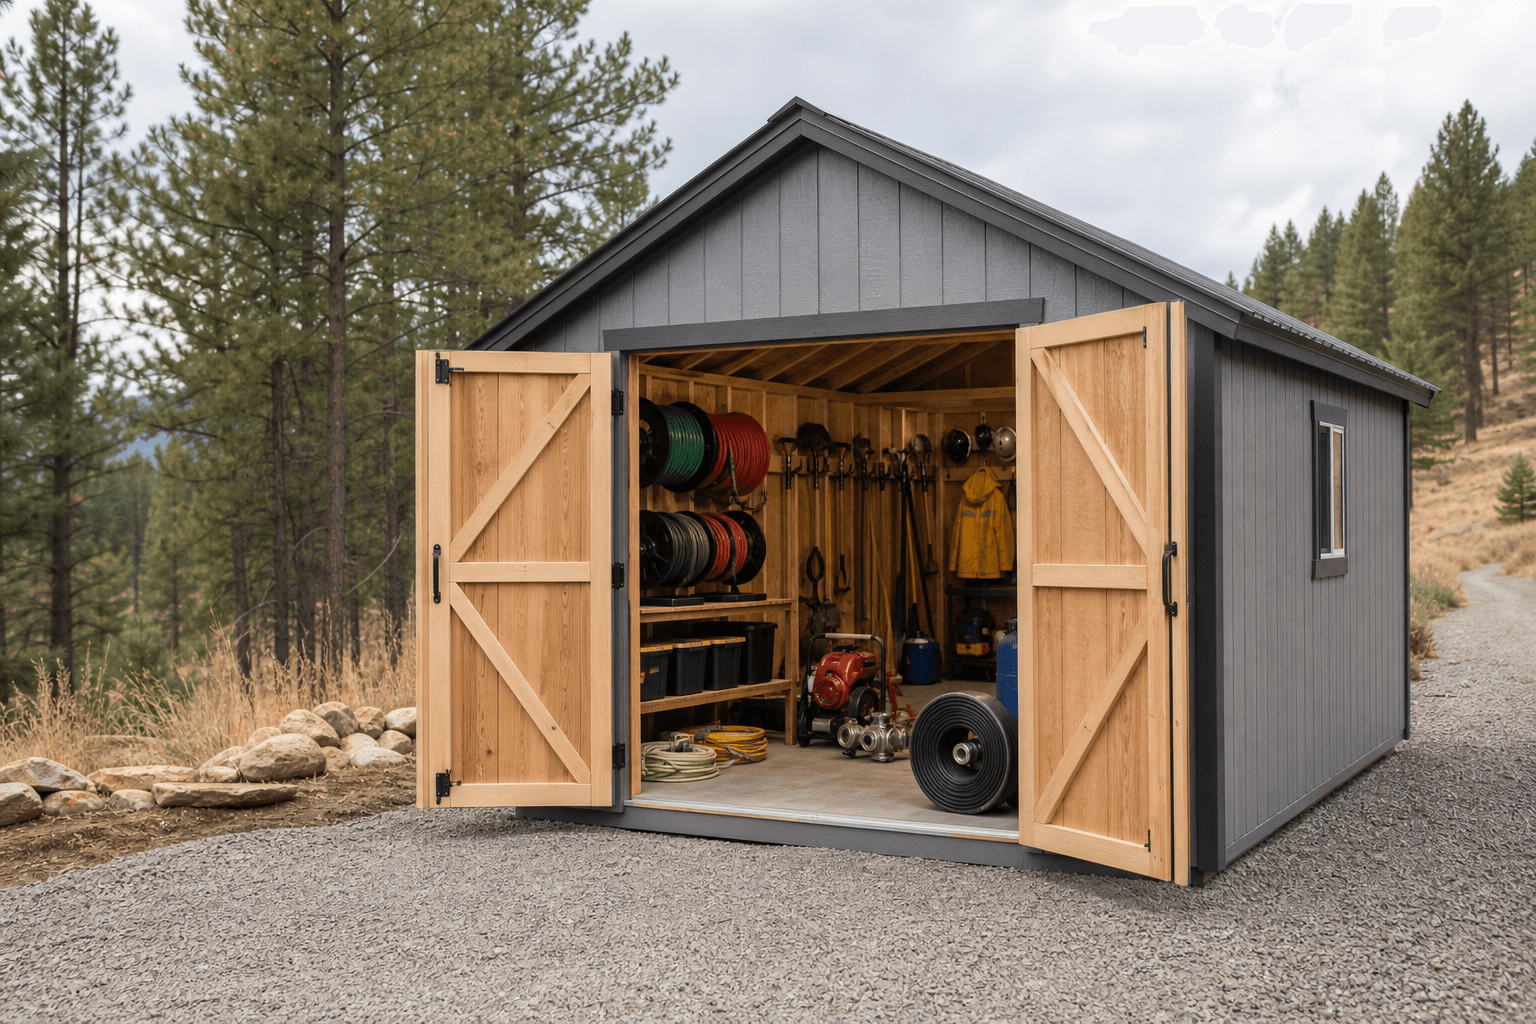
A wildfire-ready shed leads with the build and the siting — non-combustible roof and siding, ember-screened vents, and a cleared, gravel buffer between it and the trees.
A wildfire-ready shed is less about the silhouette and more about what every surface is made of and how few places an ember can lodge, so the roofline is really a decision about shedding embers, shedding snow, and keeping the details simple. A standard gable is the natural starting point: a clean, steep, metal-roofed peak sheds both North Idaho snow and the embers that rain ahead of a fire, the simple roof-to-wall lines give you fewer crevices to seal, and the straight walls take fiber-cement or other non-combustible siding without complicated trim. A lean-to or modern single-slope keeps the profile low and the surfaces flat, which means fewer valleys and corners where pine needles and embers collect — a good fit when you want the building tucked into a cleared bench with a metal roof shedding to one side. What you generally steer away from is anything with deep, complex eaves, open soffits, or fussy ornamental trim, because every overhang and gap is a place embers gather and a place flame can reach the structure.
Whatever the roofline, the parts to spec up are the roof covering, the siding, the eaves and soffits, the vents, and the under-floor gap — the five places a shed catches fire in an ember storm. Treat the building as a hardened envelope: a Class A metal or other non-combustible roof, ignition-resistant walls, boxed or screened eaves so embers can't lodge under them, ember-resistant vent screening, and a sealed or non-combustible skirt so nothing blows or piles under the floor. The same hardening logic carries into the readiness buildings you'll often pair with it. An emergency-preparedness shed shares the harden-and-stock mindset on a broader scale — water, food, fuel, and supplies for any disaster — while a clean-air shed is the sealed, HEPA-filtered companion that keeps the indoor air breathable when the smoke from those same fires settles into the valley for weeks. A wildfire-ready shed is the building that hardens the structure itself and stages the fire response; the others extend the plan.
An 8x12 holds packed go-bags, water and a document safe, and a wall of hand tools — shovels, rakes, a chainsaw, and fire swatters — so the whole household's grab-and-go kit and the basic defense gear live in one hardened spot.
A 10x12 or 10x16 adds room for a fire pump, lengths of hose, a water store, fuel in a vented locker, and PPE, so you can stage a real wet-down setup alongside the evacuation kits without anything crowding the door.
A 12x16 gives you a hardened room for fire tools, pump and hoses, fuel, go-kits, and a protected zone for documents, electronics, and irreplaceables, with a clear aisle to load a vehicle fast when the order comes.
Footprint here is set by two things at once — the evacuation supplies for your household and the fire tools you'll stage — so size to the kits plus the defense gear plus a clear path to the door, not to the bare shelf space. An 8x12 is the compact wildfire-ready shed: it takes the whole household's packed go-kits, a water and document store, and a wall of hand tools for clearing and knockdown, with room to grab a bag and step out fast — the right call when the building is mainly a hardened cache and staging point. A 10x12 adds the floor and wall space for a fire pump, coiled hose, a larger water store, and PPE, so you can stage an actual wet-down kit next to the evacuation supplies. A 10x16 gives that same setup a real working aisle plus a vented fuel locker and a tool bench, so the pump fuel, the saw, and the hand tools each get their own spot away from the kits. If you want one hardened building to carry the full plan — fire tools, pump and hoses, fuel, go-kits, and a protected zone for valuables and records — step up to a 12x16 so each job gets its own area and a vehicle-loading path stays open. When the choice is close, size up one footprint: in an evacuation you want to move through the building fast, and a crowded shed is one you can't load in a hurry.
These buildings all belong to a resilient North Idaho property, but they lead with different jobs, and naming the lead use keeps you from a building that fights its own purpose. A wildfire-readiness shed leads with fire resilience: it is a hardened, ignition-resistant structure inside a defensible space, built so embers and radiant heat find nothing to catch, and stocked specifically for the two outcomes of a fire — defending the property with pump, hoses, and hand tools, or leaving it fast with packed go-kits and your irreplaceables. Everything about it answers the fire: the roof, the siding, the vents, the siting, and the gear inside. An emergency-preparedness shed leads with broad readiness: it is the building that holds water, food, fuel, first aid, and supplies for any disaster — fire, ice storm, long outage, or quake — so it is sized and shelved for weeks of stock rather than tuned to ember exposure. Many forested properties build both and let them overlap: the wildfire shed hardens the structure and stages the fire response, the prep shed carries the deeper supplies, and a packed go-kit lives in whichever is closest to the vehicle.
A generator shed is the other natural neighbor, because a wildfire and the windstorm that often comes with it are exactly when the power drops — and a generator is what keeps a well pump, and therefore your fire-defense water, flowing when the grid fails. The distinction is what each building is built around: a generator shed is designed to breathe and vent its exhaust safely around a running engine, the opposite of a sealed cache, so you keep it as its own structure and wire it to the well and the house rather than tucking the engine in with the go-kits and the fuel. Decide which job each building leads with — fire resilience, broad supplies, or backup power — and harden and site each for its own role first, then connect them so the water, the supplies, and the power all hold when a fire runs through the valley. That order locks in your ignition-resistant build, your defensible-space siting, and your interior zones before the framing is set.
Lay the inside out for two outcomes at once: defend with pump, hose, and hand tools, or grab the go-kits and irreplaceables and leave fast.
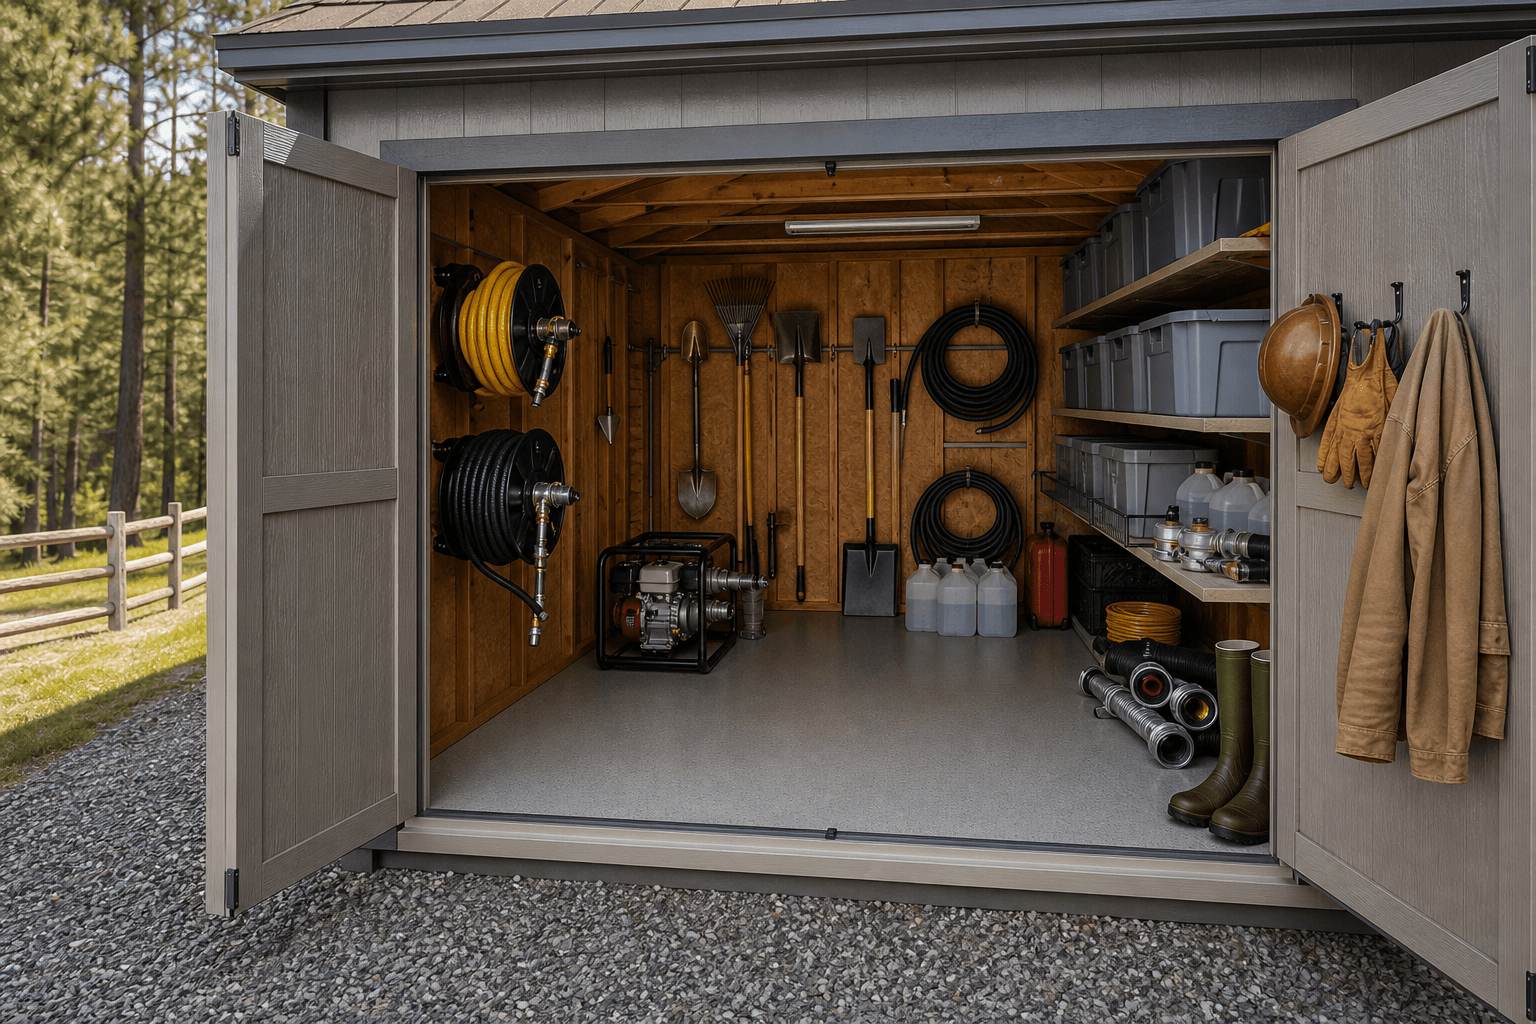
Think of a wildfire-ready shed as one hardened room organized around how a fire day actually unfolds — you either fight it or you leave, often deciding in minutes — so every zone has to be reachable fast and clearly separated. A go-kit zone sits closest to the door: packed go-bags for each person and pet on labeled hooks, a grab tote of documents and medications, car keys and chargers, and a written evacuation checklist on the wall, so an evacuation order means grabbing and walking, not searching. A fire-tool zone takes a wall rack: shovels, McLeods, rakes, a chainsaw and bar oil, loppers, a fire swatter, a backpack pump, and gloves and goggles, all hung so you can pull what you need without untangling a pile. A water-and-pump zone anchors the defense side: a fire or transfer pump, coiled lengths of hose with the fittings to reach the roof and the perimeter, nozzles, and a water store or the connection to your tank or pool, kept on a drainable floor.
A fuel zone gets its own separated, ventilated corner or an external lean-to locker — pump gas, chainsaw mix, and propane kept away from the kits, the documents, and any ignition, because fuel stored loosely is the one thing that turns your safety shed into a hazard. A valuables zone takes the most protected interior spot, ideally a fire-resistant safe or a sealed cabinet, for passports, deeds, hard drives, photos, and small heirlooms that can ride out a near miss or be loaded in seconds. Leave a clear loading aisle straight from the valuables and go-kit zones to the door wide enough to carry totes and reach a vehicle without stepping over anything. Crowding is the enemy here in a way it isn't in an ordinary shed: in a fire you are moving fast, sometimes in smoke, possibly at night, so plan the room as labeled zones with an open path, not a packed closet you'd have to dig through when seconds count.
A Class A metal or other non-combustible roof, fiber-cement or ignition-resistant siding, boxed or screened eaves, and a non-combustible skirt under the floor, so wind-blown embers and radiant heat find nothing to catch on the building itself.
Fine non-combustible mesh — roughly 1/8-inch — over every vent, soffit, and opening, weather-sealed doors with tight thresholds, and no gaps under the eaves or floor, so the embers that ride ahead of a fire can't get inside and ignite the contents.
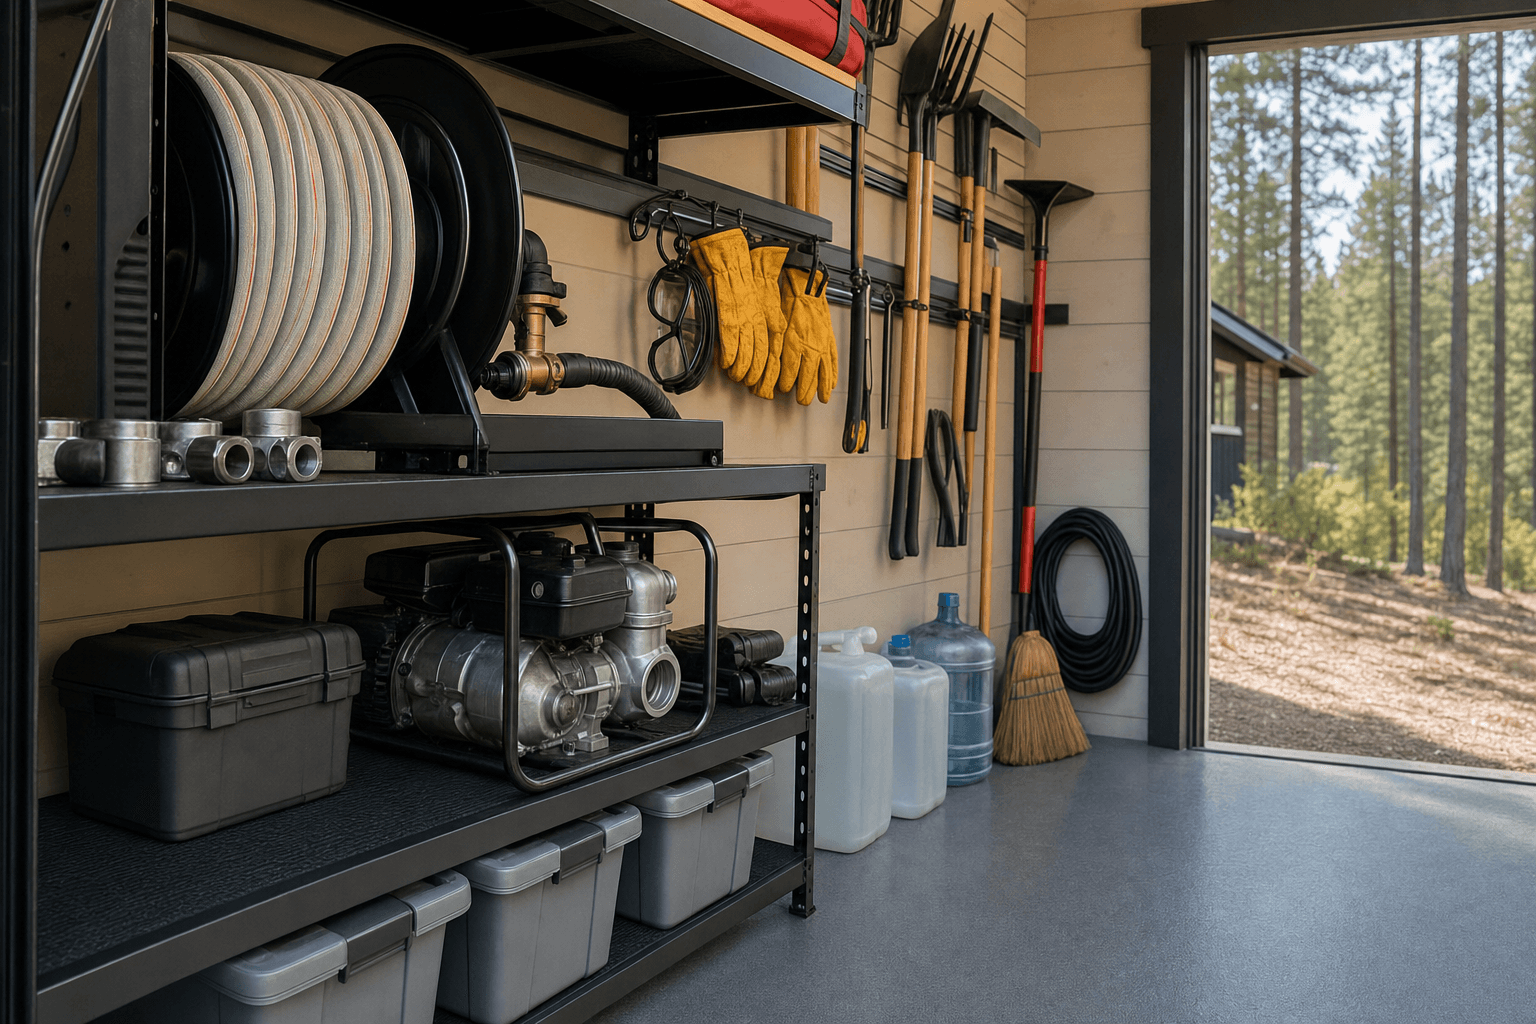
A wall rack for shovels, rakes, a chainsaw, and swatters, plus a fire pump, coiled hose, nozzles, and a water connection on a drainable floor, so a real wet-down and clearing setup is ready to grab the moment a fire approaches.
Labeled hooks for each person's and pet's go-bag, a grab tote for documents and medications, and a fire-resistant safe or sealed cabinet for deeds, passports, drives, and irreplaceables, all on a clear path to load a vehicle in seconds.
This is where a hardened shell becomes a working wildfire-readiness shed, and it is worth naming exactly what goes inside so you size the zones, the racks, the fuel storage, and the loading path around real gear. The evacuation side comes first because it sets the door-side layout: go-bags for each person and pet with clothes, water, food, flashlights, batteries, a radio, cash, copies of IDs, and chargers; a grab tote of original documents, medications, glasses, and pet supplies; car keys, a printed evacuation route and checklist, and N95 masks for the smoke; and a clearly labeled spot for each so nothing gets left in the rush. The defense side sets the working zone: a fire or transfer pump, lengths of hose with the fittings and nozzles to wet the roof and the perimeter, a water store, tank tap, or pool draft connection, a backpack pump and fire swatters, and hand tools — shovels, McLeods, rakes, loppers, a chainsaw with bar oil and a spare chain — for cutting line and clearing fuel.
Around those run the PPE and fuel that make a stand survivable and safe: leather gloves, goggles, a hard hat, boots, and N95 or better masks, plus pump gas, chainsaw mix, and propane kept in a vented fuel locker with a spill tray and a fire extinguisher, separated from the kits and the documents. The valuables side is the quiet, irreplaceable inventory: passports, deeds, titles, insurance papers, hard drives and backups, photos, heirlooms, and a household inventory for claims, stored in a fire-resistant safe or a sealed cabinet in the most protected corner. The hardware that makes it all work in a hurry is simple but specific: labeled hooks and bins so every kit has a home, a wall rack so tools come off in one motion, a drainable floor under the pump and fuel, a fire-resistant safe bolted in place, and a clear aisle to the door. Get the hardening, the zones, the fuel separation, and the loading path right and a small box becomes the building that lets you defend the property or leave it fast — and protects what you can't replace either way.
The details that decide it: fine non-combustible mesh over every vent, a fire-resistant safe for records, and labeled go-kits and hose staged to grab in seconds.
| Wildfire-readiness shed planning checklist | |
|---|---|
| Ignition-resistant construction | A Class A metal or other non-combustible roof, fiber-cement or ignition-resistant siding, boxed or screened eaves, and a non-combustible skirt under the floor, so embers and radiant heat find nothing on the building to catch |
| Ember-resistant vents & details | Fine non-combustible mesh of roughly 1/8 inch over every vent, soffit, and opening, weather-sealed doors with tight thresholds, and no gaps under the eaves or floor, so wind-blown embers can't get inside and ignite the contents |
| Defensible-space siting | The building set inside a cleared, irrigated, or gravel buffer well back from the treeline, with pine needles, dry grass, woodpiles, and brush kept clear of the walls and roof, so flame and radiant heat can't bridge to it |
| Go-kit & evacuation storage | Labeled hooks and a grab tote near the door for each person's and pet's go-bag, documents, medications, masks, keys, and a written checklist, on a clear aisle so an evacuation order means grab and load, not search |
| Fire tools, pump & fuel | A wall rack for hand tools, a fire pump, hose, and nozzles on a drainable floor with a water connection, and a separated, vented fuel locker with a spill tray and extinguisher, kept away from the kits and documents |
| Protected valuables | A fire-resistant safe or sealed cabinet bolted in the most protected corner for deeds, passports, drives, photos, and irreplaceables, plus a household inventory for insurance, all reachable to load fast |
A wildfire-ready shed has to function in the worst conditions — power out, wind up, smoke thick, possibly at night — so the power and light deserve real planning rather than an afterthought. Run wired light and outlets if you can, but back them up the way a fire day demands: battery and solar lanterns, headlamps, and a power bank that work when the grid is down, because the outages that matter most arrive with the fire and the windstorm. Keep a NOAA weather radio and a charged phone bank in the kit zone so you can track an evacuation order, and mount a fire extinguisher and a smoke alarm inside as basic backstops. If the building also stages a fire pump, plan the pump's fuel and starting so it's ready cold, and keep its fuel in the vented locker away from the lights and the kits. Tie the building into your backup power if you have it: a generator shed is what keeps a well pump — and your fire-defense water — running when the line goes down, so wiring the wildfire shed's pump or charging to that backup circuit is worth doing while the conduit is open.
Smoke season is the slow-motion half of wildfire readiness in North Idaho, because even fires that never reach your parcel can choke the valley for weeks. Stock the shed with N95 or better masks and spare filters for everyone, and keep the document safe and electronics in a sealed, dry spot so smoke and the damp that follows a fire season don't get at them. If anyone in the household has asthma, allergies, or a low tolerance for smoke, the wildfire shed pairs naturally with a clean-air shed — the sealed, HEPA-filtered building that holds breathable air when the outside is unbreathable — so the readiness gear lives in the hardened shed and the refuge lives in the sealed one. Keep the go-kits refreshed, the water rotated, the pump fuel fresh and stabilized, and a charged light by the door, and the building is ready to work the moment a red-flag warning turns into a real fire.
A wildfire-ready shed is only as safe as the ground around it, so on a forested lot the siting and the defensible space matter as much as the build — a perfectly hardened building set in tall dry grass against the treeline is still in danger, and so is the house beside it. The single most important rule is distance and clearance: set the building well back from the timber and inside a cleared, irrigated, or gravel buffer, keep pine needles, dry grass, brush, and the woodpile away from its walls and roof, and don't let it sit where flame or radiant heat from the trees or a burning fence could bridge straight to it. Bring a compacted gravel pad right up to and around the building so the floor stays dry and the immediate perimeter is non-combustible — gravel under and around a shed is both a clean, level base and a firebreak that pine needles and embers can't ignite. Set the door on the side with the clearest, shortest path to your driveway or vehicle, so loading go-kits in an evacuation is a straight, fast walk rather than a scramble around the building. Read how to prep a shed site before the build so the pad, the drainage, the clearance, and the access are squared away first.
North Idaho's two seasons set the rest of the spec. The roof and anchoring need to be rated for local snow load while the roof covering and the whole envelope are hardened against summer embers — the same metal roof that sheds the snow sheds the embers, which is why it earns its place twice. Insulate and seal the shell so the valuables and electronics stay dry through freeze and smoke alike, and keep a shoveled, cleared path to the door year-round. Because a wildfire-ready shed often combines fuel storage, a pump, and electrical wiring, it can involve permits and inspections the way a plain storage shed won't — the fuel storage, any electrical hookup, and the setbacks from the house and property line can all come into play, and a forested subdivision or HOA may have its own defensible-space and outbuilding rules. Confirm what your town and county require on the service areas pages, plan any fuel storage and electrical with a licensed pro, and factor the defensible-space clearing, the permits, and the hookups into the plan before you finalize the size and where the wildfire-readiness shed will sit.
The materials decide whether your shed becomes a torch or a survivor in an ember storm, and the priorities follow how fire actually attacks a building: from the roof, the vents, the siding, and underneath. Start with the roof, which is the most exposed and the most important surface. A Class A roof covering — standing-seam or other metal is the common, durable choice in North Idaho because the same roof sheds heavy snow — gives wind-blown embers nothing to ignite, where an old wood or composition roof full of crevices is exactly where sheds catch. Next is the siding and trim: fiber-cement, metal, or other ignition-resistant siding resists radiant heat and direct flame far better than bare wood, and keeping the trim simple means fewer gaps and ledges where embers lodge. The eaves and soffits come next, because open eaves trap embers against the structure — box them in or screen them so there's no open cavity under the roof. Don't forget underneath: close off or skirt the gap under the floor with a non-combustible material so embers and debris can't blow or pile under the building and ignite it from below. Use non-combustible mesh over every vent, and keep anything stored against the outside walls — firewood, fuel, cardboard — well clear. The through-line is simple: give a wind-driven ember no surface, gap, or pile to catch on, and the building survives the same storm that takes an ordinary shed.
Defensible space is the cleared zone around a structure that keeps flame and radiant heat from bridging to it, and a wildfire-ready shed needs it as much as the house does — a hardened building set in dry fuel is still at risk, and worse, a shed that ignites can carry fire straight to the home. Site the building well back from the treeline, not tucked against the timber, and keep the immediate perimeter as non-combustible as you can: a gravel pad that extends out around the shed is both a level base and a firebreak that pine needles and embers can't ignite. In the zone right around the walls, keep dry grass mowed or cleared, pull pine needles and leaf litter off the roof and out of the corners, and move the woodpile, fuel cans, propane, and any brush away from the building — stored fuel against a wall is one of the most common ways a structure ignites. Don't let the shed sit downhill or downwind of a heavy fuel load where flame and heat would run right at it, and keep a wooden fence or a deck from acting as a wick that leads fire to the wall. Think of it in rings: a clean, lean, non-combustible zone closest to the building, then thinned and spaced vegetation beyond. The same clearing that protects the shed protects the property, so plan the building's location and its defensible space together, before the pad goes in.
In a wildfire you're making fast decisions — fight or leave — often in smoke and sometimes at night, so storage is really about being able to grab the right thing in one motion without searching. Lay the building out in clear zones with the evacuation gear closest to the door. Hang each person's and each pet's go-bag on a labeled hook so nothing gets left behind, and keep a grab tote right there for the things you'd otherwise scramble for: original documents, medications, glasses, car keys, chargers, cash, and N95 masks. Post a written evacuation checklist on the wall so no one has to remember the list under stress. Stage the fire tools on a wall rack rather than in a pile — shovels, rakes, a McLeod, loppers, a chainsaw with bar oil, a fire swatter, and a backpack pump all hung so you pull what you need without untangling anything. Keep gloves, goggles, and a hard hat with the tools, not buried in a drawer. Leave a clear aisle straight from the go-kit zone to the door wide enough to carry totes and reach the vehicle fast. The whole point is to remove every second of searching: when an evacuation order comes, the building should let you grab packed bags and load a car, or pull the tools and make a stand, without having to think about where anything is.
Most structures that burn in a wildfire aren't taken by a wall of flame — they're ignited by embers, the burning debris that wind carries far ahead of the fire front and rains onto and into buildings, sometimes hours before any flame is near. That makes the small openings the real battleground. Vents are the classic weak point: a standard vent will pull glowing embers right into the building, where they land on whatever's stored and start a fire from the inside out. The fix is to cover every vent, soffit, and opening with fine non-combustible metal mesh — roughly 1/8 inch is the common spec, fine enough to block embers but still able to breathe — and to make sure there are no unscreened gaps anywhere. The other details that matter are the doors and the seams: a door that doesn't seal tight at the threshold lets embers blow under it, so weatherstrip and seal the openings. Boxed-in eaves and a closed-off under-floor remove the cavities where embers collect and smolder. Even the gaps where siding meets trim deserve attention, because an ember only needs one place to lodge against something combustible. The reason this matters more than almost anything else is that you can do everything right on the roof and siding and still lose the building to a single ember that found an open vent — so screening and sealing every opening is what turns a hardened shell into one that actually keeps embers out.
Protecting valuables in a wildfire shed works on two levels: keeping them safe if the building takes a near miss, and being able to load them in seconds if you have to evacuate. For the things you'd grab and take, store them so they're ready to move: a grab tote or a small fire-resistant lockbox near the door for passports, deeds, titles, insurance papers, a household inventory for claims, and backup hard drives, plus a habit of keeping digital copies in the cloud so the records survive even if the physical ones don't. For the irreplaceables that stay — photos, heirlooms, important originals — use a fire-resistant safe or a sealed, insulated cabinet placed in the most protected interior corner, ideally bolted down so it can't be moved or tip, and rated to hold up to heat for a stretch. Keep electronics and documents in a dry, sealed spot regardless, because smoke and the damp that follows a fire season are slower threats that ruin paper and drives over time. A written, photographed household inventory is one of the most valuable things in the shed for insurance, and it costs nothing to make. The order of priority is simple: anything you truly can't replace either rides out the fire in a rated safe or leaves with you in a grab tote — so set the building up so both are possible without a frantic search when the order to go comes.
Size a wildfire-ready shed to two things at once — the evacuation supplies for everyone in the household and the fire gear you'll stage to defend the property — plus a clear path to load it all fast, never to the bare shelf space, because in an evacuation you need to move through the building quickly. If the shed is mainly a hardened cache and staging point, an 8x12 holds the whole household's packed go-kits, a water and document store, and a wall of hand tools for clearing and knockdown, with room to grab a bag and step out. If you want to stage a real wet-down setup, step up to a 10x12 or 10x16 so a fire pump, coiled hose, nozzles, a larger water store, PPE, and a vented fuel locker fit alongside the evacuation kits without crowding the door, with a working aisle and a tool bench in the 10x16. For one hardened building that carries the whole plan — fire tools, pump and hoses, fuel, go-kits, and a protected zone for documents and valuables — a 12x16 gives each job its own area and keeps a vehicle-loading path open. Size for the number of people and pets whose go-kits live there, the water and fuel you want on hand, and the tools you'd actually use to defend the parcel, and when the choice is close, size up one footprint: the extra room costs little and matters a lot when you're loading a vehicle or pulling tools in a hurry.
Coeur d'Alene and the surrounding Kootenai County foothills sit inside an active wildfire interface. That shapes every decision for a wildfire-readiness shed built on site — from the setback off a wood fence to the overhang soffit detail that stops ember accumulation. Because NIOS frames and finishes each shed on your property, the builder can account for your actual site exposure, prevailing wind direction, and your lot's vegetation rather than shipping a standard box that ignores all of it.
Siting matters as much as materials. A shed placed with attention to defensible space — away from dry brush, with a cleared gravel pad underneath — performs better than one with premium cladding dropped in a bad location. Post Falls and Hayden properties on the urban-wildland edge benefit from exactly this kind of placement thinking during the build.
Roof pitch and overhang design carry real weight here. Steeply pitched roofs shed embers; enclosed soffits and tight fascia gaps stop them from lodging. We spec these details as part of the framing, not as afterthoughts. The result is a building that aligns with North Idaho's fire-adapted construction guidance without patching together mismatched components.
When you're ready to configure what you need, design it in the shed builder to see sizes and options, or get a free estimate. You can also browse completed builds in our gallery to see finished examples from properties across North Idaho.
Tell us your lot, your defensible space, and whether the building needs to stage fire tools and a pump, hold your household's go-kits, or protect your records and valuables, and we'll help spec the ignition-resistant build, the ember-resistant details, the siting, and the interior zones for your property, then you can build and price it online.
Keep planning your build with related North Idaho shed guides.