Tools are the most expensive thing a contractor owns that does not have a title, and most crews still store them in whatever was handy — a corner of the garage, the back of the trailer, a leaning rack of batteries that are never all charged at once. Then a job starts and the morning disappears: the impact driver is dead, the second set of bits is missing, the chop saw is buried behind the framing crew's gear, and somebody swears the recip saw was right here last week. A contractor tool crib ends that. It is one secure, organized building where the whole fleet lives locked up, charged, sorted by trade, and ready to load — so a crew rolls out on time instead of spending an hour hunting and a Saturday driving to the supply house for a tool they already own twice.
North Idaho On Site Sheds builds every tool crib right on your property, so the shelving depth, the charging wall, and the door can be sized for the way your crew actually loads a truck and the gear you actually run. A tool crib is a different animal from a backyard storage shed: it holds serious dollar value, it cycles in and out daily under real wear, and it has to keep batteries charged and expensive tools locked. Plan the building around security, charging, and durable organization first, and the bench, the bins, and the door fall into place around those three jobs.
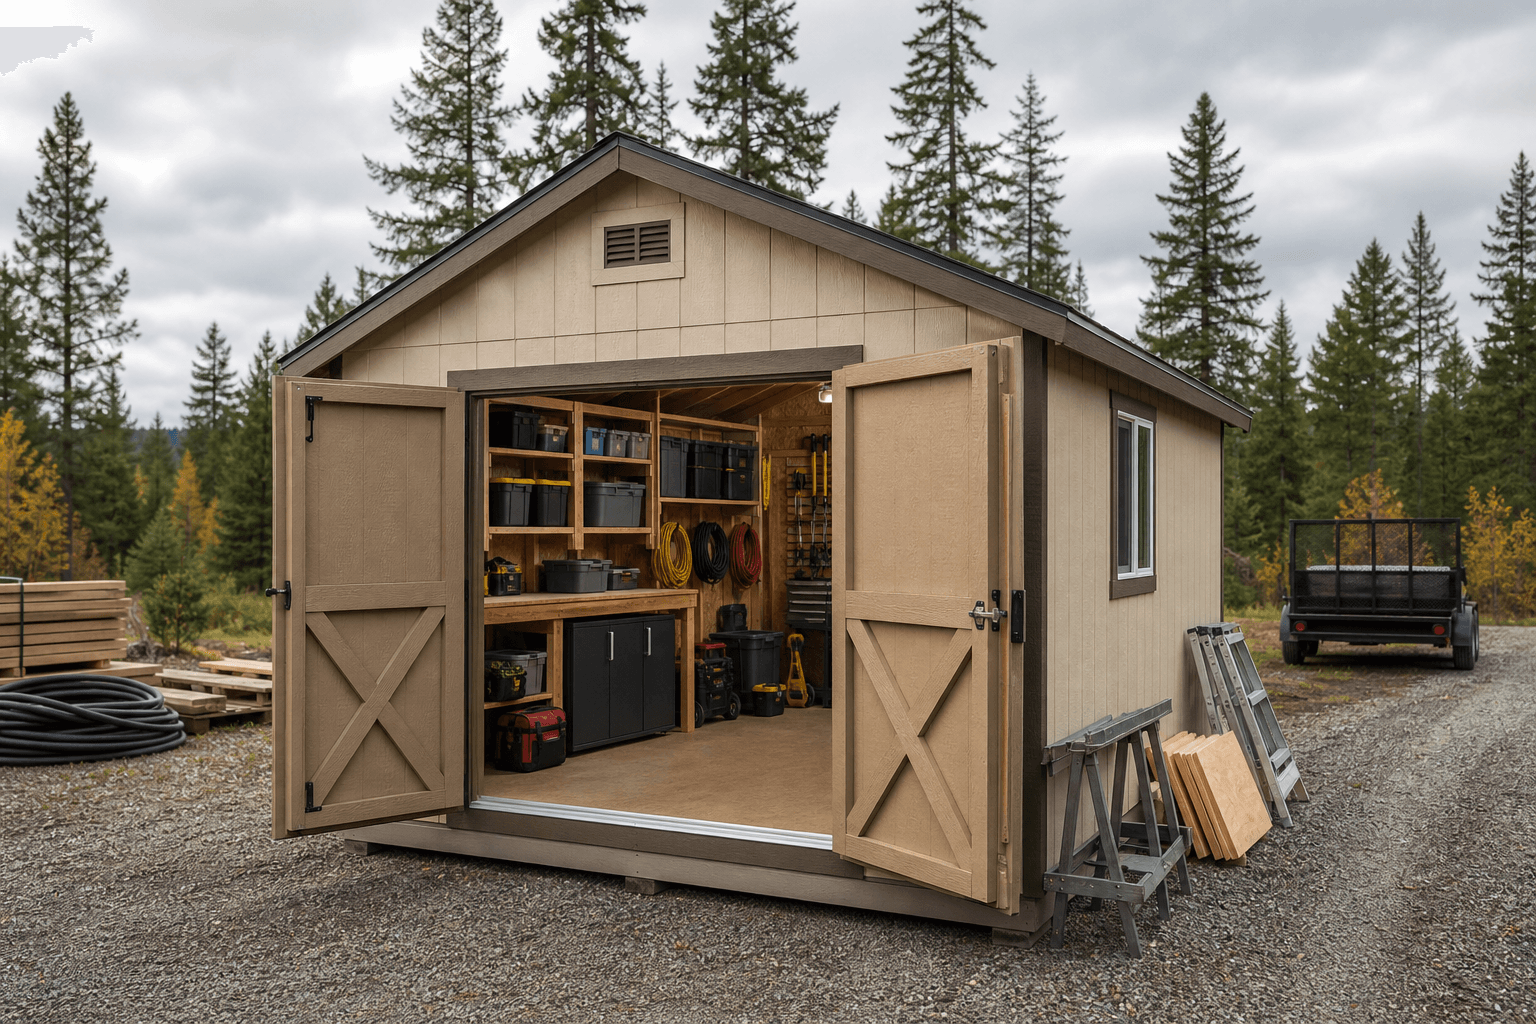
One secure building for the whole fleet: locked up, charged, sorted by trade, and staged so the crew loads out on time.
A tool crib is mostly about how much wall you can line with shelving and pegboard, how secure the building is, and how easily heavy gear comes and goes — so the roofline is really a question of vertical storage and door access. A standard gable is the honest starting point: it frames a tall, wide door for a chop saw stand, a job box, or a pallet of materials to roll straight in, and it leaves clean full-height sidewalls for the deep shelving and bin walls a tool inventory demands. Order taller sidewalls (8-foot-plus) so you can stack shelving high, hang ladders and long-handled tools, and still clear a stand-up tool overhead. A lofted barn (gambrel) raises the ridge and adds a loft for the slow-moving gear — seasonal tools, spare cases, off-season equipment — keeping the floor and the reachable walls for the daily fleet. A lean-to sheds North Idaho snow predictably to one side and makes a tidy covered spot to stage a trailer or stand fuel and a generator alongside the main building.
Whatever the roofline, build for security, height, and a wide, solid door, because those are the things you cannot bolt on later. A tool crib sits right between a tidy gear room and a working shop, which is why it overlaps with a tool shed when one tradesperson stores a personal kit, and with a workshop or stick-built shop when the crew also wants a bench to service tools, change blades, and build out fixtures. Decide early whether the building is pure secure storage and charging or also a place to repair and prep gear, because that one call drives how much bench you frame, how much open floor you keep clear, and how heavy you build the wall systems.
A 10x12 locks up a single trade's full kit — cordless fleet on a charging wall, hand tools and bins on shelving, and a corner for a chop saw stand and ladders.
A 10x16 or 12x16 adds a workbench, a full charging station, and deep bin walls for two or three trades, with room to lay gear out and stage a load before the truck.
A 12x20 stores a multi-trade fleet plus a rolling job box or a small trailer, with a long bench, a dedicated charging bay, and open floor to load in order.
Footprint decides whether the crew loads out of an organized wall or digs through a pile, so compare the real dimensions before you commit. A 10x12 is a solid lock-up for one trade's complete kit — a charging wall down one side, shelving and bins down the other, and a clear lane to carry gear out — but it tightens up the moment a second trade or a real service bench moves in. A 10x16 buys the length to keep shelving down one side and a charging-and-bench wall on the other, so you can prep and sort without bumping into stored gear. Step up to a 12x16 and the added width lets two people pull gear at once and gives you a deep bench plus room to stand a chop saw and a job box without losing the carry lane. If you run a multi-trade fleet, or you want a rolling job box, a small trailer, or a pallet of stock under the same roof, a 12x20 keeps one bay clear for loading and still runs a full wall of shelving, a charging bank, and a service bench. Depth matters as much as width in a crib: a long building is what lets you stage a full truck load in order along one wall and carry it straight out the door.
These overlap, and the right call comes down to scale and who uses the building. A tool shed leads with one person's organized kit — wall systems, a small bench, and the gear a homeowner or a solo tradesperson grabs most weeks — so it favors tidy access over hardened security and high-volume charging. A dedicated contractor tool crib leads with a crew's working fleet: hardened locks and a solid door for real dollar value, a charging bank sized for a whole cordless lineup, heavy-duty shelving rated for daily abuse, and bins organized by trade so a crew loads fast and nothing walks off. A commercial storage building leads with bulk inventory, materials, and equipment for a business that needs square footage and access more than a fine-grained tool layout.
Plenty of contractors want one building that pulls double duty, and that works — just name which job leads. If the crew services tools, changes blades, and builds fixtures, lean toward a workshop-grade build with a real bench and power and add the secure storage and charging around it. If it is pure inventory control — tools in, tools out, charged and locked — build the crib around security and the charging wall and keep the bench small. Naming the lead use up front keeps you from a building that stores poorly and secures poorly both, and it locks in your lock hardware, your charging capacity, and your shelving rating before the build is ordered.
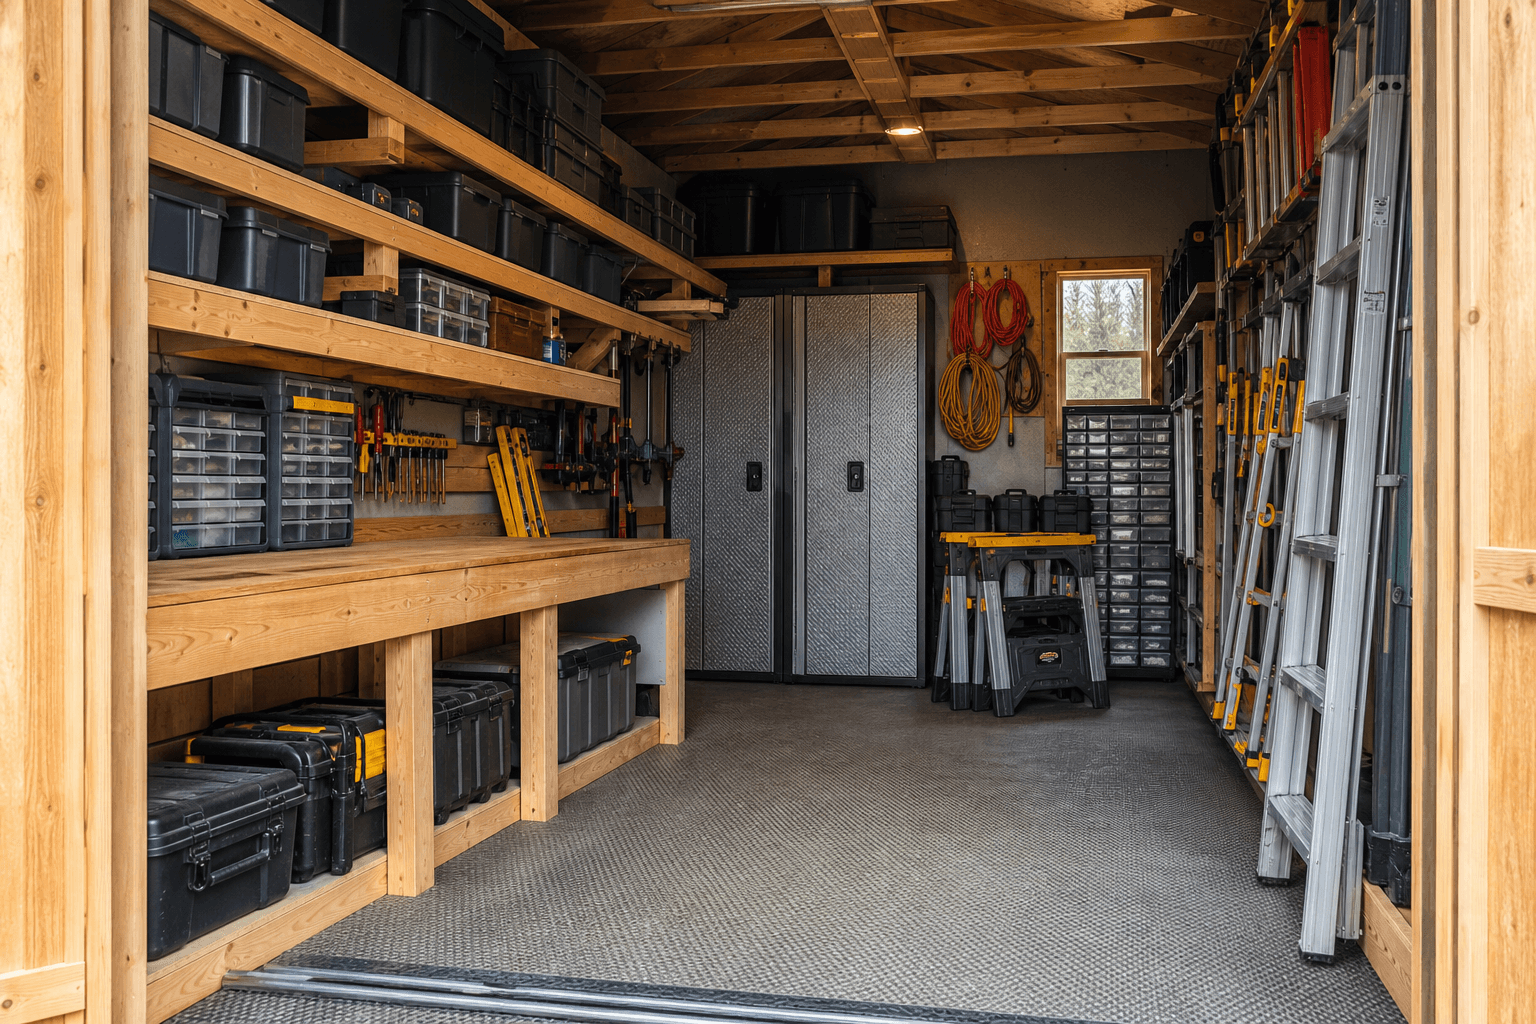
Zone it: a charging wall for the cordless fleet, heavy-duty shelving with bins by trade, a service bench, and a clear load-out lane.
Think of the crib as four working zones instead of one open box, and lay them out in the order the crew loads the truck so gear flows from the back toward the door. A charging zone anchors one wall near the power: a bank of outlets and charger shelves where the cordless fleet — drills, impacts, recip saws, grinders, vac, and a stack of batteries — sits topped off and ready, with the chargers grouped by brand so the right battery is always charged and in reach. A shelving and bin zone runs deep heavy-duty racks down another wall for the hand tools, fasteners, accessories, and consumables, each bin labeled and grouped by trade so a framer, an electrician, or a finish carpenter grabs their kit without cross-digging. A big-tool zone keeps the floor and the wide door clear for the stuff that rolls — a chop saw stand, a table saw, a job box, ladders, and a generator — so heavy gear comes and goes without lifting it over anything. And a bench and staging zone gives you a sturdy surface to change blades, charge and service tools, and stage a full load in truck order before any of it goes out.
Good zoning means the crew never unstacks three bins to reach the chargers, and the most-used tools live closest to the door so they load first and last. Keep a clear carry lane from the shelving to the door wide enough to walk a job box or a chop saw stand through without turning sideways, and put the charging wall on its own dedicated circuit so the whole fleet runs untouched overnight. Stand the heavy rolling tools nearest the door so they load without a fight, and put the bench where you can lay a tool out to service it and still reach the bins you are pulling from. Stage the load along one wall in truck order — heavy stands and job boxes first, the grab-it-on-site cordless tools last — so loading out is a fifteen-minute job, not a morning of hunting.
Steel or rated industrial shelving that carries stacked tool cases, battery banks, and fastener bins without sagging, paired with labeled stackable bins grouped by trade so the right kit is always in reach.
A dedicated charging wall with banks of outlets and charger shelves sized for a whole cordless fleet, grouped by brand and battery so the crew rolls out on fully charged packs every morning.
A sturdy bench with a vise to change blades, swap bits, and service tools, with a rolling tool chest, pegboard, and bins for fasteners, blades, and the small spares that keep a fleet running.
A solid door with quality deadbolts and protected hinges, a job box or locking cabinet for the highest-value tools, plus motion lighting and an option for an alarm or camera on a rural lot.
This is where a bare shell becomes a working tool crib, and it is worth naming exactly what lives inside so you size the shelving, the charging wall, and the door around it. The cordless fleet is the anchor and the reason charging leads the plan: drills, impact drivers, recip saws, circular saws, grinders, an oscillating tool, a cordless vac, and a leaning stack of batteries and chargers that all need a home on a powered wall. The corded and bench power tools ride the floor and the heavy shelves — a chop saw on a stand, a table saw, a planer or a router table, a tile saw, a compressor and hose reel, and a generator for off-grid jobs. Then come the hand tools and layout gear: hammers, levels, squares, a laser, tape measures, pry bars, clamps, and the full set of wrenches, sockets, and drivers, each on a pegboard or in a labeled drawer so nothing wanders.
Around the tools you stock the consumables and the small parts that a crew burns through. Fasteners and hardware fill labeled bins by type and size — framing nails and collated strips, screws, lags and anchors, construction adhesive, and a wall of the brackets and connectors a given trade uses every day. Blades and bits and abrasives get their own organized drawer — saw blades, drill and driver bits, hole saws, grinding and cut-off wheels, and sanding stock — so a dull blade is a thirty-second swap, not a supply run. Round it out with the support gear: ladders and a step stool, sawhorses, extension cords and a cord reel, work lights, totes and job boxes for loading, safety glasses, hearing protection, hard hats, a first-aid kit, and a fire extinguisher by the door. That full fit-out is what turns a storage shed into the place every job loads out of and returns to.
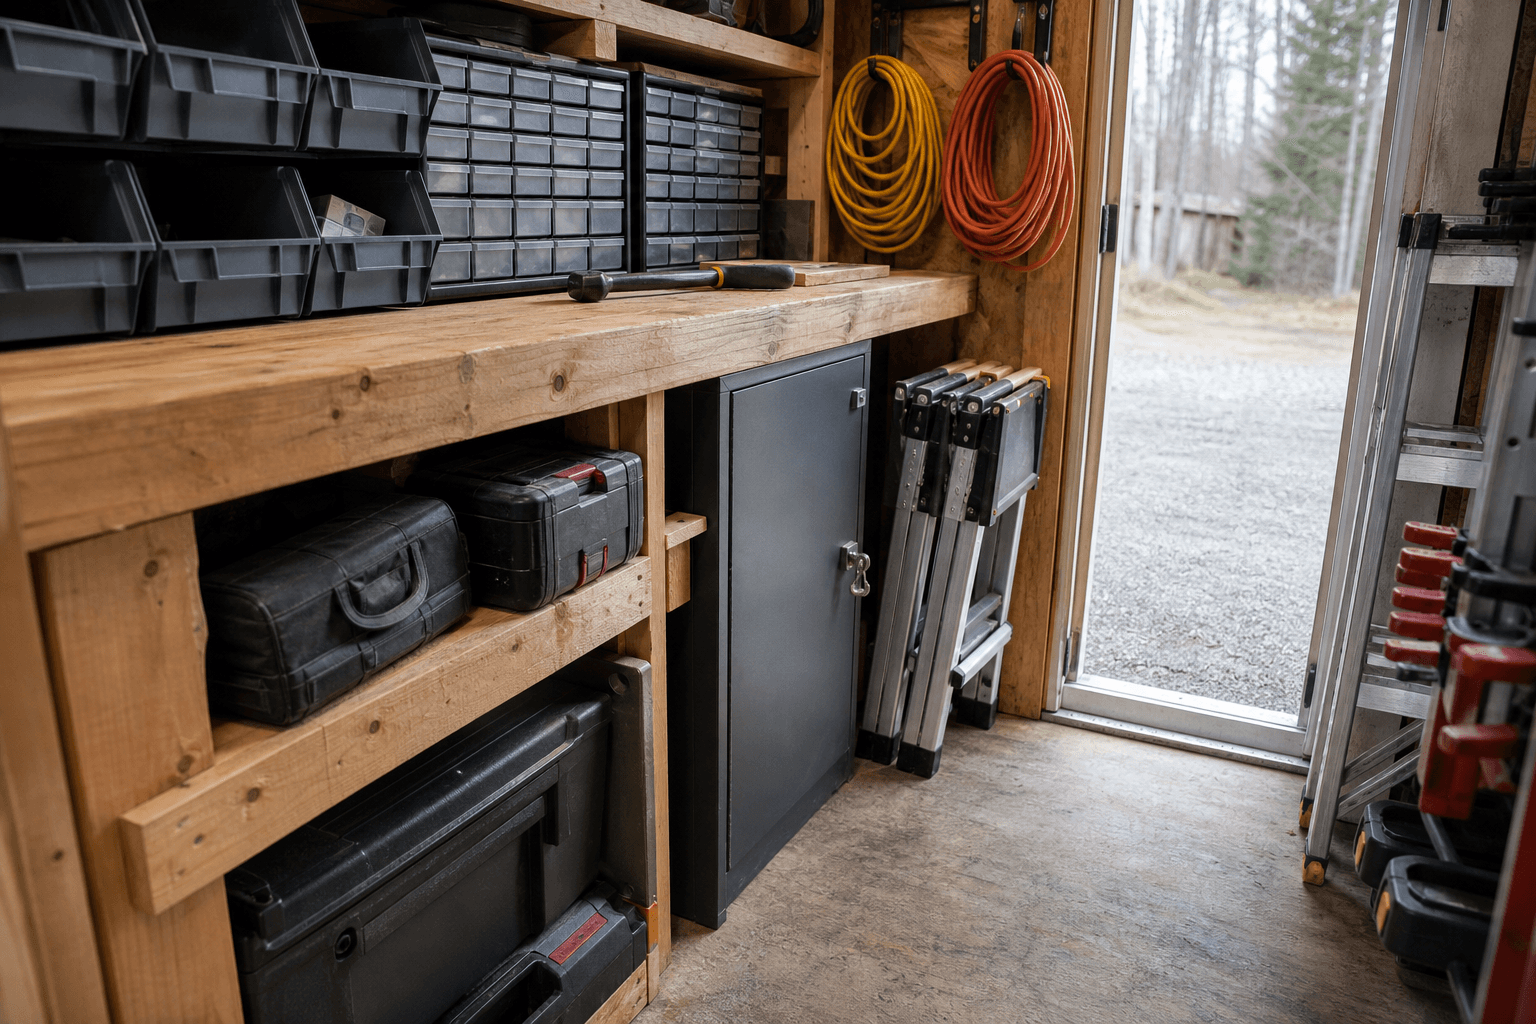
The cordless fleet charges on its own wall and the most-used bins sit by the door, so the crew never digs for a charged tool.
| Contractor tool crib planning checklist | |
|---|---|
| Security & locking | A solid door with quality deadbolts and protected hinges, plus a locking cabinet or job box for the highest-value tools and an option for an alarm or camera |
| Charging capacity | A dedicated circuit and a charging wall with banks of outlets and charger shelves sized for the whole cordless fleet, grouped by brand so packs are ready every morning |
| Heavy-duty shelving | Steel or rated industrial shelving and labeled bins that carry stacked cases, batteries, and fasteners under daily abuse without sagging or racking |
| Door & load-out access | A wide, solid door and a clear carry lane so a chop saw stand, a job box, and ladders roll straight out to the truck without lifting over stored gear |
| Durable build & floor | A tough floor and frame built for the weight of stacked tools and daily traffic, with mats or a slab that takes dropped gear and rolling job boxes |
| Lighting & power | Bright shadow-free LED light over the shelving and bench, plus several outlets so chargers, the bench, and work lights run without crossing cords |
Power is the line a tool crib cannot underbuild, because a modern crew runs on batteries and a single 120V circuit will not keep a fleet charged. Plan several dedicated 120V circuits run from the house with a bank of outlets along the charging wall, so a dozen chargers, the bench, and the work lights all run without tripping a breaker or daisy-chaining power strips. Mount charger shelves at a working height, group the chargers by brand and battery so the right pack is always topped off, and keep the whole charging wall on its own circuit so the fleet charges untouched overnight and no cord crosses the load-out lane. Add a couple of 120V outlets at the bench for corded tools and a charger or two, and if the crew runs heavier shop tools — a big table saw or a compressor — rough in a 240V circuit while the walls are open, since it is far cheaper now than after the building is lined.
North Idaho winters drive the rest, and they are hard on both batteries and tools. Lithium batteries lose capacity and can refuse to charge in deep cold, so an insulated, heated-enough corner keeps the charging wall working all winter instead of leaving the crew with packs that read full and die at the first trigger pull. Tools stored in a damp, unheated shed rust at the chuck and the table as condensation grows on cold steel — insulation and a little heat keep the fleet dry, the batteries healthy, and the bench usable on a January morning. Bright, even LED light matters more here than in most buildings, because a crew loads out before dawn and unloads after dark half the year, and you cannot read a battery gauge or inventory a tool wall in the shadows.
A tool crib earns a real base and a real approach, because everything in it is heavy and it cycles in and out every working day. A compacted gravel pad drains well and works under a properly built framed floor, but a crib that takes daily traffic and rolling job boxes is a strong case for a concrete slab — it gives a dead-flat, washable floor that shrugs off dropped tools, carries the weight of loaded steel shelving without flex, and lets a hand truck or a chop saw stand roll straight to the door. Just as useful is a flat, hard staging apron right outside: a stretch of gravel or concrete where the work truck or trailer pulls up close so the crew carries gear a few steps from the shelving to the tailgate instead of across a muddy yard. Plan the approach so a truck pulls right up off a gravel driveway, and grade the pad so snowmelt and rain drain away from the door rather than pooling at the threshold. Read how to prep a shed site before delivery so the pad, drainage, and the staging apron are ready.
North Idaho weather drives several choices. Plan a roof and anchoring rated for local snow load, and detail the door and threshold so drifting snow does not block the crew in on a work morning. Keep the gravel approach plowed and passable so the truck can reach the door after a storm, and grade so snowmelt channels away from the threshold instead of icing it over. These buildings also tend toward larger footprints with added power and security wiring, which can trigger local rules: many small sheds skip a permit, but bigger buildings, electrical work, and setback or HOA requirements often do not — and a building used for a business may face its own zoning questions. Confirm what your town and county require on the service areas pages, and factor any electrical permit into the plan before you finalize the size and where the crib will sit.
Treat security as part of the build, because a crew's fleet is tens of thousands of dollars sitting in one building. Start with a solid, well-built door fitted with quality deadbolts and protected or hidden hinges so the door cannot be pried or lifted off, and skip or reinforce any window that gives a view of the tools. Add a motion-activated light over the door and the staging apron, and on a rural lot set back from the road consider a simple alarm or a camera. Inside, lock the highest-value tools and battery banks in a steel cabinet or a job box and keep them out of sight, and keep an inventory so you know fast if something is missing. Building on-site lets you spec the door, the locks, and the wiring for a security light or camera from the start, so the gear the crew depends on stays protected overnight and on weekends.
Plan the charging wall as its own zone with real power behind it, because a modern fleet of drills, impacts, saws, grinders, and a vac runs through a lot of batteries and a single circuit will not keep up. Run several dedicated 120V circuits from the house and mount a bank of outlets and charger shelves along one wall at a working height, so a dozen chargers run at once without tripping a breaker or daisy-chaining power strips. Group the chargers by brand and battery size so the right pack is always topped off and in reach, label the shelves by tool, and keep the whole wall on its own circuit so the fleet charges untouched overnight. In North Idaho, keep that corner insulated and heated enough that lithium batteries actually charge in winter cold instead of reading full and dying at the first trigger pull.
Build for abuse, because a tool crib gets loaded, unloaded, and dropped into every working day, and light wire shelving sags and racks under stacked cases and battery banks fast. Use steel or rated industrial shelving anchored to the wall so it carries stacked tool cases, fastener bins, and heavy power tools without bowing, and keep the heaviest gear low so the racks stay stable. Pair the shelves with labeled, stackable bins for fasteners, bits, blades, and accessories, and a pegboard or slat wall for hand tools so everything has a visible home. A rolling tool chest at the bench handles the daily-use kit. Sizing and rating the wall systems for real load up front means the shelving survives years of a crew pulling gear instead of collapsing under it.
Sort the building the way the crew works, and group gear so each trade grabs a complete kit without cross-digging. Give framing, electrical, plumbing, and finish work their own labeled shelving sections or bin runs, so a framer pulls nailers and layout tools from one zone while the electrician pulls their kit from another. Keep the most-used cordless tools and the daily fasteners closest to the door and the charging wall so they load first and last, and stage a full load along one wall in truck order before it goes out — heavy stands and job boxes first, grab-it-on-site tools last. Color-coded bins or job-specific totes make a multi-trade fleet even faster to load. Building on-site means the shelving runs and the carry lane get sized for your trades and your loading routine instead of a generic shelf layout.
More durable than a backyard storage shed, because a crib takes real wear — a crew in and out daily, heavy steel shelving loaded to the gills, job boxes and chop saw stands rolling across the floor, and dropped tools. Spec a tough floor and a solid frame that carry the weight of loaded shelving and daily traffic without flexing, and consider a concrete slab or heavy framed floor with mats that shrug off dropped gear and let job boxes roll. Solid, well-built doors and quality hardware take constant use without sagging, and a building rated for North Idaho snow load and anchored properly stands up to the seasons. Building on-site lets you spec the floor, the frame, and the door for the load and the daily abuse a working crib sees, so it holds up for years instead of wearing out in a few seasons.
Size it to the fleet and whether the crew also services gear, not just the floor area. A 10x12 locks up one trade's complete kit — a charging wall, shelving and bins, and a corner for a chop saw stand and ladders — with a clear lane to load out. A 10x16 or 12x16 adds a service bench and deeper bin walls for two or three trades, with room to lay gear out and stage a load. A 12x20 holds a multi-trade fleet plus a rolling job box or a small trailer, with a long bench, a dedicated charging bay, and open floor to load in order. Remember that depth matters as much as width — a long building lets you stage a full truck load in order and carry it straight out — and that a crew's kit grows, so build a size up from today's gear if the lot allows.
A contractor's tool crib is a working building, not just a lock box. The tradespeople and small contractors based around Coeur d'Alene and Post Falls who build one on site are usually solving a specific problem: too much inventory to secure in a job-site trailer, too many cordless batteries depleting overnight, and a shop or garage that has quietly become a liability when jobsite gear disappears.
Security starts with the framing. A contractor tool crib built on site can be spec'd with heavier door hardware, steel hasp points, and no accessible window penetrations — choices that are trivial during construction and costly to retrofit. The building is also permanent, which means your security system, your charging bank, and your shelving layout are all fixed infrastructure rather than bolt-ons.
Heavy-duty shelving for a cordless fleet means more than a shelf. Charging a battery bank for multiple tradespeople requires a dedicated circuit, organized charging stations, and enough wall clearance that tools don't stack on the floor during busy weeks. Framing those circuits in during the build costs a fraction of what an electrician charges for a finished-wall retrofit.
In Rathdrum, Hayden, and the rural Kootenai County parcels where many trades operate out of home shops, the on-site build matters for a different reason: a delivered shed can't reach a gravel drive behind a fence line or up a sloped yard. Built-in-place framing gets the structure where the work actually happens.
Design the footprint and door layout in the shed builder — a wide double door on the gable end, a walk-through entry on the side, and a shelving wall along the back is the most functional layout for most cribs. Get a free estimate with your square footage and electrical needs.
Tell us what your crew runs and how you load out, and we will help spec the locks, the charging wall, the heavy-duty shelving, and the site prep around your property — then you can build and price it online.
Keep planning your build with related North Idaho shed guides.