A dirt bike does not belong in the garage between your daily driver and the lawn mower, leaking chain lube on the floor and getting bumped every time someone reaches for a rake. A dedicated dirt bike and moto shed gives every bike a stand of its own, a real bench to wrench at, and a place for the gear, parts, fuel, and tires that come with the sport. Whether you ride a single 250 on the weekends or you keep a couple of motocross bikes plus a pit bike for the kids, the building that makes ownership easy is the one planned around how you actually load up, wash off, and turn wrenches between rides.
North Idaho On Site Sheds builds every moto shed on your property, so the layout can answer to your gravel driveway, your trailer turnaround, and how a muddy bike gets from the truck to the wash spot without dragging grime through the house. This guide walks through which shed style fits, what size to build for the number of bikes you run, how to lay out a stand-and-bench shop, and how to handle the fuel, ventilation, and durable flooring that a riding habit demands in a climate with real winters.
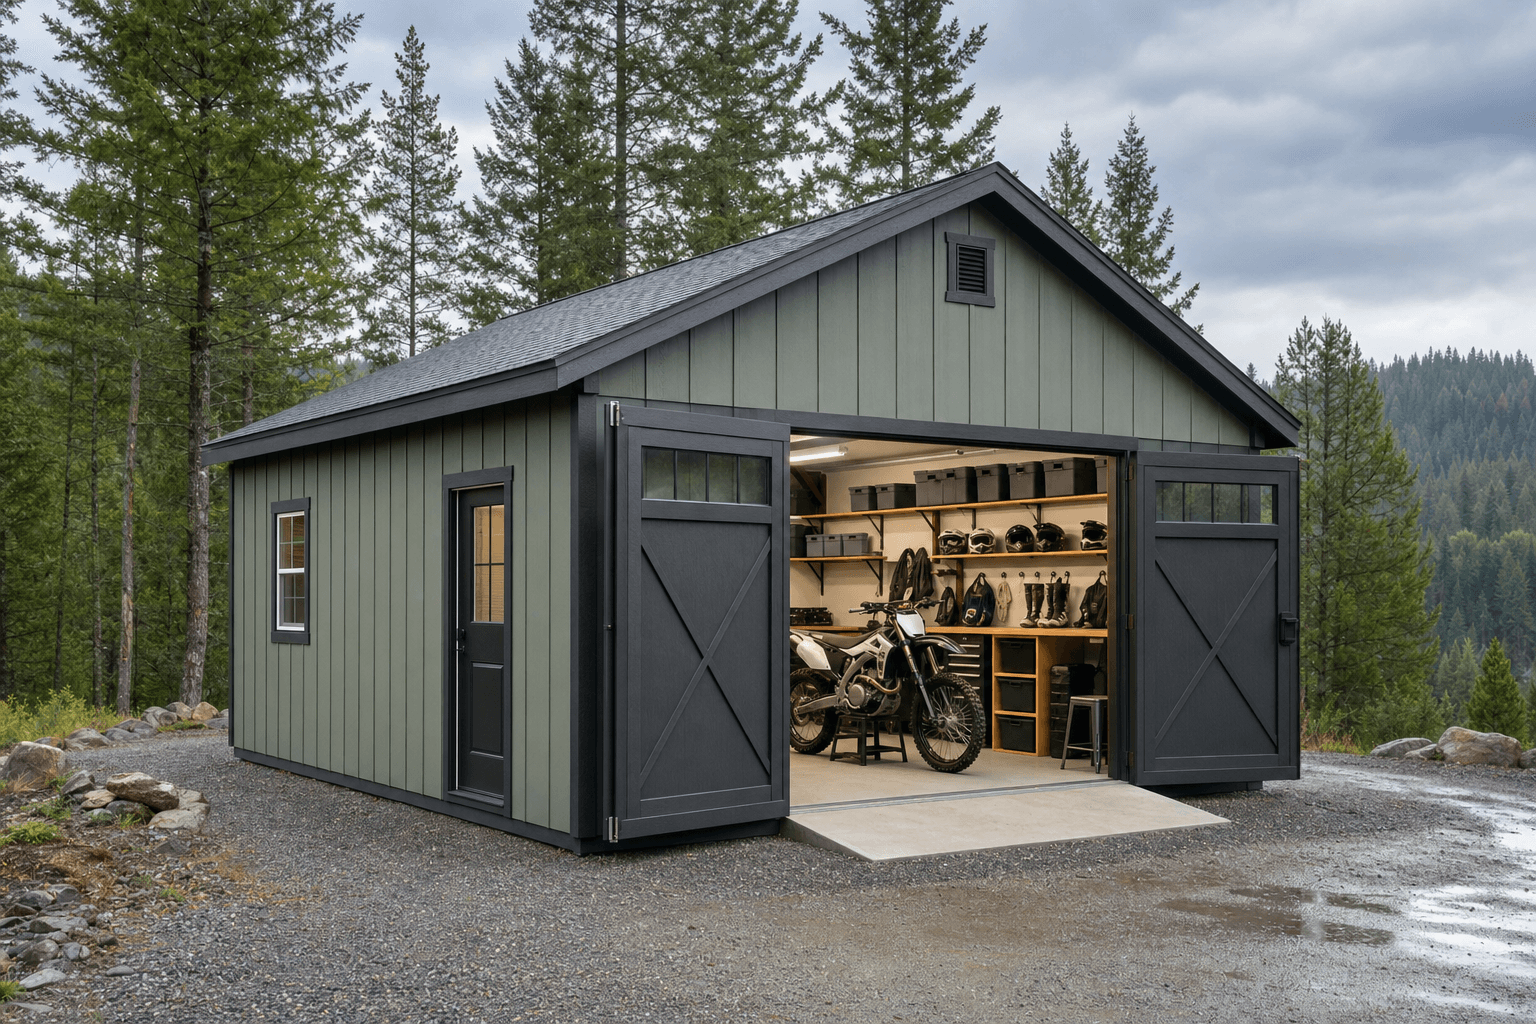
A moto shed starts with the shell: wide doors a bike rolls straight through, room for stands, and a bench wall along one side.
Moto sheds reward floor space and a clear path more than overhead volume, so the roofline you pick should keep the walls usable and the doors wide. A standard gable is the honest starting point — tall enough at the ridge to stand and lift, simple to line with plywood you can screw a wheel chock or a helmet rack into anywhere, and easy to fit with a wide door a bike rolls straight through without ducking. A lofted barn (gambrel) earns its keep when you run more than two bikes: the loft swallows spare tires, riding gear totes, and end-of-season parts so the floor stays clear for stands and a bench. A lean-to or modern single-slope sheds North Idaho snow predictably to one side and gives you a tall front wall to fill with windows and bright task light over the work zone.
Whatever the roofline, the moto shed leans closer to a working shop than to a plain storage shed — it overlaps heavily with a backyard workshop the moment you add a real bench and a 240V outlet for a compressor. If your fleet runs to four-wheelers as well as bikes, plan it alongside an ATV and UTV shed so the door width and the floor carry the heavier machines too. Decide up front whether wrenching leads or pure storage leads, because that one call drives your door width, your bench length, and how much power you rough in.
A 10x12 holds a pair of bikes on stands, a short bench along one wall, and a gear corner for helmets, boots, and a tote of riding kit.
A 10x16 or 12x16 lines up two to three bikes, a full wrench bench, a tire and parts wall, and clear aisle to roll any bike out first.
A 12x20 fits three or four bikes, a dedicated tear-down zone, a tire-change corner, and room to wheel a stand into the middle to work.
Footprint decides whether you wrench in comfort or shuffle bikes every time you want to reach the back one, so compare the real dimensions before you commit. A 10x12 is a tidy two-bike shed with a short bench — plenty for a rider who keeps gear simple. Step up to a 10x16 or 12x16 and you get the length for a full bench wall plus a tire-and-parts wall opposite it, with aisle to roll any bike out without moving the others. The extra two feet of width on a 12-foot building is what lets you drop a stand in the middle of the floor and walk a full circle around the bike while you adjust suspension or pull a wheel. If you run a family fleet with a pit bike and a couple of full-size motocross bikes, size up to a 12x20 so there is room for a tear-down zone separate from the parked bikes. Length matters more than width in a moto shed — it is what lets bikes line up nose-in along one wall while the work happens on the other side.
These overlap, and the right call comes down to what rolls through the doors and how much you turn wrenches. An ATV and UTV shed is built around heavier, wider machines, so it favors a stronger floor, a wide drive-through door, and turning room over a long bench. A dirt bike and moto shed is narrower and taller in its needs — bikes stand on their own stands, the bench does real work, and the floor takes a beating from boots, mud, and dropped tools. A backyard workshop blurs into a moto shed once you add bike stands to a bench-first building, but a purpose-built moto shed puts the stands, the wash-friendly floor, and the fuel venting first.
Plenty of riders want one building that pulls double duty, and that works — just decide which job leads. If wrenching and maintenance lead, build a moto shed with a full bench and power, then store the quad in it too. If you mostly need a clean, secure home for bikes between rides with light tinkering, a simpler storage-first layout does the job and leaves budget for the floor and the gear walls. If mountain bikes share the space, a mountain bike shed layout handles the pedal fleet, repair stand, and gear right alongside the moto side. Naming the priority up front keeps you from a building that does neither job well.
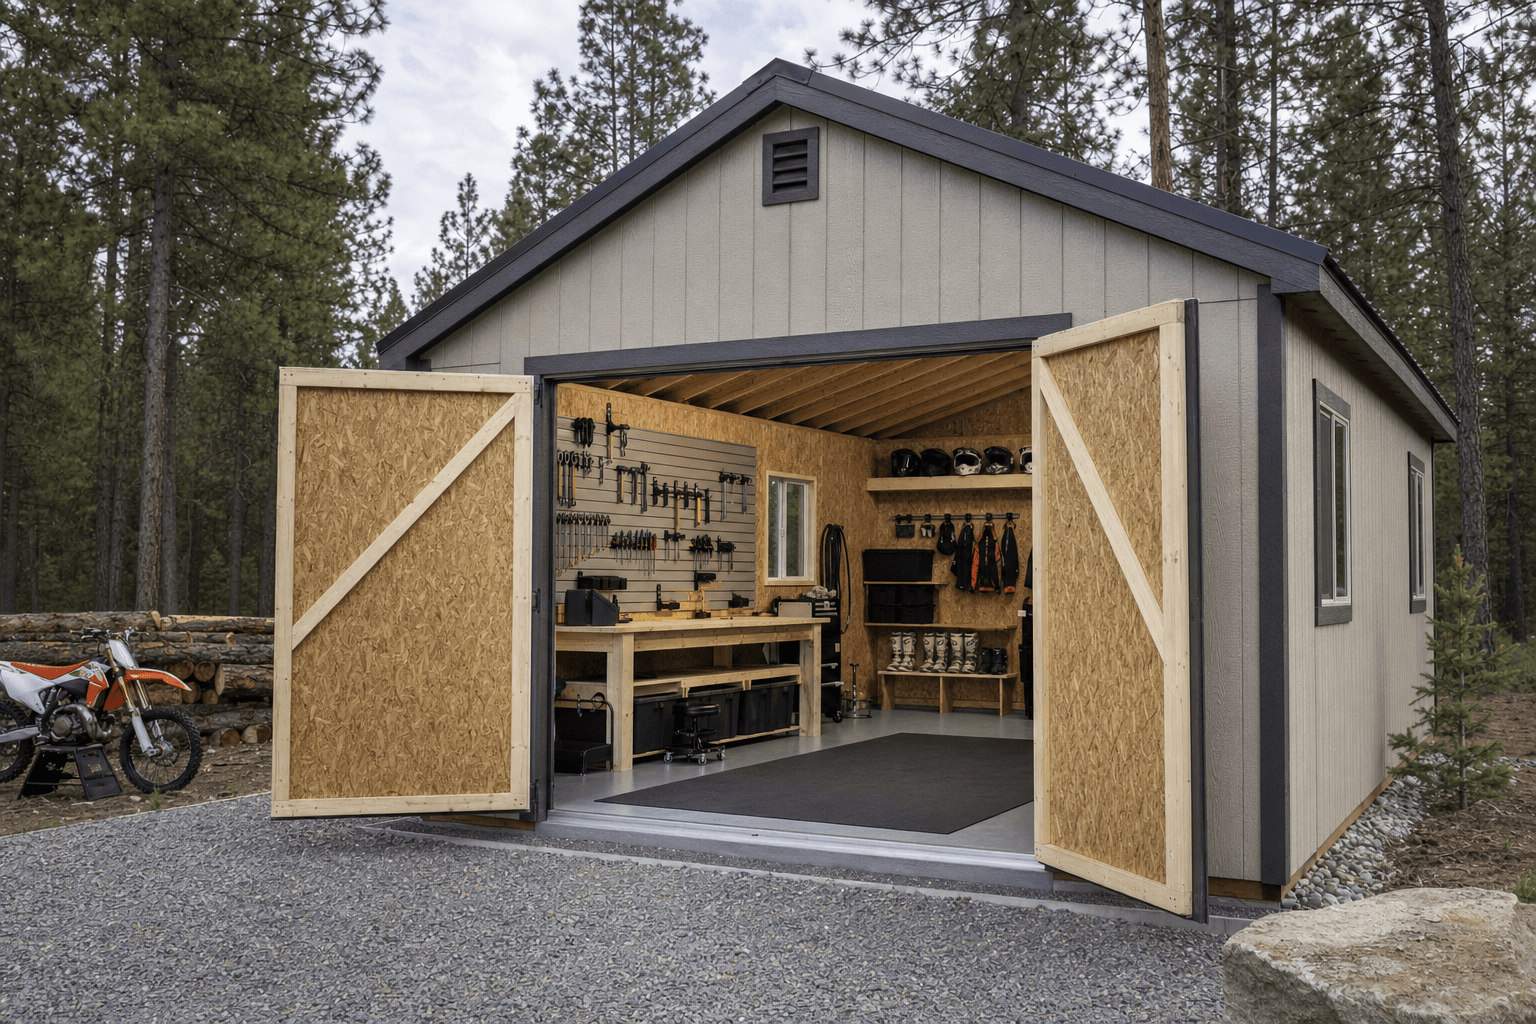
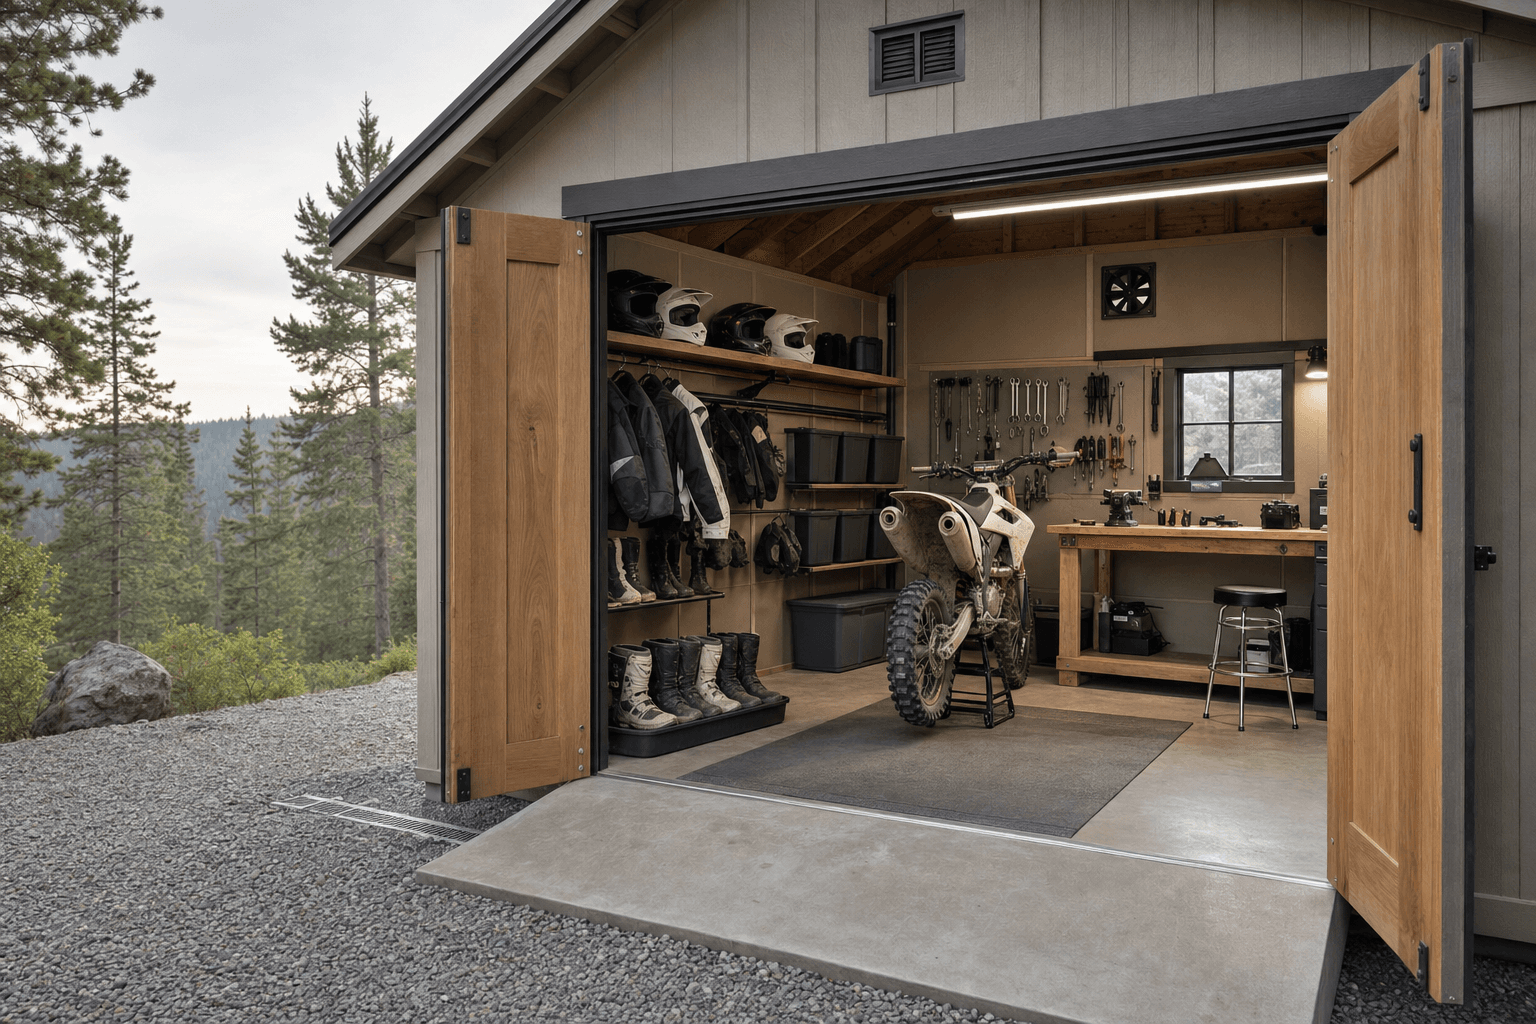
Zone it: a stand-and-park row along one wall, a wrench bench opposite, and a tire-and-parts wall near the door.
Think of the moto shed as four working zones instead of one open box, and lay them out so a bike moves from the door to the work in a straight line. A stand-and-park row runs along one long wall, where each bike sits on its own stand with a wheel chock at the door end so it rolls in and locks straight. A wrench bench runs opposite, with a vise, a parts washer or tray, and outlets at counter height for an impact gun and a battery tender. A tire-and-parts zone lives near the door with a tire-change stand, a wall of spare tubes and sprockets, and bins for the small hardware that disappears mid-job. A gear and wash zone by the entry holds helmets, boots, and jerseys up off the floor, with a hose bib or a drain nearby so a muddy bike gets rinsed before it ever reaches the bench.
Good zoning means you never wheel a dripping bike across your tool drawers or trip over a chock to reach a wrench. Leave roughly three feet of aisle between the parked row and the bench so you can pull a wheel without backing into another bike, and keep a clear lane from the wide doors to the work area so a bike on a stand never has to pivot in place. Put the tire-change and wash work near the door where the mess belongs, and keep the bench and the clean parts deeper in where they stay dry. A moto shed that flows is one where the next job is a step away, not a bike-rearranging project.
A folding or hydraulic stand for each bike plus a fixed wheel chock at the door end so bikes load straight, lock in place, and free your hands to work.
A heavy bench with a vise, a parts tray, and a torque-wrench drawer, sited so you can roll a stand alongside it and turn wrenches without crouching on the floor.
A wall rack for spare tires, a tire-change stand, and labeled bins for tubes, sprockets, levers, and bolts so a quick fix does not turn into a parts hunt.
Bench outlets for an impact gun and compressor, plus a dedicated outlet to keep a battery tender on the EFI bike so it fires on the first ride of spring.
This is where a bare building becomes a moto shed, and it is worth naming exactly what lives inside so you size the bench, the walls, and the power around it. The bikes and their stands are the anchors — each full-size motocross or trail bike on a folding or hydraulic lift stand, a pit bike on a smaller one, and a wheel chock at the entry so loading is a one-person job. The tools fill the bench and the wall: a torque wrench, an impact gun, sockets and T-handles, tire irons and a bead breaker, a chain breaker and rivet tool, spoke wrenches, and a sag scale for setting suspension. An air compressor with a hose reel airs tires, blasts mud out of a chain, and runs the impact gun.
Around the bench you fit out for the maintenance that keeps a bike running: chain lube and cleaner, a chain-cleaning brush, contact cleaner, fork oil, coolant, and a stack of air filters with filter oil and a wash bin. Tire work needs a stand, spare tires and heavy-duty tubes, rim locks, and a bead lube. Add a parts shelf of sprockets, brake pads, levers, and grips, labeled bins for nuts and bolts, and a secure, organized tool wall so nothing walks off. Round it out with a fuel can on a low shelf, a battery tender for the EFI bikes, a gear rack for helmets and boots, and a fire extinguisher rated for fuel — the small touches that turn between-ride maintenance into a 20-minute job instead of an afternoon.
A tire stand, chain tools on the wall, and labeled bins for tubes and sprockets — the details that keep a riding season moving.
| Dirt bike and moto shed planning checklist | |
|---|---|
| Doors | A wide door sited for a straight roll from the trailer or truck to the stand row, with a low or ramped threshold a bike crosses easily |
| Floor | A washable, durable surface — sealed concrete or a heavy-duty mat over a gravel-and-slab pad — that takes mud, dropped tools, and a hose rinse |
| Bench & stands | A heavy wrench bench with a vise opposite the parked row, plus a lift stand per bike and a fixed wheel chock at the door |
| Power | Bench outlets for an impact gun and compressor, a dedicated battery-tender outlet, and bright LED light over the bench and stand row |
| Ventilation | Cross-vents or a wall fan plus a louver so fuel and solvent fumes clear, with fuel and oily rags stored away from any spark or heat |
| Winter readiness | Snow-rated roof and anchoring, a plowed path to the doors, and insulation if you want to wrench through a North Idaho freeze |
Power is the line most riders underbuild, and it is the hardest thing to add later, so plan it generously up front. A small subpanel fed from the house gives you several 120V circuits for bench outlets and lighting, plus the option of a 240V circuit if you run a larger compressor. Space outlets every few feet along the bench wall at counter height so you never drag a cord across a wet floor, and dedicate one outlet to a battery tender so the EFI bikes hold a charge through a long off-season and fire on the first warm Saturday. Layer bright, even LED light over the whole floor so there are no shadows on the bike you are working on, then add focused task light directly over the bench and the tire-change stand.
Fuel and solvents make ventilation a safety decision, not an afterthought. Plan cross-ventilation — vents or operable windows on two walls, or a wall fan paired with a low louver — so gas, brake cleaner, and chain-lube fumes clear instead of pooling. Store fuel cans and oily rags on a low shelf well away from any heat source or spark, and keep a fuel-rated fire extinguisher by the door. If you want to wrench through a North Idaho winter, insulate the walls and ceiling and add a heat source like a mini-split or an electric heater, but pair any heater with good airflow and never run it near an open fuel can. Insulation also keeps the morning chill off your tools and your hands so the shed gets used in January, not just July.
A moto shed earns a real floor because of what happens on it — mud, water, dropped tools, and the weight of bikes on stands all year. A compacted gravel pad drains well and suits a lighter, storage-first shed, but most riders want a sealed concrete slab: it gives a dead-flat surface for stands and a tire-change job, it takes a hose rinse without turning to mud, and it wipes clean of chain lube and spilled fuel. Whichever you choose, plan the approach so a bike rolls straight off the trailer and through the doors without a muddy uphill fight, and read how to prep a shed site before delivery day so the pad, drainage, and access are ready.
North Idaho winters drive several choices: a roof and anchoring rated for local snow load, a clear plowed path so the doors open after a storm, and insulation if you plan to keep working through the freeze. Moto sheds also tend toward footprints and added power that can trigger local rules — many small sheds skip a permit, but bigger buildings, electrical work, and setback or HOA requirements often do not. Confirm what your town and county require on the service areas pages, and factor any electrical permit into the plan before you finalize the size and where the shed will sit on your property.
It comes down to length and how you line them up. Park bikes nose-in along one long wall, each on its own folding or hydraulic stand, with a wheel chock at the door end so they roll in straight and lock in place. A 10x12 holds two bikes on stands with a short bench; a 10x16 or 12x16 lines up two to three plus a full bench wall; and a 12x20 takes three or four with a separate tear-down zone. Leave about three feet of aisle so you can pull a wheel without backing into the next bike.
Put the bench on the wall opposite the parked row so you can roll a stand alongside it and work standing up instead of crouching on the floor. Run a heavy bench with a vise, a parts tray, and outlets at counter height for an impact gun and tender, and line the wall above it with a French cleat or pegboard for torque wrenches, T-handles, tire irons, and a chain tool. Keep a roll-around tool chest at one end and labeled bins for the small hardware. The goal is to reach any tool without leaving the bike.
Give parts a dedicated wall near the door, separate from the bench, so a quick fix does not turn into a parts hunt. Hang spare tires on a wall rack or a loft, keep a tire-change stand and a bead breaker in that corner, and store heavy-duty tubes, rim locks, sprockets, brake pads, levers, and grips on labeled shelves and in bins. A lofted or gambrel roof adds overhead room for off-season tires and gear totes, keeping the floor clear for stands and a tire-change job.
Treat ventilation as a safety decision. Plan cross-ventilation with vents or operable windows on two walls, or a wall fan paired with a low louver, so gas, brake cleaner, and chain-lube fumes clear instead of pooling. Store fuel cans and oily rags on a low shelf well away from any heat source or spark, keep a fuel-rated fire extinguisher by the door, and if you add a heater for winter, pair it with good airflow and never run it near an open fuel can. A sealed floor also keeps spilled fuel from soaking in.
You want a surface that takes a hose and shrugs off chain lube. A sealed concrete slab is the durable choice — it stays dead-flat for stands and tire work, wipes clean of grease and fuel, and rinses out without turning to mud. If you build on a gravel-and-slab pad, add heavy-duty interlocking mats or rubber roll flooring in the work and wash zones for grip and easy cleanup. Keep the tire-change and rinse work near the door where the mess belongs, and slope or drain that area so water runs out instead of pooling under the bikes.
Plan more than a single outlet. Run a small subpanel from the house with several 120V bench circuits so an impact gun, a compressor, and lighting are not fighting over one breaker, and add a 240V circuit if you run a larger compressor. Space outlets every few feet along the bench at counter height, and dedicate one outlet to a battery tender so the EFI bikes hold a charge through the off-season and fire on the first ride of spring. Detached-building wiring usually needs a permit, so plan it before the walls close up.
Fuel and exhaust fumes concentrate fast in a sealed space, so ventilation is the first design decision for a dirt bike shed built on site — not an afterthought. Low vents near the floor and opposing high vents or a ridge vent move fumes out passively even when the bikes are just sitting. That combination is easy to frame into the wall plan from the start and awkward to add after the fact in a delivered unit.
Floor load and surface matter more than square footage for a moto shed. Two or three full-size bikes on stands are heavy, and a concrete slab or engineered floor with a sealed or painted surface stands up to oil spills, chain lube, and the grit that comes off knobbies. Coeur d'Alene and Post Falls properties often have the yard space for a proper slab-on-grade pour; on the sloped lots more common in Rathdrum or Athol, on-site framing handles the grade leveling that a pre-built delivered structure can't.
A real wrench bench — not a folding table — is what separates a storage shed from a functioning moto garage. Framing a dedicated bench wall with outlets at bench height, an overhead strip light, and a pegboard backing is a during-build decision. The same goes for parts and tire storage: a few deep shelves at the back of the structure keep a season's worth of tubes, filters, and sprockets organized without eating floor space needed for the bikes themselves.
North Idaho riding season runs from spring mud through fall frost, which means bikes come in wet. A drain-capable floor — even a simple sloped concrete apron at the entry — keeps standing water from sitting under frames all winter. See how we build moto sheds or design your layout to price the footprint and door width you need.
Tell us how many bikes you run and where the shed should sit, and we will help size the building, the bench, the power, and the site prep around your property — then you can build and price it online.
Keep planning your build with related North Idaho shed guides.