An e-bike is two expensive things in one: a bike worth thousands and a large lithium-ion battery that deserves a careful place to charge. If you ride the trails and bike paths around Coeur d'Alene, Post Falls, or the Centennial Trail, you have probably been charging that battery on the kitchen counter or in an attached garage, plugged into whatever outlet was closest — and that is exactly the setup the bike world is moving away from. A dedicated e-bike charging shed pulls the charging out of the house and gives it a deliberate home: a fire-aware charging station on a non-combustible surface, ventilation and enough winter heat that the battery never charges cold, wall hangers that get the bikes off the floor, and a small workbench for tuning. The point is to charge a high-capacity battery the right way, in a building designed for it, not next to your living space.
North Idaho On Site Sheds builds every e-bike storage shed right on your property, so the charging wall, the outlets, the ventilation, and the bench layout can be specified for the bikes and batteries you actually own. Start by counting the fleet — a commuter e-bike, an e-MTB or two, maybe an e-scooter and the kids' bikes — and add up the chargers that need to run at once, because that number drives your electrical plan. This guide covers which roofline fits, what size holds the bikes plus a real charging station, how to lay out a fire-safe charging zone separated from storage, and how to wire, ventilate, heat, and secure the building for the long Idaho off-season. Safety threads through all of it: a good e-bike shed is first a good place to charge a battery, and a good place to store bikes second.
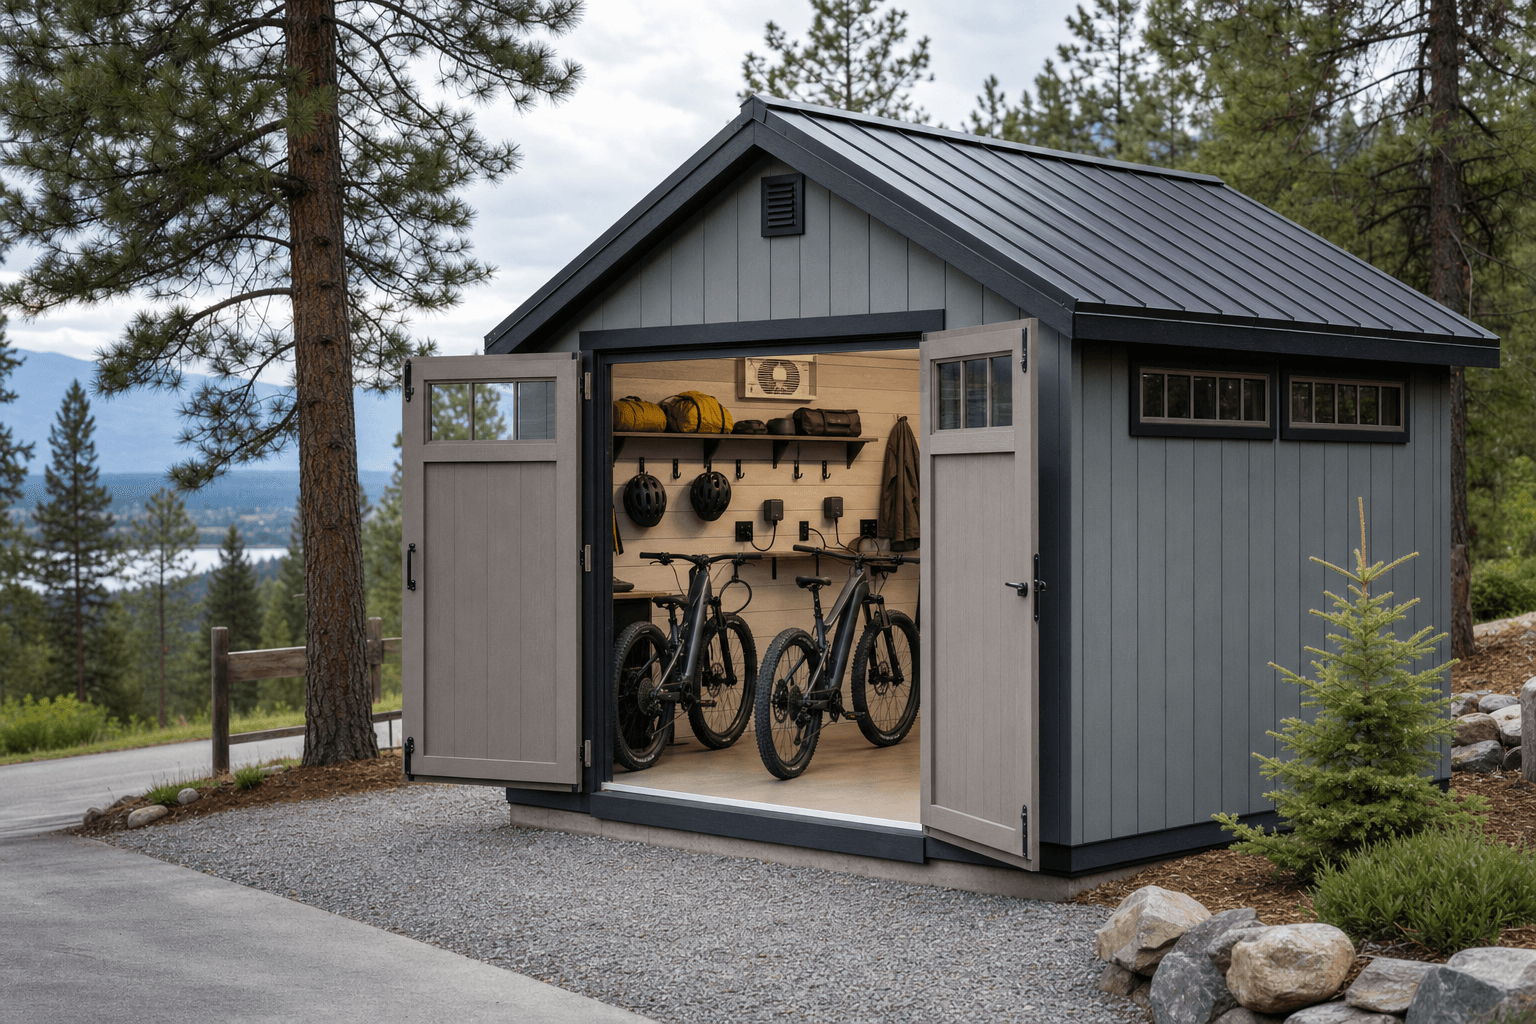
Charge the right way: a fire-aware charging station on a non-combustible surface, ventilation, wall hangers, and a bench for tuning.
An e-bike shed asks two things of its shell: usable wall height for hanging bikes and a charging wall you can build out with a fire-aware surface, outlets, and clearance. That makes the standard gable the honest starting point — it gives the most headroom for the money, takes plywood-lined walls you can screw a hanger or charging shelf into anywhere, and leaves a clean sidewall to dedicate to charging. The number that matters most is sidewall height: taller walls (8-foot-plus) let a 29er e-MTB hang vertically with its rear tire clear of the floor and leave room for a charging shelf above the bench with the battery out in the open. A lofted barn (gambrel) raises the center ridge and adds a small loft for off-season wheelsets, riding packs, and spare gear, keeping the floor open for the working fleet and the charging zone.
If you do a lot of your own wrenching, a stick-built shop style with a tall, square wall gives you a full-height surface for a pegboard, a workbench, and a charging station without the roof slope eating into the work zone. A lean-to or modern single-slope sheds North Idaho snow predictably to one side and gives you a tall front wall for a window, a vent, and the charging bench. Whatever the roofline, the charging wall is the part to spec up first: plan it on an exterior wall where a vent and a fresh-air path are simple, line it with a non-combustible backer, and keep it clear of stored fuel or solvents. An e-bike charging shed sits close to a working mountain bike shed but adds the deliberate charging plan, and it overlaps with a dirt bike and moto shed when a gas machine shares the space — at which point fuel venting and battery charging both have to be designed in.
An 8x10 hangs two e-bikes on one wall and dedicates a corner to a fire-aware charging station with its own outlet, plus a small bench.
An 8x12 or 10x12 hangs several e-bikes, gives a full charging wall with separated outlets, a workbench, and parts storage with room to work.
A 10x16 fits the fleet, a multi-bike charging station on a dedicated circuit, a tuning bench, parts cabinet, and a gear-drying corner.
Footprint decides whether the shed feels like a clean, safe charging shop or a crowded closet where a charging battery ends up buried under wet jackets — and that distinction is a safety one, not just comfort. Compare the real dimensions before you commit. An 8x10 hangs two e-bikes on one wall and leaves a corner for a charging station with its own outlet and clearance — plenty for a one- or two-rider household. An 8x12 adds length to keep the charging zone fully separated from the storage and tuning zones, so a charging battery always sits in open air. A 10x12 opens up a second wall for the rest of the fleet plus a real workbench and a dedicated charging wall with separated outlets. If you want the whole fleet, a multi-bike charging station, a tuning bench, a parts cabinet, and a gear-drying corner all set up at once, step up to a 10x16 so the charging zone keeps its own air and clearance with everything else in place. The extra length is what lets you put real distance between the charging shelf and the stored bikes, gear, and any flammables — the separation safety experts ask for.
These overlap, and the right call comes down to what is in the fleet and what has to charge. A pedal-powered mountain bike shed leads with vertical storage and a clean workbench — light bikes that hang easily, a repair stand, sealant and tools, with no battery to babysit. The moment an e-MTB or a commuter e-bike joins, charging stops being an afterthought: you need a dedicated outlet, a non-combustible charging surface, clearance around the pack, and enough heat that the battery never charges at freezing temperatures. That deliberate charging plan is the entire reason an e-bike charging shed exists, and it is why the build differs from a plain bike shed even though the hanging walls and bench look similar.
If a gas machine is also in the mix, a dirt bike and moto shed changes the build again — now you are venting fuel fumes and planning a washable floor on top of the battery-charging setup, and the two safety needs do not cancel out, they stack. The cleanest answer for most riders is to name the lead use up front. If charging a high-capacity battery the right way is the priority, build the e-bike charging shed and treat the pedal bikes as the easy part. If you are storing a battery bank or panels alongside the bikes, the same fire-aware, ventilated thinking carries straight over to a solar battery shed, which is built around exactly this problem: large lithium storage that wants temperature control, ventilation, and separation from anything flammable. Naming the lead use locks in your charging wall, circuit, venting, and heat before the framing is ordered.
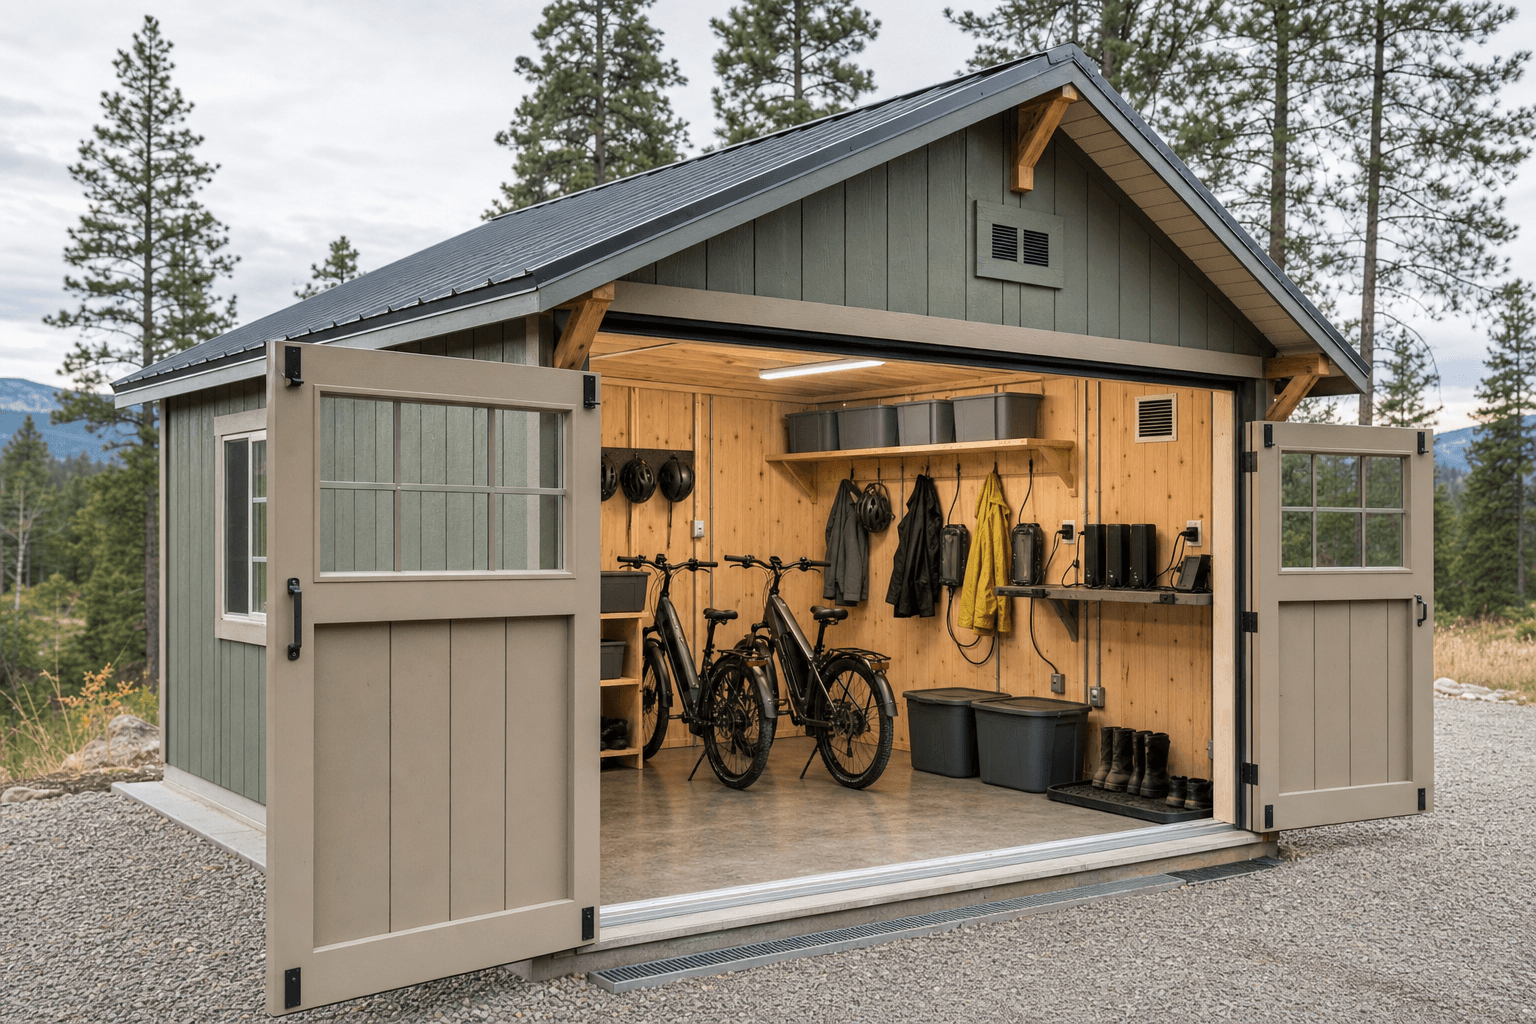
Zone the shed: a separated charging station on a non-combustible surface, a hanging wall, a tuning bench, and a gear corner by the door.
Think of an e-bike shed as four working zones instead of one open box, and lay them out so the charging zone always has its own space and air. A charging zone is the one you plan first and protect most: site it on an exterior wall, build a charging shelf or bench with a non-combustible top and backer, give it dedicated outlets, and keep a clear radius around the battery so a charging pack is never buried under gear or pressed against anything flammable. Mount a smoke or heat alarm above it and keep an electrical-rated fire extinguisher within reach. A hanging zone anchors on one or two plywood-lined walls with vertical hooks or a wall rack spaced so handlebars clear and tires never rub a frame, getting the fleet off the floor. A tuning zone centers on a workbench, ideally with a clamping repair stand beside it. A gear-and-drying zone sits by the door, where wet jackets, packs, and shoes hang and drip without crowding the charging shelf.
Good zoning is a safety system, not just tidiness. The charging zone earns separation so a thermal event has air around it and an alarm above it, instead of being wedged between dry gear and a fuel can. Put the charging shelf where you can see it from the door and where the vent and fresh-air path are simplest, and keep the gear-drying corner away from it so damp jackets never end up draped over a charging battery. The bikes can crowd a little; the charging station never should.
A charging shelf or bench with a non-combustible top and backer on an exterior wall, dedicated outlets, clearance around each battery, a smoke or heat alarm above it, and an electrical-rated fire extinguisher within reach.
Vertical front-wheel hooks or a wall rack screwed into plywood-lined framing so e-bikes hang clear of the floor and the charging zone, plus a sturdy workbench and a pegboard for tools and a clamping repair stand.
Dedicated 120V outlets for the chargers, ideally on their own circuit so several batteries charge without tripping a breaker shared with a heater, shop tools, or lighting, with no extension cords crossing the floor.
A vent or fan to keep fresh air moving past the charging shelf and clear damp, off-gassing air, plus hooks and a rack by the door for wet jackets and packs kept well clear of any charging battery.
This is where a bare shell becomes a safe charging shop, and naming exactly what lives inside is how you size the charging wall, the circuit, and the airflow around it. The charging hardware comes first: a non-combustible charging shelf or cabinet, each bike's own manufacturer charger (the right charger for the right battery matters — mismatched or off-brand chargers are a leading cause of e-bike fires), a power strip with individual switches so idle chargers are truly off, and the habit of unplugging at full charge rather than leaving packs on the charger for days. Around it go the safety anchors: a smoke or heat alarm above the charging zone, an electrical-rated fire extinguisher by the door, and a non-combustible mat or tray under each charging battery so a single cell problem stays contained, and the shelf kept clear of solvents, fuel, and propane.
Then you fit out the storage hardware: vertical front-wheel hooks, horizontal wall mounts, a freestanding gravity rack for renters who would rather not drill, and a ceiling-mounted hoist for the bikes you ride least — all of it keeping bikes off the floor and away from the charging zone. The tuning anchors round it out: a clamping repair stand, a workbench with a vise, a pegboard of hex and Torx keys, a chain tool, a torque wrench, tire levers, and a floor pump, plus labeled bins for spare tubes, brake pads, cables, and chains. If muddy kit drying is part of why you want the building, a gear-drying setup of hooks and a rack belongs by the door, well clear of the charging shelf. And if you are storing a larger battery bank alongside the bikes, the same fire-aware shelving and ventilation extend naturally into home battery storage. The right charging surface, the right chargers, an alarm, and an extinguisher are what turn a storage shed into a building you can safely charge in every day.

The details that make it safe: a non-combustible charging surface, clearance around the battery, an alarm overhead, and an extinguisher within reach.
| E-bike charging shed planning checklist | |
|---|---|
| Charging surface | A non-combustible charging shelf or cabinet on an exterior wall, with clearance around each battery and the charging zone kept clear of fuel, solvents, and gear |
| Dedicated circuit | Dedicated 120V outlets for the chargers, ideally on their own circuit so several batteries charge without sharing a breaker with a heater or shop tools |
| Ventilation | A vent or fan that keeps fresh air moving past the charging shelf and clears off-gassing and damp air, planned on the same wall as the charging zone |
| Heat for batteries | Insulation and a heater sized to keep the charging zone above freezing all winter, so a lithium battery never charges cold and damaged |
| Fire safety | A smoke or heat alarm above the charging zone, an electrical-rated fire extinguisher by the door, and a mat or tray under each charging battery |
| Hanging & security | Plywood-lined walls for vertical hangers off the floor, plus a solid-core door, a deadbolt, and a ground or wall anchor for the valuable bikes |
An e-bike shed earns real electrical planning because charging is the main event, and a charging plan done casually is where fires start. Plan dedicated 120V outlets run from the house, sized for how many chargers run at once, and put them on their own circuit wherever possible so several batteries charge without tripping a breaker shared with a heater or shop tools. Place the outlets right at the charging shelf so no extension cord crosses the floor or daisy-chains into an overloaded power strip — overloaded cords and cheap strips are a classic ignition source. Use a strip with individual switches so an idle charger is genuinely off, and never leave packs charging unattended for days. Layer bright LED light across the ceiling and add a task light at the bench for battery checks.
Ventilation and heat are not comfort features in this building, they are battery-safety features. Ventilation matters because a charging lithium battery can off-gas, and in a thermal event you want fresh air moving and a path for heat and fumes to leave — plan a vent or a small fan on the charging wall so the zone is never a sealed pocket. Heat decides whether the battery charges safely through a North Idaho winter, and this is the single most overlooked detail: lithium-ion batteries should not be charged at sub-freezing temperatures, because charging a cold cell can permanently damage it and, in the worst case, create a hazard. An unheated shed that drops below freezing for months is the wrong place to charge. Insulate the walls and ceiling and add a heater — a mini-split, an electric heater, or a small wall unit — sized to keep the charging zone comfortably above freezing whenever a battery is on the charger. Insulation helps in summer too, since extreme heat is also hard on batteries; the goal is a charging zone that stays moderate year-round.
E-bikes are valuable and easy to grab, so security is part of the build, not an afterthought. A solid-core door with a real deadbolt beats a hollow door and a padlock hasp, and reinforced hinges and a strike plate make the door itself hard to force. Inside, mount a ground or wall anchor into the framing so you can lock the most valuable bikes to the building with a hardened chain. Pull the batteries when bikes sit for a while and keep them on the charging shelf inside — a battery is a large part of an e-bike's value and the easiest piece to walk off with. Keep the contents out of sight with high or frosted windows, add a motion light and a camera at the door, and a shed that is clearly locked, anchored, and lit is a far less tempting target than e-bikes in an open garage.
An e-bike shed is not heavy, but it earns a proper base. A compacted gravel pad drains well, keeps the floor dry, and works under a framed floor — which matters in a building where you track in wet gear and want the charging zone kept dry. Plan the approach so you can roll bikes straight in off a path without a muddy uphill fight, and read how to prep a shed site before delivery day so the pad, drainage, and access are ready. North Idaho winters drive a roof and anchoring rated for local snow load, insulation that keeps the charging zone above freezing through the freeze, and a plowed path so you can reach the shed after a storm. Most small e-bike sheds skip a building permit, but bigger buildings, the added electrical for a dedicated charging circuit, and setback or HOA rules sometimes do not — confirm what your town and county require on the service areas pages. Wiring a charging circuit is exactly the kind of work worth permitting and doing to code.
Charge it on a deliberate setup, not whatever outlet is closest. Use the manufacturer's charger made for that battery, since mismatched or off-brand chargers are a leading cause of e-bike fires, and plug it into a dedicated outlet rather than a daisy-chained power strip or extension cord. Set the battery on a non-combustible charging shelf in open air, with clearance around it and nothing flammable nearby, and unplug it once it reaches full charge instead of leaving it on the charger for days. Mount a smoke or heat alarm above the charging shelf and keep an electrical-rated fire extinguisher by the door. A shed lets you give charging its own separated, ventilated, fire-aware zone away from your living space, which is the whole reason to move charging out of the house.
Not safely if it drops below freezing, which an unheated North Idaho shed will for months. Lithium-ion batteries should not be charged at sub-freezing temperatures, because pushing a charge into a cold cell can permanently damage it and, in the worst case, create a hazard. The fix is to insulate the walls and ceiling and add a heater — a mini-split, an electric heater, or a small wall unit — sized to keep the charging zone comfortably above freezing whenever a battery is on the charger. You do not have to heat the whole shed to room temperature, just keep the charging area out of the danger zone. Insulation helps in summer too, since extreme heat is also hard on batteries, so the goal is a charging zone that stays in a moderate range year-round rather than swinging with the weather.
A single e-bike can run off a regular outlet, but once you are charging more than one battery or charging alongside a heater and shop tools, a dedicated circuit is the safer plan. Several chargers plus a heater on one breaker invites trips and, worse, encourages overloaded power strips and extension cords, which are a classic ignition source. Plan dedicated 120V outlets right at the charging shelf, ideally on their own circuit, so each charger has clean power and nothing daisy-chains across the floor. Build the charging station itself as a fixed spot — a non-combustible shelf or cabinet with the outlets, a switched power strip so idle chargers are truly off, and clearance around each battery — rather than a loose pile of chargers on the bench. Wiring a charging circuit is exactly the kind of work worth permitting and doing to code.
Build the charging zone so a single battery problem stays contained and has somewhere to go. Site it on an exterior wall where a vent and fresh-air path are simple, and build the charging shelf or bench with a non-combustible top and backer, with a mat or tray under each battery. Keep clearance around every charging pack and keep the zone clear of fuel, propane, solvents, and anything that off-gasses — no charging battery should ever sit next to a gas can or under a pile of drying gear. Mount a smoke or heat alarm directly above the charging shelf and keep a fire extinguisher rated for electrical fires within reach by the door. Ventilation matters here too: a vent or small fan keeps the charging area from being a sealed pocket, so heat and any fumes can move out rather than build up.
Treat the shed like a safe, not just storage, because an e-bike and its battery are worth thousands. Use a solid-core door with a real deadbolt, reinforced hinges, and a strong strike plate so the door is hard to force, and skip the flimsy padlock-and-hasp setup. Inside, mount a ground or wall anchor into the framing and lock the most valuable bikes to the building itself with a hardened chain. Pull the batteries when bikes sit for a while and keep them on the charging shelf inside, since the battery is a big part of the value and the easiest piece to grab. Keep the bikes out of sight with high or frosted windows, or none on the street side, and add a motion light and a camera at the door. A shed that is clearly locked, anchored, and lit is a far less tempting target than e-bikes in an open garage.
Plan the building around the number of chargers that run at the same time, then give them clean power. Add up every battery that might charge at once — a couple of e-MTBs, a commuter e-bike, an e-scooter, the kids' bikes — and run dedicated 120V outlets at the charging shelf, ideally on their own circuit, so the load is spread instead of stacked on one breaker behind an overloaded strip. Use a power strip with individual switches so idle chargers are genuinely off and only the batteries that need charging are drawing power. Space the chargers and batteries out on a non-combustible shelf with clearance between them rather than stacking packs together, so each one has air around it. Stagger charging if you can, finishing one battery before starting the next, and unplug each at full charge so packs are not all sitting on chargers overnight.
The trail networks around Coeur d'Alene, Post Falls, and the broader Kootenai County riding scene have made e-bikes a serious investment for a lot of households. A dedicated e-bike charging shed built on your property keeps lithium battery packs away from the house, charges them in a ventilated space, and stores the bikes securely — which is exactly the combination that fire marshals and insurance carriers are increasingly recommending.
Lithium battery chemistry is temperature-sensitive in both directions. In a North Idaho winter, a battery charged below freezing degrades faster and can become a safety concern. An insulated shed wall and a small thermostat-controlled heater keep charging temperatures within the battery manufacturer's range without running continuously. In summer, a ventilated wall keeps heat from building up to the point where it stresses cells during a long charge cycle.
The electrical side is worth doing correctly from the start. Wall hangers and a charging station wired to a dedicated circuit — ideally with an outlet per bike — are cleaner and safer than a power strip extension-corded from the garage. When NIOS frames the shed on your Coeur d'Alene or Post Falls property, the electrical rough-in happens before the walls close, not as an afterthought.
On wooded or tight lots in Hayden and Rathdrum, the on-site build process resolves placement and access that a delivered unit can't navigate. Configure your e-bike shed in the builder to work through size and wall options, check the pricing page for a starting range, or get a free estimate for your specific property.
Tell us how many e-bikes and batteries you charge and the riding you do, and we will help spec the fire-aware charging wall, ventilation, a dedicated circuit, winter heat, and security around your property — then you can build and price it online.
Keep planning your build with related North Idaho shed guides.