When the first real storm drops two feet on the Panhandle and your sled is buried under a tarp on the side of the house, you learn fast why a dedicated snowmobile shed is worth planning right. A sled that lives outdoors all winter starts hard, ices up, and rots its seat and belt from the inside out; one that lives in a purpose-built building rolls out warm, dry, and ready to load for Lookout Pass or the trails off Magee. The sheds that actually earn their keep are planned around the way a snowmobile season really runs: a low ramp you can drive a sled up without spinning the track, a floor that takes carbide studs and dripping snowmelt without rotting, a place to dry a soaked suit and helmet by morning, a bench for waxing and tuning, and enough ventilation to store fuel and run an engine safely. This guide walks through how to plan that building for a North Idaho property: which roofline sheds the snow, what size fits one sled or three, how to lay out the interior, and how to handle gas, gear, and a long freeze.
North Idaho On Site Sheds builds every sled shed right on your property, so the door height, ramp, floor, and ventilation get specified for the machines and gear you actually own instead of a generic storage shed that happens to be near the driveway. Start with the hardest facts — how many sleds you run, whether they ride on studded tracks, how much wet gear comes off after a day in the deep snow, and whether you tune at home — and size the building around those. Get it right and the shed becomes the staging area for the whole winter; get it wrong and you are back to wrestling a frozen tarp in the dark.
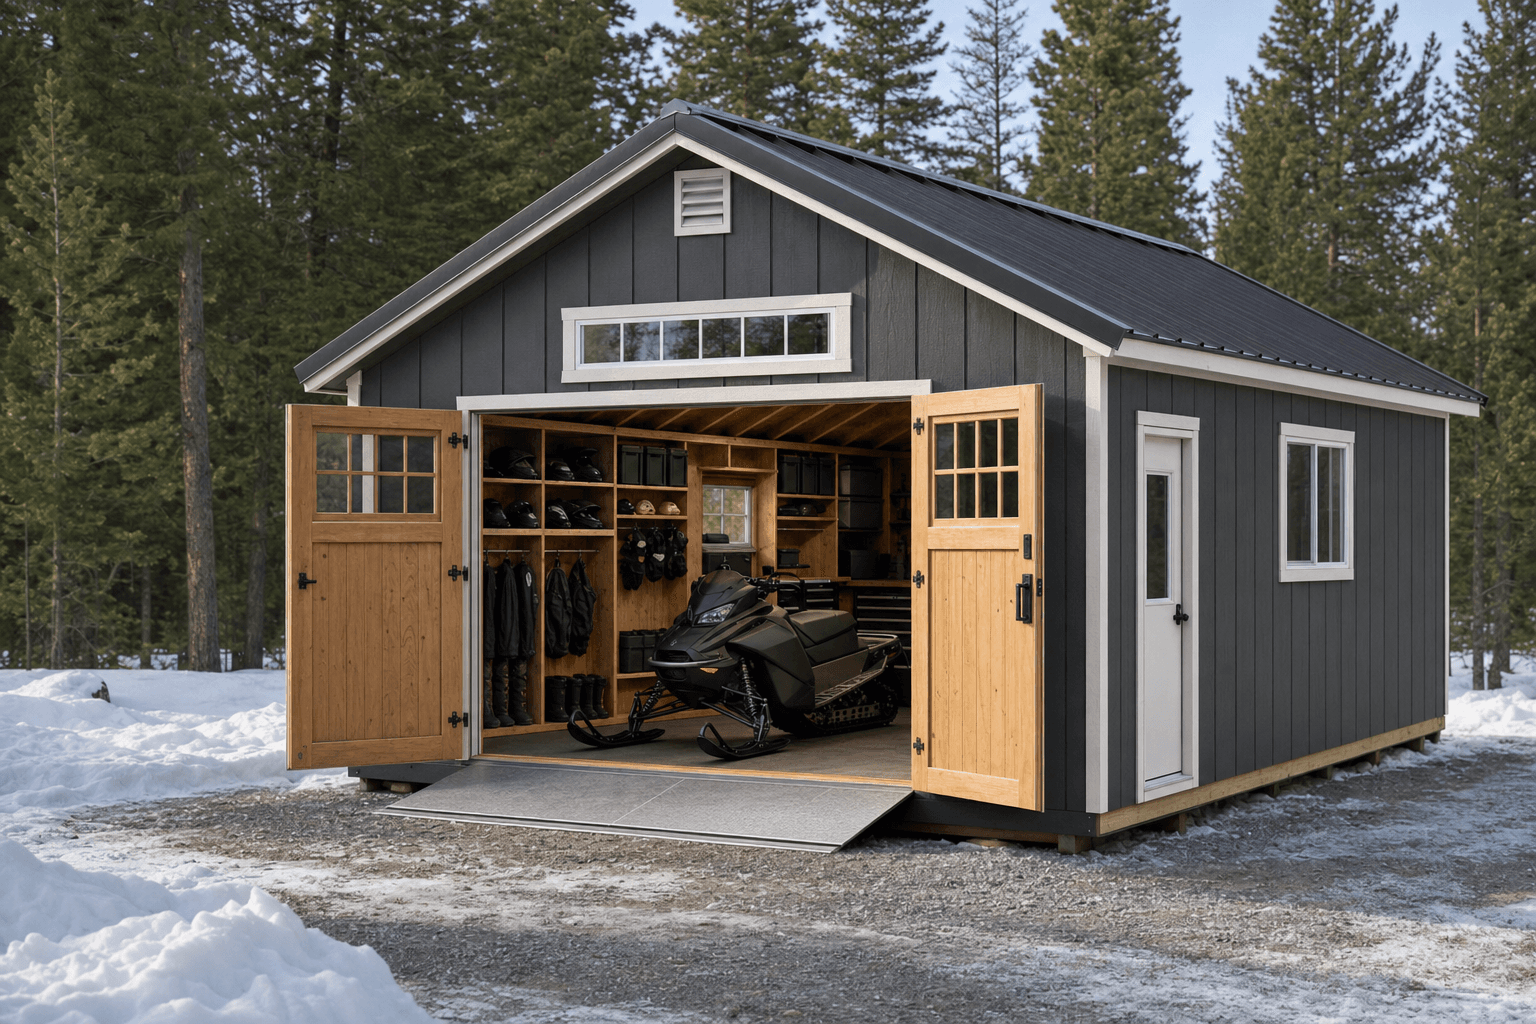
A real sled shed starts with the approach: a wide door, a gentle ramp, and a floor that takes studs and snowmelt without rotting.
A sled shed wants three things from its shell before anything else: a tall, wide door, a roof that handles North Idaho snow, and enough length to drive a machine in and still walk around it. The standard gable is the honest starting point — it gives you the most usable headroom and wall height for the money, sheds snow evenly off both slopes, and is easy to insulate and line with plywood you can screw shelving and hooks into anywhere. Order the door tall and wide enough that a sled on a trailer-height deck, with a windshield and mirrors, clears the opening without ducking it under the header. A lofted barn (gambrel) raises the center ridge and gives you a loft up top for off-season storage — covers, tow ropes, spare belts, summer gear — while keeping the floor clear for the sleds. A lean-to or modern single-slope sheds snow predictably to one side, which is useful for controlling where the roof avalanche lands relative to the door and the path you keep plowed.
Whatever the roofline, the door and the floor are the parts to spec up, not down — a sled shed lives or dies on whether you can get the machine in and out cleanly and whether the floor shrugs off studs and meltwater. A snowmobile shed sits close to a heated, working garage in how it is used, which is why it overlaps with a detached garage when the building also stores a truck or a trailer, and with an ATV and UTV shed when the same family rides quads in summer and sleds in winter off the same pad. If you are a serious tuner, the wax-and-tune side of the build shares a lot with a ski and snowboard tuning room — the bench, the lighting, the venting for hot wax. Decide early whether this is purely storage, a storage-plus-staging space, or a full home shop, because that one call drives the size, the door, the bench, and how hard the heat and ventilation have to work.
A 10x16 fits a single sled lengthwise with a windshield, plus a strip of floor for a wax bench, hanging gear, and a shelf for helmets and oil.
A 12x16 or 12x20 holds two sleds side by side or nose to tail, a real workbench, a drying rack for suits, and wall storage for tools, belts, and fuel cans.
A 12x24 gives length for three sleds or two plus a trailer, a tuning bench, a heated drying zone, and open floor to pull a machine out and turn it for service.
Footprint decides whether the shed is a tight single-sled garage or a winter staging area you can actually work in, so compare the real dimensions before you commit — a sled is long, and a couple of feet at the nose is the difference between walking around the machine and squeezing past it. A 10x16 parks one sled lengthwise with the windshield up and still leaves a lane along one wall for a wax bench, a few hooks, and a shelf; a 12x16 or 12x20 opens up to two sleds side by side or nose to tail with a genuine workbench and a drying corner that does not crowd the machines; and a 12x24 gives you the length for three sleds, or two plus a trailer or a stack of off-season gear, with room to pull one machine fully out and spin it around for a belt change or a track inspection. The extra length is what lets you load and unload without playing musical sleds, and the extra width is what lets you walk a soaked suit to the drying rack without brushing it against a greasy track. Length matters more than width in a sled shed — a long, narrow bay is exactly what a snowmobile wants, because the machine and the ramp both run in a straight line.
These overlap, and the right call comes down to what the building does most of the year. An ATV and UTV shed is built around wheeled machines that come and go on bare ground or mud, so it leans on a durable floor, a ramp for tires, and tie-downs, but it does not have to plan around snowmelt, studded tracks, and a hard freeze the way a sled shed does. A detached garage is the most general-purpose answer — it stores a truck, a trailer, tools, and the sleds together under one bigger roof — and it makes sense when the snowmobiles are one of several things you are parking and you want a single large building. A purpose-built snowmobile shed puts the winter use first: the low ramp tuned for a track, the rot-proof floor that drinks meltwater, the drying zone for wet gear, and the venting for fuel and a warming engine.
Plenty of buyers want one building that does double duty across the seasons, and that works as long as you build to the hardest job. A shed that stores sleds in winter and quads in summer off the same gravel pad still needs the sled-shed floor and ventilation first, because you cannot retrofit better drainage or a taller door after the framing is up — but you can always add tie-downs and a second ramp for the wheeled machines. Naming the lead use up front keeps you from a building that stores poorly and works poorly both, and it locks in your door size, your floor build, and your ventilation before anything is ordered.
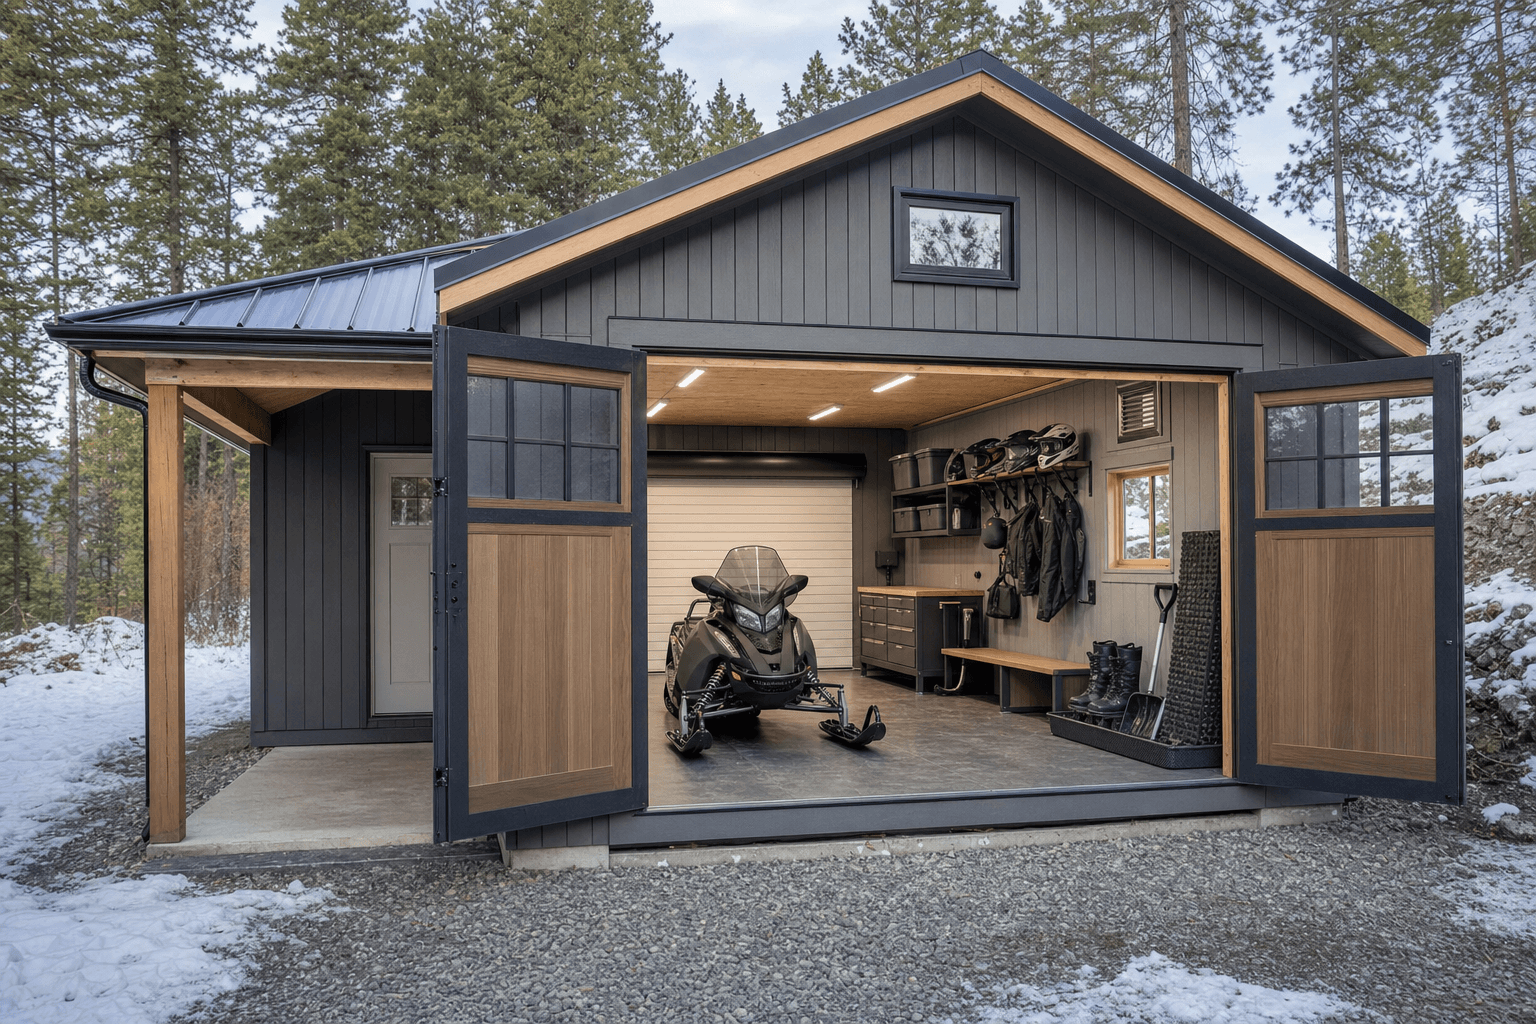
Zone the shed: a parking lane for the sleds, a tuning bench along one wall, a drying corner for wet gear, and hooks up high.
Think of the shed as three or four working zones instead of one open box, and lay them out so a snowy sled never has to back through the bench or the drying gear. A parking lane runs straight in from the door, sized for the number of sleds you store, with the stud-friendly floor underneath and a drain or sloped pad so the snow that rides in has somewhere to go. A tuning and wax bench anchors along one solid wall, away from the door's cold draft, with a vise, an outlet strip, and good light for belt changes, carbide work, and hot-waxing the slides. A drying zone lives near the heat source, with hooks and a rack for suits, bibs, gloves, helmets, and boots so a day's worth of soaked gear is dry by the next morning instead of freezing stiff overnight.
Good zoning means a dripping sled never parks under your hanging gear and you never reach across a hot wax iron to grab a helmet. Keep the parking lane clear and straight so you can drive a machine in and out without three-point turns, and leave a sled's length plus a couple of feet of open floor near the door so you can pull one machine out and work on it without moving the others. Put the bench against an interior wall, not beside the door, so cold air does not pour over your work, and set the drying rack where the building is warmest and the air moves, because wet base layers and a soaked helmet liner need both heat and airflow to dry.
A durable, sealed or treated floor that drinks meltwater without rotting and takes carbide studs without chewing up, plus a long, gentle ramp so a sled drives in and out without spinning or catching the running boards.
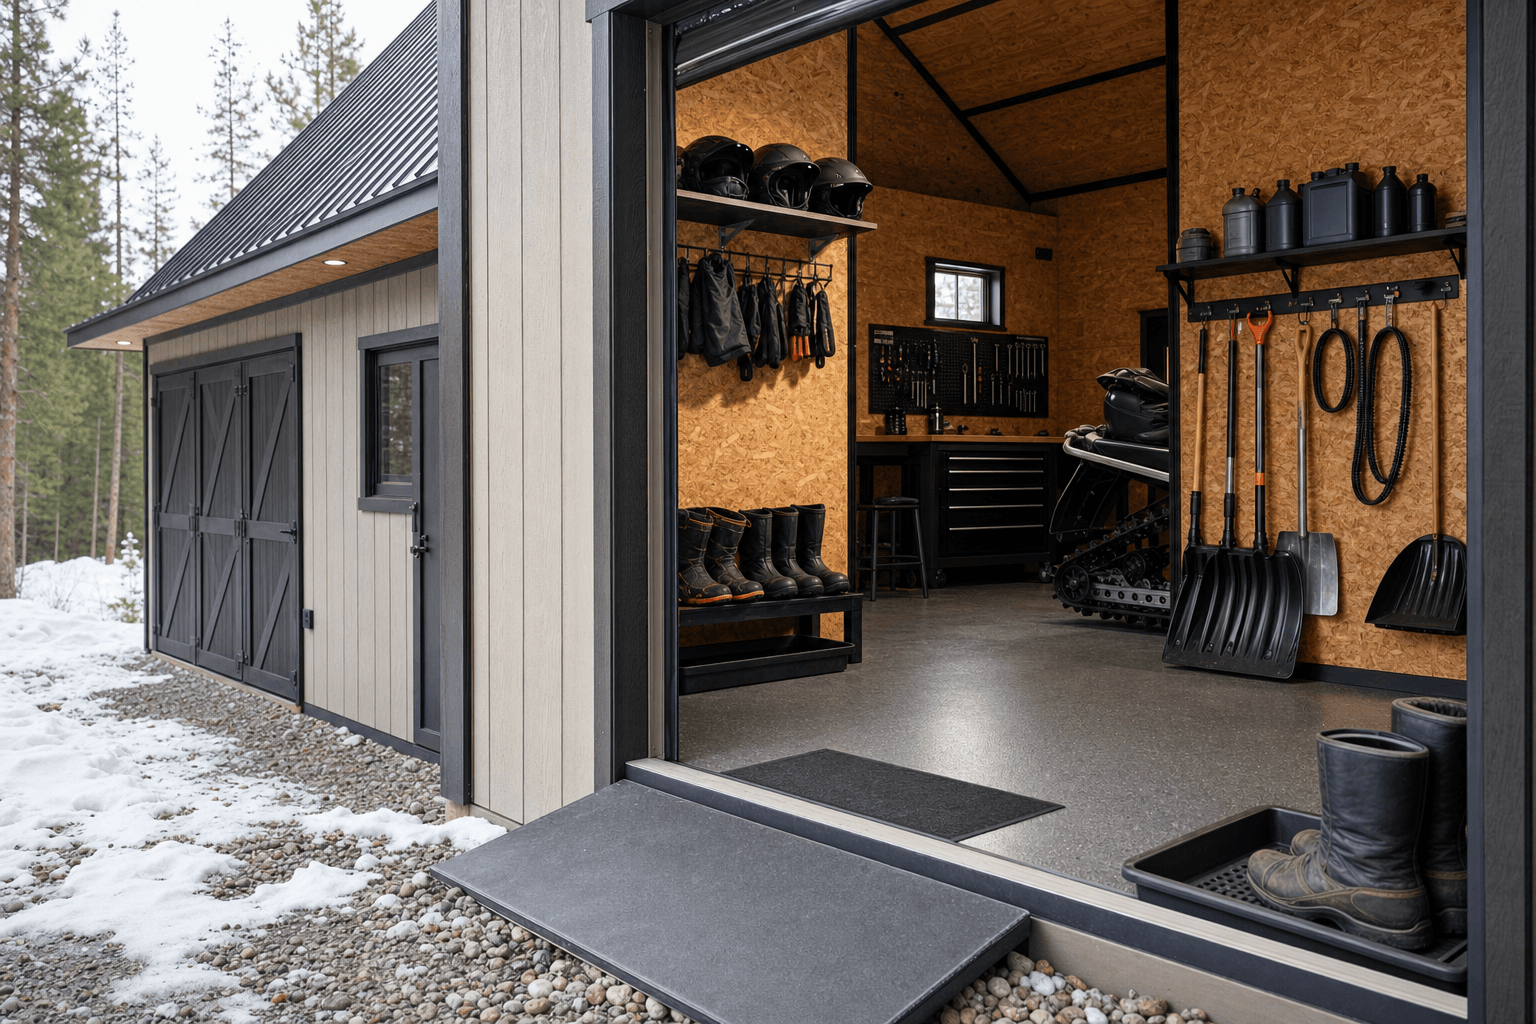
A solid workbench along an interior wall with a vise, a vented surface for hot wax and slide work, a belt-change clamp, and drawers or pegboard for carbides, tools, spare belts, and plugs.
Hooks, a hanging bar, and a boot-and-glove rack near the heat and airflow so bibs, suits, gloves, helmets, and liners dry overnight instead of freezing, plus a tray to catch the drips.
Low and high vents or an operable window plus a fan to clear gas fumes and exhaust, a flammable cabinet for cans and oil, and a layout that keeps fuel storage away from any heater's flame or element.
This is where a bare shell becomes a working sled shed, and it is worth naming exactly what lives inside so you size the floor, the bench, the storage, and the airflow around it. The machines lead: one to three snowmobiles, plus the trailer or sled deck if it lives inside, and a shovel and avalanche pack staged by the door for backcountry days. The tuning and service gear clusters at the bench — a vise and a belt-change clamp, carbide runners and a carbide wrench, spare drive and secondary belts, spark plugs, a clutch puller, hot wax and a waxing iron for the slides, and a basic socket and wrench set. Nearby goes the fluids zone: jugs of premix and two-stroke oil, fuel stabilizer, and a gas can or two in a flammable cabinet, all kept clear of any heater.
Around the anchors you fit out for the wet, cold reality of riding the Panhandle. The drying gear is half the point of the building — a hanging bar and hooks for snow bibs and jackets, a helmet shelf or pegs with a small fan to dry the liners, glove and mitten clips, a boot rack or boot dryer, and goggle hooks where they will not get scratched. The storage climbs the walls and into the loft: tow straps, tie-downs, a spare windshield, hand and toe warmers, a first-aid and tool kit, and bins of off-season covers and summer gear up high and out of the way. Round it out with a shop heater, bright light over the bench and parking lane, a snow brush by the door, and a mat under the machines to corral the meltwater — the touches that turn a cold box into the staging area for the whole season.
The working details: a vise and belt clamp at the bench, carbides and wax within reach, and wet gear drying on hooks above a drip tray.
| Snowmobile shed planning checklist | |
|---|---|
| Door & ramp | A tall, wide door and a long, gentle ramp so a sled drives in with a windshield up and the track climbs without spinning or catching the boards |
| Floor | A durable, sealed or treated floor that takes carbide studs and drinks snowmelt without rotting, ideally sloped to a drain or set on a slab |
| Drying zone | Hooks, a hanging bar, and a boot-and-glove rack near the heat and airflow so suits, helmets, and liners dry overnight |
| Tuning bench | A solid bench with a vise and belt clamp along an interior wall, with bright light and a vented surface for hot wax and carbide work |
| Ventilation & fuel | Low and high through-venting or an operable window plus a fan to clear fumes and exhaust, and a flammable cabinet kept clear of any heater |
| Heat & insulation | Insulated walls and ceiling with a shop heater so the building stays above freezing, sleds start easily, and gear actually dries |
Heat and airflow decide whether the shed is a real staging area or just a cold box with a roof. A little warmth goes a long way: an insulated, heated building keeps the temperature above freezing so a sled starts easily on a cold morning, the carbs and lines do not ice, and — critically — the wet gear actually dries instead of going stiff. A mini-split, an electric shop heater, or a vented propane heater all work; size it to take the chill off the volume of the shed, and keep any open flame or hot element well away from where you store fuel and where solvent and hot-wax fumes collect. Then plan the power to match the work: several dedicated 120V circuits run from the house so the heater, the bench tools, a battery tender or two, a boot dryer, and the lights are not all fighting over one breaker, with outlets at the bench, by the parking lane for trickle chargers, and at the drying rack.
Ventilation is not optional in a sled shed, because you are combining three things that demand fresh air: gasoline and two-stroke oil that off-gas, an engine that may idle while you back a machine in or warm it up, and hot wax and solvents at the bench. Plan through-ventilation — a low intake and a high outlet, or an operable window plus an exhaust fan — so fumes and any exhaust clear out instead of pooling, and never run a sled with the door closed and no airflow. The same vent path keeps humidity down: a building full of melting snow and drying gear builds moisture fast, and without airflow that condenses on the cold steel of your sleds and rusts hardware. Insulation keeps the heat you pay for inside and makes the bench a place you will actually use in January.
A snowmobile shed earns a real base and a smart approach, because you are driving heavy machines in and out all winter on snow and ice. A compacted gravel pad drains meltwater well and works under a durable framed floor, but if you want the toughest, easiest-to-clean surface for studded tracks, drips, and fuel, a concrete slab sloped to a drain is the move — it shrugs off carbides, hoses out clean, and gives the ramp a level landing. Either way, plan the ramp so a sled climbs in at a gentle angle without the track spinning or the running boards catching, and point the door at a path you can keep plowed. Read how to prep a shed site before delivery so the pad, drainage, and access are squared away, and think hard about where the roof sheds snow — you do not want a season's worth of roof avalanche burying the very door you drive through.
North Idaho winters drive nearly every choice here: a roof and anchoring rated for the local snow load so the building carries a heavy wet pack, a slope or door orientation that dumps roof snow away from your plowed approach, and insulation and heat that keep the shed workable through a long freeze. Keep a clear, plowed lane from the driveway to the door so you can get a sled in and out after a storm, and stage the building where snow you push off the pad has somewhere to go that is not in front of the door. Sled sheds also tend toward the larger footprints and added electrical that can trigger local rules — many small storage sheds skip a permit, but bigger buildings, a slab, and any wiring often do not. Confirm what your town and county require on the service areas pages, and factor any electrical or structural permit into the plan before you finalize the size and where the shed will sit.
Plan around the length of a snowmobile, not just the width, because a sled is long and you want room to walk around it. A 10x16 parks one machine lengthwise with the windshield up and still leaves a lane for a small bench and some hooks. For two sleds side by side or nose to tail, plus a real workbench and a drying corner, step up to a 12x16 or 12x20. For three machines, or two plus a trailer and off-season gear, a 12x24 gives you the length to store them all and still pull one out into the open floor to work on it. Always size up if you tune at home or expect to add a machine, since a sled shed fills fast.
A snowmobile loads best on a long, gentle ramp so the track climbs without spinning and the running boards do not catch on a steep lip — keep the angle shallow and the ramp solid and wide enough for the machine. The floor needs to handle two things a normal shed floor does not: carbide studs that chew up soft surfaces, and the snowmelt that drips off the sled all winter. A concrete slab sloped to a drain is the toughest answer because it takes the studs, hoses out clean, and gives the ramp a level landing. A durable, sealed or treated framed floor on a well-drained gravel pad also works when it is built for the wear and a mat catches the meltwater.
Drying gear is half the reason to build the shed, and it needs both heat and airflow to work — a cold, sealed corner just keeps everything damp. Set up a drying zone near your heat source with a hanging bar and hooks for bibs, jackets, and suits, a shelf or pegs for helmets with a small fan to dry the liners, clips for gloves and mittens, and a boot rack or a boot dryer. Put it where the air moves, and add a tray to catch the drips. With heat and airflow together, a day's worth of soaked gear is dry and warm by the next morning instead of freezing stiff overnight, which is the difference between gearing up and dreading it.
Yes, and a well-planned sled shed is a great off-season home for the machines and the gear. In the off-season, lift covers, tow ropes, spare belts, and summer items into the loft or onto high shelves, and use the open floor for the trailer or other equipment. Keep the building ventilated through the warm months so trapped humidity does not condense on the sleds and rust hardware, and store fuel properly with stabilizer in a flammable cabinet. The same heat and insulation that keep gear dry in winter also keep the shed from swinging through big temperature and moisture cycles in summer, which protects seats, belts, and electronics on machines that sit for months.
Treat fuel and engine fumes as the safety priority. Plan through-ventilation — a low intake and a high outlet, or an operable window plus an exhaust fan — so gasoline vapor, two-stroke oil fumes, and any exhaust clear out instead of pooling, and never idle a sled in the shed with the door shut and no airflow. Store gas cans, premix, and oil in a dedicated flammable cabinet, and keep that cabinet and any fuel well away from a heater's flame or hot element, since fuel vapor is heaviest down low where a spark or pilot can reach it. A carbon monoxide detector is cheap insurance any time an engine might run inside. Build the airflow and the fuel storage into the plan from the start, not as an afterthought.
Put the bench along a solid interior wall, away from the door's draft, with bright shadow-free light over it. The core tools are a vise and a belt-change clamp, carbide runners and a carbide wrench, spare drive and secondary belts, spark plugs, a clutch puller, and a basic socket and wrench set, with pegboard or drawers to keep it all in reach. For hot-waxing the slides you want a vented surface and good airflow, since wax and any solvent give off fumes. Add an outlet strip for tools and a battery tender, a drip tray, and storage for premix and oil nearby but clear of any heater. A bench like this turns the shed into a home shop where you handle belt changes, carbide swaps, and waxing without a trip to town.
A snowmobile shed in North Idaho has to work on the worst mornings of the year. When a storm drops overnight and you want to be on the trail by first light, a shed with a wide door, a dry floor, and a dedicated waxing bench makes that happen. Built on site in Coeur d'Alene or Post Falls, the structure is framed to carry the roof loads our winters actually produce — engineered for snow, not for a milder climate.
The on-site build advantage matters most on sloped or wooded lots, which describe a large share of North Idaho properties from Hayden out to Rathdrum and north toward Sandpoint. A delivered unit can't reach those sites without major regrading. A shed framed in place on a compacted gravel pad reaches any accessible lot and levels itself to the ground rather than fighting it.
Fuel-safe ventilation is a real requirement here, not a checkbox. Gasoline and two-stroke exhaust vapors need a path out, especially if the shed doubles as a tuning bay. Insulating the walls keeps temperatures stable enough to protect electronics and carb components through freeze-thaw cycles, and a vapor barrier in the floor keeps ground moisture from rising under your machines.
If you're ready to design the size and door layout, start in the shed builder or browse our snowmobile shed page. Owners in Coeur d'Alene can also get a free estimate without leaving the house.
Tell us how many sleds you run, whether you tune at home, and how much gear comes off after a day in the deep snow, and we will help spec the door, ramp, floor, drying zone, ventilation, and site prep around your property — then you can build and price it online.
Keep planning your build with related North Idaho shed guides.