A home solar and battery system is a small power plant, and the part most people underplan is where the equipment actually lives. The panels go on a roof or a ground mount, but the inverters, charge controllers, combiner box, disconnects, and the battery bank itself need a dry, fire-aware, temperature-controlled home of their own — not a corner of the garage next to the lawn mower and the gas can, and not bolted to an exterior wall where the batteries freeze every January. Across the off-grid cabins, grid-tied homes, and backup systems around Coeur d'Alene, Post Falls, and the rural lots up toward the lakes, the systems that age well are the ones where the equipment got a proper room. A solar and battery shed gives the gear that room: an insulated, ventilated building that holds the batteries in their safe temperature band, keeps the electronics dry and cool, separates the energy store from your living space, and gives an electrician clean walls to mount everything and clean paths to run conduit.
North Idaho On Site Sheds builds every solar equipment shed right on your property, so the battery wall, the inverter wall, the ventilation, and the conduit penetrations can be specified around the exact system you are installing. The single most important word in this whole plan is temperature — battery chemistry is fussy about cold and heat, and an unheated, uninsulated shed in our climate is the wrong place for a battery bank. Fire safety is a close second, because a battery bank stores a lot of energy and deserves to be in a building designed to contain a problem, not spread it. This guide covers which roofline fits, what footprint holds your equipment plus the batteries with proper clearances, how to lay out the inverter, controller, and battery zones, how to ventilate and heat the room for the batteries, and how to plan the conduit and wiring access so the install is clean and to code. Treat the building as electrical infrastructure first and storage second, and it will protect a serious investment for decades.
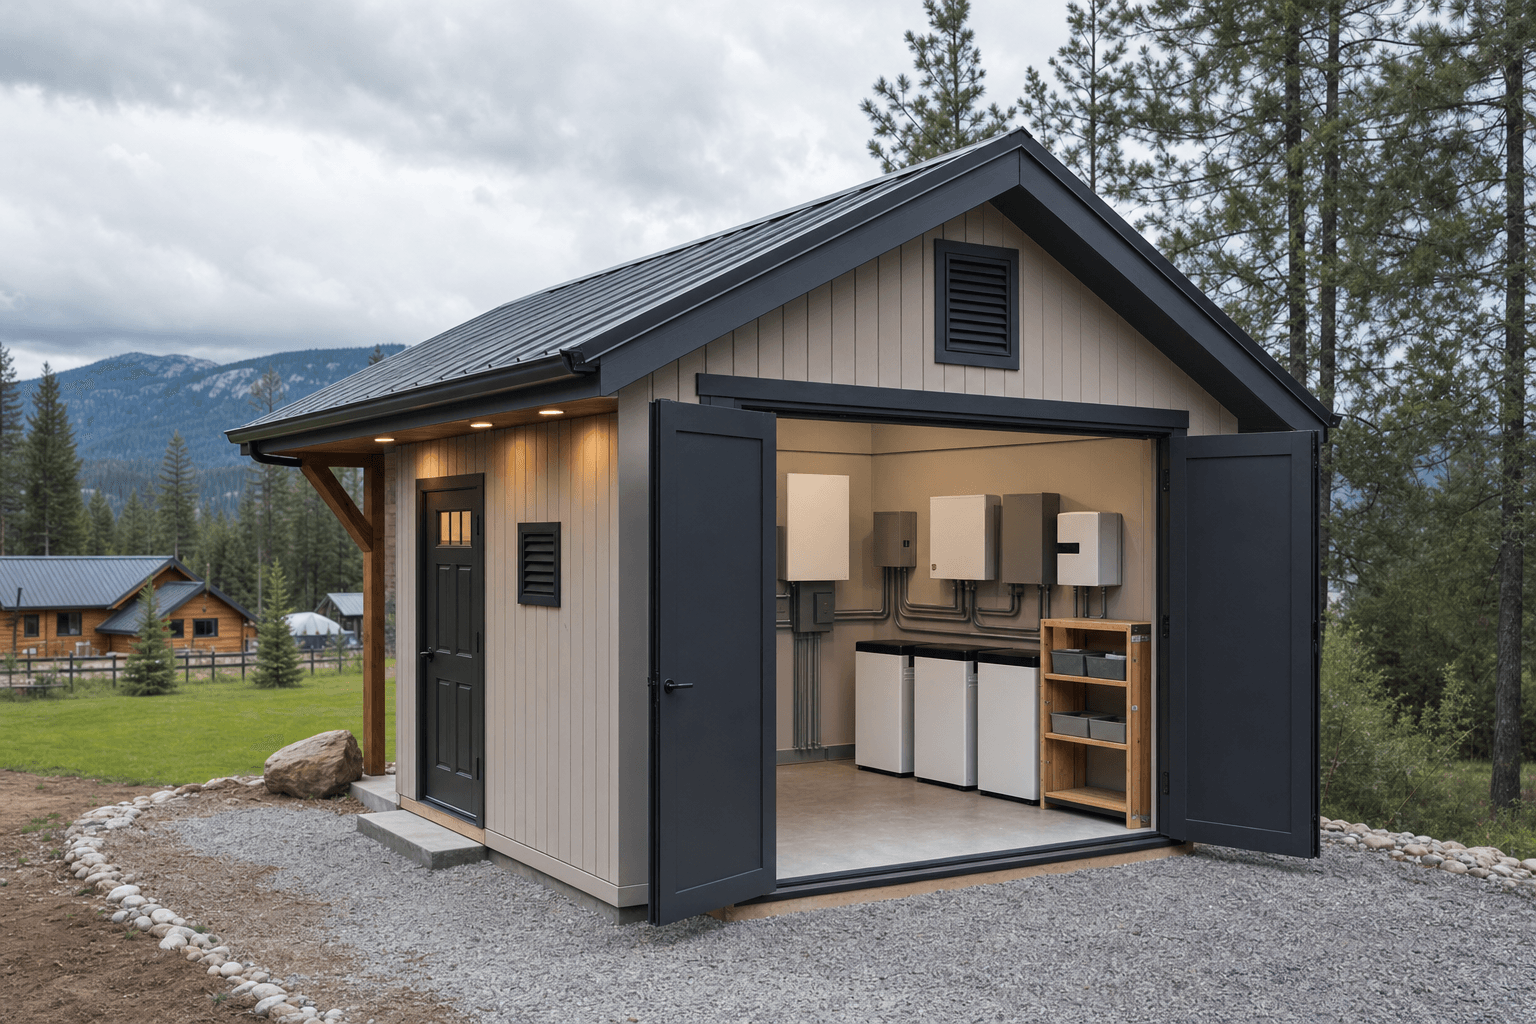
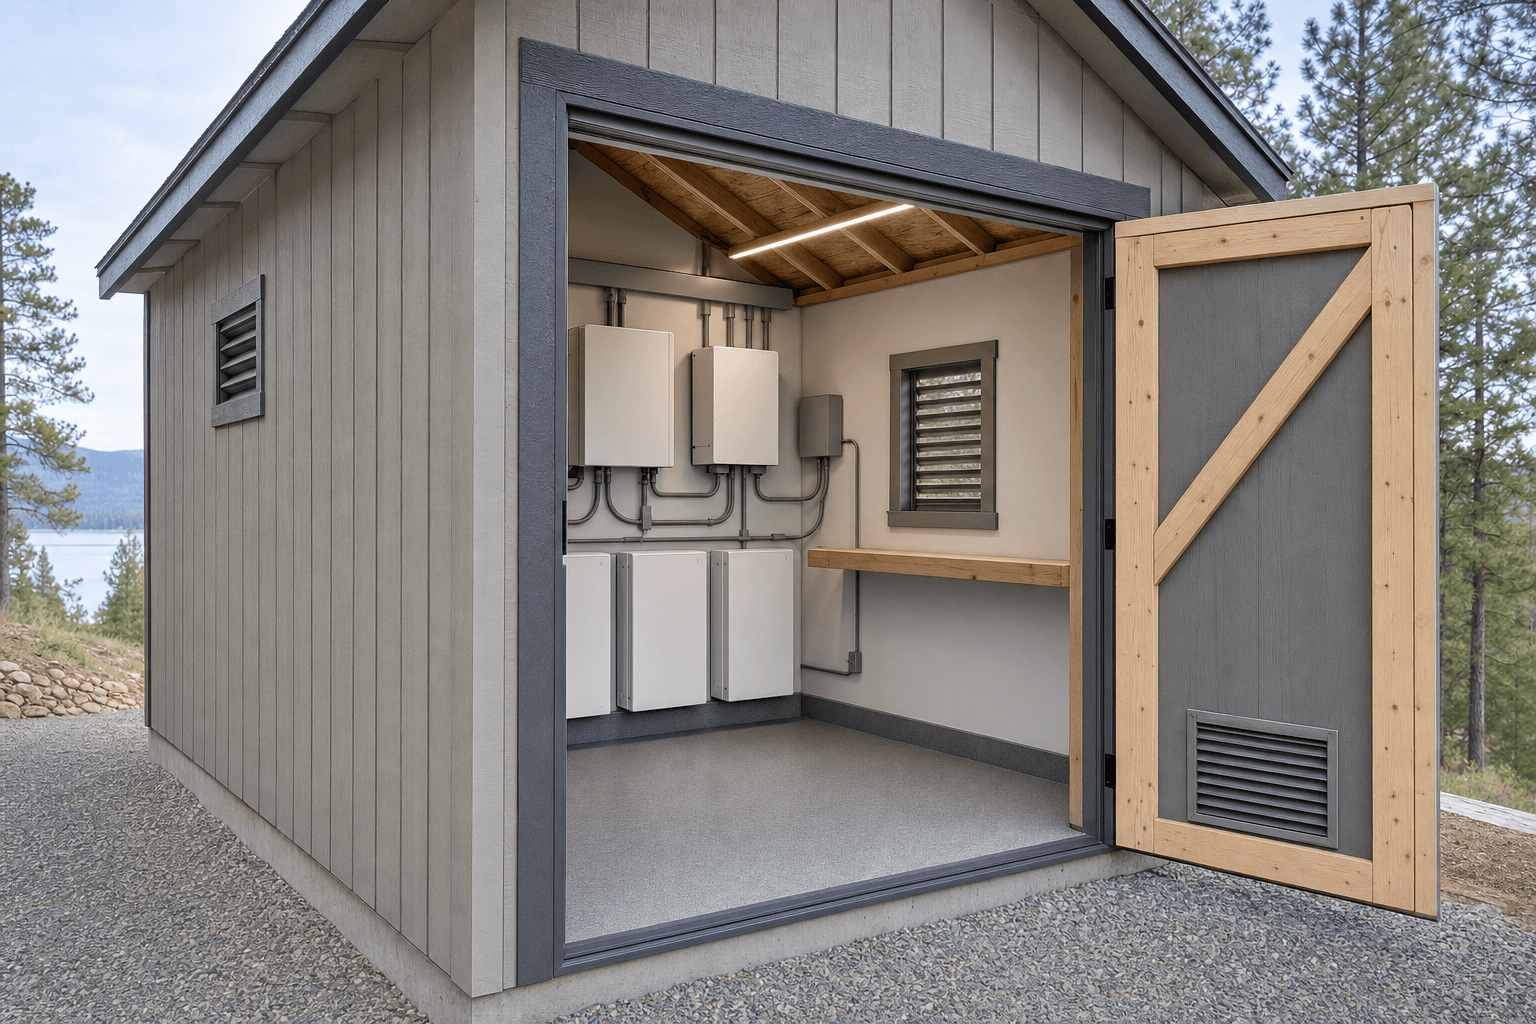
A real room for the power plant: insulated and ventilated, batteries held in their safe temperature band, electronics dry, and walls ready for clean conduit.
A solar equipment shed asks for clean, square wall area you can mount heavy gear on, an insulated and sealable shell that holds temperature, and a simple path for conduit to enter and leave. That makes the standard gable the honest starting point: it gives full-height, plumb sidewalls you can line with plywood and bolt inverters, charge controllers, disconnects, and a combiner box to anywhere, with a peaked roof that sheds our snow and a high point where warm air from the electronics can collect and vent. The number that matters is usable wall height and flat wall run — you want enough clear, plumb surface to mount the electronics at eye level and stand the battery rack or enclosure below them with clearance all around. A lean-to or modern single-slope sheds North Idaho snow predictably to one side and gives you one tall wall to dedicate to the equipment, which suits a shed sited against the house, the garage, or the array.
A stick-built shop-style shell with tall, square walls is the most comfortable for a larger system, because it gives full-height surfaces for a big inverter stack, a battery bank, and a service panel without a sloped roof crowding the wall you mount to. Whatever the roofline, the parts to spec up first are insulation in the walls, roof, and floor; an air-sealed shell with a sealing door; a ventilation plan for the battery zone; and planned conduit penetrations rather than holes drilled wherever on install day. Spec a non-combustible or fire-rated treatment on the battery wall and keep the room finished simply so there is nothing flammable stacked against the gear. A solar and battery shed sits right next to a generator shed when an engine generator backs up the system — at which point you are also venting exhaust and handling fuel — and it overlaps with an emergency preparedness shed when the same building anchors your whole backup-power and resilience plan.
A 6x8 or 8x8 holds a backup inverter, a charge controller, disconnects, and a small battery bank on one wall, with clearance around the electronics and a vent for the batteries.
An 8x10 fits a full inverter stack, controllers, a service subpanel, and a floor-standing battery bank with working room in front and clearance to all sides.
An 8x12 holds a big inverter and battery setup, a dedicated battery zone with its own ventilation, conduit runs, and a clear aisle to service every component.
Footprint here is about the size of your battery bank, how many inverters and controllers you are mounting, and how much working clearance an electrician needs to install and service it safely — and clearance is a code and safety matter, not a comfort one. Equipment needs working space in front of it, and a battery enclosure needs air and access on its sides, so size to the gear plus its clearances, not to the gear alone. A 6x8 is the compact backup room: it mounts an inverter, a charge controller, and disconnects on one wall and stands a small battery bank below with room to work, plenty for a grid-tied backup or a cabin's modest system. An 8x8 gives a square room with two usable walls, so the electronics line one wall and the battery bank gets its own wall and its own ventilated zone, with floor space to stand in front of both. An 8x10 is the whole-home workhorse — long enough to mount a full inverter stack and a subpanel on one wall, stand a floor-mounted battery bank along another with clearance on every side, and keep a clear aisle to service it. If you are building a larger off-grid system with a big battery bank and multiple inverters, step up to an 8x12 so the battery zone gets its own dedicated, ventilated space, the conduit has room to run cleanly, and you can walk all the way around the gear to maintain it. Depth buys you the working clearance and the separation between the battery zone and the electronics that a safe, serviceable install depends on.
These buildings all hold backup power, but they manage very different hazards, and naming the lead use keeps you from a room that does two jobs poorly. A solar and battery shed leads with temperature-controlled, fire-aware electrical storage — an insulated, ventilated room built to hold a battery bank in its safe temperature band and give inverters and controllers clean, dry walls to live on. A generator shed leads with a very different set of needs: it houses an engine that produces exhaust and heat and runs on fuel, so it is built around high-volume ventilation, exhaust routing, sound control, and fuel-safe construction. The two often live near each other in a backup system — the generator charges the bank and covers the gaps — but a running engine and a sensitive battery bank want opposite environments, so they belong in separate rooms or a well-divided building rather than crammed together. If an engine generator is part of your plan, build its venting and fuel handling into the generator shed side and keep the batteries and electronics in their own clean, cool, fire-aware room.
If the bigger goal is whole-property resilience, an emergency preparedness shed is the natural neighbor: it anchors backup power alongside water, food, fuel, and gear so the household can ride out an outage or a wildfire evacuation, and the solar-and-battery room is often the power heart of that larger plan. An EV charging shed overlaps too, because the same solar and battery system frequently feeds a vehicle charger — and the fire-aware, ventilated, temperature-controlled thinking that protects a home battery bank carries straight over to the large vehicle batteries and charging hardware in that building. Decide which job leads — storing energy safely, generating it with an engine, charging a vehicle, or anchoring a whole resilience setup — and build the room around that hazard first. That order locks in your insulation, your ventilation, your fire detail, and your conduit plan before the framing is set, and it keeps a battery bank from sharing air with engine exhaust or sitting in a room that was never meant to hold it.
Zone the room: electronics mounted at eye level on one wall, the battery bank in its own ventilated zone below with clearance, conduit run clean to each box.
Think of a solar and battery shed as three working zones rather than one open box, and lay them out so the battery zone always keeps its own air, clearance, and separation. An electronics zone anchors one plumb, plywood-lined wall: mount the inverter or inverter stack, the charge controllers, the combiner box, the AC and DC disconnects, and any subpanel at a serviceable height, grouped so the wiring between them is short and tidy, with working space kept clear in front so an installer can stand and reach every device. A battery zone is the one you plan first and protect most: give the battery rack or enclosure its own space — ideally its own wall or a defined corner — with clearance on the sides and top per the manufacturer's spec, a non-combustible surface beneath and behind it, and a clear path for the air the batteries need. A service and access zone is simply the open floor and aisle that lets a person stand in front of the gear, pull a cover, and work safely, plus the door wide enough to bring a heavy battery or inverter in and out.
Good zoning here is a fire-safety and serviceability system, not just tidiness. The battery zone earns separation so a thermal problem in one cell has air around it and detection above it instead of being wedged against the inverters or a stack of stored boxes, and so heat from the electronics is not dumped straight onto the batteries. Keep the room dedicated — resist the urge to let it become general storage, because a battery bank should never share a wall with stacked fuel, paint, propane, or a pile of flammable clutter. Mount a smoke or heat detector above the battery and electronics zones, keep a fire extinguisher rated for electrical fires by the door, and leave the aisle genuinely clear so you can reach a disconnect fast. The electronics can be packed reasonably tight on their wall; the battery bank should always have its clearance, its own air, and nothing combustible against it.
An insulated shell with a heater sized to keep the battery bank above freezing all winter and ventilation to shed heat and any off-gassing in summer, so the batteries stay in their safe temperature band year-round on a non-combustible surface with clearance all around.
Full-height plywood backing on the equipment wall so inverters, charge controllers, the combiner box, disconnects, and a subpanel bolt securely at a serviceable height, grouped for short, tidy runs with working clearance kept clear in front of every device.
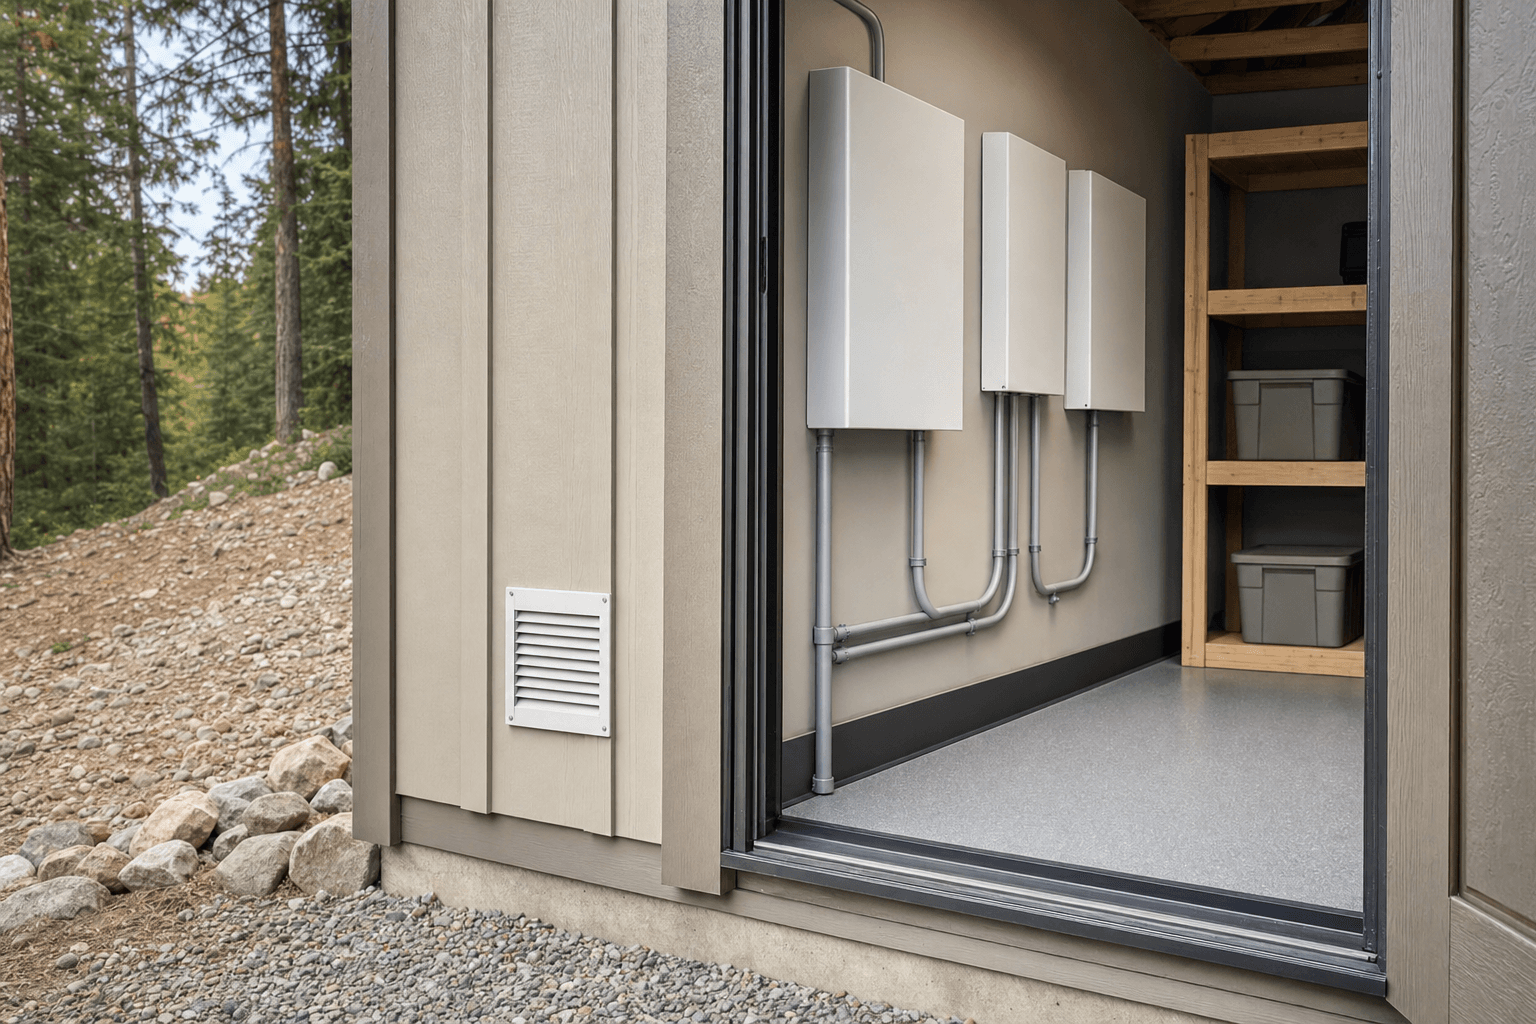
Conduit penetrations planned into the build for the array feed, the AC tie-in, and grounding, with chases and a clear route between the array, the equipment wall, and the house, so wiring runs straight and to code instead of through holes drilled wherever on install day.
A smoke or heat detector above the battery and electronics, an electrical-rated fire extinguisher by the door, fire-aware surfaces on the battery wall, and a room kept dedicated to the power system with nothing flammable stacked against the gear.
This is where a bare shell becomes a working equipment room, and naming exactly what mounts inside is how you size the walls, the clearances, the ventilation, and the conduit. The power electronics come first and set the equipment wall: a string or hybrid inverter, or a stack of them, plus the charge controllers for a DC-coupled system, a combiner box where the array strings land, AC and DC disconnects, a surge protection device, a grounding and bonding setup, and often a small service subpanel for the backed-up circuits. Each of these wants to bolt to solid plywood at a height you can read and reach, grouped so the cable between them is short — which is why a clean, plumb, lined wall matters more here than in almost any other shed. Around it lives the monitoring and control gear: a system monitor or gateway, shunts and current sensors, and the comms wiring that lets you watch production and battery state.
The battery bank is the heart of the room and the reason for the temperature, ventilation, and fire planning: a wall-mounted or floor-standing lithium battery system, or a rack of modules, sized to your storage target and installed on a non-combustible surface with the manufacturer's clearances on the sides and top, in its own ventilated zone. Naming the bank's size and chemistry up front is what drives the heater, the ventilation, and the clearance plan — a bigger bank stores more energy and earns more separation and detection. The safety anchors round it out: a smoke or heat detector above the gear, an electrical-rated fire extinguisher by the door, clear labeling and signage on the disconnects, and the room kept clear of fuel, propane, solvents, and flammable storage. If an engine generator charges the bank, its fuel and exhaust belong on the generator shed side, and if the system also feeds a vehicle, the charging hardware extends naturally into an EV charging shed. Get the wall, the clearances, the ventilation, the heat, and the detection right and a plain shed becomes a building you can safely store a lot of energy in for the life of the system.
The details that make it safe: a non-combustible battery surface, manufacturer clearances, a detector overhead, and clearly labeled disconnects within reach.
| Solar and battery shed planning checklist | |
|---|---|
| Battery temperature | An insulated shell and a heater sized to hold the battery bank above freezing all winter and keep it from overheating in summer, so the batteries stay in their safe, manufacturer-rated temperature band year-round |
| Ventilation | A ventilation plan for the battery zone to shed heat from the electronics and the batteries and clear any off-gassing, so the room is never a sealed pocket and the air around the bank stays fresh |
| Fire safety & clearances | A non-combustible battery surface and wall, manufacturer clearances on the sides and top, a smoke or heat detector above the gear, and an electrical-rated fire extinguisher by the door |
| Equipment wall | Full-height plywood backing on a plumb wall so inverters, controllers, the combiner box, disconnects, and a subpanel bolt securely at a serviceable height with working clearance in front |
| Conduit & wiring access | Planned penetrations and chases for the array feed, the AC tie-in, and grounding, with a clean route between the array, the equipment wall, and the house so wiring runs straight and to code |
| Dedicated, sealed room | A sealing, weather-tight door and a room kept dedicated to the power system, with nothing flammable stored against the gear and clear labeling on every disconnect |
A battery shed lives by its temperature, so this is the part to get right before anything else. Battery chemistry has a safe operating and charging range, and the two failure modes our climate produces are a battery bank that drops below freezing in winter and one that bakes in a sealed, sun-baked box in summer — both shorten battery life, and charging a battery that is too cold can damage it. The fix is the same one that protects any sensitive gear: insulate the walls, roof, and floor and air-seal the shell so the room rides out the swings, then add a heater sized to keep the battery bank above freezing through a North Idaho winter, ideally thermostat-controlled so it holds a steady floor temperature whenever the cold sets in. You are not heating the room to be comfortable, you are holding the batteries in the band the manufacturer requires. Insulation does double duty in summer by slowing the heat gain, so the bank does not cook on a hot afternoon. Read your battery's spec sheet for its temperature range and design the heat and insulation to hold it.
Ventilation is the other half of the temperature story and a safety feature in its own right. The electronics and the batteries both give off heat, and some battery and charging conditions can off-gas, so the room needs a ventilation plan — at minimum passive intake-and-exhaust vents, and for a larger bank or a tighter room a fan — so heat is carried off and the air around the batteries stays fresh rather than building up in a sealed pocket. Size and place the vents around the battery zone, and balance them against the heating plan so the room sheds summer heat without bleeding all your winter warmth — dampered or thermostatically managed ventilation is the usual answer. On the electrical side, the building wants a proper feed: the array conductors, the battery and inverter wiring, the AC tie-in, and a clean grounding and bonding setup all run to code, with the conduit penetrations planned into the shell so nothing is drilled at random on install day. Plan bright LED light for service work and a switched, well-labeled layout so an electrician — and future you — can find and isolate any part of the system fast. This is exactly the kind of work to permit and have done by a qualified electrician.
A solar and battery shed is electrical infrastructure, so where and how it sits matters as much as the build. A compacted gravel pad drains well and keeps a framed floor dry from below, which matters in a room full of electronics and batteries you want kept dry for decades. Site the shed for short, clean conductor runs — close to the array and to the house service so the wiring between the panels, the equipment wall, and the main panel stays as short and straight as possible, since long runs cost money and lose energy. A spot with afternoon shade or a north wall helps the room stay cool through a warm stretch, which eases the summer side of the temperature problem, while the insulation and heater handle the winter side. Plan the approach so a heavy battery or inverter can be carried straight in through a wide door, and read how to prep a shed site before delivery day so the pad, the drainage, and the access are squared away before the building arrives.
North Idaho's seasons set the rest of the spec. The roof and anchoring need to be rated for local snow load; the shell wants real insulation in walls, roof, and floor so the battery bank holds its temperature through a deep January cold snap and a hot July afternoon alike; the ventilation needs to be sized and dampered to manage both the heat and the cold; and a shoveled path keeps the door reachable so you can service or shut down the system after a storm. Because this building carries a permanent electrical system and a significant energy store, permitting and inspection are not optional in the way they might be for a garden shed — the electrical work, the interconnection with the utility for a grid-tied system, the battery installation, and often the structure itself are exactly the things your town and county will want reviewed and inspected. Confirm what applies on the service areas pages, plan to pull the electrical and building permits, and have the system installed and connected by a qualified solar installer and electrician. Doing it to code is how you protect the investment, your home, and your warranty.
Insulate the shed and add heat. Battery chemistry has a safe operating and charging range, and charging a battery that has dropped below freezing can damage it, so an unheated, uninsulated shed is the wrong place for a bank in our climate. Insulate the walls, roof, and floor and air-seal the shell so the room holds temperature, then add a heater — ideally thermostat-controlled — sized to keep the battery zone above freezing whenever the cold sets in. You are not heating the room for comfort, you are holding the batteries in the band the manufacturer requires. Read your battery's spec sheet for its rated low temperature and design the insulation and heater to hold above it through a deep January cold snap, then keep a shoveled path to the door so you can reach the system after a storm. Insulation also slows summer heat gain, so the same shell that prevents freezing helps keep the bank from overheating on a hot afternoon.
Enough to carry off heat and keep the air around the batteries fresh rather than letting it build up in a sealed pocket. Both the inverters and the battery bank give off heat under load, and some battery and charging conditions can off-gas, so the room needs a ventilation plan — at minimum passive intake-and-exhaust vents around the battery and electronics zones, and for a larger bank or a tighter room a fan to move air actively. The goal is to shed the heat the electronics and batteries produce, clear any off-gassing, and keep the bank in its temperature range, all without turning the room into a sealed box. The catch in our climate is balancing ventilation against heating, since you do not want to bleed all your winter warmth out the vents — dampered or thermostatically managed ventilation is the usual answer, sized to your equipment. Follow the battery and inverter manufacturers' ventilation and clearance specs, because they set the real requirement for your particular gear.
A battery bank stores a lot of energy, so the room is built to contain a problem rather than feed it. Stand or hang the batteries on a non-combustible surface and against a fire-aware wall, and give the enclosure the manufacturer's required clearances on the sides and top so heat is not trapped and a thermal event in one cell has air around it instead of being wedged against the inverters or stored boxes. Keep the room dedicated to the power system — no fuel, propane, paint, solvents, or flammable clutter stacked against the gear — and keep a genuinely clear aisle so you can reach a disconnect fast. Mount a smoke or heat detector above the battery and electronics zones, keep a fire extinguisher rated for electrical fires by the door, and label every disconnect clearly. The exact clearances come from your battery's installation manual and local code, which is one more reason to have the system installed and inspected by a qualified electrician rather than improvised.
Group the electronics on one wall and give the battery bank its own protected zone. Mount the inverter or inverter stack, the charge controllers, the combiner box, the AC and DC disconnects, and any subpanel together at a serviceable height on a plumb, plywood-lined wall, arranged so the wiring between devices is short and tidy and there is clear working space in front of every box to stand and reach it. Give the battery rack or enclosure its own wall or defined corner below or beside the electronics, on a non-combustible surface, with the manufacturer's clearances on the sides and top and its own ventilation, kept separated so the heat from the electronics is not dumped straight onto the batteries. Leave a real aisle and a door wide enough to bring a heavy battery or inverter in and out. The pattern is electronics packed reasonably tight on their wall for short runs, and the battery bank always given its clearance, its own air, and nothing combustible against it.
Plan the penetrations and the route into the build instead of drilling holes wherever on install day. You will run conductors from the array into the shed, the battery and inverter wiring between the gear on the equipment wall, an AC tie-in back to the house service panel, and a proper grounding and bonding setup — so the shell should have conduit penetrations and chases planned for each, with a clean, short route between the array, the equipment wall, and the house. A plywood-lined equipment wall lets an electrician mount and bond everything solidly and keep the runs straight. Site the shed close to the array and the service panel so the conductor runs stay short, since long runs cost more and lose energy. Bright LED light and a switched, clearly labeled layout let an installer — and future you — find and isolate any part of the system quickly. All of this is electrical work that should be done to code by a qualified electrician and permitted and inspected, because a clean, code-compliant install is what keeps the system safe and your warranty intact.
Size it to the battery bank, the number of inverters and controllers, and the working clearances an electrician needs — not to the gear alone, since clearance is a code and safety requirement. A small grid-tied backup with a modest battery bank fits a compact room around 6x8 or 8x8, with the electronics on one wall and the batteries given their own ventilated, cleared zone. A whole-home or off-grid system with a full inverter stack and a floor-standing battery bank wants something like an 8x10, long enough to mount the electronics and a subpanel on one wall, stand the batteries along another with clearance on every side, and keep a clear aisle to service everything. A larger off-grid build with a big bank and multiple inverters earns an 8x12 so the battery zone gets dedicated, ventilated space, the conduit has room to run cleanly, and you can walk all the way around the gear to maintain it. When in doubt, size up — the working clearance and the separation between the battery zone and the electronics are what make the install safe and serviceable, and a cramped room makes both harder.
Battery banks lose capacity and can become a safety concern when they operate outside their temperature range. In North Idaho, where an unheated outbuilding in Coeur d'Alene or Post Falls can drop well below 0°F in January, a solar and battery shed needs a thermally managed envelope — not a bare metal box. An on-site build lets us frame the right insulation spec into the walls and ceiling from the start, and place the structure on your property where it makes sense relative to your array, your panel, and your conduit run.
Conduit routing is the unsexy variable that controls a lot of the cost and performance of a battery installation. A shed built in place means the conduit path from the array to the shed to the main panel can be planned with your actual lot in mind — buried run length, entry points, and any frost-depth requirements for direct-buried conduit in Kootenai County all get resolved during the build rather than improvised afterward.
Ventilation matters even in a climate-controlled battery room. Lithium chemistries have specific off-gas scenarios; lead-acid banks need steady air exchange. Rough-in for an exhaust penetration and intake vent is easy to include during framing and difficult to add cleanly later. The same is true for the fire-rated separations some battery setups require.
Configure your shed footprint and options at the shed builder, or get a free estimate for your Coeur d'Alene or Post Falls property.
Tell us about your inverters, controllers, and battery bank and the system you are installing, and we will help spec the temperature-controlled, ventilated, fire-aware equipment room and clean conduit access around your property — then you can build and price it online.
Keep planning your build with related North Idaho shed guides.